
Upgrade Considerations
Upgrading with Custom Logos and Color Schemes
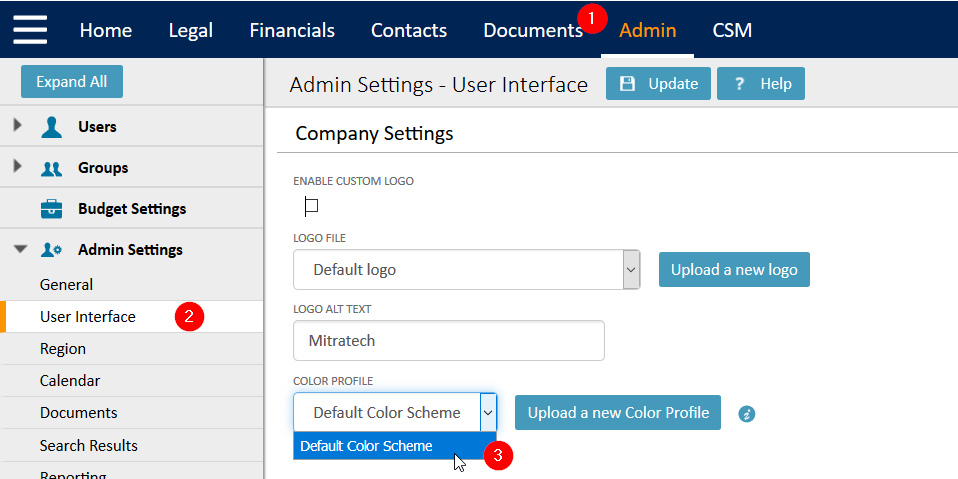
If you are upgrading from TeamConnect Enterprise version 5.x and are using a custom logo and/or color scheme, you will need to remove or disable custom color profiles before upgrading.
You can do this by navigating to Admin > Admin Settings > User Interface > Set to Default Color Scheme and ensure the Enable Custom Logo box is NOT checked.
Once your instance is upgraded, the new profile can be uploaded using the 6.X format.
If you have already upgraded and are experience issues, please follow these steps to troubleshoot and resolve the issue.
Upgrading with TeamConnect Modules
If you are upgrading TeamConnect Modules (e.g., Financial Management, Collaborati Spend Management, Legal Matter Management, etc.) from an Enterprise version prior to 5.0, it is important to ensure your Enterprise version is not upgraded beyond an available upgrade path for the modules to reach 6.x. For example, if TeamConnect Enterprise is upgraded to 6.1 while CSM is still at version 3.4, there will be no available upgrade path to get CSM to 5.0. Please consult the Module Upgrade Guide for more information on the best order for upgrading each module and TeamConnect Enterprise.
TeamConnect Business Intelligence
If you have a previous installation of TeamConnect Business Intelligence, follow the specific instructions for upgrading found in Upgrading to TeamConnect Business Intelligence 6.1 or Upgrading to TeamConnect Business Intelligence 6.2.
Elasticsearch
Upgrading to TeamConnect 6.1 with Elasticsearch 5.3.0
Important: The following steps must be incorporated into the upgrade process when upgrading to TeamConnect 6.1 in order for Global Search to perform properly.
- Search Indexes - Due to changes in the Elasticsearch index structure from one index for all objects to one index per object, the index needs to be deleted and rebuilt using this process and timeline:
- Before starting the upgrade process:
- Delete the existing index from the pre-6.1 version of TeamConnect.
- Delete the records from the Y_RECORD_CHANGE table if any exist.
- After the TeamConnect upgrade is complete:
- Build the index for each object using the Global Search Index Tool.
- Before starting the upgrade process:
- Search Guard - In TeamConnect 6.0 and earlier versions, the "ElasticSearchUUID" system setting is stored in the database and the UUID value is the name of the index. The new TeamConnect 6.1 naming convention for the indices is in the format UUID-[uniqueCode for object]. For example, index name for Contacts will be UUID-cont. Existing clients with Search Guard must do the following:
- Since these configurations added the index name (the UUID from the database) to their certificate on the node, update the certificate to include a wildcard after the UUID name.
- In the SG_ROLES.YML file, the index name under each role refer to the ElasticsearchUUID from the database. At the end of the index name, add an asterisk at the end of the name, before the closing single quote.
Upgrading to TeamConnect 6.2 with Elasticsearch 7.1.1
TeamConnect 6.2 requires an upgrade to Elasticsearch 7.1.1. The following steps must be incorporated into the upgrade process when upgrading to TeamConnect 6.2 in order for Global Search to perform properly.
- Search Indexes - The index needs to be deleted and rebuilt using this process and timeline:
- Before starting the upgrade process:
- Delete the existing index from the pre-6.2 version of TeamConnect.
- Install Elasticsearch 7.1.1 and upgrade TeamConnect.
- After the TeamConnect upgrade is complete:
- Build the index for each object using the Global Search Index Tool.
- Before starting the upgrade process:
If using Tomcat and Elasticsearch, the following files need to be added to the tomcat/lib directory:
- bcpg-jdk15on-1.61.jar
- bcprov-jdk15on-1.61.jar
Upgrading to TeamConnect 6.3 with Elasticsearch 7.10
TeamConnect 6.3 requires an upgrade to Elasticsearch 7.10. The following steps must be incorporated into the upgrade process when upgrading to TeamConnect 6.2 in order for Global Search to perform properly.
- Search Indexes - The index needs to be deleted and rebuilt using this process and timeline:
- Before starting the upgrade process:
- Delete the existing index from the pre-6.3 version of TeamConnect.
- Uninstall the older version of Elasticsearch and install Elasticsearch 7.10 and upgrade TeamConnect to 6.3.
- After the TeamConnect upgrade is complete:
- Build the index for each object using the Global Search Index Tool.
- Before starting the upgrade process:
Upgrading to TeamConnect 7.0 with Elasticsearch 7.16
TeamConnect 7.0 requires an upgrade to Elasticsearch 7.16. The following steps must be incorporated into the upgrade process when upgrading to TeamConnect 7.0 in order for Global Search to perform properly.
- Search Indexes - The index needs to be deleted and rebuilt using this process and timeline:
- Before starting the upgrade process:
- Delete the existing index from the pre-7.0 version of TeamConnect.
- Uninstall the older version of Elasticsearch and install Elasticsearch 7.16 and upgrade TeamConnect to 7.0.
- After the TeamConnect upgrade is complete:
- Build the index for each object using the Global Search Index Tool.
- Before starting the upgrade process:
Localization Key Updates
See Localization Key Updates to see the updates in each version of TeamConnect.
Optional Script to Support Data Warehouse and Localization
When upgrading from a version prior to 3.3 SP1, the database schema is altered, but not to the extent necessary to completely support localization. If your organization is upgrading and wishes to support localization, you must run an optional database script after the upgrade process is complete.
Even if your organization does not expect to use localization, you need to run this script if:
- You use Data Warehouse, and
- You expect to add new custom object types to your application design in the future.
That's because some Data Warehouse tables related to custom objects have datatypes that are compatible with localization, but not compatible with the datatypes that existed prior to version TC3.3 SP1. Running the script will resolve this incompatibility. You must drop and recreate the Data Warehouse after running the script.
This script requires exclusive use of your database while it is running. It increases database size by 2% to 4% in internal testing done by Mitratech. Nearly all VARCHAR columns have their datatypes changed to NVARCHAR2 (Oracle) or NVARCHAR (SQL Server.)
Contact Mitratech Support to obtain this script.
Upgrading Legal and Financial Management
For more complex installations across several modules, contact Mitratech documentation at documentation@mitratech.com for the Module Upgrade Detailed Matrix.
The following information details upgrades for users first upgrading to the 6.x product line. Users who are already on 6.0 (or later 5.0.x releases) can download the relevant Legal and Financial Management versions via Available Updates.
Use this page if you have a version of Legal Matter Management prior to 5.0.1 and are upgrading to the following versions:
- TeamConnect Enterprise 6.1 or later
- TeamConnect Legal Matter Management 5.0.1 or later
- TeamConnect Financial Management 5.0.1 or later
Following these steps to upgrade:
- Upgrade TeamConnect Enterprise.
Note: You may run into validation errors that you need to correct before continuing.
- Restart your application server.
- Upgrade to Legal Matter Management 5.0.1.
After correcting conflicts, re-run the Upgrade Toolkit.
Note: If the tool fails, review the error log to identify the necessary fix and report errors to Mitratech support.
- Restart your application server.
- Install Financial Management and any other modules from the About page. Each time you install a new product, restart you application server.
- Configure Financial Management.
- Proceed upgrading.
Validate Your Data Before Running the Installer
When you are upgrading an existing TeamConnect database, particularly one that was once used with a TeamConnect 2.x version, the database may contain duplicate detail records that would interfere with the upgrade to the current version. Such duplicates may have arisen from earlier conversions that disabled validation rules while the conversion was running.
To check for this possibility, you must run a validation SQL script, which will provide information about whether duplicates exist. If they do exist, you must run a second small SQL script, doing a separate run for each duplicate record that must be removed. Follow these steps:
- In your installation media, locate the validation script that is appropriate to your database server:
\validation\TC33_Upgrade_Data_Validation\MSSQL\MSSQL_TC33_upgrade_data_validation.sql\validation\TC33_Upgrade_Data_Validation\Oracle\Oracle_TC33_upgrade_data_validation.sql
- Run this SQL script against your TeamConnect database and observe the results. If the result set is empty, you have no duplicate detail records and you do not need to perform the rest of these steps.
For Oracle, use SQL*Plus to run this script, and look for the result set in file TC33_Data_Validation_report.log, in the same folder as the script file. For SQL Server, the result set is returned on-screen, although you can direct the result set to a file if you wish, depending upon the query tool that you use. - If the validation script returns results, you must manually remove the duplicate records. You will need to supply the values of four parameters, which are found in the validation script's result set:
- TABLE_NAME
- MASTER_PRIMARY_KEY AND
- FIELD_PRIMARY_KEY
- DETAIL_PK_to_keep
- If you are using Oracle, skip to step 6. If you are using Microsoft SQL Server, execute SQL script
\validation\TC33_Upgrade_Data_Validation\MSSQL\MSSQL_Parametrized_To_Remove_Duplicate_Details.sql
This script will create a procedure named remove_duplicate_detail_pro, which you will execute repeatedly in the next step. - For each row in the result set of step 2, execute this procedure, supplying four parameters as shown in this example:
exec remove_duplicate_detail_pro 'E_CONT_DETAIL_TEXT_VALUE ', 703 , 604 , 502 ; - If you are using Oracle, for each row in the result set of step 2, run script
\validation\TC33_Upgrade_Data_Validation\Oracle\Oracle_Parametrized_To_Remove_Duplicate_Details.sql
supplying the four parameters in the syntax shown by the example in step 5. - After you have run the procedure for each row in the validation script's result set, manually drop table BAD_DATA_RPT, then do a final check by running the validation script from step 1 again. This time, there should be no rows in the result set.
Data Warehouse
If you use Data Warehouse, which has a denormalized database containing data from the TeamConnect production database, consider dropping the data from that denormalized database and repopulating it after you upgrade. In some cases, upgrade scripts for TeamConnect may repair incorrect data in the production database but the repaired data is not automatically moved to the denormalized database. Clearing and repopulating the denormalized database resolves this potential issue.
Note: Only Data Warehouse version 5.0.1 and 5.1 will work with TeamConnect version 6.0 and 6.1. Only Data Warehouse 6.1.1 will work with TeamConnect 6.2. Earlier versions of Data Warehouse must be upgraded.