
Interactive Invoice Review - End User Guide
Introducing Interactive Invoice Review
Learn more about managing invoices on this page.
Clients can adopt this new feature at their convenience or continue using the existing line item review functionality. The new interactive line items can be “turned on” by the security group using the Setup tool in TeamConnect.
Important Note: The following features can be found in the existing line item review and have been built into the new interactive line items.
- Inline Adjustment History - the clickable norgi arrow that displays a synopsis of all adjustments on the line item made thus far
- Workaround: Adjustment history is visible inside the adjustment modal on each line item.
- Revert Adjustments inside the Inline Adjustment History - the ability to select a checkbox next to each adjustment history item in order to revert it by the action of the Revert button
- Workaround: Manually revert past adjustments by negating their value.
- Reject line items - the ability to select 1 or more line items and reject them by action of the Reject button outside the grid
- Workaround: Adjust each line item to zero by changing the rate or quantity to zero.
- Appealed invoice line item tag - line items appealed by firm billing analysts reappears in the grid with an Appealed tag.
- Bulk / Inline adjustment of line items - when enabled, the ability to view the grid of line items in a separate screen where one or more items can be selected in bulk for uniform adjustment; or the ability to tab through quantity, rate and total values to insert new numbers quickly.
- Printable view - the ability to render the grid of line items in a separate view which is specially formatted for printing to paper.
Creating an Invoice Manually
To create an Invoice, click here.
Invoice Record Pages
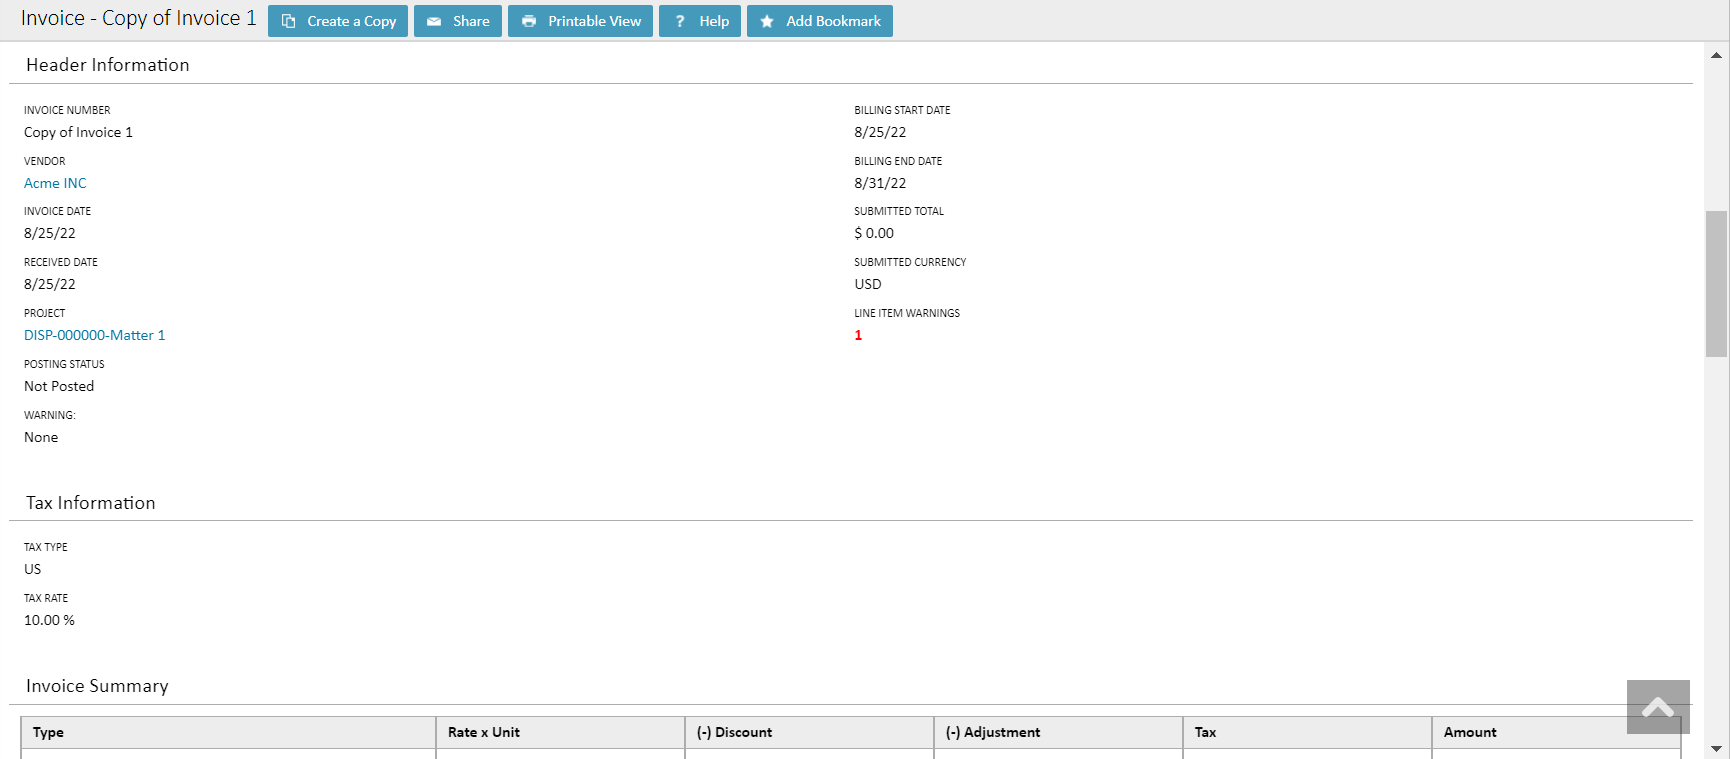
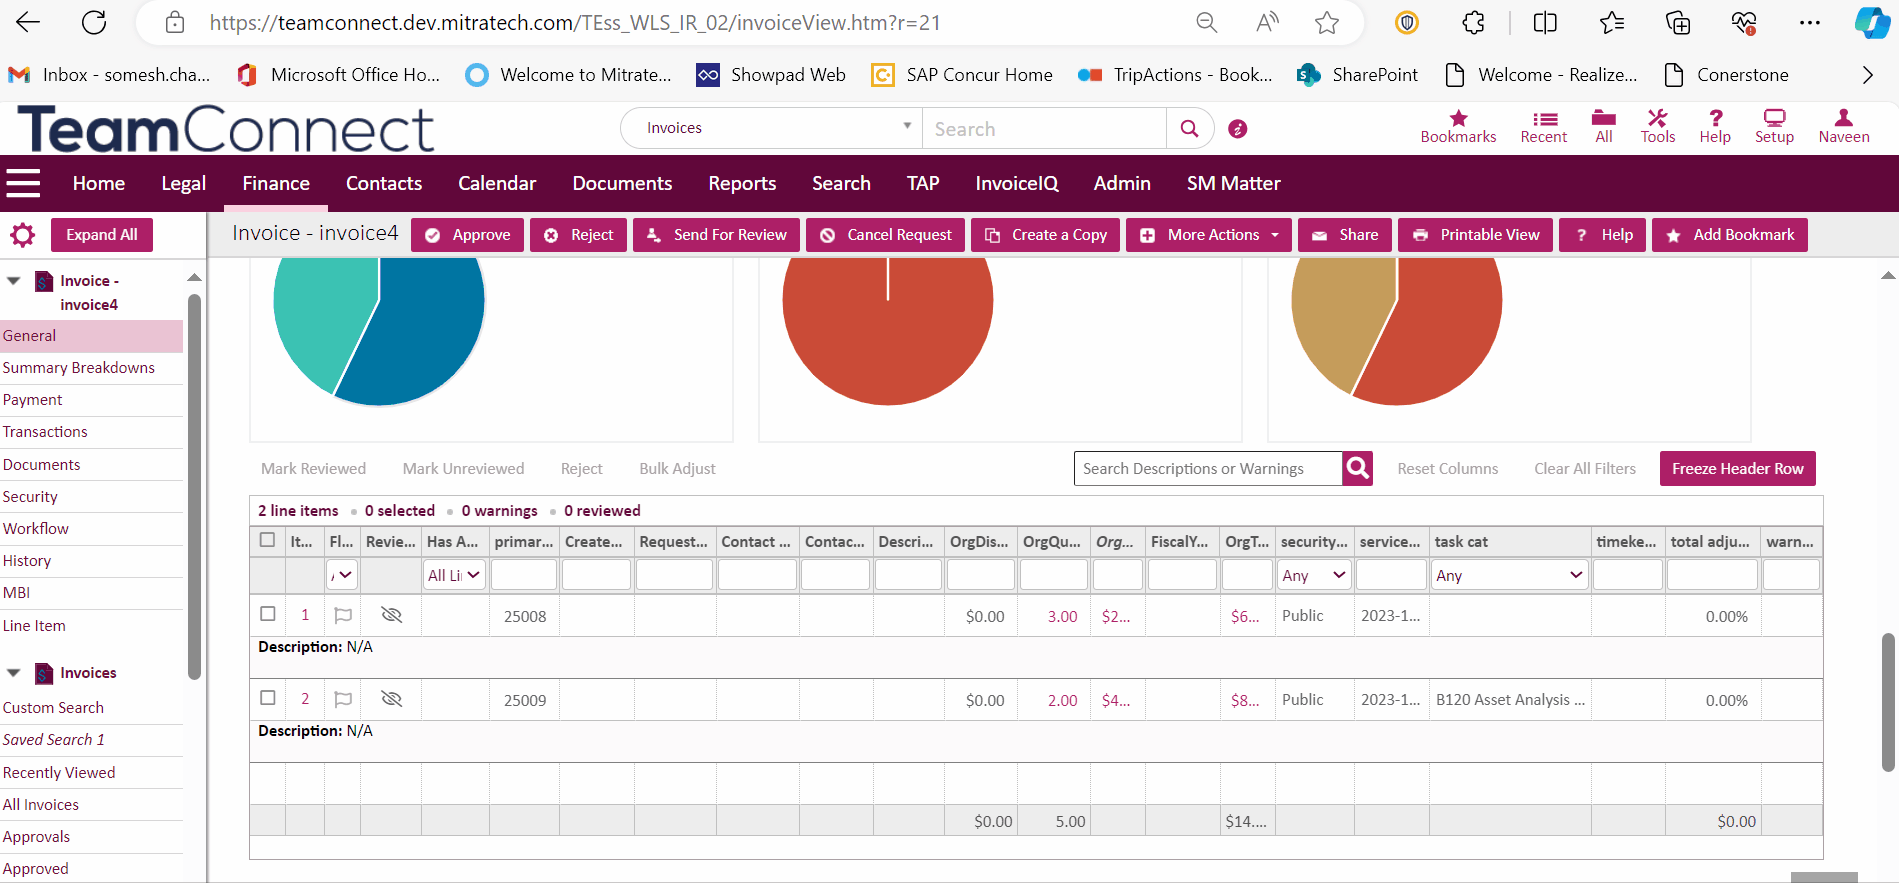
The General page of the invoice is as shown below:

Hover on the Adjustment icon, the system displays a tool-tip as below:
- The Latest Adjustment made to the Line Item
- The Count of No. of Adjustments on the Line Item
- No Ellipsis to display for the Comments.
When the user hover over the “Has Adjustments” icon, the "Latest Adjustment" tooltip appears along with required details.
Introduced in TCE 7.0.

Note:
- Displays warning message when the number of line items (N) equals or exceeds 1000 at the top of the invoice page.

-
In both the View page & Edit pages, all the line items for an Invoice are loaded.
Load all Line items on the Invoice Details
Introduced in TCE 7.0.
When the user loads the specific invoice page, all of the line items are loaded on the same page. So instead of fixing the height of the grid, all the line items on the grid will automatically load.
Regardless of how many line items are required, it will automatically load and there will be only one level of scrolling on the page vertically/horizontally, which is called page level scrolling and there will be no secondary or tertiary level scroll within the page (no grid-level scrolling).

Additionally, starting with TCE 7.0 PB2 onwards, when the user loads a large list of invoices on the Invoice page, an on-screen notification stating "Large invoices will take longer to load" appears.

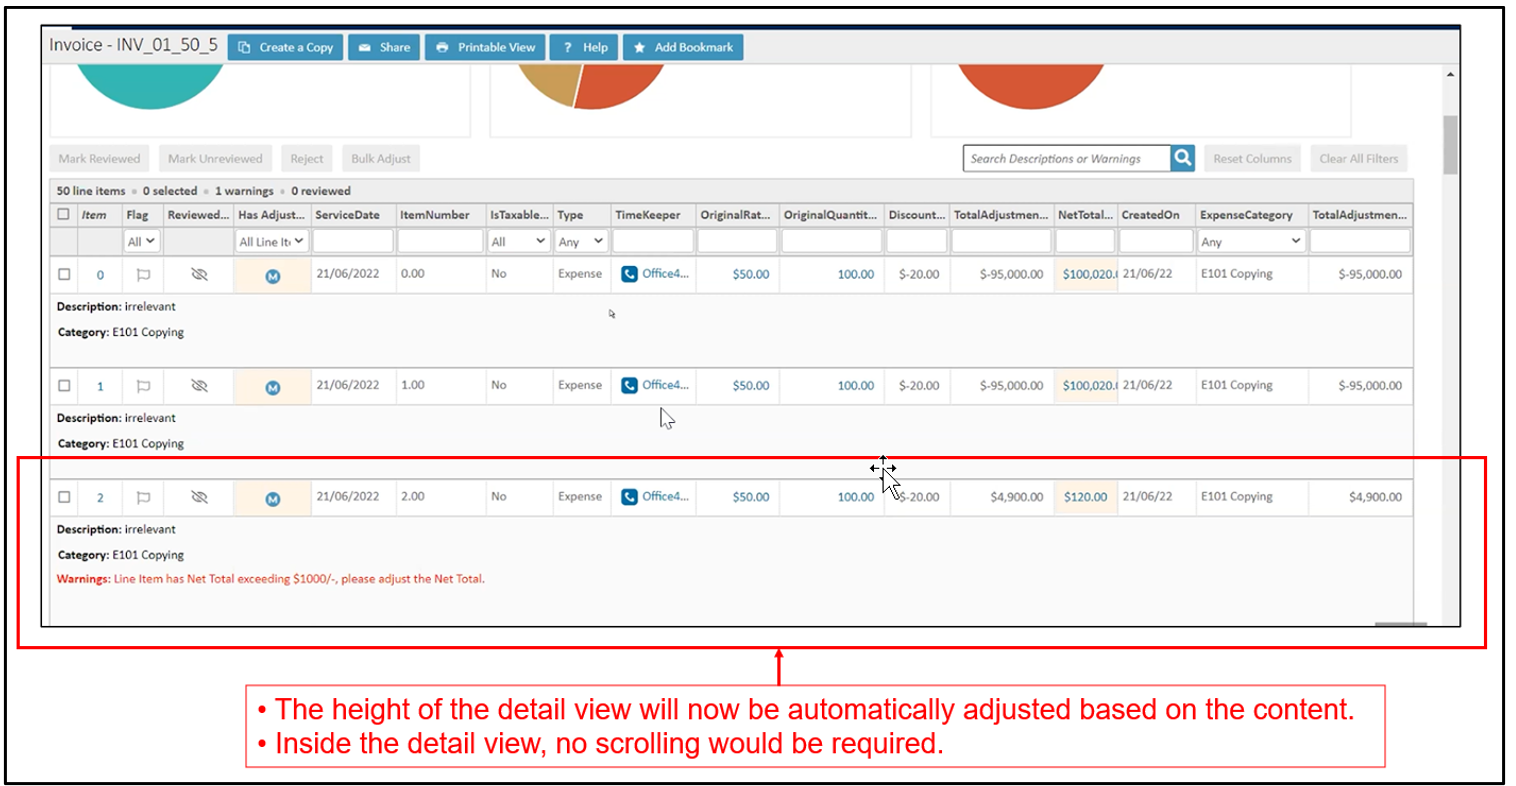
Auto size line item detail view to fit all content without any scrolls
Introduced in TCE 7.0.
Introduced below update related to the detail view of the invoice page:
- The height of the detail view will now be automatically adjusted based on the content.
- Inside the detail view, no scrolling would be required.
Default and Optional Columns
To analyze the details of a required line item, the user can apply filter options with different values provided in each column of the invoice.

The Line Items grid divided into two types of columns:
- Default Columns
- Optional Columns
Default Columns
- Date
- Type
- Category
- Activity
- Timekeeper
- Tax Type
- Rate
- Quantity
- Discount
- Total
- Project
Optional Columns
- Original Rate
- Original Quantity
- Original Discount
- Original Total
- Adjustment Total
- Has Warnings
- Taxable
Default Fixed Columns
- Checkbox
- Item
- Flag
- Reviewed
- Has Adjustment
NOTE: The above functions will only work if the invoice is posted into active workflow, and the user is the current approver.
NOTE:
The update is introduced in TCE 7.0.
- a user can add the selected columns from column configuration to the grid.
- the optional and default columns can be resized and reordered.
- the default fixed columns cannot be resized.
- the columns are automatically adjusted with the text entered.
- the horizontal scroll bar is extended to move to the left of the grid.
In TCE 7.0 PB 15 and TCE 7.2, users can hide, reorder, and resize the column width for Item, Flag, Reviewed, and Has Adjustment in both edit and view modes, and for Tax Type in view mode only. They can also use the Autofit Columns button to adjust column sizes automatically. These changes are saved in user preferences and can be reset to the original settings by clicking the Reset Columns button.
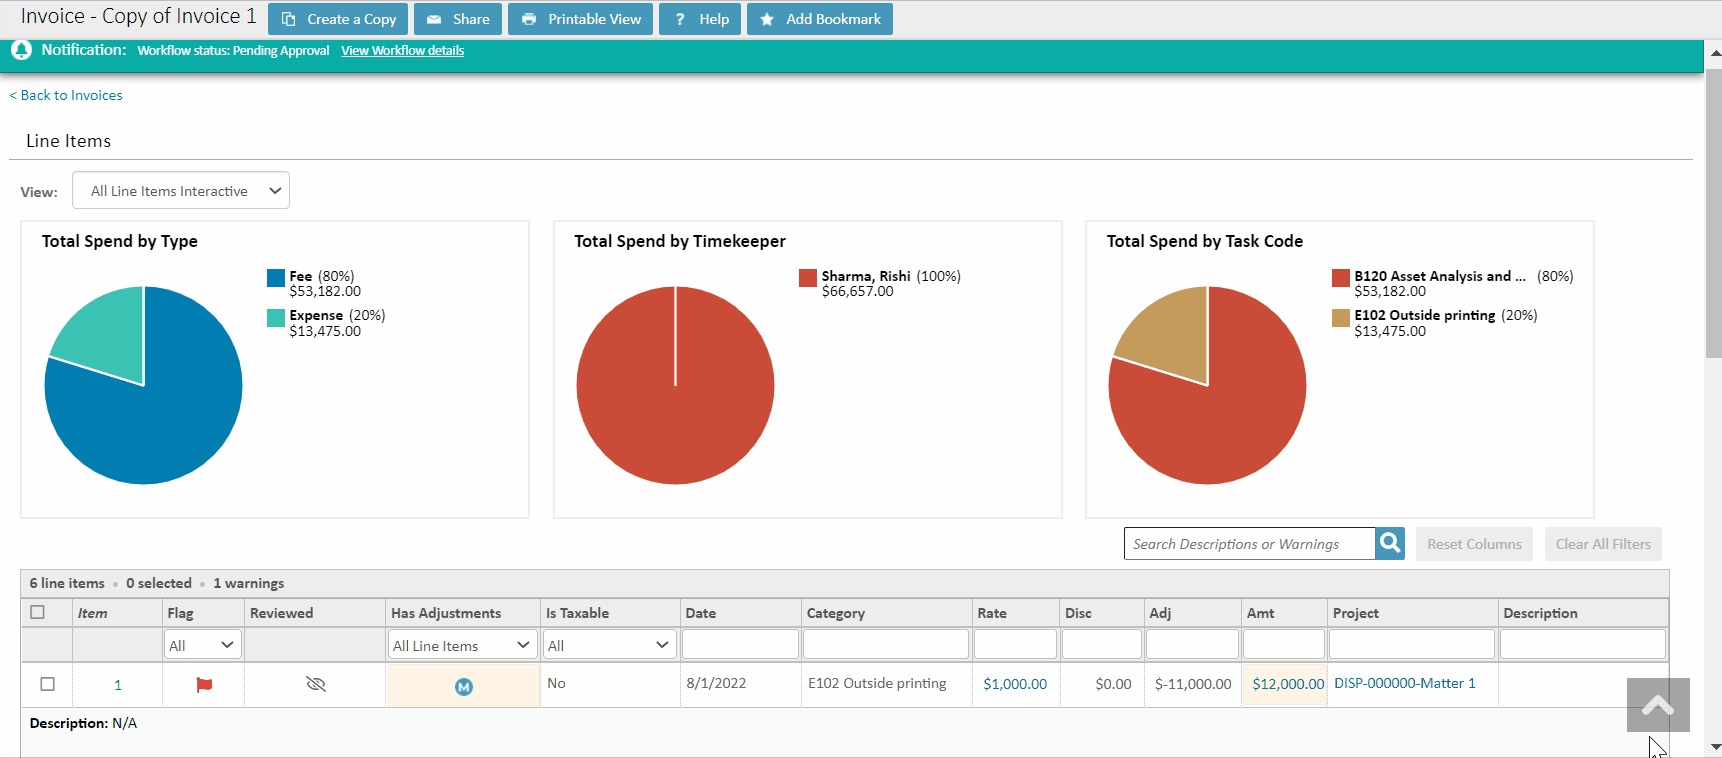
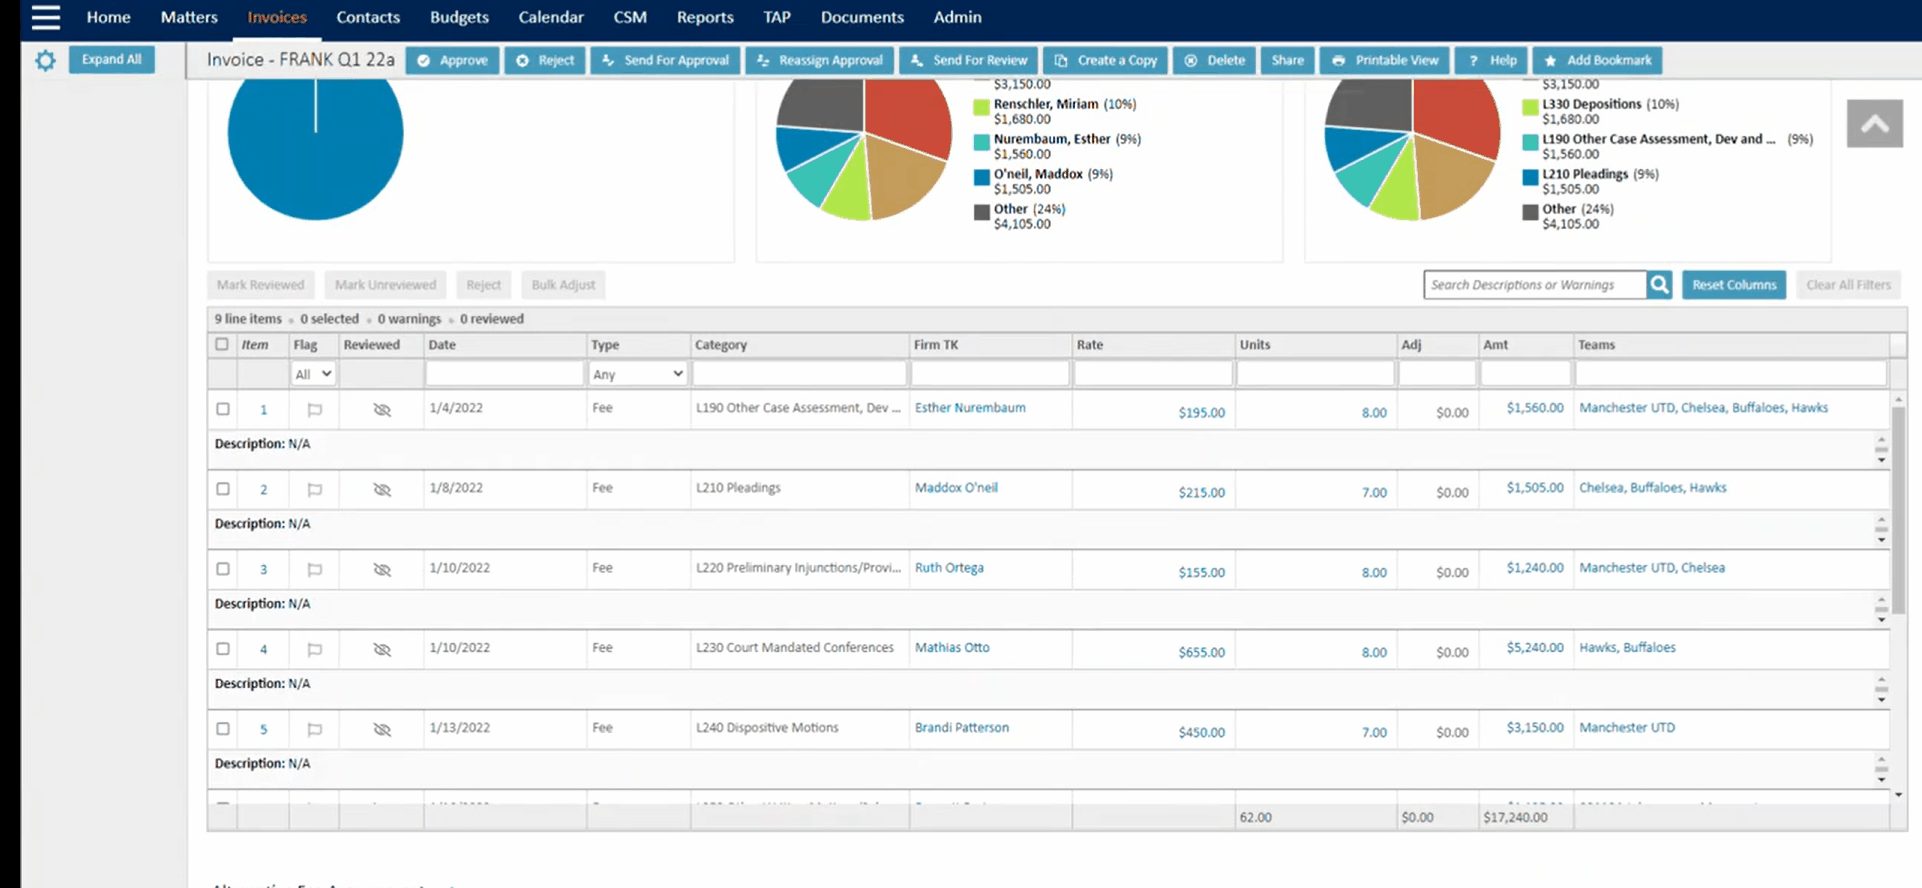
Interactive widgets roll-up critical spend data and act as filters for the line items of the invoice as described below.
- Total Spend by Type: Breaks down spend between Expense and Fee in the invoice. Hovering on the Fee or Expense slice, shows the total spend and the percentage of the total spend by that type. The invoice line items can be filtered by either spend type by clicking on a pie slice.
- Total Spend by Timekeeper: Displays the total spend and percentage of spend for the top 5 highest spend timekeepers on the invoice. All of the remaining timekeeper spend is captured under “Other”. Hovering on the slice, displays the Timekeeper Name, Percentage of amount spent and the total sum spent (Rate x Quantity) by the timekeeper. The invoice line items can be filtered by each timekeeper by clicking on a pie slice.
- Total Spend by Task Code: Displays the total spend and percentage of spend for the top 5 highest spend task categories on the invoice. All of the remaining task category spend is captured under “Other”. The Task Code widget corresponds to the Category column in the line item table. The invoice line items can be filtered by each task code category by clicking on a pie slice.

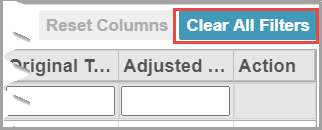
To clear the applied filters that are in the columns, click Clear All Filters button.
Sticky Horizontal Scroll Bar
Introduced in TCE 7.0.
Introduced Sticky horizontal scroll which displays:
- Users have the option to resize the column width in the invoice page.
- If any column is manually re-sized and all the columns fail to display in the overall grid width, then a sticky horizontal scroll is visible at the Invoice page level.
- If the adjusted width of the combined columns is greater than the width of the grid, the floating horizontal scroll bar is displayed which stays with the user as they scroll vertically over the grid.

Column Configuration
You can configure additional columns to be displayed in the grid. By default, Default Columns appear.
To configure or add the columns:
- Right click on the Column Header.
- A pop-up window appears with the Default columns and Optional columns.

- Select the checkbox of the required columns to be displayed in the grid.
- The column placement can be changed by drag and drop and columns can be added or removed.
- Once the column configuration is set, it will persist from session to session as long as the user is logged into TeamConnect from the same computer, in the same browser.
- To cancel, click
 .
. - To restore the default configuration, click the Reset Columns button.
NOTE:
- If the Reset columns button is in grey, then the columns in the Line Items grid are in the default view.
- This hides non-default columns (if any), restores user hidden default columns (if any), restores the order of the columns and restores column widths to standard values.
Column Width persistence
In TCE 7.0 PB7 and above version, when a user modifies a column width, whether it is default or optional, the column width setting is saved to the user's preference and the value is saved in the database.
- If the user changes the value, their preferences will override the default configuration and will always load with the preferred configuration. The selected view will be retained even after the user uses the filters, freeze/unfreeze, clear, rearrange column, add and remove optional column and even if the user logs out.
- If the user chooses to extend the column width beyond the grid space, the horizontal scroll will be available on every load.
- When a column is disabled in the column options, the remaining columns will still apply the user preference and will not auto-fit the grid.
Note: When the grid is not auto-fit, a white space emerges, as per the user preference described above. If the user reduces the total column width to less than the grid width, white space appears which is configured by the user.
- When a column that has not been defined by the user is enabled via user preferences, it is loaded with a default value of 200 pixels.
- The "Reset Columns" button will restore the column configuration to the default grid settings, i.e., the user preferences will be restored to auto-fit columns.
Autofit Columns
(Introduced in TCE v7.0 PB 15 and TCE v7.2)
The Autofit Columns feature allows users to automatically adjust the width of the Interactive Grid (IG) to fit within the available page space, without affecting their grid preferences or settings. This functionality ensures that users can quickly optimize the grid's appearance without losing any preferences they have made to column widths or layout.
Note: For the Autofit Columns Icon to display, users will need to update their locale manager file.

How to configure Invoice detail view section and the grid columns?
The user can add or remove the columns from the grid to specific invoice detail view section.

- Go to TeamConnect setup.
- Click the above "Go To.." dropdown and select "Object Definitions".
- In "Object Definitions", under "Invoice", click the dropdown button and select the "Line Item" option.
- Now, select the "Search Views" tab.
- Inside "Search Views", select "Interactive All Line Items" or the specific search view in which the invoice has been created.
- Under "General" tab, uncheck the "Interactive" checkbox option under "Used for" section.
- Select the "Result Display" tab above.
- In result display window, check the Column Name which the user want to make it appear in the invoice detail view section.
- In this case, check the "Project" checkbox and select the below option to edit.
- In edit mode, under "Span?" column, check the checkbox and press "Ok". The user can see as "YES".
Note: In non-edit mode, under "Span?" column, the user can see initially "NO", as Project is part of grid column. To add it in invoice detail view section, the user should make sure it should display as "YES" under "Span?" column.
11. Now go back to "General" tab, and make sure to check the "Interactive" checkbox option under "Used for" section. Click Save. Now in Invoice page, make sure to refresh the page so that changes is displayed.

Note: To add any column in grid or from invoice detail view, the user should follow the above steps and make sure to uncheck the checkbox under "Span?" Column and and click "Ok" to display as "NO.
Important:
1. The user should make sure that under "General" tab, uncheck the "Interactive" checkbox option under "Used for" section so that the "Span?" column is displayed in "Result Display" tab. After making changes in the "Result Display tab," the user should recheck the "Interactive" checkbox.
2. Do not add the "Description" field as a span column or it will appear twice in detail view.
For the above detailed explanation, please see the below animation.
Creating Invoices in TeamConnect
The steps to create an invoice manually in TeamConnect have not changed in the new invoice review feature. Instructions to create a new invoice can be found here. The steps to add line items have changed.
NOTE: Line items are required for all invoices sent from Collaborati to TeamConnect.
Once an invoice is created, if it has no line items, the invoice line item grid will appear as follows:

To add line items to an invoice that has been manually created in TeamConnect:
- Click Edit at the top of the invoice.

- Scroll down to the Line Item section.
- Enter all the required fields in the line item.
- Click Add.

- Upon clicking Add, the new line item appears in the Line Item grid.

- Repeat steps 1- 4 until all line items have been added and the click Save & View and the invoice will be updated with the new items.

Note: When the user adds an invoice, the interactive grid that user sees is a fixed interactive grid and will not support custom fields. This fixed grid is available on both invoice add page and invoice edit page. Custom field support only available for the invoice view page.
Removing Line Items
To remove a line item:
- Ensure an invoice is in the approval workflow either in create or edit mode.
- Select the check box of the line item to be removed. The selected line item is highlighted. See the below image.

3. Click Remove.
NOTE: If the invoice is in the approval workflow, this option is no longer available.
Description and Warnings
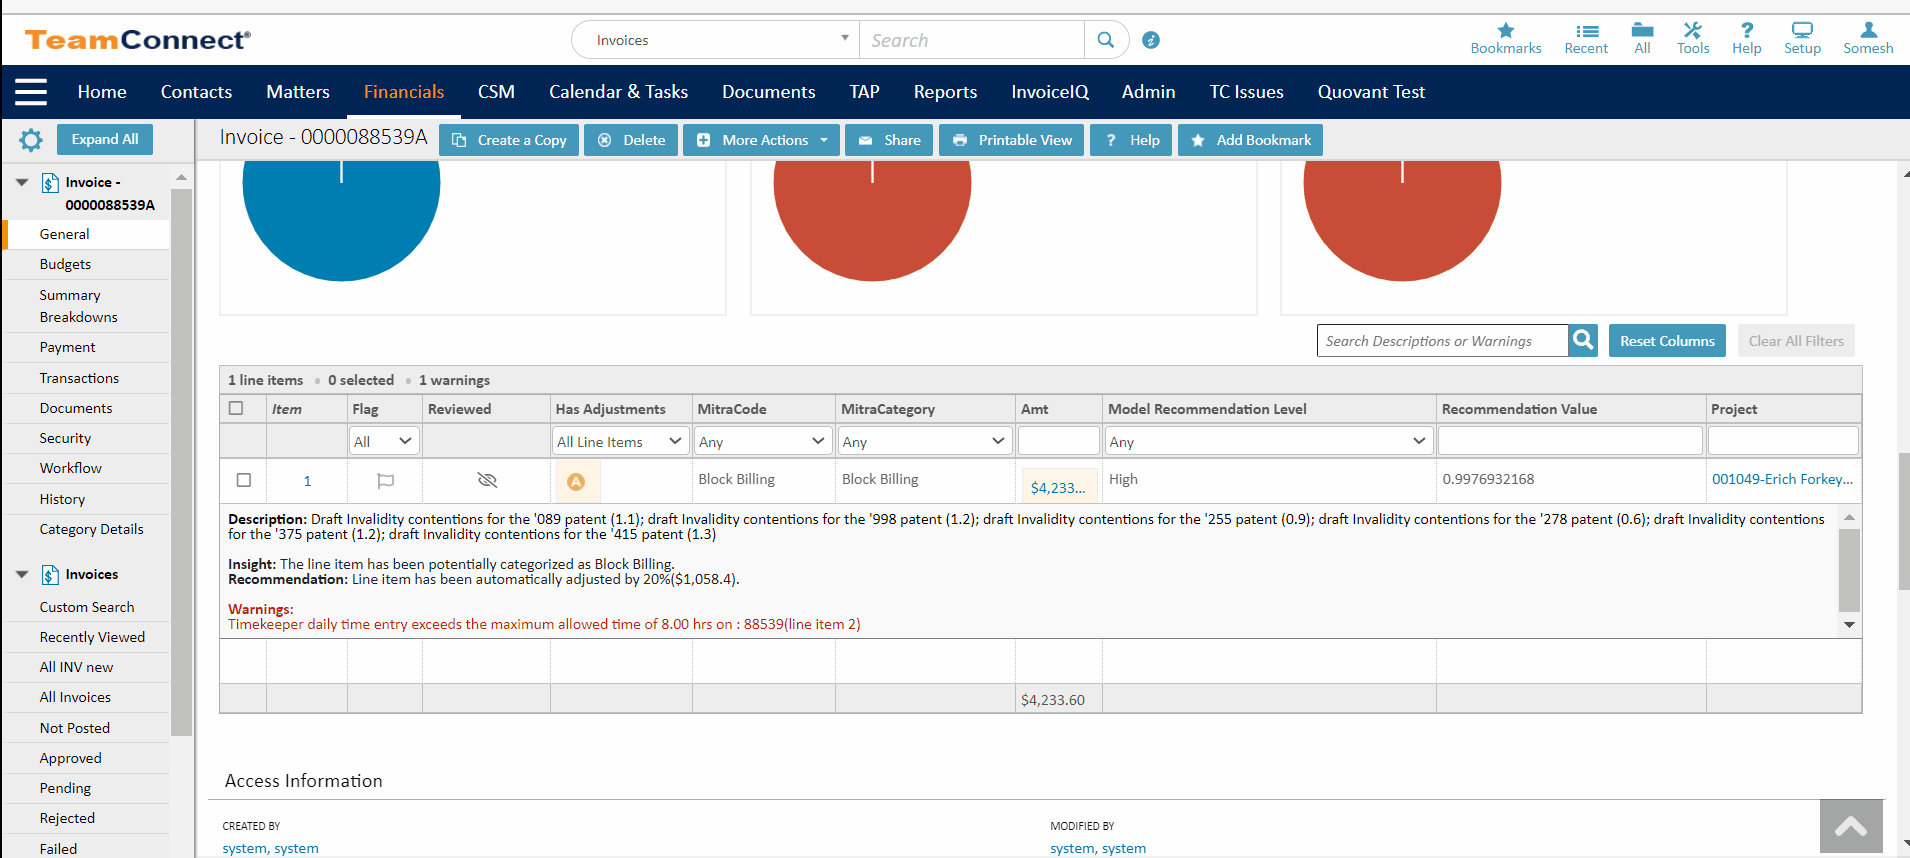
The Description and Warning text of the line item are displayed in the row of the line item. If there is no description, then ‘N/A’ is displayed in the line item. If the length of the text is more than one line, a “Show more’ hyperlink is provided which expands on click and changes to 'show less'. To collapse the window, click "Show less". The text fields are provided with Smart search functionality. On entering the first two characters the match criteria of the search result appear in the list with highlighted. If no filter is matched with a smart search, then the text boxes are grayed out. Warning messages are displayed in 'Red' color.
NOTE: Warning messages are not displayed when there are no warning alerts.
Adjustment History
Displays the modified or adjusted values made to Original values. The number of values is provided by hyperlink.
NOTE: When an adjustment is made to an Interactive line item the user must manually refresh to reflect/update the adjusted amount in the invoice summary block.
The user from the Approval list can edit/adjust the invoice. To view the adjustment history of the values, the user should:
- Click on the hyperlink of the value.
- A pop-up window appears which displays Line Item Adjustment History.

- Select New Amount from the drop-down list and enter the new value.
- Select Reason for Adjustment from the drop-down list.
- The new Adjusted values are displayed in Adjusted Row.
- Click Save.
- To cancel, click Cancel.
When a Non-assigned user or reviewer clicks on the value hyperlink, displays the adjustment history as shown below:
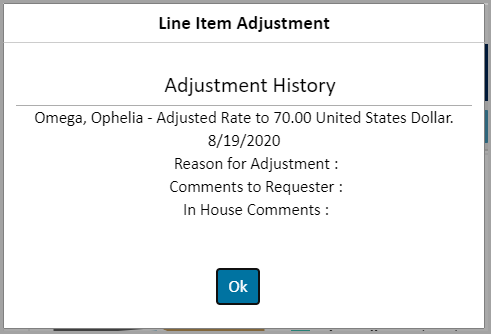
The user is restricted to edit the original value.
The update is introduced in TCE 7.0.
When the user clicks on the icon in the "Has Adjustment" column, a pop-up window appears, displaying all of the adjustment history made on the specific line item.

Comments Without Adjustments
The update is introduced in TCE 7.2 PB1.
-
From the Adjust Rate dropdown, select Comments without Adjustments.

-
Select a Reason for Adjustment from the drop-down list and enter a comment in either the "Comments to Vendor" or "In House Comments" field.
Note: At least one of the fields ("In House Comments" or "Comments to Vendor") must be populated. If both fields are left blank, an alert will appear, stating:
Please fill 'In House Comments' or 'Comments to Vendor'. Both fields cannot be left blank when submitting 'Comments without Adjustments'.

-
Click Save to apply the adjustment.
-
Comment(s) will be displayed in the Line Item hover/tooltip on the Has Adjustments column.
_will_be_displayed_in_the_Line_Item_hover_tooltip_on_the_Has_Adjustments_column.png?revision=1&size=bestfit&width=800&height=138)
Note: The latest comment will appear at the bottom of the Adjustment History list.

NOTE: For Comments without Adjustments feature, please note the following on reverting the line items:
-
For In-Line Adjustment(s): Comments cannot be reverted for in-line adjustment(s).
-
For Bulk Adjustment(s): Comments cannot be reverted for bulk adjustment(s).
Revert Line Items
In adjustment history, the selected adjusted line item(s) are reverted to the previous state when a line item is Reverted.
To Revert the line items(s):
- Click on the Revert button in the Adjustment History.
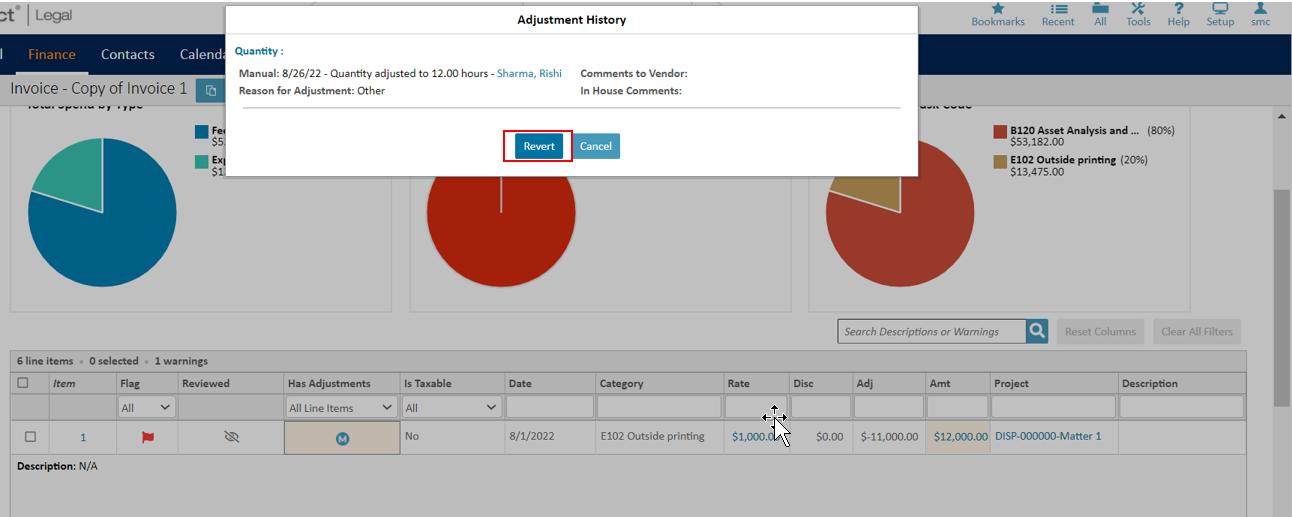
- A Line Item Adjustment pop-up window appears.

- Modify the Adjustments and click Save.
- Updated changes appear in the Adjustment History.
- To cancel the changes, click Cancel.
The update is introduced in TCE 7.0.
NOTE 1: If there is NO change in Rate / Quantity / Discount, REVERT button in the subline is hidden.
NOTE 2: If an adjustment has been made to a line item on an invoice and the invoice has been posted, the user can revert the adjustment by clicking on the "Has Adjustment" column.
The Invoices procedures are of two types:
Printable View
Displays the selected blocks of the Interactive Line Items that appear in the printable view render a page.

- Click on Printable View icon.
A Sections pop-up window appears.
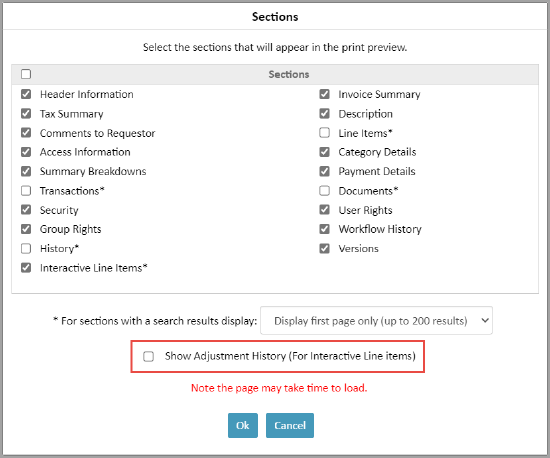
- Select check-boxes of the required Interactive line-items.
- The Interactive grid accommodates as many as columns but in the legacy Printable view, the excess columns at the end of the page are cut in either layout.
- The selected Interactive line-items appears in the printable view page in tabular format.
- Click OK.
The update is introduced in TCE 7.0.
To View Adjustment History (For Interactive Line items)
NOTE: When an adjustment is made to an Interactive line item the user must manually refresh to reflect/update the adjusted amount in the invoice summary block.
- Select Interactive Line Items check-box from the sections.
- Show Adjustment History (For Interactive Line items) displays with check-box.
- Selecting check-box, displays the Line Items with Adjustment History.
- Click OK.


NOTE:
- Up to 200-line items are displayed, and all line items as part of Parity.
- The columns set by the user reflects in the Printable view.
- The layout (Landscape or Portrait) is fixed for the Printable View while printing the PDF.
- When there is no data in Project, Description, No Adjustments made on the Line Item; No Data/Insights from the ML model for any line item, the horizontal panel is not displayed under the line items.
Search Functionality in different Columns
Date Search
To view the invoices, select the Date Picker Calendar in date column. When a user clicks on the date column, the system displays a calendar.
- Select the start date and end date in the calendar to view the invoices ranging on the selected date.
- Double click on the same date for Start Date and End Date to view the records of a particular date.
Item Type
To view the Item Types:
- Select the required Item type ALL, Expenses or Fees from the drop-down list.
- Selected items types appears in the grid.
- The same is reflected in the Total Spend by Type pie chart widget.
Flag Column
NOTE: This function will only work if the invoice is posted into active workflow, and the user is the current approver.
Introduced Flag column in the interactive grid with the following options:
- Red - Actively Flagged
- Grey - Resolved / Formerly flagged
- White - Default state
The functionality of the flag is to sort the capabilities, sorting all line items with a flag to the top on the first click, by line item number descending. Then by all line items without a flag, in line item number descending.
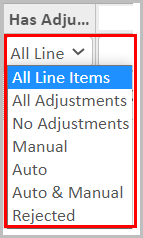
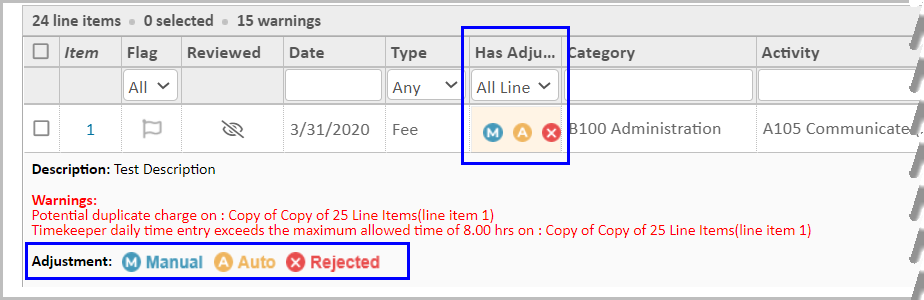
HasAdjustment
The update is introduced in TCE 7.0.
To view the columns that are adjusted:
- Select the value "All Line Items", "All Adjustments", "No Adjustments", "Manual", "Auto", "Auto & Manual" or "Rejected" from drop-down list.
- Displays the selected value line items in the grid. The values are provided with hyperlink.
- When user clicks on the hyperlink, Adjustment History Modal pop-up window with the Adjusted history details appears.
To search for a Timekeeper
- Enter first two characters of a person in the filter box.
- The filter is enabled with smart search.
- The matching name of the timekeepers appears on the list.
- Select the required Timekeeper from the list.
- The line items of the Timekeeper appears in the grid.
- The users have an option to select single or multiple invoices.
Column Filtering (Number)
To view the rows with required number/value,
- Enter the required value in the number filter column.
- Select the required line item to perform the functionality.
NOTE:
- Using operators (<, > and =), to filter the required number to/which pulls the exact value. If no operator is selected, then assumed as a direct match. The below are the operators:
- <, >, = exclusively and only one at a time.
- = pulls up the exact value
- Number filter is applied for both Quantity and currency columns (Original Quantity, Original Rate, Original discount, Original Total, Adjusted Quantity, Adjusted Rate, Adjusted discount, Adjusted Total, Adjustment Total).
Activity Column
To review the large invoices with many line items:
- Enter the Activity details in the filter box of the column.
- All the line items pertaining to a specific matter displays in the grid.
- This helps the user to focus on the specific groups of line items.
Project
Displays the line items with Matter name that are billed/linked against the Matter in the grid of the Invoice. The column is provided with ascending and descending options with display name.
Reviewing Invoice Line Items
NOTE: This function will only work if the invoice is posted into active workflow, and the user is the current approver.
Invoice approvers can quickly filter and manage individual line items on larger invoices by using the Mark Reviewed and Mark Unreviewed buttons. These buttons act as quick filters to display which line items are All, Only Reviewed and Only unreviewed. All invoice line items will remain in the "unreviewed" state until the invoice is put into workflow (when the post button is clicked). The invoice is posted successfully when a new Invoice with NON-US Tax of type 'Line Item Level' is tied to the matter vendor. In the account section, separate accounts for the line item task and corresponding non-us line taxes have been created after successfully posting the invoice.
If the user is an invoice approver, line items display with All, Only Reviewed and Only unreviewed options (when in workflow) see image below.
- All: Displays all the line items of the invoice.
- Only Reviewed: Displays all the reviewed (eye ball open) line items.
- Only Unreviewed: Displays all the unreviewed (eye ball closed) line items.
- Mark Reviewed: Changes the status of reviewed/unreviewed.
- Mark Unreviewed: Displays all the unreviewed (eye ball closed) line items.

To change the status of unreviewed to reviewed:
- Select the required line item which contains unreviewed status.
- Buttons above the grid are highlighted.
- Click Mark Reviewed button.
- The line item with Unreviewed changes to Reviewed.
To change the status of reviewed to unreviewed:
- Select the required line item which contains reviewed status.
- Buttons above the grid are highlighted.
- Click Mark Unreviewed button.
- The line item with Reviewed changes to Unreviewed.

NOTE: To view the Approve button, Users must be listed in the invoice workflow.
Reject Line Items
To reject the line items,
- Select the required line item(s) from the Line Items widget.
- Click Reject button.

- A pop-up window appears.
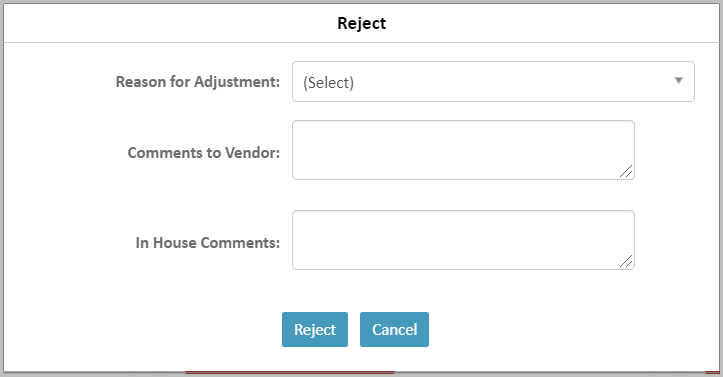
- Enter Reason for Adjustment from the drop-down list.
- Enter Comments to Vendor in the text field.
- Enter In House Comments in the text field.
- Click Reject.
- To cancel, click Cancel.
NOTE:
- If no line items are checked or already rejected, then the system greys out the Reject line item button.
- The reject line item button is "available" in the following scenarios:
- When one or more line items are selected or
- When one or more line items are selected (with a mix of rejected and unrejected).
- When the user clicks on the reject button, if the line item has a mix of rejected and unrejected then the unrejected item is rejected and the already rejected line item is "skipped".
Multi-List filtering
This feature is introduced in TCE 7.0.
- The Interactive grid is provided with multi-list column filtering with smart-search option.
- Interactive grid multi-list column filtering should filter line items that have all the comma-separated values entered in the filter criteria.
- When searching for values that are multi-select fields, the ',' must not be included as part of the Search String.
- The ',' symbol must act as a string separator for the Search criteria.
- The search strings which are separated by ',' must have the AND condition when searching for multiple strings. For Ex. if the user enters the search string as 'Chel, Hawks', then the grid must fetch results for all line items where the multi-select field has values of both India AND Singapore.
- When the text is matched to values on any line item, the matched string must be highlighted in ‘Yellow’ color.
- The help text on the tool-tip is displayed hovering on the search field to identify that a field has the multi-search feature.
Note:The search operation will be performed only when a user enters 2 or more characters. So in the instance that the user enters first 2 letters of Chelsea 'Ch', the search will be performed only for the string ‘Ch' & whatever invoices match it will be shown.
Important: If the user entered the third country (for example: Norway) which is no where in the list, then the user should ensure that even the entries with 'Chel, Hawks' will not be displayed.
Bulk Adjustments
To make adjustment changes in the Invoice for multiple line items:
NOTE: When an adjustment is made to an Interactive line item the user must manually refresh to reflect/update the adjusted amount in the invoice summary block.
- Select the multiple line items.
- Upon selecting multiple line items, Bulk Adjust button enables.
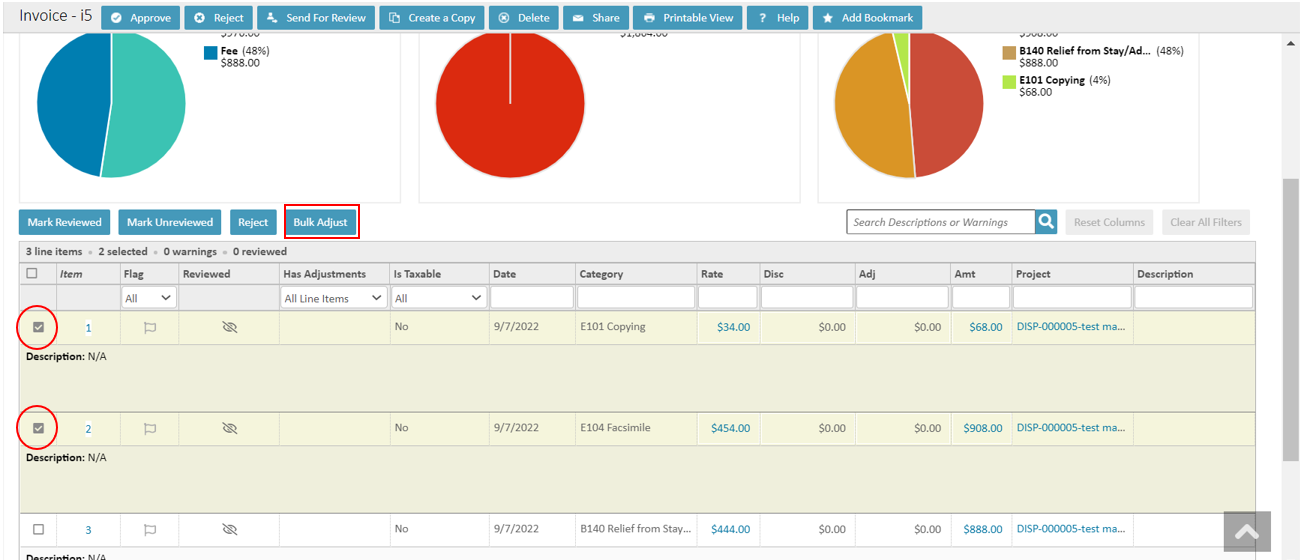
- Click Bulk Adjust button.
- A Bulk Adjustment pop-window appears.
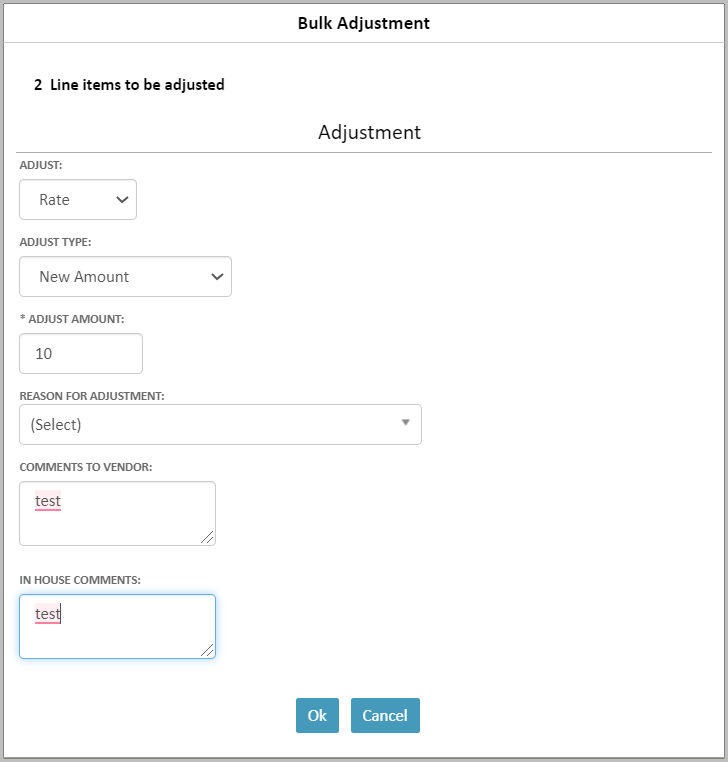
- Select the Adjust (Rate/Units/Amount) from the drop-down list.
- Select the Adjust Type (Reduce by Amount/Reduce by Percentage).
- Enter Adjust amount.
- Enter Comments.
- Click Ok.
- The updated changes appears under the line items.
Total Rows and Counts
Users can view the total number of line items and the number of selected line items (if any) at the bottom of the invoice line item grid.
Totals appear at the bottom of the invoice line item grid for the columns Quantity, Discount, Original Total and Adjusted Total. When the filter is applied to the columns, the total value of the filtered rows are displayed at the bottom of the grid.
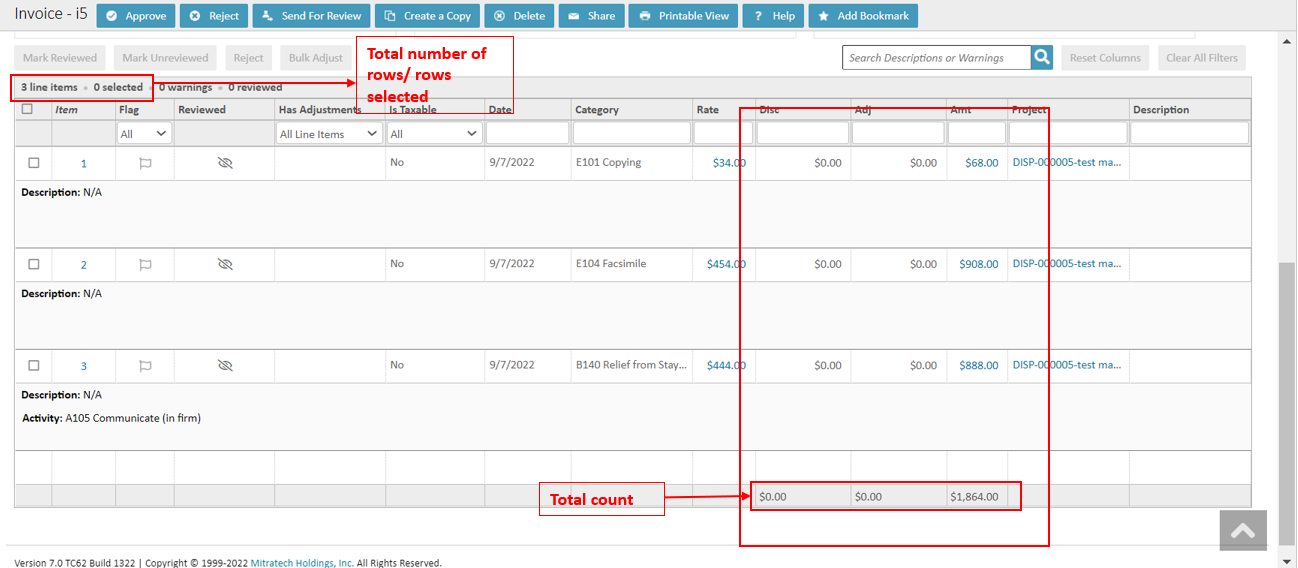
NOTE: The count is displayed on the grind in the following scenarios:
- Line items with Multiple warnings – Displays the posted invoice. Individual warnings are not considered.
- Displays when an Invoice is moved to the next stage of the approval process - Reviewed numbers apply to current users only.
- The count is not displayed to the non-workflow users.
- In edit mode, the number of line items, the number of selected line items, and warnings are displayed.
- When a filter is applied, values on the top of the grid dynamically change as per the applied relevant Filters.
Interactive Search views
To view the user preference/customized columns through Interactive Search views for the Invoice to view in the Interactive grid, a user can configure the default or optional columns based on their preference from the Setup menu.
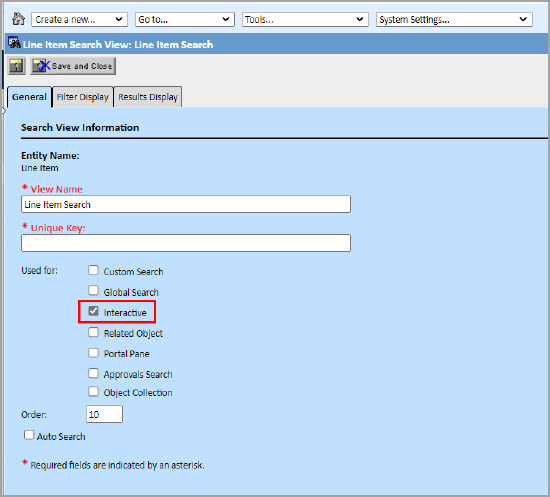
How to configure Interactive Search View?
To configure/setup the preferred columns to the Interactive grid at High Complexity,
- Go to Setup >> Line Item >> Search View >> General >> Used For
- Select Interactive checkbox.
- Click Results Display tab.
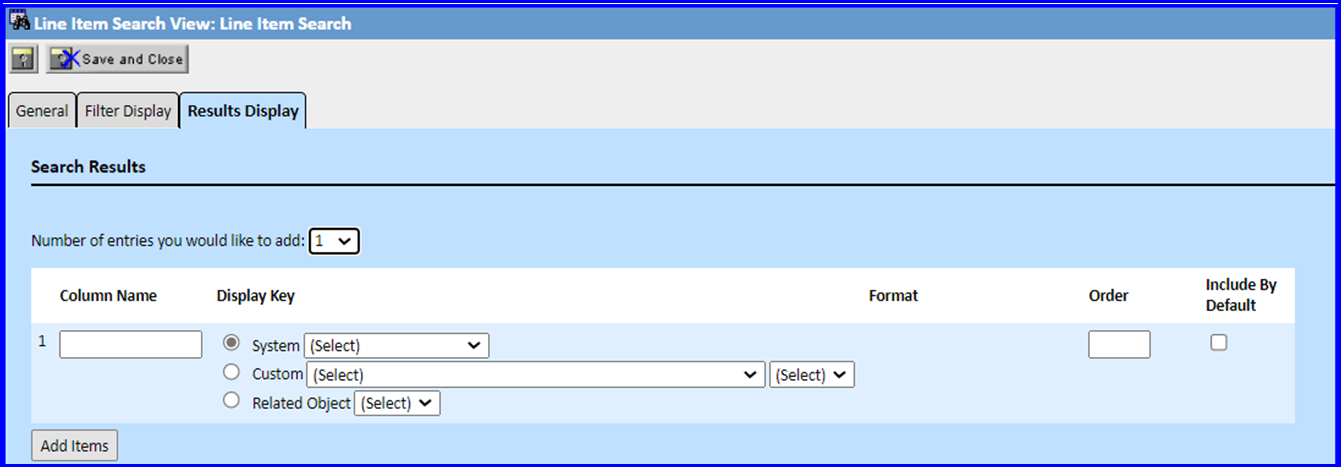
- Enter column name.
- Select the options in display key ().
- Any system and custom fields can be added as a column in the Result Display tab.
- Enter the order no.
- To add a column as default column, select the “Include by default” checkbox. This column is displayed in Default columns list in column picker panel otherwise displays as optional column.
- Click Save and Close.

Note: When a user copies a Search View from an existing Search View and uses it as an interactive, the checkbox in the "Include by default" column is initially unchecked. The user must ensure that the checkbox for the column which they want in the interactive grid as default should be ticked in the “Include by default” column, otherwise there will be no column displayed in the grid as default columns and all the columns will be displayed as an optional column which users can enable from the column picker in the UI.
Important Note:
When the user makes an adjustment on the rate column, it will have two values, i.e original rate (initial rate) and net rate (new rate). If the user wants to see both the initial value and the new value, then the user needs to add two different columns in the Setup >> Go to Object Definitions >> Invoice Object >> Search Views>> Result Display. Similarly, it is also applicable for unit, amount and discount.
View the Search View
To view the user preference Search View,
- Search Views marked as Interactive displays in the new Line Item block
- Go to Line Items, panel in High Complexity Interactive grid.
- Select the preferred interactive from the drop-down list.
- The initial columns (Checkbox, Reviewed, Peek, etc.) are considered as default columns. And Description, Warning, Adjustment History & Revert (button) remains the same and are not affected by custom fields.

- Different search views for the interactive line items can be chosen as shown in above picture. The user can select multiple search views as per the drop down option in the front end itself.
- Data in the grid and the widgets will be updated as per the search view selected.
Persistence of selected "View" in Invoice Review
After TCE 7.0 PB7 version, in the Invoice page, the persistence configuration is specific to Invoice Review.
- This is a user preference. Because this is unique to Interactive grids, there is no Interactive Search view by default and thus there will be no saved value.
- By default the first available search view in the dropdown for Invoice Review will be loaded.
- If the user changes the "view" value, their preferences will take precedence over the default and the page will always load with the desired configuration.
- If the user deletes the user preference selected search view, the dropdown will revert to the first accessible search view.
- The selected view will be retained even after the user uses the filters, freeze/unfreeze, clear, rearrange column, add and remove optional column and even if the user logs out.
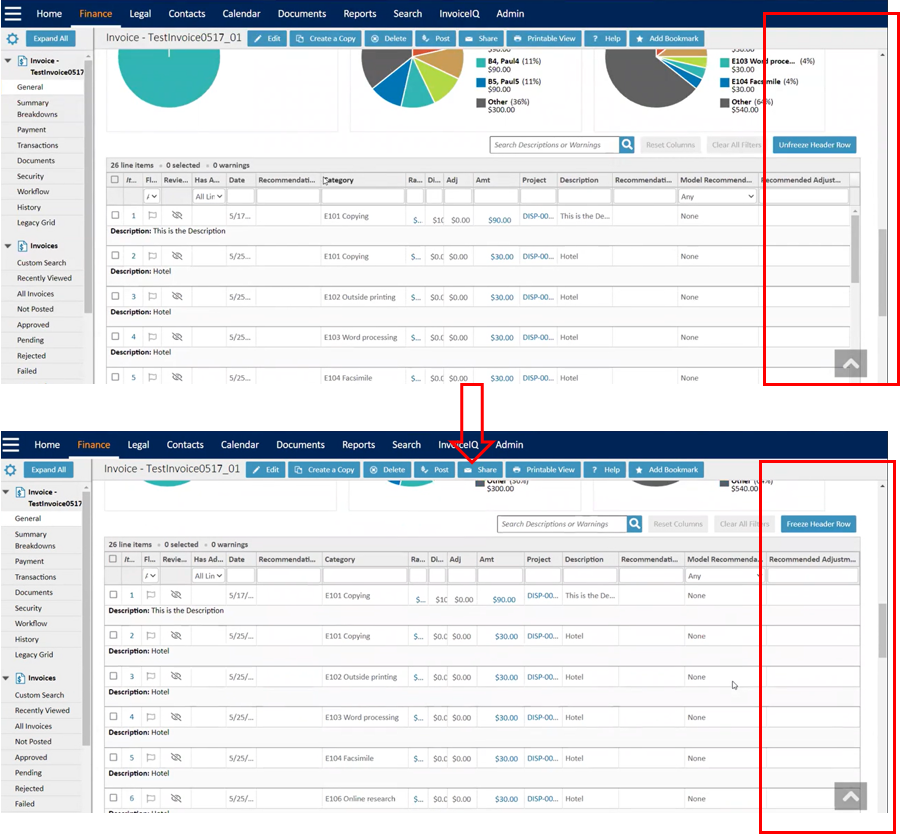
Freeze/Unfreeze Headers for Invoice page
Introduced in TCE 7.0 PB2
When a user views a large amount of data on a single page, the header row for the Invoice page is frozen by default, which helps the user keep track of what they are viewing. Also, the Invoice page will be equipped with dynamic sizing of the bounded box, which is dependent on user resolution, for more efficient invoice review.
- Open TeamConnect.
- Login to TeamConnect with Admin User.
- Navigate to Finance > Invoices. Select a invoice and the Interactive Grid is displayed.
- The user can see that the "Unfreeze Header Row" button is displayed next to the "Clear All Filters" button.
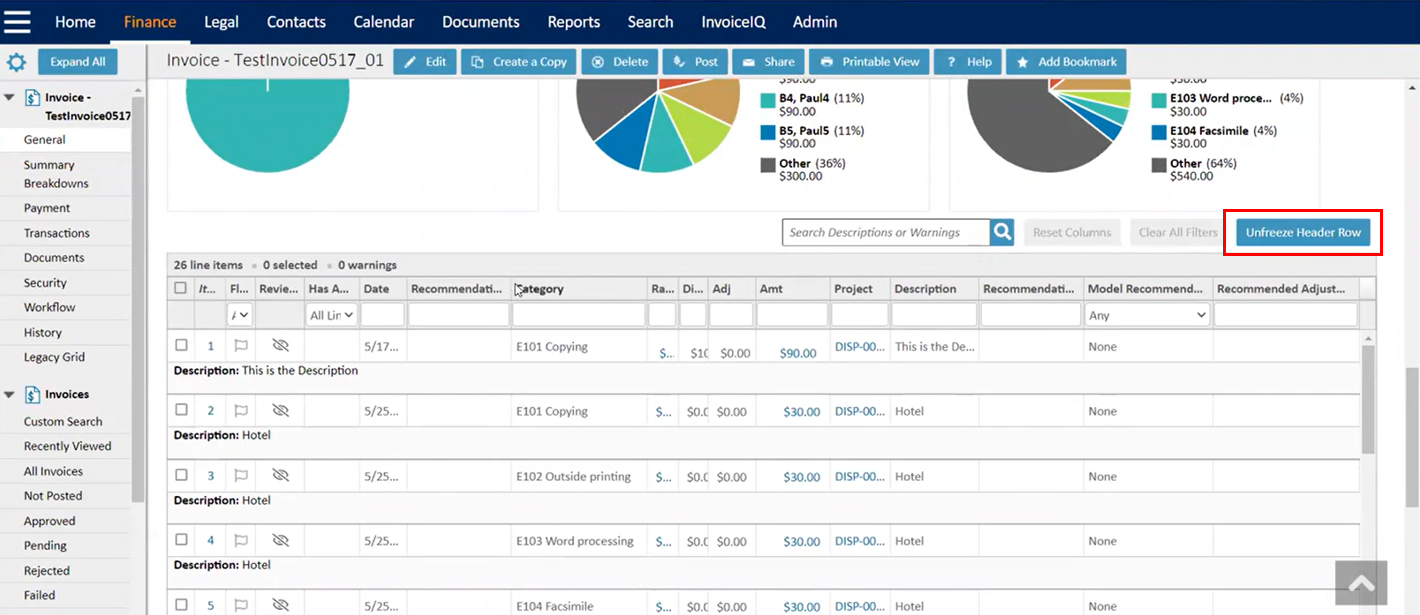
- By default, the headers of the grid are frozen when a user scrolls.
- Once the user hover over the "Unfreeze Header Row" button, a help text is displayed as, "Unfreezing the header row loads all records at once and may reduce performance".
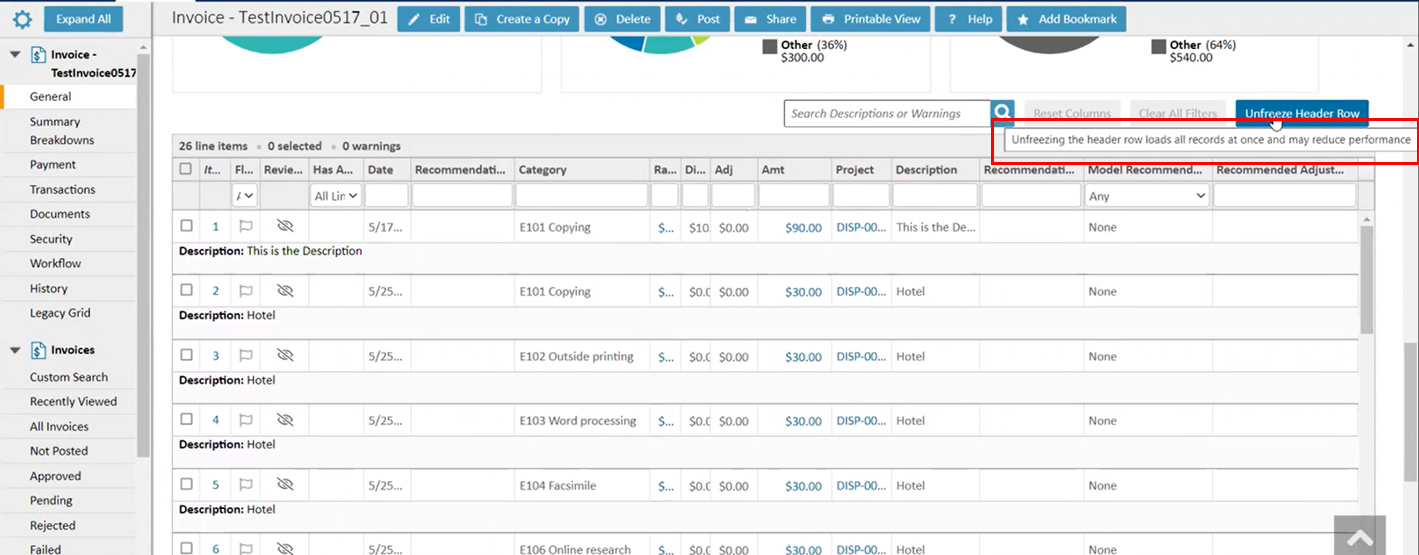
- When the user click on the "Unfreeze Header Row" button, the text on the button is switched to "Freeze Header Row" and all the invoices are loaded at once on the same page. Regardless of how many invoices are required, it will automatically load and there will be only one level of scrolling on the page, which is called page level scrolling and there will be no secondary or tertiary level scroll within the page (no grid-level scrolling).
NOTE: The same is true when the user switches between interactive views. Each user's preference for Freeze/Unfreeze Header Row will be saved in relation to the interactive views they have chosen.
- It should be noted that the user setting of Freeze/Unfreeze Header for Invoice page persists for further sessions also i.e. when the user click on the "Unfreeze Header Row" button, the text on the button is switched to "Freeze Header Row" and all the invoices are loaded at once on the same page and when user logout & login again and navigate to Finance > Invoices and select the same invoice and the user setting from previous session persists, i.e., text on the button is "Freeze Header Row" and all invoices are still displayed on the same page at the same time.

NOTE: When a filter is applied using Bar Graph and the user switches from Freeze Header to Unfreeze Header or vice versa, the "Clear All Filter" button will be disabled. It should be noted that the filters are reset when the user switches between the Freeze and Unfreeze options.
NOTE: When the header row is frozen, there will be visible white space in the grids if there are less than 6 or fewer line items. However, there is no visible white space when the header row is unfrozen.
What to do if the performance is slow?
Because each environment is different, we cannot guarantee performance benchmarks. Here are some relative examples from our testing, using 6 columns of a mix of data types:
|
Search Size |
Classic Grid |
Interactive Grid |
|
1000 Line Items |
1.5 seconds |
3-5 seconds |
|
5000 Line Items |
3 seconds |
5-10 seconds (results vary depending on the number of object links and additional fields) |
Also note that the first search performed after a system restart will take longer than subsequent searches, due to the cache being loaded.
NOTE: Mitratech is aware of certain search conditions which may cause significant performance impact. Patches to versions 6.3.5, 6.3.6, 6.3.7, and 7.0 were released in Q2 2023. Please check the Versions Release page for availability or contact Customer Support for assistance.
Here are some additional recommendations on optimizing performance:
-
Toggle Freeze Header Row to on
-
Include 10 or fewer columns in the search results and/or limit the number of dropdown fields included
-
If on premise: talk to IT about enabling http compression on your app server or load balancer
-
Contact Support for further evaluation and options