
Search Management in TeamConnect - Streamlining Your Searches
NOTE: The minimum version that supports the below features is TCE 7.1 and higher versions
This section provides a comprehensive overview of the Manage Searches page for objects in TeamConnect. In TeamConnect, users have access to two primary types of searches:
-
Custom Searches: These searches can be personally created by any user and saved using the custom search feature.
-
Search Views: These views are created by administrators.
Users have the flexibility to save multiple custom searches and subscribe to numerous search views for the various objects available in TeamConnect. However, as the number of searches grows, finding specific custom searches and search views becomes challenging. This difficulty arises because these searches are displayed in the left panel based on their creation date.
To address this challenge and enhance user experience, we have introduced updates to custom search and search views management which allow users to efficiently organize, save, and subscribe to searches, providing a more seamless and productive experience in TeamConnect.
Note: In this article, the term "Object" encompasses any entity available in TeamConnect, such as Contacts, Expenses, Documents, and Appointments.
By utilizing these features, users can save searches within a folder structure on the Manage Searches screen. All searches can be arranged into appropriate folders based on user preferences. The Manage collections and Manage custom searches user interfaces have been implemented for various types of objects.
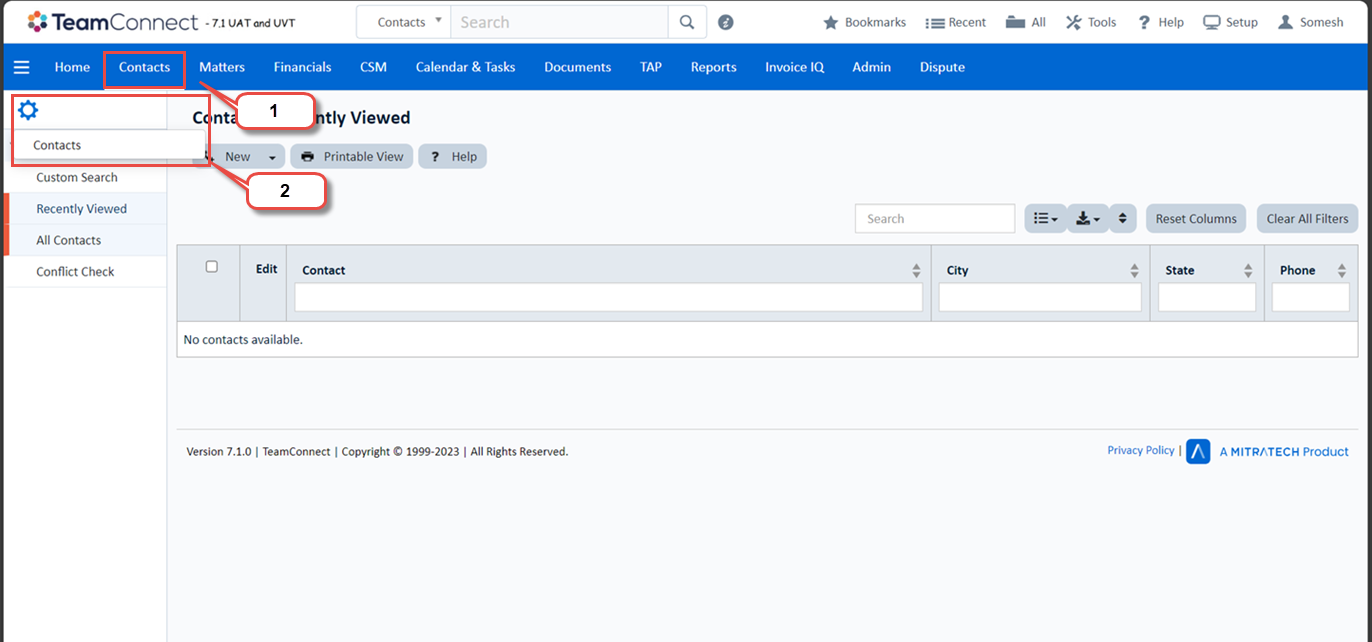
Here are the steps to navigate to the Manage Searches section for a specific object:
-
On the TeamConnect Homepage, navigate to the Object (such as Contact or Expense) where you want to access Manage Searches.
-
In the Top left corner of the Left Panel, click on the gear icon and choose the object. This action will display a screen featuring both Manage Custom Searches and Manage Collections.
-
Users have the option to create a New Folder, UnSubscribe, and Move the selected custom searches and search views.
-
Breadcrumbs are provided to help users identify the folder level they are working in. These breadcrumbs are hyperlinked, allowing users to navigate to the appropriate folder by clicking on the provided links.
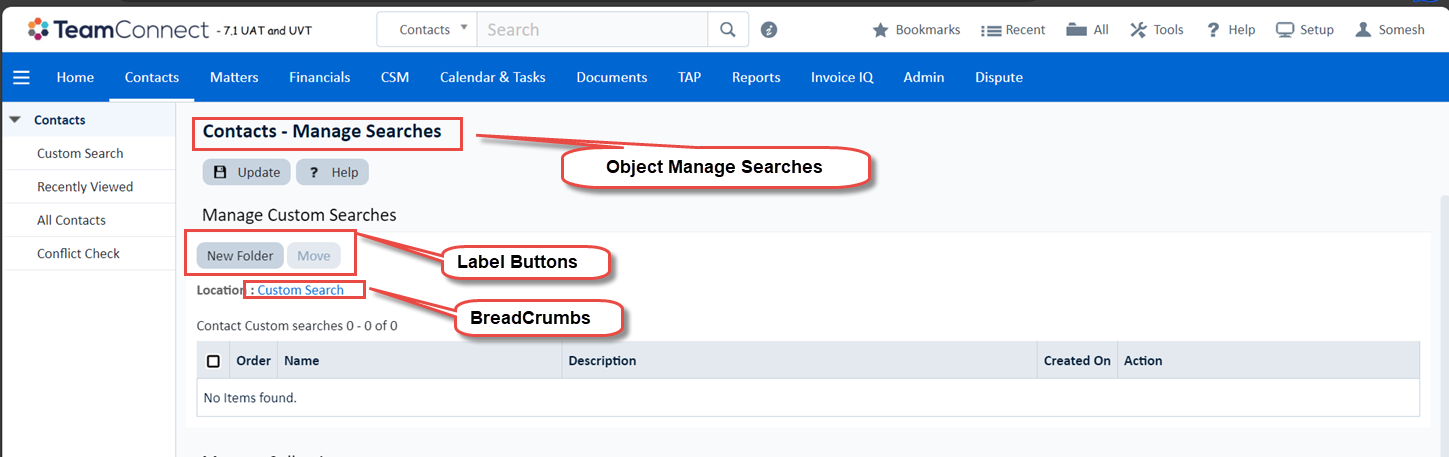
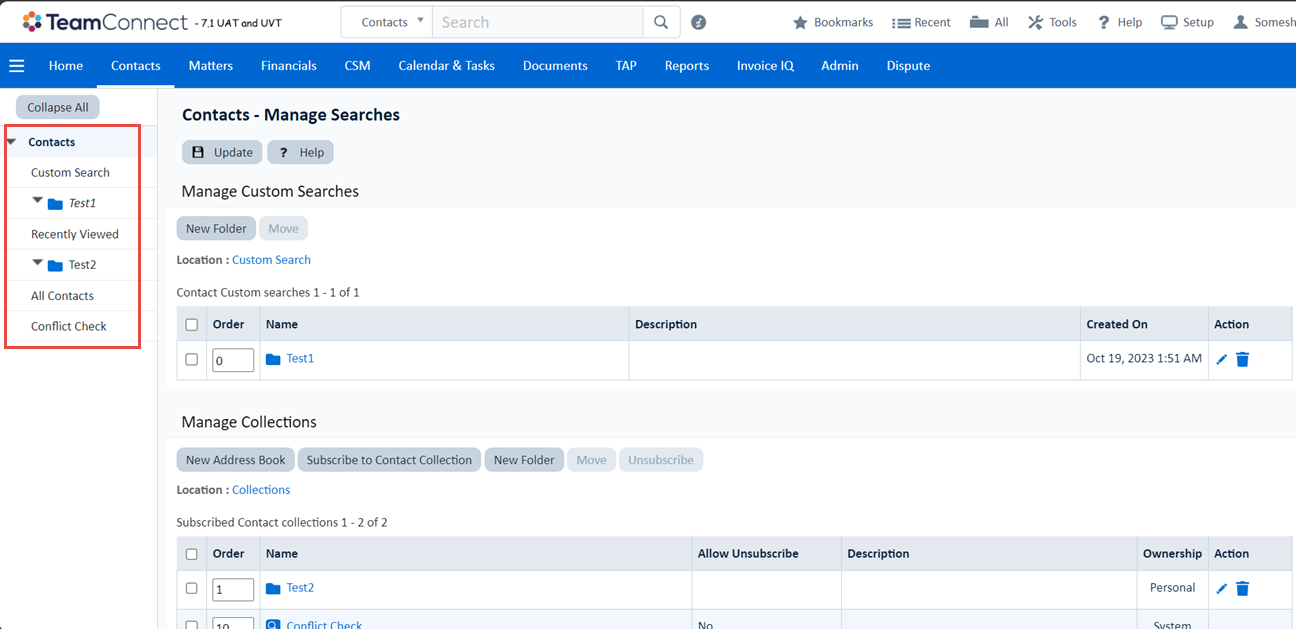
Manage Searches
The Manage Searches Screen assists users in managing their saved custom searches and subscribed search views. This screen is divided into two blocks:
-
Manage Custom Searches
-
Manage Collections
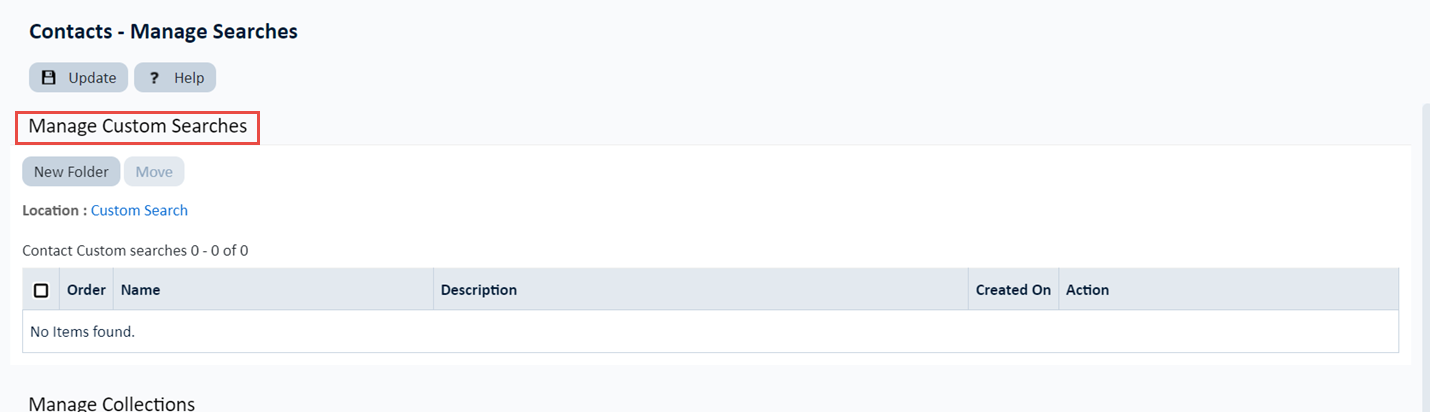
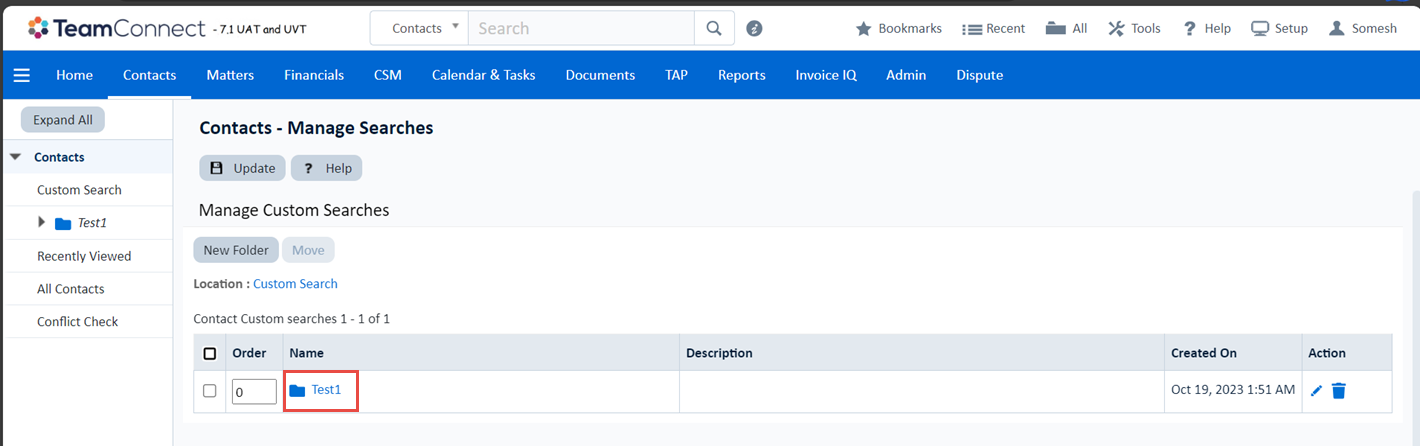
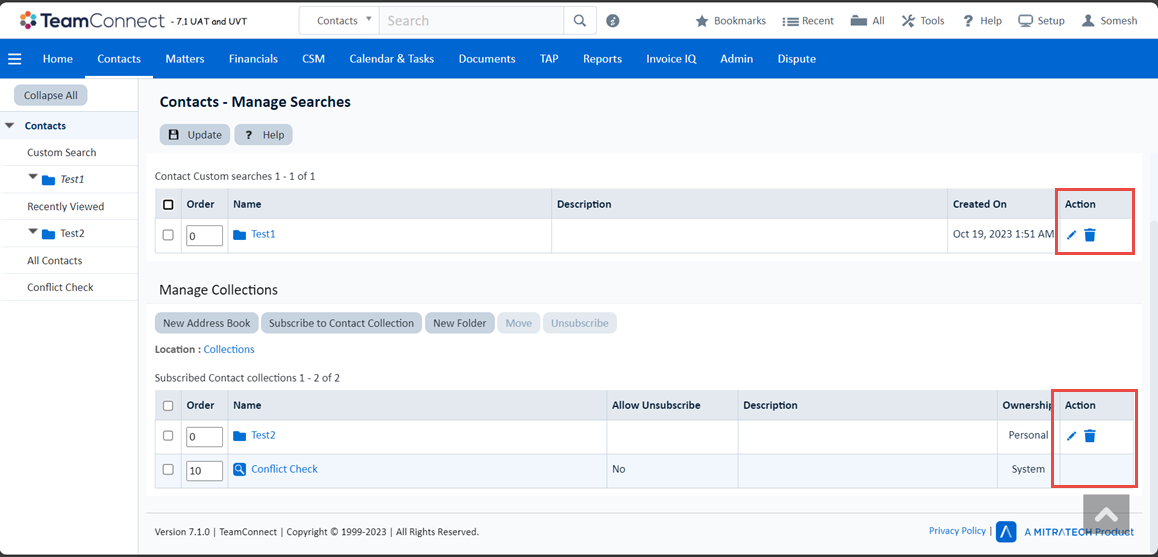
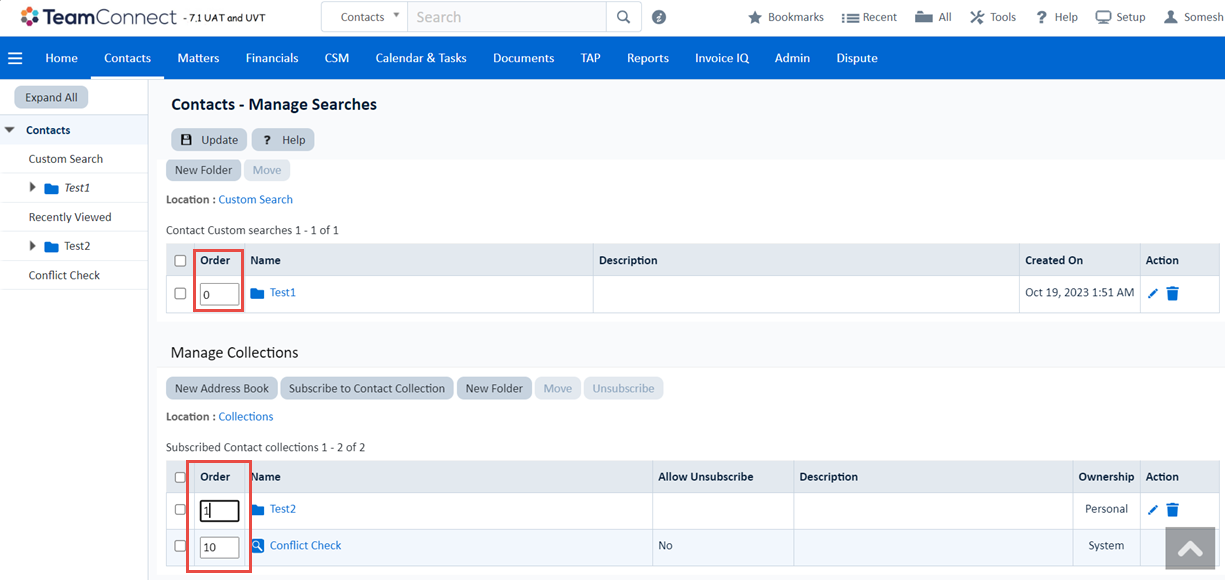
Manage Custom Searches
Under Manage Custom Searches, users can access their saved custom searches and their respective folders. This block contains two buttons and a table that shows the list of saved custom searches.
The following table will provide the information about the label functionalities and the table headers:
| Name of the field | Description |
| New Folder | This is used to create the new folders as per the client requirements. |
| Move | By using this button clients can move the selected saved searches inside a folder. By default, this button is in disabled state. |
| Order | This is used to arrange the position of the saved custom search in the table by giving a number as an order value. |
| Name | Name of the saved custom search. |
| Description | An overview of the saved custom search. |
| Created on | The date on which the saved custom search is created. |
| Action Column | Action column contains Edit and Delete options. |
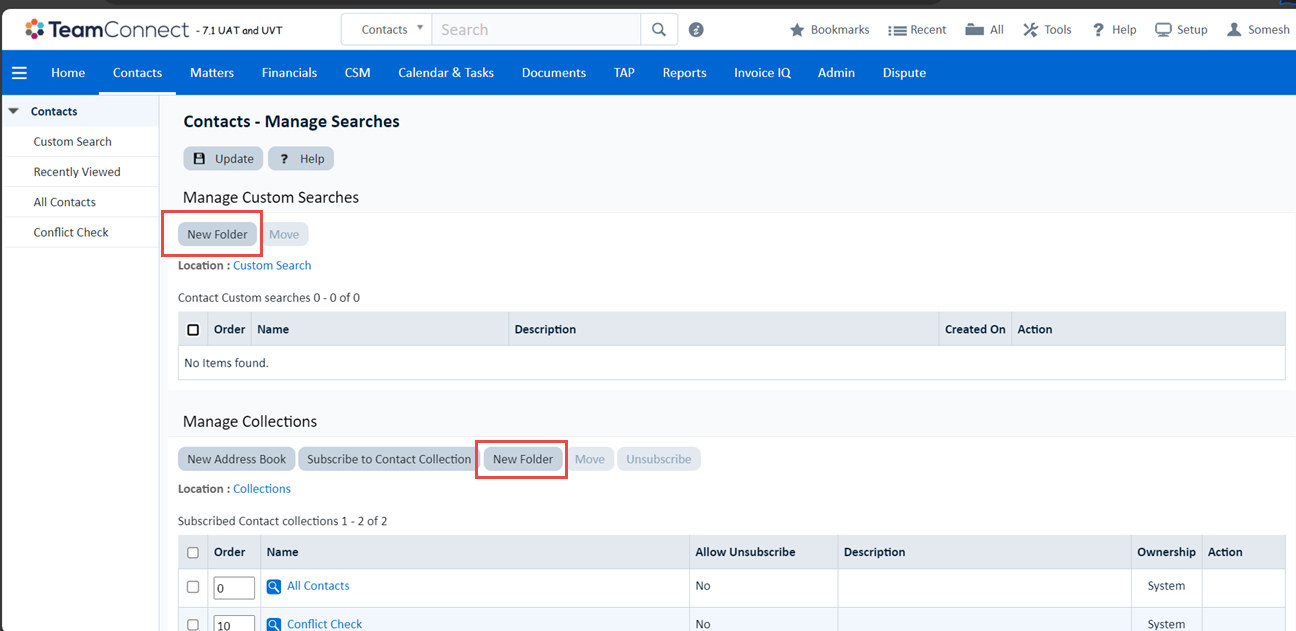
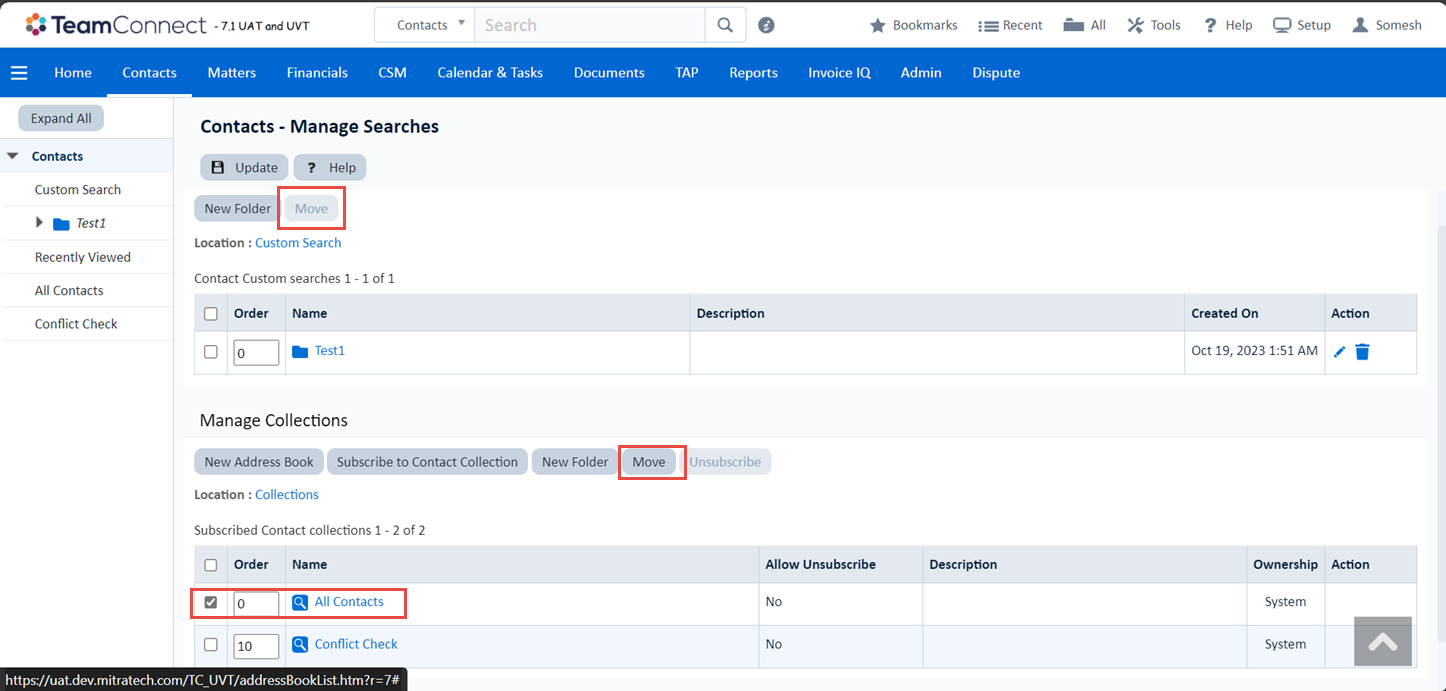
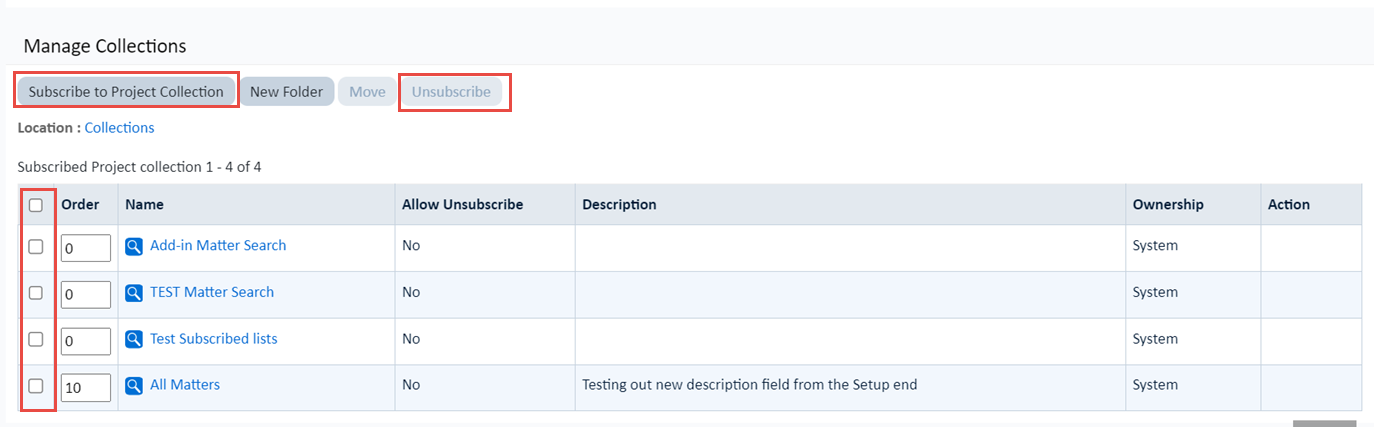
Manage Collections
Under Manage Collections, users can access the available search views, and folders they have created. This block comprises five label buttons with distinct functions, along with a table displaying the list of search views, and folders.
Note: The New Address Book button is only accessible within the Contacts object in TeamConnect.

The following table will provide the information about the label functionalities and the table headers:
| Name of the field | Description |
| New Folder | This is used to create the new folders as per the client requirements. |
| Move | By using this button clients can move the selected saved searches inside a folder. By default, this button is in disabled state. |
| Order | This is used to arrange the position of the saved custom search in the table by giving a number as an order value. |
| Subscribe to Object Collections | Users can subscribe to the collections (search views) that are saved in the collections block. |
| Unsubscribe | Users can unsubscribe from search views that are not in use |
| Allow Unsubscribe | Informs the users if they can unsubscribe the specific search view or not. |
| Ownership | Displays who created the search view or address book. |
| Name | Name of the saved custom search. |
| Description | An overview of the saved custom search. |
| Created on | The date on which the saved custom search is created. |
| Action Column | Action column contains Edit and Delete options |
Creating a New Folder with Manage Searches
Under Manage Searches, users are required to create folders in order to move custom searches and search views inside them for better management.
Here are the steps to follow on how to create New Folder on Manage Searches screen:
-
Under Manage Searches, click on the New Folder button. A popup with one mandatory text field labeled as “Name” and a memo field labeled as “Description” will be displayed on the screen.
-
Users need to enter all the required details in the given fields and then click “Create Folder.”
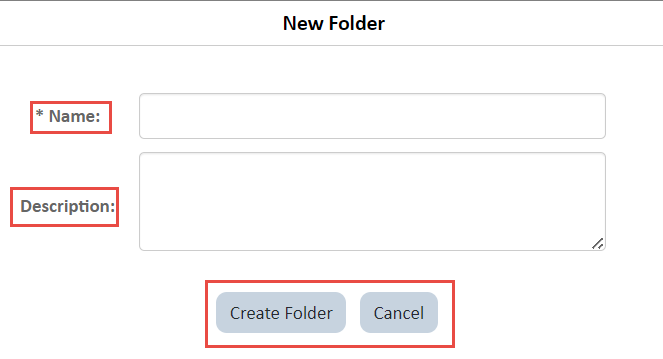
Note: The “Name” field should not exceed 50 characters, and the “Description” field should not exceed 2000 characters.
-
A new folder will be created, and a success message will be displayed on the screen. Folders are always shown above the Searches and search views in the table.
Note: Creating duplicate folder names is not allowed; if users attempt to do so, an error message will be displayed.
Move Operation for Manage Searches
When users create folders under Manage Searches, they should move the custom searches and search views into the appropriate folder based on the categories they have identified.
Here are the steps to perform the “Move” operation:
-
To Move custom searches and search views into folders, users need to navigate to Manage Searches.
-
On the Manage Searches screen, users should select custom search and search views from the table. The “Move" button gets enabled when the user selects custom search and search Views. By default, the “Move” button is disabled.
-
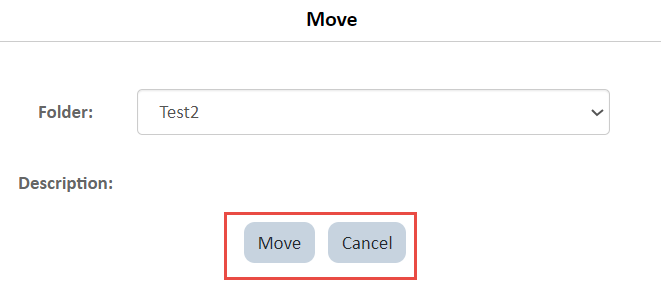
Once the required custom search and search views are selected, click on the Move button. A popup window will appear on the screen.
-
In the popup window, users can choose a folder from the folder dropdown, and a corresponding description will be displayed. Clicking the Move button in the popup window will relocate the selected custom searches and search views to the appropriate folder.
Note: If users select a search view (or) custom search in the root folder and click on the Move button, an error message will be displayed on the screen if no folders have been created by the user.
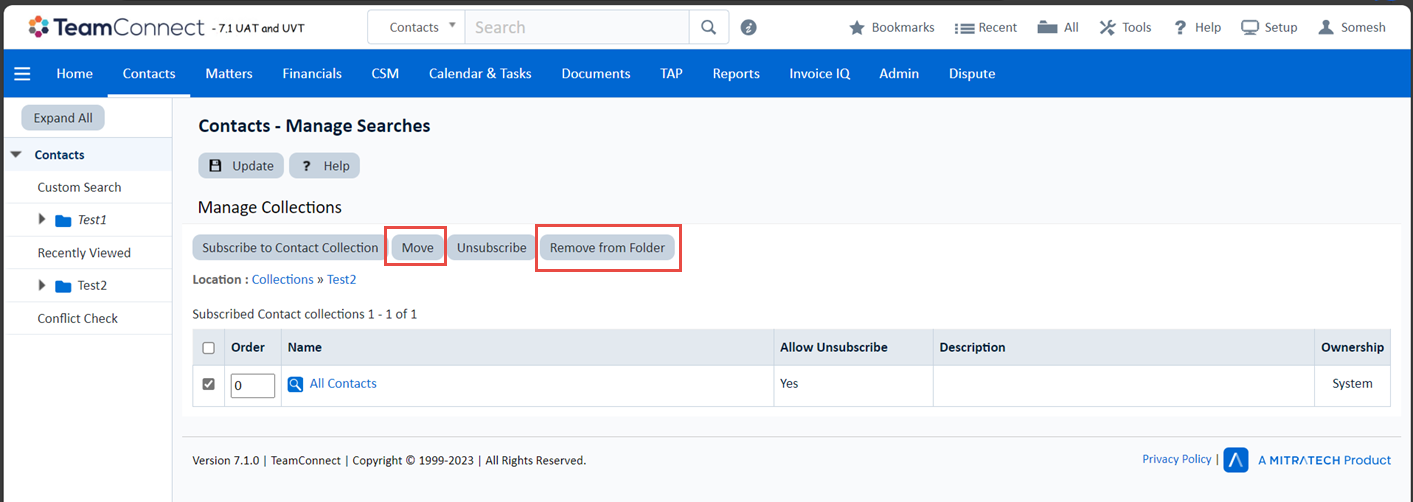
-
Inside the folder, users can view two buttons named "Move" and "Remove from Folder." Using these options, users can transfer Searches and Search Views from one folder to another, as described earlier.
-
To remove custom search and search views from a folder, users must select the desired search and click the "Remove from Folder" button. This action will relocate the selected searches from the folder back to the root folder.
Editing and Deleting searches via Action Column in the Table
Users can manage their searches by utilizing the Edit and Delete action buttons in the action column on the Manage Searches screen.
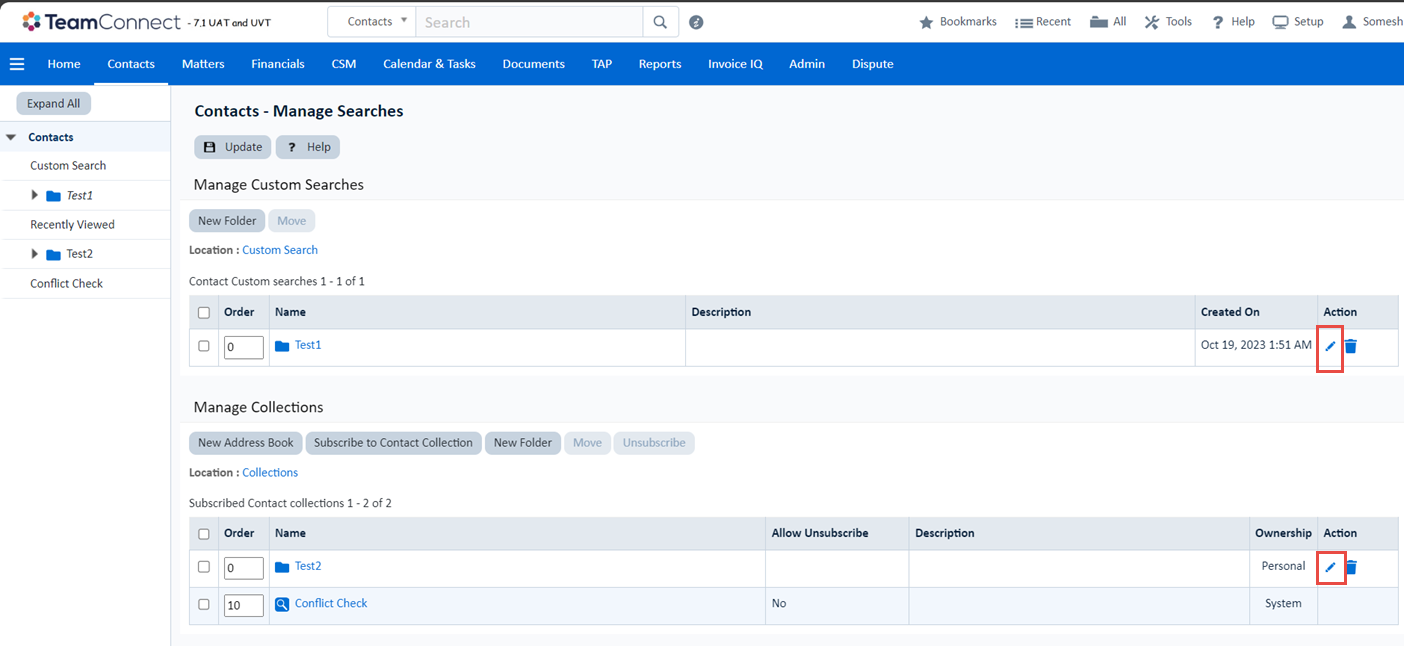
Action Column
In the Manage Searches screen's table, there is an action column housing two distinct icons, each with its own specific function.
In both the Manage custom searches and Manage Collections sections, folders and custom searches have only two available icons: Edit and Delete. However, for search views in the Manage Collections section, no icons will be present in the action column.
Editing Information for Manage Searches
Users have the ability to modify information for custom searches and folders. This can be done using the edit icon found in the action column. It's important to note that users are only allowed to update information for folders and custom searches.
Here are the steps to follow to edit the information:
-
To update the information related to custom searches and folders on the Manage Searches screen, users need to navigate to Manage Searches.
-
Within the Action Column of either the Manage Custom Searches or Manage Collections blocks, Users can select the edit icon associated with the chosen custom search or folder to make updates.
-
Once the Edit icon in the action column is clicked, a popup window will appear on the screen.
-
Users should edit the information in the appropriate fields within the popup window and then click the "Update Info" button to apply the changes to the Searches and folders. Additionally, the modified date will be updated to the current date, and the revised information will be visible on the screen. Upon a successful update, a confirmation message will be displayed.

Note: The Name field is mandatory; if left blank, an error message will appear.
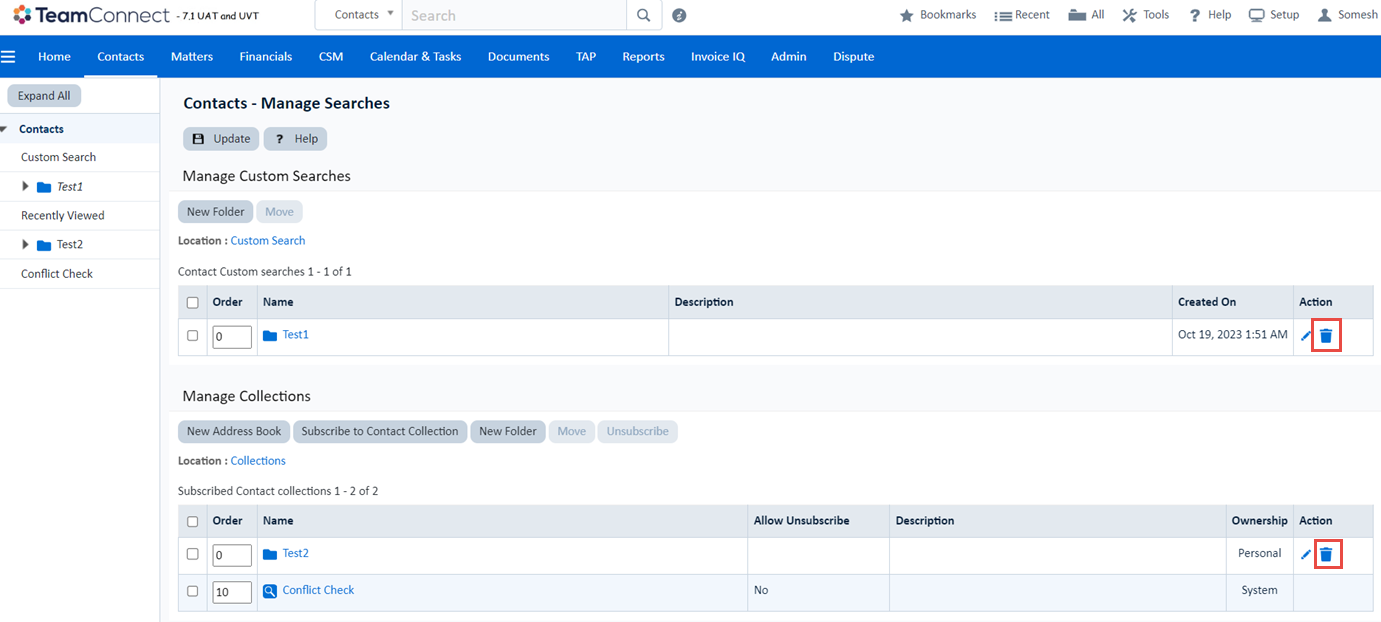
Deleting Information from Manage Searches
By selecting the Delete option in the action column, users can remove unwanted searches and folders.
Here are the steps to follow to delete the searches and folders:
-
To delete the custom searches and folders on the Manage Searches screen, users should go to Object Manage Searches.
-
In the Action Column of Manage Custom Searches or Manage Collections blocks, click the Delete icon corresponding to the selected custom search or folder that needs to be deleted.
-
Once the Delete icon in the action column is clicked, a pop-up window containing a warning message will appear, offering buttons labeled "Yes" and "No." After user confirmation by selecting "Yes," the delete operation will be executed.

-
When a user deletes a folder, all views within that folder are relocated to the root level. If a folder with custom searches is deleted, all searches within the folder will also be deleted. A success message will appear on the screen after the deletion process is successfully completed.
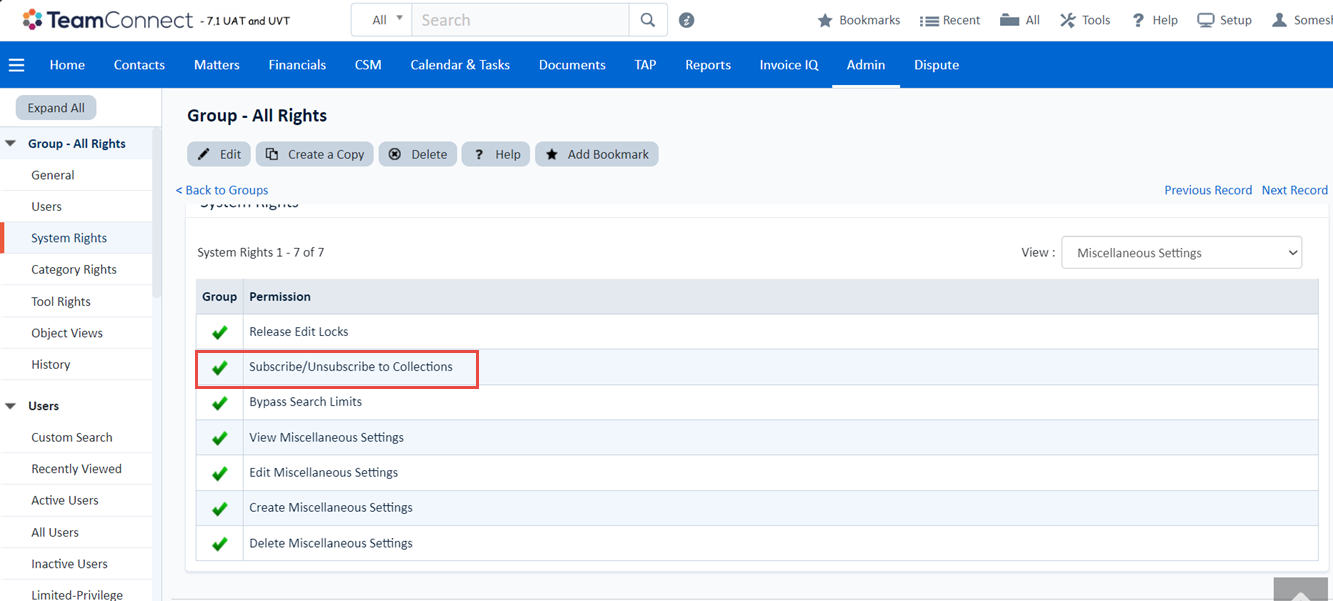
Subscribe and Unsubscribe from Search Views with Manage Collections
In the Manage Collections block, users won't find any icons in the action column for search views. Instead, within the folder and at root level, users will find Subscribe to Object collections and Unsubscribe buttons for search views.
Note: User accounts lacking system rights, such as the ability to Subscribe/Unsubscribe to Collections, won't be able to subscribe to Object collections or Unsubscribe Button.
Here are the steps to follow to subscribe and unsubscribe from search views:
-
To subscribe and unsubscribe the search views, users must go to the Manage Collections block.
-
In the root folder, users will find Subscribe to Object Collection and Unsubscribe buttons on the screen. By default, the Unsubscribe button is disabled.
-
When a user selects the checkbox for a search view or address book row in a grid and then clicks the Unsubscribe button, the search view will be unsubscribed for the user and moved to the “Subscribe to Object Collections" screen.
-
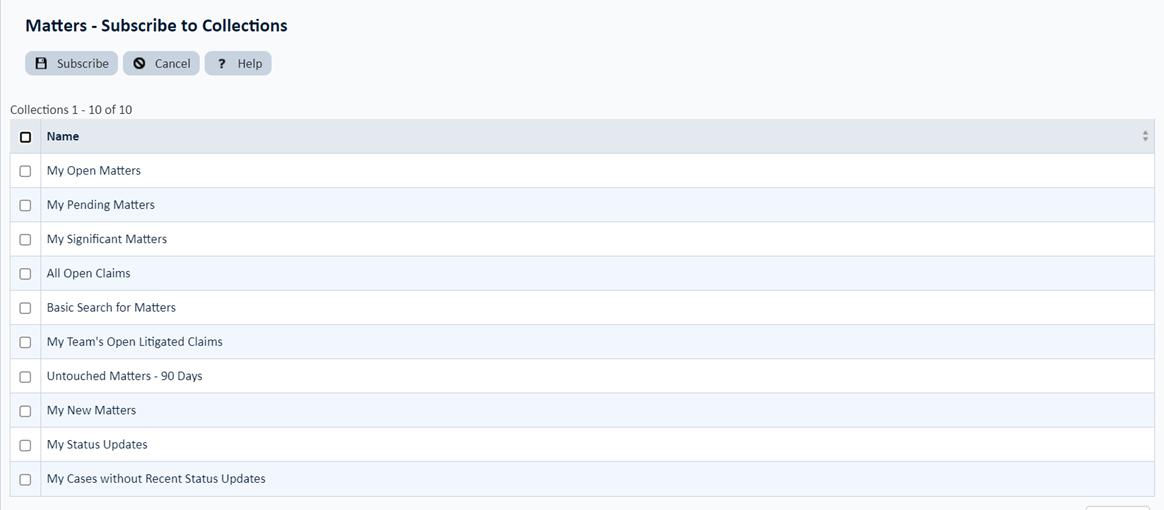
To Subscribe to search views, users must click the “Subscribe to Object Collections" button, which will redirect them to the Subscribe to Collections screen.
-
On this screen, users should select the desired search views and then click the “Subscribe” button. Subscribed searches will then be moved to the root folder.
-
Within the folder, users can find options to "Subscribe to Object Collection" and "Unsubscribe" from search views, as explained earlier. Subscribed search views will be accessible within the folder.
Updating Order for Searches, Folders and Search Views
Within Manage Searches, users have the flexibility to arrange searches, folders, and search views according to their preferences. To customize the sequence, users can utilize the Order column provided in the table.
To modify the order, users should update the numeric value in the order field within the manage custom search and collections blocks. After updating the order value, clicking the "Update" button in the page header will apply the changes.
Folders and searches will be sorted based on the order value. In case of identical order values, they will be sorted alphabetically.
Left Navigation Panel for Manage Custom Searches and Manage Search Views
In TeamConnect's Manage Searches screen, users can create custom searches and search views. These created searches are accessible through the left navigation panel. Any changes made in the Manage Custom Searches and Manage Collections blocks will be reflected in the Object's Left Navigation Panel, including the ability to collapse and expand sections.
The folders containing custom searches are positioned above the folders with search views. Folders always appear above searches and views. Both folders and searches/views are sorted based on their order value; in cases of the same order value, they are arranged alphabetically.
When users perform actions like Edit, Delete, Move, Subscribe, Unsubscribe, and Update the order value within the Manage Custom Searches and Manage Collections tables, these changes will be reflected in the left navigation panel.
In the Left Navigation panel, all folders, searches, and search views are clickable. Users can expand or collapse folders by clicking on the drop-down icon or the folder name. The selected folder will be highlighted, and all associated searches and search views will be displayed.
Search View Design Changes in TeamConect Setup
New User Interface Block in TeamConnect Setup for Search Views.