Using XML Mapper
Overview
The first step to using the XML Mapper is to define a data import or export event by creating an XML map file. Data to be imported into Suite from an outside source must be provided in a format that Suite can understand. This data must be output into a standalone XML document, and a correlating XML map file must be created to translate the XML format into Suite’s data tables.
Next, the task is imported into Suite using the Scheduler component of Suite Manager.
- For data import or export events that are to be run as a scheduled event (such as nightly), Mitratech provides generic tasks that can be used to schedule the event using the Scheduler component of Suite Manager.
- If the data import or export is trigger-based (i.e., a certain action within the database causes data to be imported or exported), then customized scripts must be created that define these triggers.
Each task contains a parameter that points to the corresponding XML map file to be used for the import/export. Import tasks also contain a parameter defining a file server location for retrieving source files, whereas export scripts define a file server location in which generated files will be created.
Once the scripts are in place, the Scheduler executes the defined data import/export events. Once the data has been imported into the system, the Scheduler removes processed files to prevent data from being imported again the next time the task is executed. The Scheduler does not manage export files; it is the responsibility of the client to independently move or rename processed export files.
Scheduling the XML Mapper Task
The Scheduler component has several options for automating tasks at time intervals specified by the System Administrator. To run a task outside of its schedule, delete the task, edit the schedule, or edit any parameters, click the task name on the Schedule tab of the Scheduler window and click the appropriate button.
To Schedule a Task:
- Open Suite Manager.
- On the Suite Manager control panel, click on the
 Scheduler component in the Tools & Utilities area.
 - On the Scheduler window, click New.

- On the Schedule Information dialog box, select the name of the appropriate task from the Scheduler dropdown field.
- Type a description for the schedule in the text box.
- Select the appropriate radio option button in the Schedule area. Tasks may be scheduled as follows:
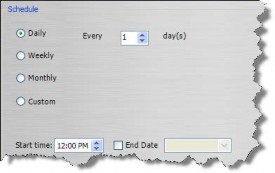
- Daily – Specify the time each day the task should be run and if any days should be skipped in between runs (for example, setting the field to 2 day(s) at 1:00 AM would mean that the task would be run every other day at 1:00 a.m.).
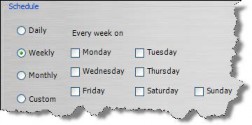
- Weekly – Specify the day(s) of the week on which the task should be run (for example, selecting the Monday, Wednesday, and Friday checkboxes would mean that the task would be run on those days at the time specified).
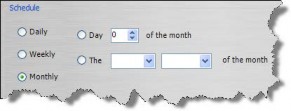
- Monthly – Specify the day (such as 15 for the 15th of each month) of the month to run the task or specify the time of the month (such as the first Sunday of each month) to run the task at the time specified.
- Custom (Advanced) – See below.
- Daily – Specify the time each day the task should be run and if any days should be skipped in between runs (for example, setting the field to 2 day(s) at 1:00 AM would mean that the task would be run every other day at 1:00 a.m.).
- Click on the End Date checkbox and select a date for which the schedule will be terminated for the task.
- Enter any parameters for the task as needed.
- Click Save and Close.
To Schedule a Task Using Custom Time Parameters:
- Follow Steps 1-5 above.
- Select the Custom radio option button.
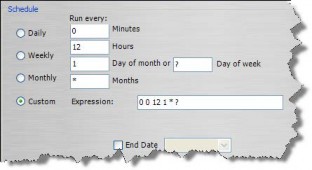
 The string in the Expression text box is a cron (command run on) statement used to schedule the task. Suite Manager will build a statement for you according to the values in the text boxes as described below.
 Editing the value in the Expression text box is advanced functionality and should only be performed by an administrator who is knowledgeable concerning valid cron statements.
 - In the Schedule area, specify the following:
- the number of minutes between runs. Valid entries are 0-59 (and the , - * / special characters). For example, entering “30” means that the task will execute every 30 minutes.
- the number of hours between runs. Valid entries are 0-23 (and the , - * / special characters). For example, entering “2” means that the task will execute every 2 hours.
- the number of the day-of-the month for execution. Valid entries are 1-31 (and the , - * / ? L W special characters). For example, entering “15” means the task will execute on the 15th of every month.
- the number of the day of the week on which the task will run. Valid entries are 1-7 or SUN-SAT (and the , - * ? / L # special characters). For example, entering FRI means that the task will execute every Friday.
- the number of month for execution. Valid entries include 1-12 or JAN-DEC (and the , - * ? / L # special characters). For example, entering “3” means the task will execute in March.
where special characters are defined as follows:
* - used to specify all values. For example, an asterisk in the minute field means every minute.
? - Specifies no value (day-of-month and day-of-week only). For example, a question mark in the day-of-month text box and a “3” in the day-of-week text box indicate the task will execute every Tuesday regardless of the day of the month.
- - Specifies a range of values. For example, entering “10-12” in the Hours text box means the task will execute at 10 p.m., 11 p.m., and 12 p.m.
, - Specifies additional values. For example, entering “MON,WED,FRI” in the day-of-week field means the task will execute on Monday, Wednesday, and Friday.
/ - Specifies increments. For example, entering “0/15” in the Minutes text box means the task will execute every 15 minutes starting at 0 minutes (0, 15, 30, 45). Entering “5/15” in the Minutes text box means the task will execute every 15 minutes starting at 5 minutes (5, 20, 35, 50).
L - Specifies the last day-of-month or day-of-week.
W - Specifies the weekday (Monday-Friday) closest to the given day. For example, entering “15W” means that the task will execute on the weekday closest to the 15th of the month (if the 15th falls on a Sunday for a month, the task will execute on Monday the 16th).
# - Specifies the nth X day of the month. For example, entering “6#3” in the day-of week text box means the third Friday of the month (day 6 = Friday and “#3” = the 3rd one of the month).
![]() Combinations of the various components may be configured. For example, entering 30 minutes and 1 hour means that the task will execute every 1.5 hours. Or, entering “LW” for the day-of-month translates to “last weekday of the month.”
Combinations of the various components may be configured. For example, entering 30 minutes and 1 hour means that the task will execute every 1.5 hours. Or, entering “LW” for the day-of-month translates to “last weekday of the month.”
- Click on the End Date checkbox and select a date for which the schedule will be terminated for the task.
To Configure the XML Mapper Exporter Task:
- In the Parameters area on the Schedule Information dialog box, type the path and name of the file to be used to map information to an XML file.
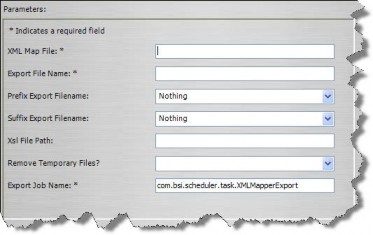
- Type the path and name of the file that will be created with the mapped fields.
- Select an option (such as Date & Time) to be used as a prefix for all exported files, then select an option to be appended to the name of the exported file.
- Type the path and name of the XSL file used to convert the data from XML to another format.
- Select Yes to remove any temporary files that are created during the process.
- Click Save and Close.
To Configure the XML Mapper Importer Task:
- In the Parameters area on the Schedule Information dialog box, type the path and name of the file to be used to interpret information from the import file.
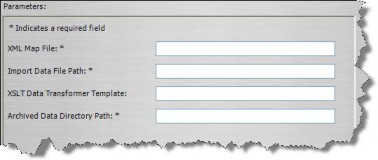
- Type the path to the directory in which the data to be imported resides.
- Type the path and name of the XSL template used to convert the data from the original files into Suite.
- Type the path to the directory where files will be moved after processing (files that were not processed successfully due to errors are designated as such).
- Click Save and Close.

