
Smart Form Lookups
Introduction
The integrum Management System allows users to powerfully integrate existing data sets by importing CSV data from 3rd party database systems for use in smart form lookups.

This guide shows you how to configure integrum in two different ways which give two different methods of accessing your data within the smart form.
Importing CSV Data
The integrum Management System allows you to import data from your other database systems or datasets you have constructed using Excel or even a simple text editor. This allows you to enter data into a smart form from a drop-down lookup that pulls the data imported from CSV based on a specific key field.
The first step is to import your CSV data. To do this you will need administrative rights to access integrum’s main system navigation menus.
- Select ‘Main System Navigation’

- Select ‘Smart Form Builder (New)’

- Select ‘Look up Tables’

- The right-hand pane displays a list of the CSVs that have been imported.

- To import another CSV click ‘New Table’

- Type in a ‘table name’ that matches the import CSV filename.

-
Add columns to mirror the columns in your CSV by clicking on the ‘Add Column’ button.
Note; you must have the columns in the same order that they appear in the CSV and ideally the same order as they appear in the smart form. If you are implementing the method B configuration as specified later in the guide, then your key field must be the first column in the CSV and in your look up.


- Click Save
- Click on your newly created lookup:

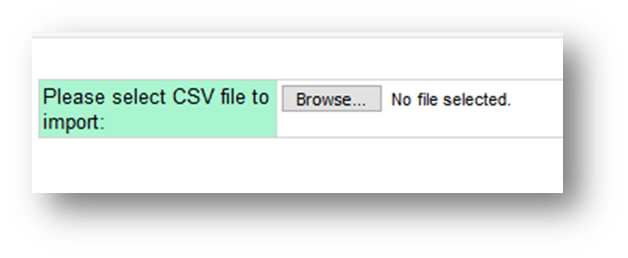
- Click Import:

- Browse and select your CSV file. Once the file has been imported you will receive email notification and the import log will show that the CSV has been imported.
- Import log example below (it is possible to download the import CSV by clicking on the FILE link):

Smart Form Lookup Configuration
Method A
There are two ways that you can enter your imported CSV data into a smart form. Method A requires that each field is dependent on the previous field and the user must manually select each field.
In the screenshot below the contents of the ‘H-Phrase’ dropdown is determined by what the user has selected for the ‘H-Number’.

This method is configured as follows:
- Navigate to ‘Smart Form Builder (New)’ and select ‘Field Library’.

- First configure the parent field as shown in the screen shot below. Field type should be ‘Single Selection’ and option type ‘Imported Look up Tables’. This is the first field in the CSV so there is no ‘Parent Look up Table Field’. Select the look up table from the drop down and specify the ‘Look up Table Column’.

- Next, configure the lookup field that is dependent on the key field. Again the field type should be ‘Single Selection’ and option type ‘Imported Look up Tables’. This field is dependent on the previously created ‘H-Number’ field which is specified as the ‘Parent Look up Table Field’. Specify the ‘Look up Table Column’ that matches with the correct column imported from the CSV.

- The lookup configuration and CSV for this example were as follows:

Method B
With Method B several fields can be populated automatically based on the user’s selection of a key field (the first field in the CSV).
In the screenshot below once the user has selected the ‘SAP Number’ the remaining seven fields are populated.

This method is configured as follows:
- Navigate to ‘Smart Form Builder (New)’ and select ‘Field Library’.

- First configure the parent field as shown in the screen shot below. Field type should be ‘Single Selection’ and option type ‘Look up’. The ‘Lookup View’ is the name of your lookup table. This is the key field and first field in the CSV so the ‘Lookup Column’ is 1. Type in a ‘Link Group ID’ this can be anything you choose but it must be common across this field and the others that are going to be automatically populated.

-
Configure the remaining fields as in the graphic below. The field type should be text. The ‘Link Group ID’ must match that specified for the key field (see above). The ‘Link UP View’ is the name of the lookup table. The ‘Map Field Name’ is the column position in the CSV.
Note: the column positions are COL_0, COL_1, COL_2… so the second column is COL_1
Create and configure the remaining fields remembering to use the same ‘Link Group ID’ for each field.

- The lookup configuration and CSV for this example were as follows:
