
INSZoom - Broadcast Messaging
Send important messages to prospects, clients, and corporate case managers using the Broadcast Message tool
Introduction
Broadcast messaging is a mass communication tool. It can be used to:
- On-board multiple users at once
- On-board a corporation customer and all its users, foreign nationals
- Notify former and current clients of document expiration or priority dates
- Reach out to prospects regarding your services, updates
- Reach out to former current and clients regarding new government regulations that may impact their status
- Send the communication to specific or targeted users
Features
- Robust recipient list filtering
- Filtering the recipient list by case type, such as "All open, active H1B case corporations" or "All open H1B and Green Card case clients"
- Filtering the recipient list by company, date, or group, such as "Staff Members at X Corporation" or "Active Individuals with X Priority Date" or "Closed Individuals with X Expiration Date"
- Uploading a contact list to target specific audiences, such as "New Foreign National Access to the FN Portal"
- Scheduling messages to send at future dates or intervals
- Improved message tracking, including viewed rate, failure to send, etc.
- Advanced features such as HTML, using images and hyperlinks
- The ability to select multiple petition types and multiple corporations when filtering
- Auto-archiving sent messages older than 6 months
- Filtering archived records by Last 1, 3 & 6 months
How can I access the Broadcast message feature?
To access the broadcast module:
- Mouse-over Setup and select Settings

- Under Section 4. Tools, select Organization Tools

- Under Section 3. Broadcast, select Broadcast Messages

- The Broadcast interface will open in a new tab.

The default view is All Messages. Users may use the drop-down to see messages by status:
- Sent
- Draft
- Scheduled
- Archived
- Failed - messages that were created and launched but failed to send to all recipients
How to get started?
There are three components to use this feature:
- Selecting your Recipients
- Creating a message
- Scheduling the broadcast
Users should define and create each component prior to setting it up in the broadcast module.

1. Creating a recipient list
There are two methods for creating a recipient list in the broadcast module; users may create a list from a report or use the tool presented in the broadcast module.
Creating a recipient list from a report

Users with access to the Reports module may create a list by running a report. In order to use the data from reports, however, the data must be converted into the proper format for the broadcast template.

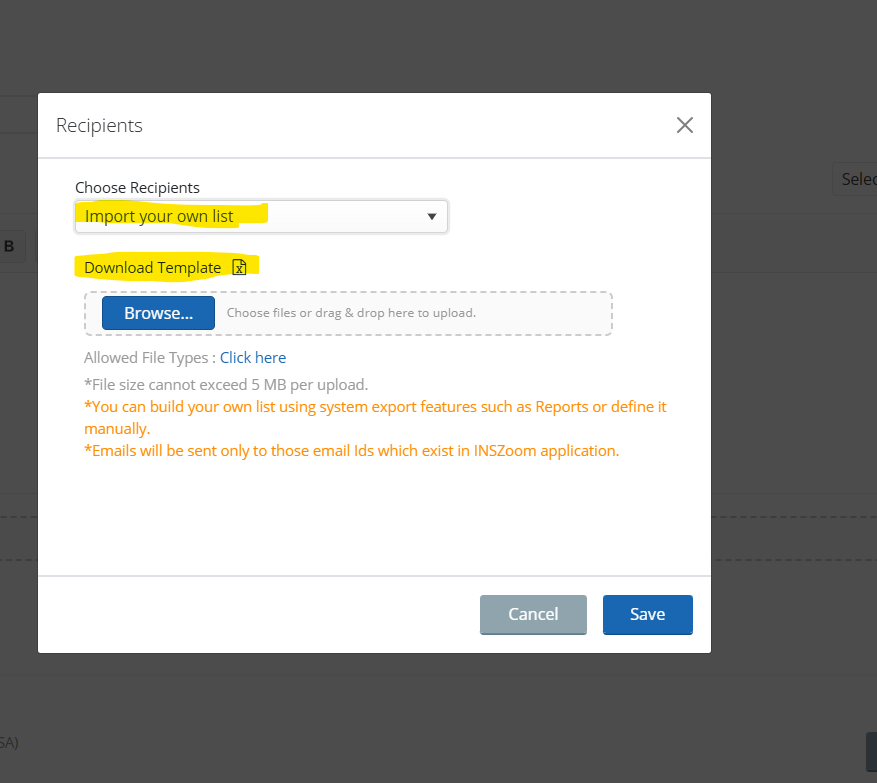
To download the template:
- Select New Message
- In the Choose Recipients drop-down, select Import your own list
- In the pop-up, click the Download Template icon
Save the template to your computer.
Next, run the report. It is vital that the report you select contains an email address field. The Super Admin may need to create an Ad Hoc report for non—admin users.
For this example, I selected the US Document Expiration report.
- Select the report from the menu.
- Filter the report for your intended audience.
- Click the Export File button.
- Click the Download to Excel file link.
- Open the file.
- Copy the email addresses from the report and paste them into the template.
- The template can only hold the email address; no other column headers or other data should be included.
- Save the template with the email addresses to your computer.
- Returning to the Choose the Recipient’s field in your broadcast message.
- Select Import your own list from the drop-down.
- Click Browse to upload your template, then click Save.

Creating a recipient list using the broadcast module filter
- To create a list using the Broadcast Recipient tool, follow the below steps:
- From the main dashboard, click New Message.
- Click on the drop-down menu under Choose Recipients.
- In the first field, use the drop-down to select from:
- All Contacts
- All foreign nationals for a specific petition
- Specific Corporation
- Import your own list (use if you created a list in Reports)
- Next, select the next level of filtering:
- All corporate users
- All Corporation Foreign Nationals
- All individual Foreign Nationals
- Prospective corporations (additionally by conversion possibility status – High, Medium, Low, All)
- Prospective clients (additionally by conversion possibility status – High, Medium, Low, All)
- By Contact status:
- active
- inactive
- both
- Click Save.
- A link to a list of recipients will render.


2. Creating a new broadcast message
Next, you will enter a subject into the subject field.
Create your message. Users may create a new message manually, upload a message from their computer or use a message template from the drop-down menu. You may choose from Firm-defined or Zoom-defined email templates.
Note: Email templates are loaded into the Knowledge Base by the Super Admin.
The drop-down menu also includes the Login ID message template; this is a predefined message used to send a link for new INSZoom users to login and create their password. This could also be used when on-boarding a new corporate client with multiple Corporate users (Enterprise only).
To manually create a message, enter your content into the message field and then format as desired. Use the browse button to attach a document if needed.
3. Scheduling the broadcast
Once you’ve created your message and validated your recipients, users may send the message, save it as a draft or schedule it to be sent in the future.
Send the message immediately
To send the message immediately schedule it for the current date. Users may choose 1-hour increments. The time must be scheduled after the actual current time. For example, if it is 3 pm, the broadcast must be scheduled after that time. Click Schedule.
Scheduling the message
To schedule the message for delivery in the future, enter a date and the time in the respective fields. Click Schedule

4. Edit a Broadcast Message
Navigation: Setup>Settings>Organization Tools>Broadcast>Edit
Any Broadcast that is in "scheduled" status may be edited.
- Click Edit next to the message.
- Make any changes to the message, attachments, dates, recipients, or schedule, then click Save.

5. Create a Broadcast Message Template
To create a template for a broadcast email, go to New Message in the Broadcast workspace.
- Click New Message.
- Create your message.
- Select the Save Draft drop-down and choose to Save as Email Template

The template will become available immediately using the template drop-down.
- Click the View All Templates drop-down arrow .
- Select View All templates.

- Use the search tool to search for the subject line of the template.
- Click the template name to insert it into the message box.

Broadcast Message Management
Review Status
The status of each broadcast is listed in the default view of the Broadcast Messages page. Users may filter for a specific status using the drop-down menu above the list of messages.

View Logs
Once you have sent a broadcast, you'll probably want to know the success/failure rate. To view the logs:
- Select View Logs under the Actions column
- Open the downloaded CSV file