INSZoom - Receipt Management 3.0
Module Availability

Receipt Management 3.0
An all-new way of adding and managing Case Receipts. This will replace the existing Receipts page with a new design and enable case managers to add more details to the Receipt Notices. Currently, Receipt Management 3.0 is available for USA applications only.
New Features and Workflows
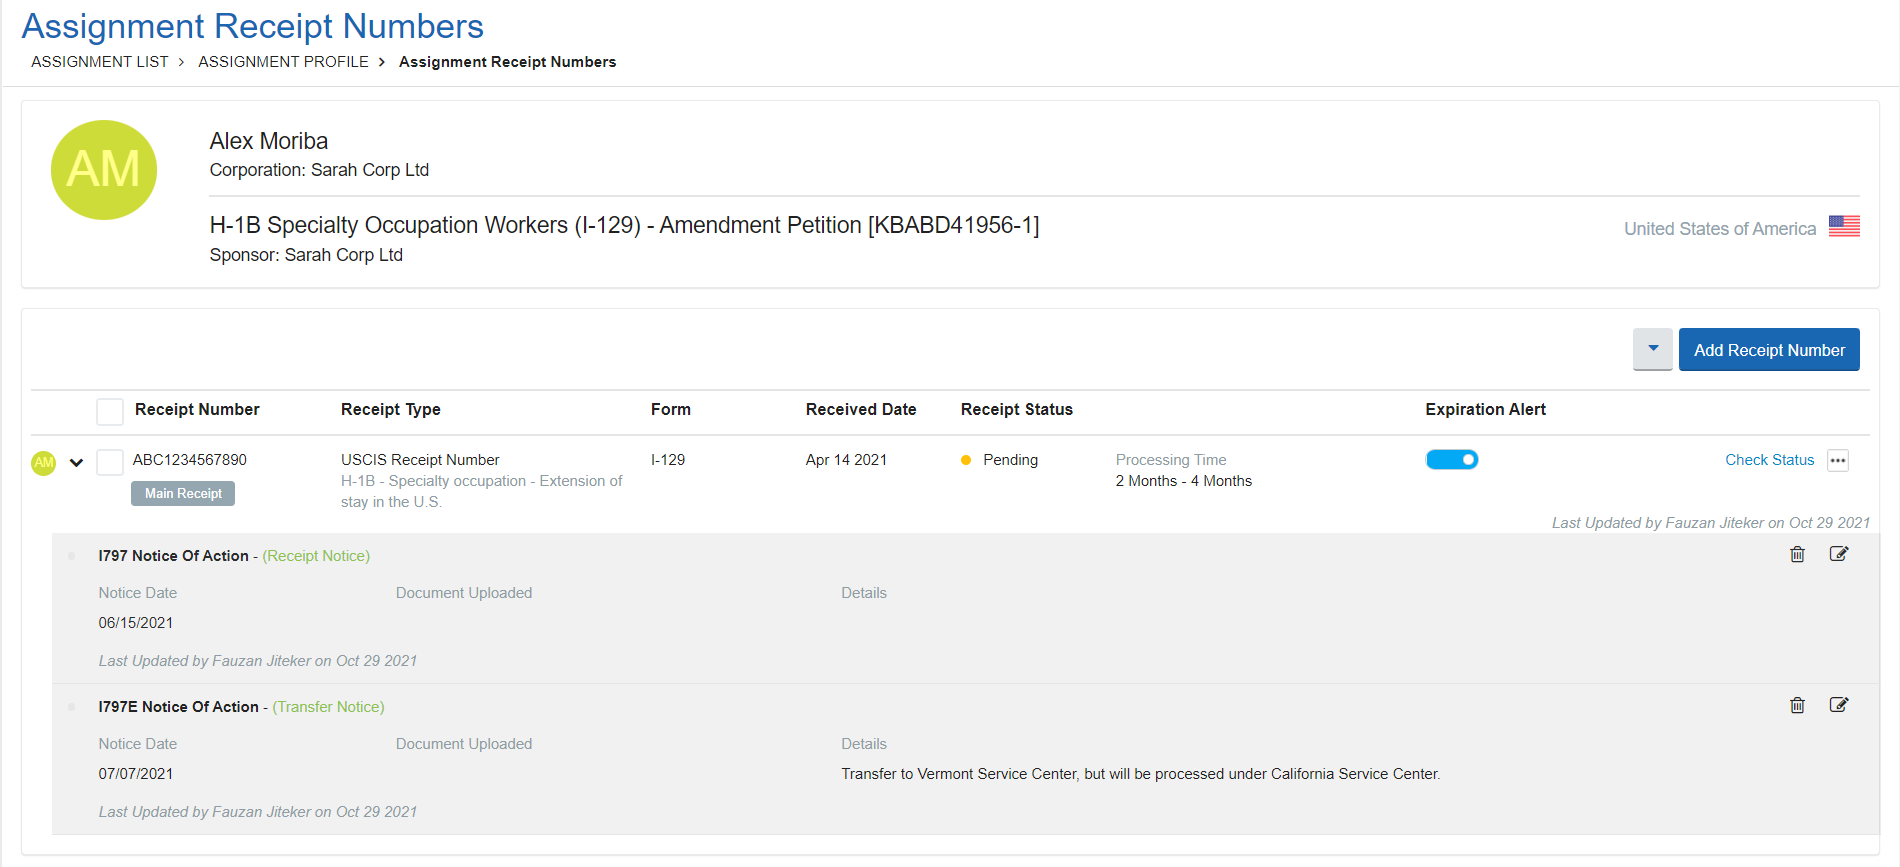
- Multiple Receipt Notices - Stay organized with multiple Notices against a single Receipt Number.
- Upload Receipt Notice documents - Upload scanned Notices directly attaching them to the Receipt.
- New fields for tracking - Case Type, Notice Document, Basis for Filing, Section/Class are included for detailed tracking.
- Easy access to Processing Times - Get direct access to processing time, as per the latest 'USCIS Processing Times' webpage.
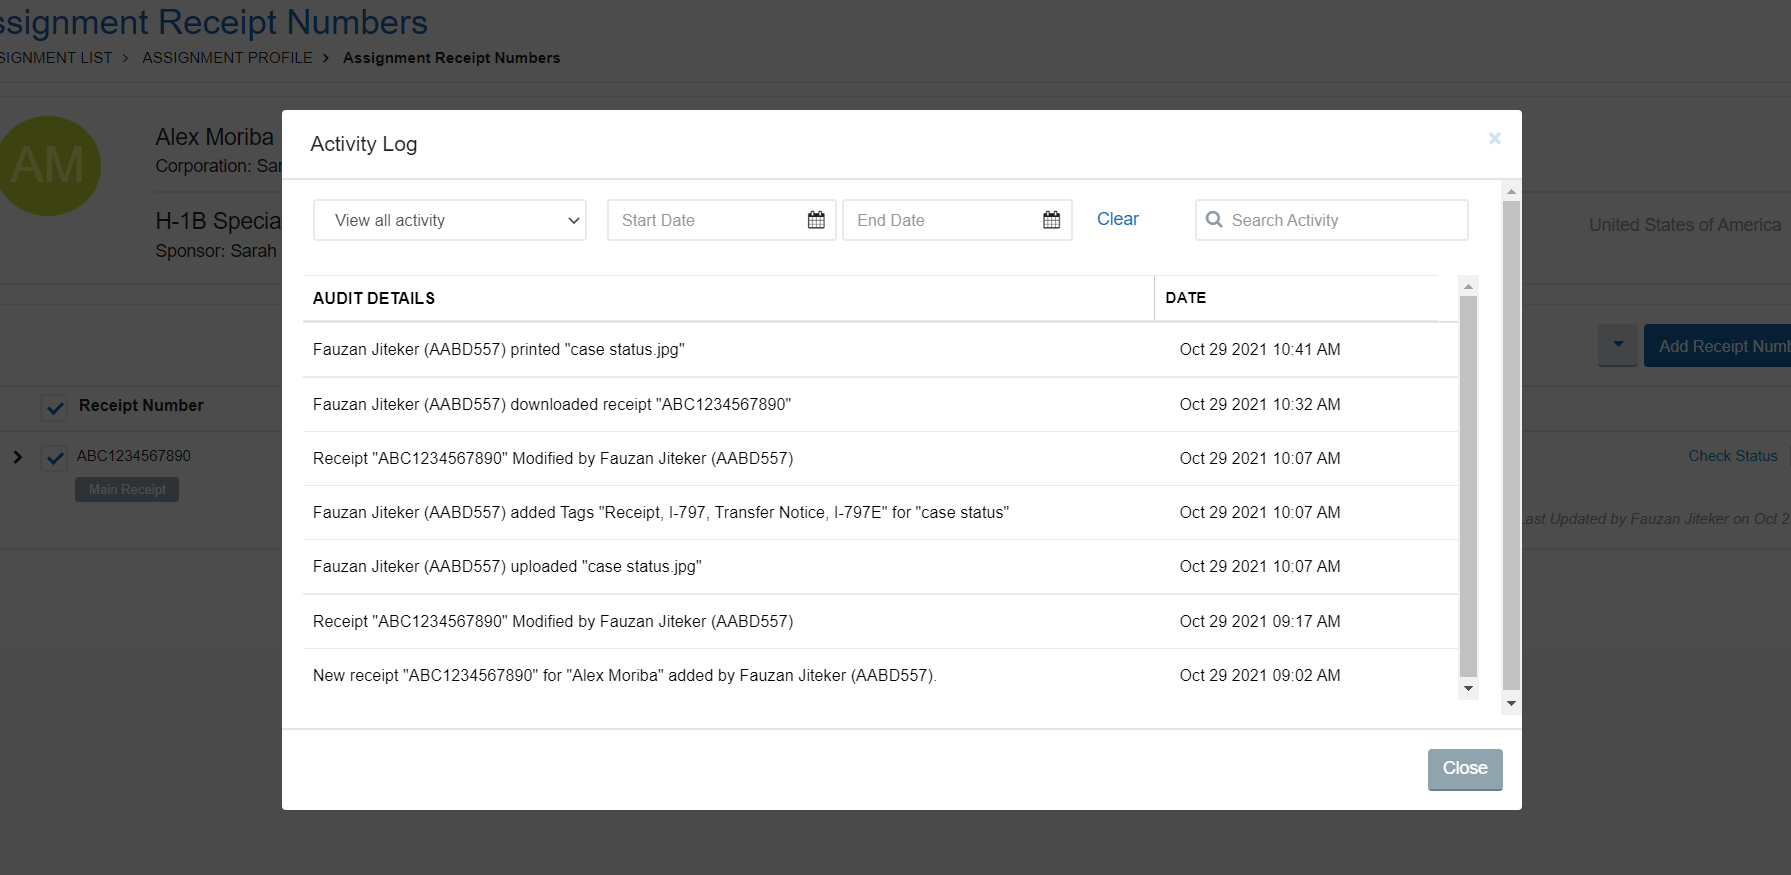
- Activity Log - Managing the Who, What, and When for the Receipt’s operational transactions.
- Simple Form tagging - Tag related Forms to the receipt using a modern interface.
- Expiration Alert setting - Easily turn On/Off the Receipt expiration date alerts from the list view.
- Become Zoomee Ready - An intelligent robotics process automation RPA bot that makes use of the new features of Receipt Management 3.0. Learn more about 'Zoomee'.
Getting Started with Receipt Management 3.0
INSZoom will start switching the existing users to the new Receipt Management module phase-wise. You will be notified before the switch. The Receipt Management 3.0 will replace the existing Receipts module, and you can access it via the left menu option 'Receipt Numbers' at Case-level.
Note: Receipt Management 3.0 is set to open in a new tab.
Receipt Management 3.0 Interface
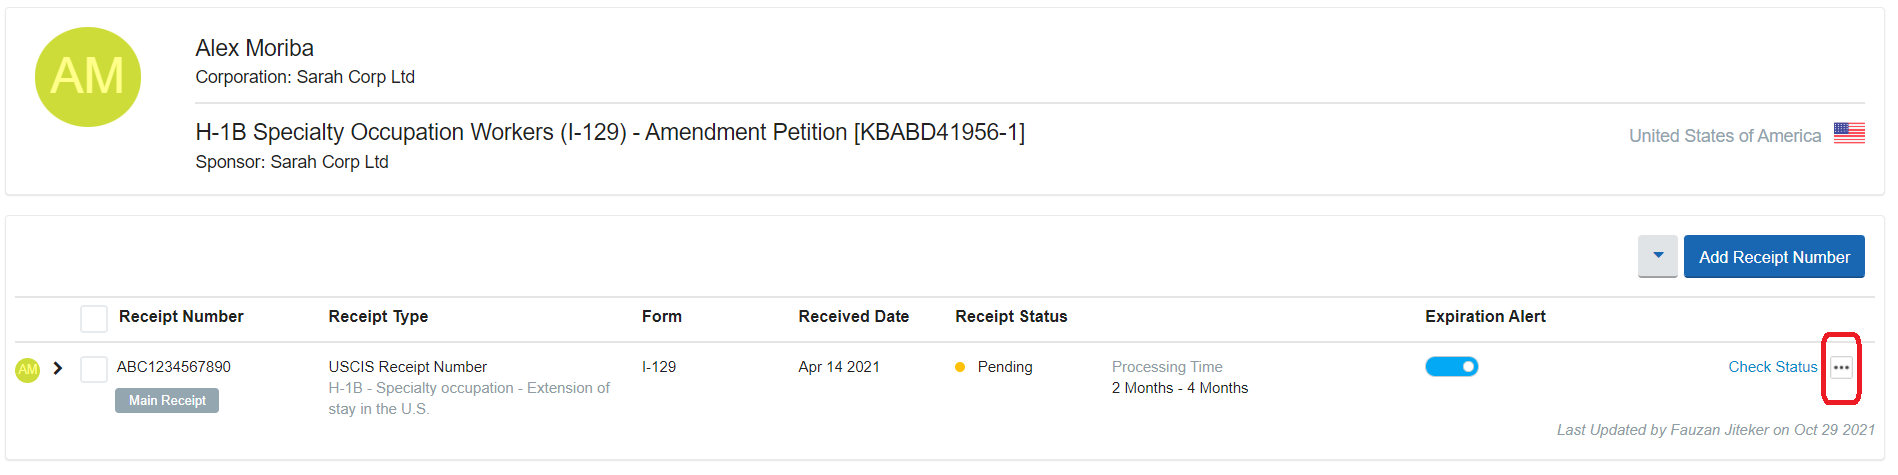
The Receipts Management 3.0 lists different Receipt Numbers and each Receipt Number nests multiple Notices. This design helps in staying organized with all Notices received against the same Receipt Number.
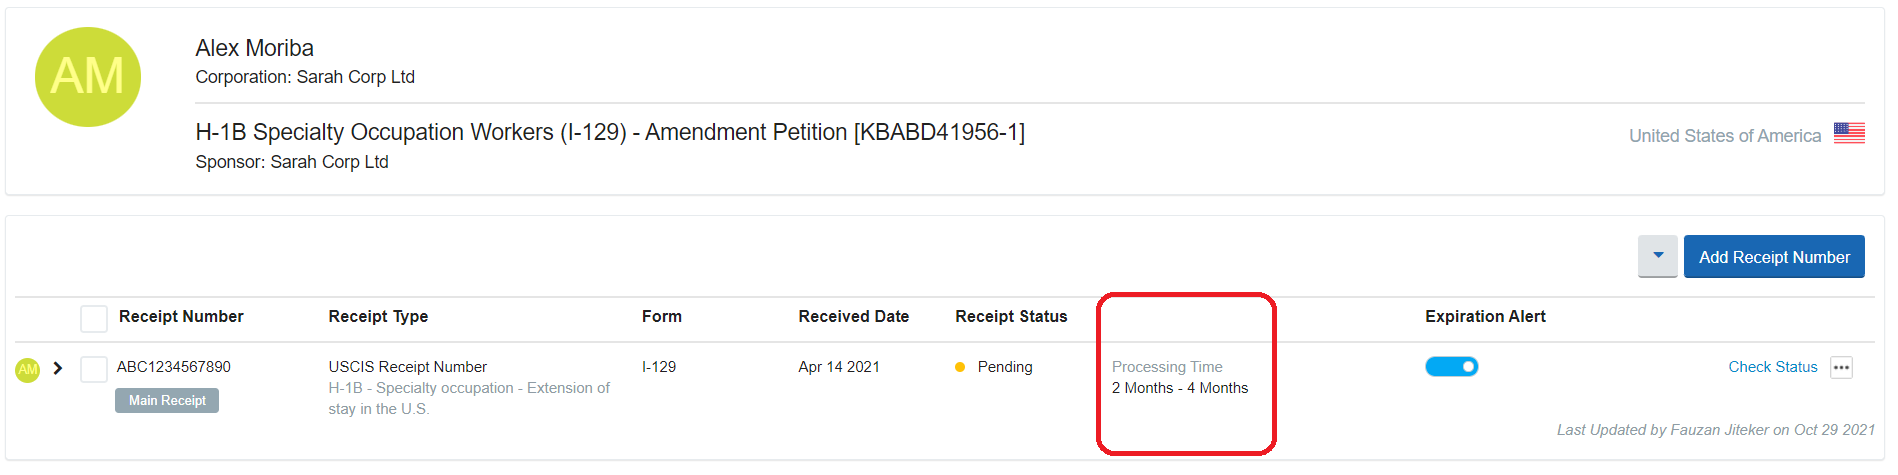
Upon clicking the Receipt Numbers left menu, you will land on the Case Receipt List screen. This screen will list out all the Receipt Numbers for the case indicating Receipt Type, the linked Forms, Received Date, Status, Processing Time (if any), and Expiration Toggle (On/Off).
You can expand each of the Receipt Numbers to show the different Notices that were received against the Receipt Number. To view details of any of the Receipt/Notice, click on the Receipt Number and a new screen will pop up. Here, all details of the Receipt and their respective Notices will be available to view and edit. The Receipt Notices can be found below the Receipt Details box. You can add as many Notices as are applicable.
Status and workflow for Receipts
Receipt Status
Receipt Statuses are now easier to maintain. They are automatically updated upon the addition of Notices.
For example: If you add an 'Approval Notice' to the Receipt, then the Receipt Status is marked as Approved.
To understand how different Notice types affect the Receipt status, refer to the following table.
| Adding this Notice Type will... | update the Receipt Status to... |
| Receipt Notice | Pending |
| Premium Processing Receipt Notice | Pending |
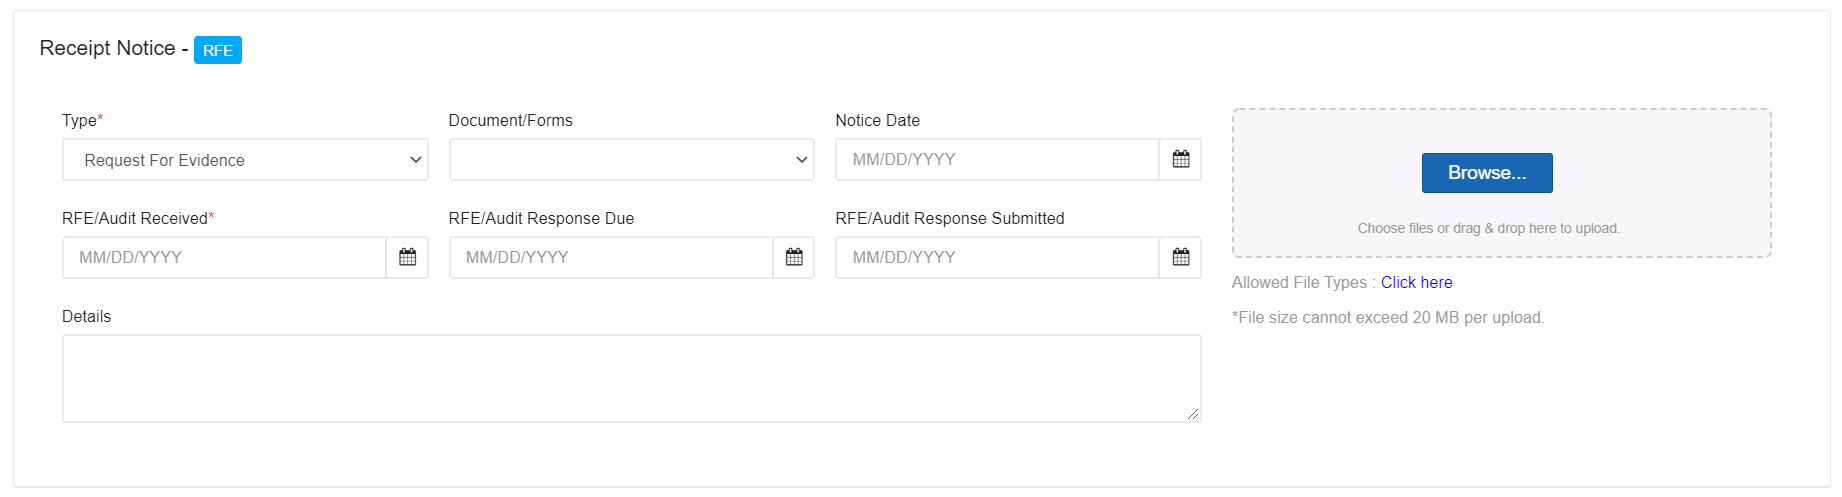
| Request For Evidence | RFE |
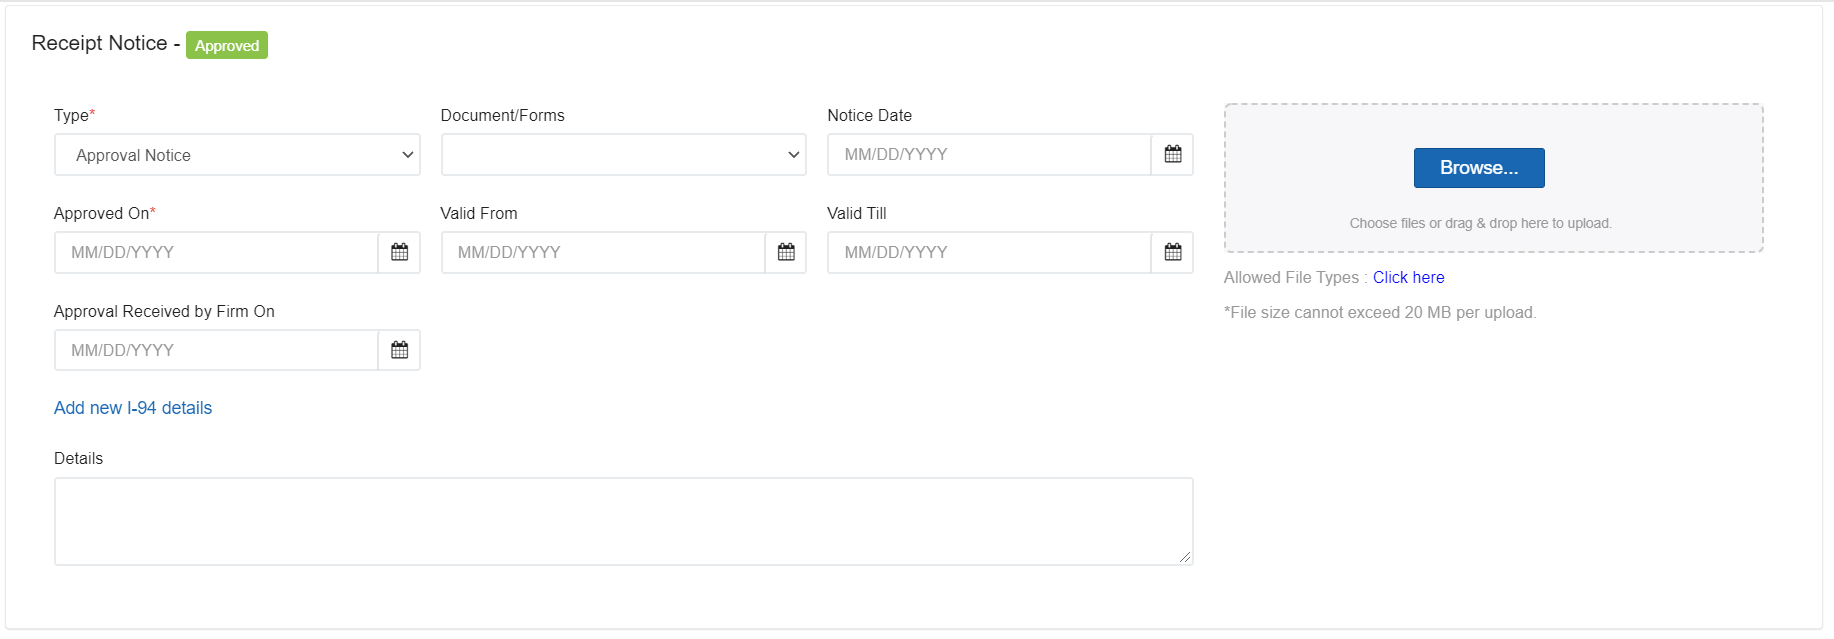
| Approval Notice | Approved |
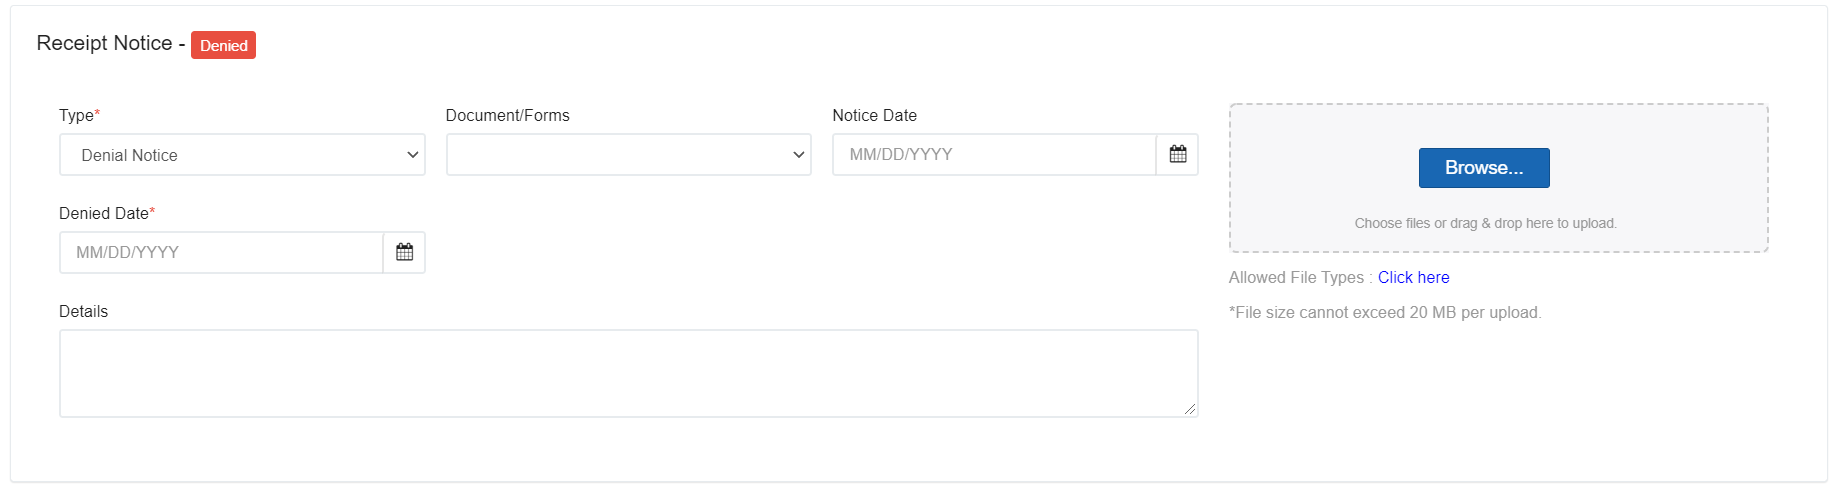
| Denial Notice | Denied |
| Transfer Notice | Pending |
| ASC Appointment Notice | Pending |
| Biometrics Notice | Pending |
| Other | Pending |
| Withdrawn Notice | Withdrawn |
Note: Click on the 'Save' button to ensure the Receipt Status is updated with the new Notice added.
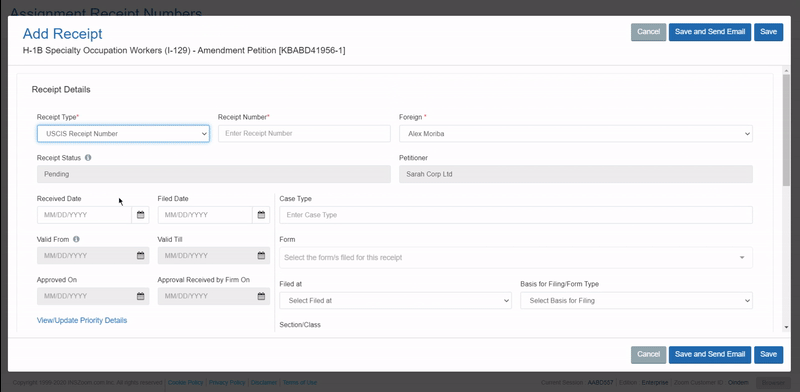
Add a new Receipt
To add a new Receipt, start by clicking the 'Add Receipt Number' option on the left.
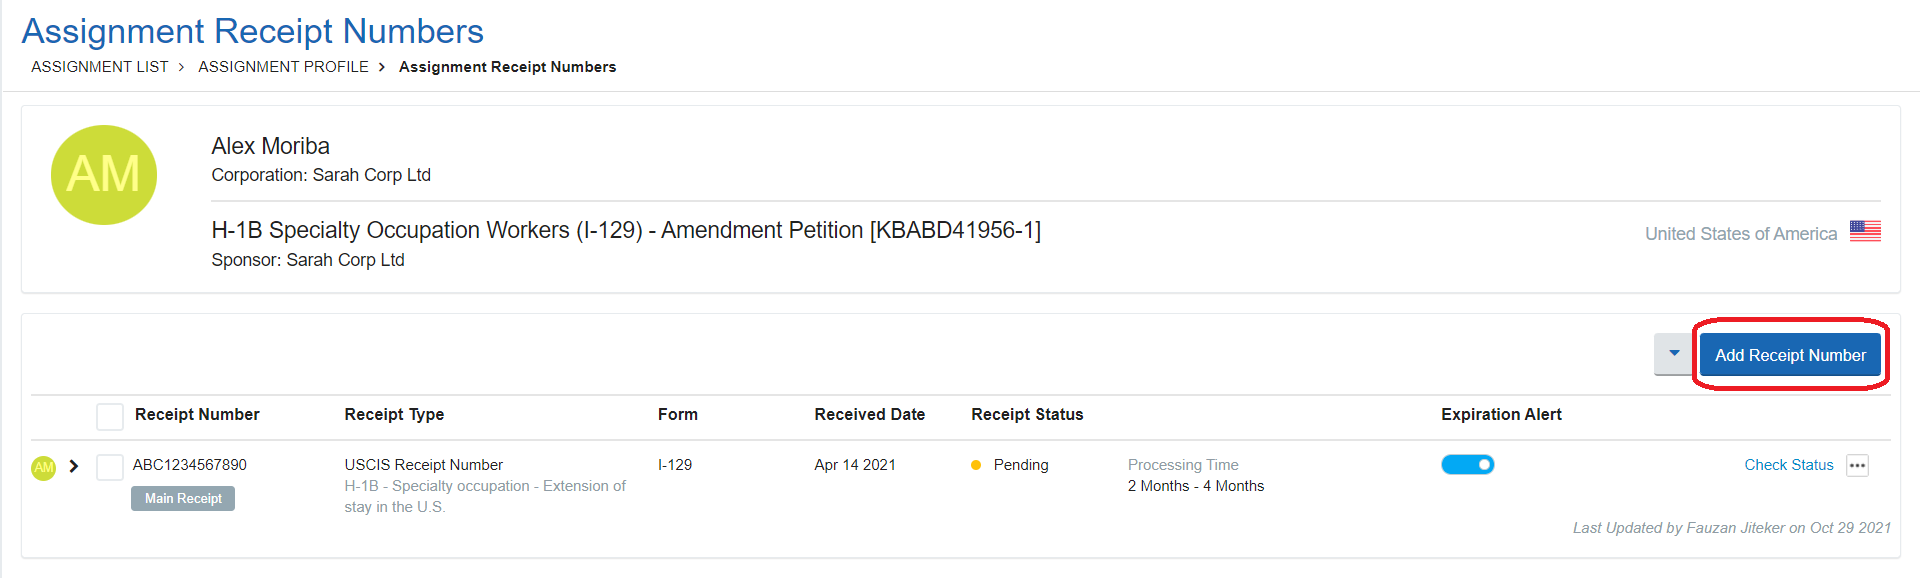
On the pop-up screen, select the Receipt Type, input the Receipt Number.
Select the correct Foreign national from the dropdown.
Proceed to add other relevant details from the Receipt Notice received.
The Receipt Details and Notice were designed keeping the actual USA Immigration Receipts in mind, where all the important details from the receipts can be copied into the Receipt Management 3.0.
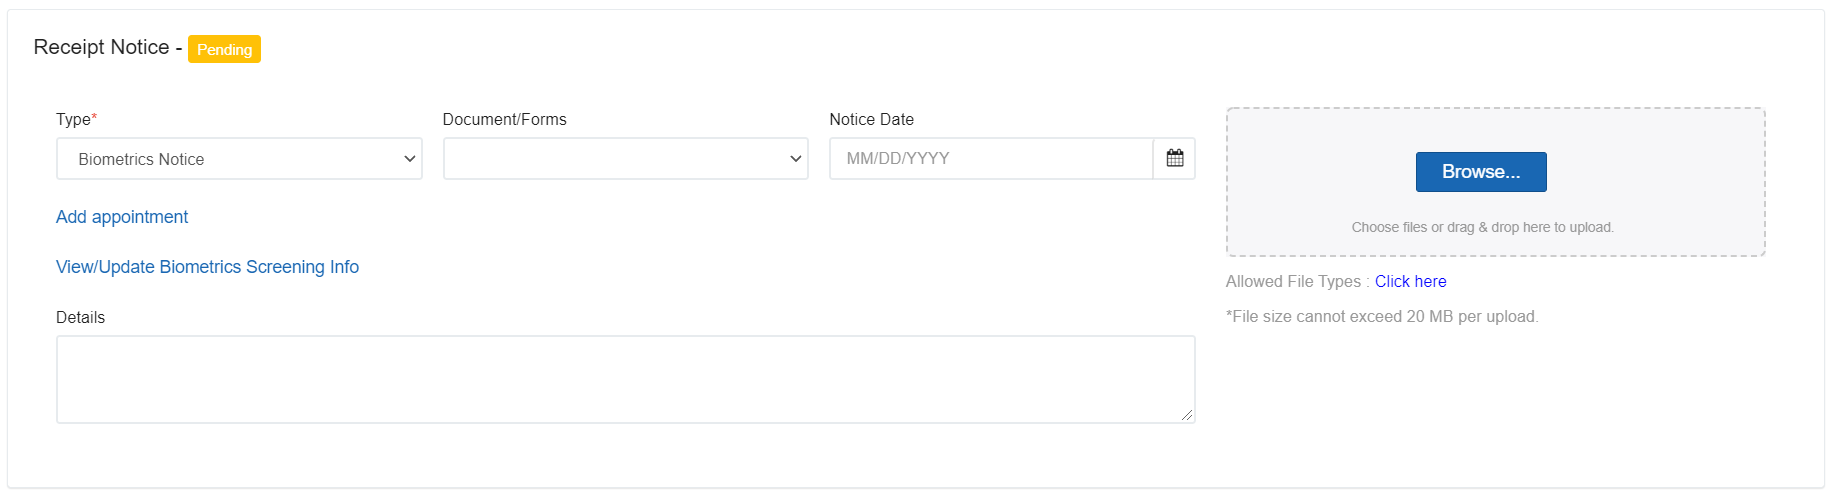
Uploading Scanned Receipt Notices:
Receipt Management 3.0 also allows uploading the scanned copy of Notices directly into the Receipt Management 3.0, by dragging & dropping files into the upload area, or by choosing files from the desktop using the Browse option.
All uploaded Receipt Notices are stored under the Documents/Doc Checklist page for the Case. The Notice documents are also automatically tagged with relevant values and can be accessed easily by FN and other stakeholders as per defined access.
Notice Types
Receipt Management 3.0 supports different Notices. Some of these notices have special details respective to only those notices. Below, are such Notice Types, with instructions on their specific fields.
1. RFE Receipt Notice:
For RFE Receipt Notices, you can add specific details such as the RFE/Audit Received, RFE/Audit Response Due, and RFE/Audit Response Submitted. The fields for these details will show only when Notice Type is selected as Request for Evidence. Updating the Notice as RFE will also update the Receipt Status as RFE, as mentioned here.
2. Approval Notice:
When Notice Type is selected as Approval Notice, the specific details such as Approved On, Valid From, Valid Till, and Approval Received By Firm On, can be entered on the respective fields. When adding an Approval Notice, the Receipt Status will be updated as Approved, as mentioned here. You may also record the I-94 details from the Approval Notice directly to the FN record.
3. Denial Notice:
Selecting the Denial Notice will show one specific field 'Denial Date'. Also, this will update the Receipt Status to Denied, as mentioned here.
4. ASC Appointment Notice and Biometrics Notice:
When adding Notices with Type as 'ASC Appointment Notice' or 'Biometrics Notice', you will be provided with links to add/schedule appointments as well as the Biometric Screening Info directly to the Foreign national record (FN > US Immigration Info).
5. Withdrawn Notice:
Selecting the Withdrawn Notice will show one specific field, 'Withdrawn Date'. Also, this will update the Receipt Status to Withdrawn, as mentioned here.

Once all the details are updated, click Save to save the details and go back to the list page. Alternatively, you can click on Save and Send Email to start drafting the email for the FN/Corp User to notify them of any new Notice document received.
USCIS Processing Times
Receipt Management 3.0 makes it easier to access the Case Processing Times directly from the Receipts list page. Processing Times uses the values such as Receipt Received Date, Form ID, and Basis for filing. And matches them with the USCIS Check Case Processing Times page. On the Receipt List page, you can see it shows the range for the Processing Time as given under USCIS Check Case Processing Time webpage.
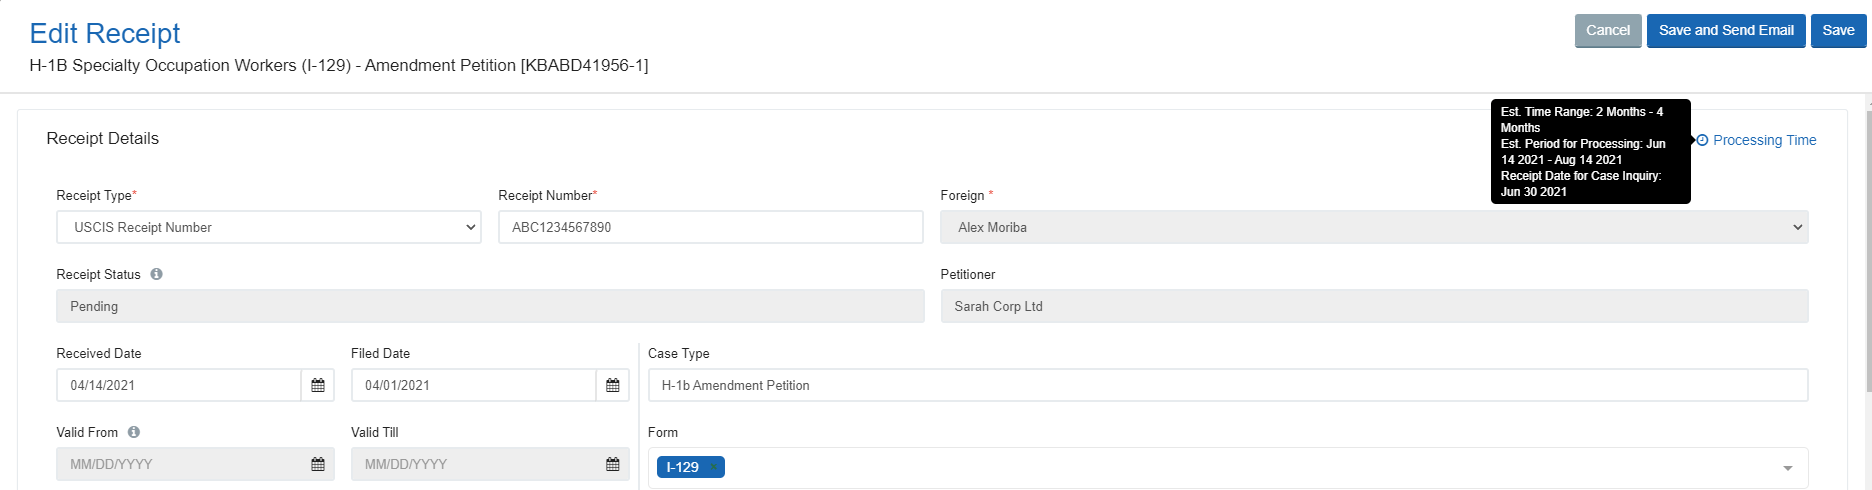
On the Receipt Edit page, upon hovering the Processing Time, it will show the following details:
- Estimated Processing Time range: This value is directly taken from USCIS Check Case Processing Time webpage.
- Estimated Period for Processing: This value is calculated as per the information given by USCIS Check Case Processing Time webpage.
- Receipt Date for Case Inquiry: This value is directly taken from USCIS Check Case Processing Time webpage.
Note: 'Processing Times' will no longer be available as a separate left-menu option, instead it will be fully integrated with Receipt Management 3.0.
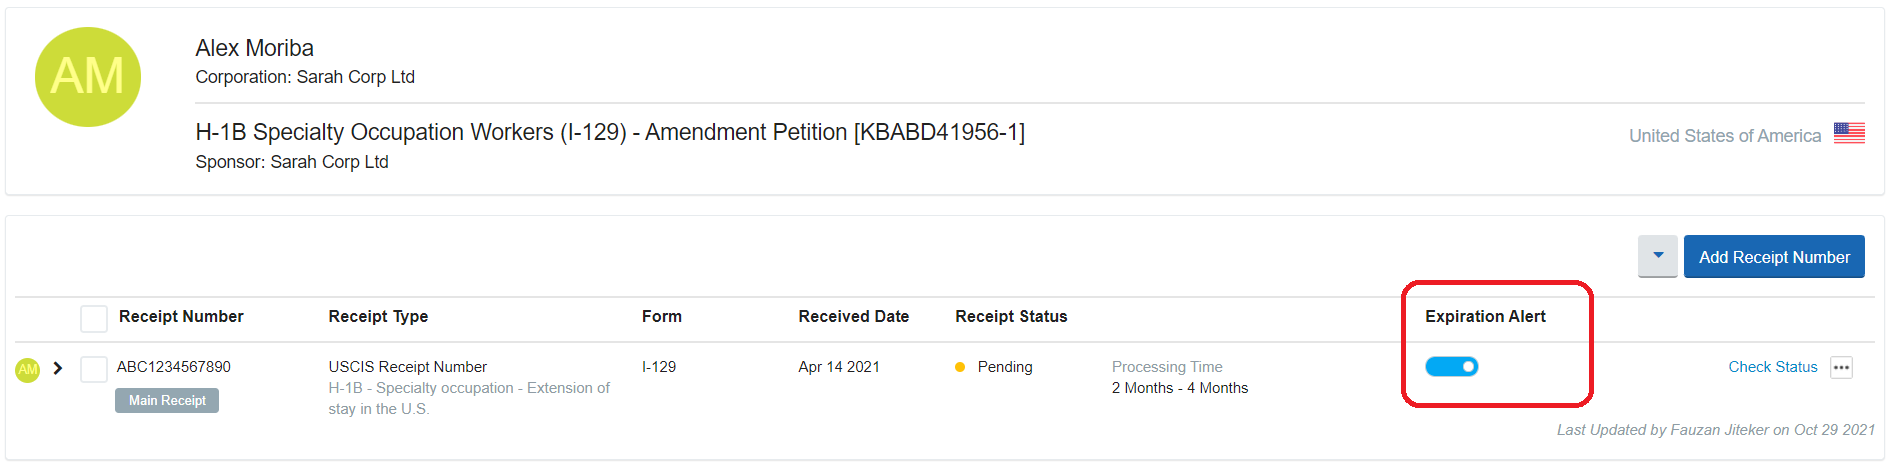
Expiration Alert Toggle
To notify the case managers of Receipt validity nearing its expiration, turn on the Expiration Alert Toggle. This uses the same setting as defined under My Settings > Document Expirations.
Check Status
You can check the Case status by clicking on the Check Status option on the right of the Receipt on the list page. This option will now automatically retrieve the case status from the USCIS website(Case Status Online - Case Status Search (uscis.gov)) using the respective Receipt number and display the status on the same screen.


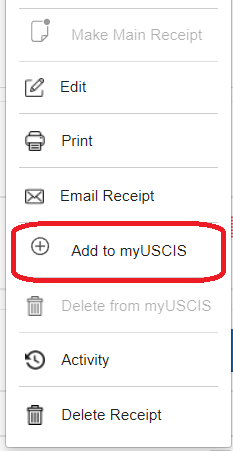
Add to myUSCIS
Add to myUSCIS uses the e-filing desktop add-on to log on to the myUSCIS portal and update the Receipt details. This option is available within the three-dot menu on the right of the Receipt on the list page.
Main Receipt
The Main Receipt is a feature that allows the Case Status and Case validity to be updated automatically when a Receipt marked as 'Main Receipt' is updated. Just in the previous Receipts module, only one Receipt can be marked as 'Main Receipt' at a time. And the first Receipt added to the Case will always be marked as 'Main Receipt' by default.
Other Actions
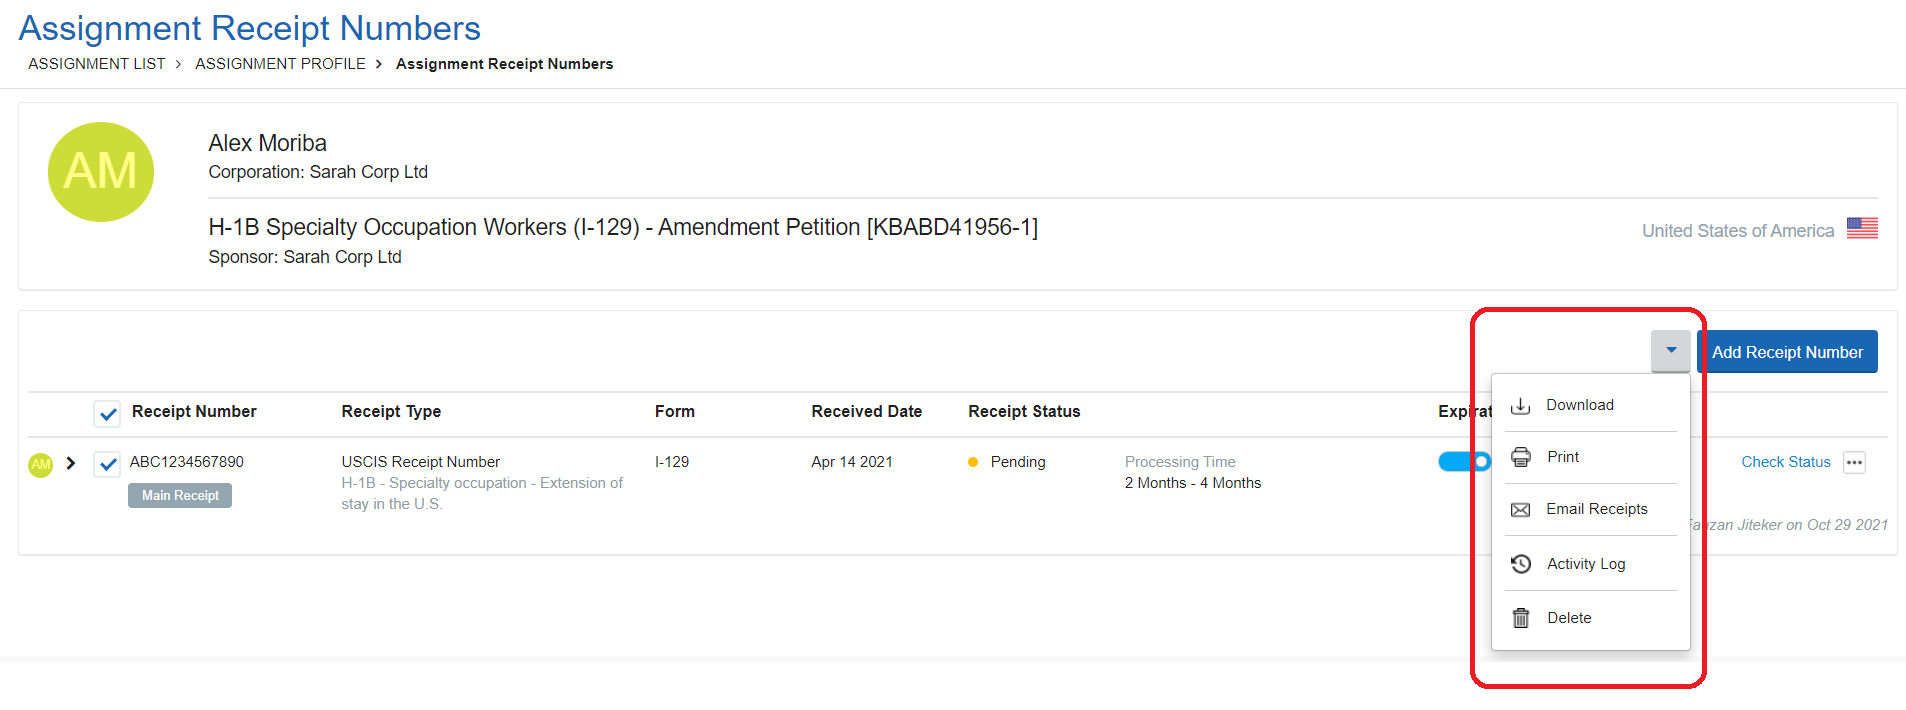
Receipt Management 3.0 nests other actions for the Receipts under the down arrow next to the 'Add Receipt Number'. The actions included are Download, Print, Email Receipts, Activity Log, and Delete.
- Download: To download the attached Receipt Notice documents.
- Print: To print the attached Receipt Notice documents.
- Email Receipts: To email the Receipt Notice along with Receipt details to a stakeholder (Foreign National/Vendor/Corp User).
- Activity Log: To view the history of edits/operational transactions.
- Delete: To delete the Receipt from the Case.