
Performing A Search
When Searching Client is started, you are either presented with a Default Search Template or with a list of all available Search Templates.
Default Template
If, when you open the Searching Client, a Search Template is also opened, it has previously been set as the Default Search Template.
If you want to initiate a search using this Default Search Template, follow the Standard Searching procedure described below.
If you do not want to initiate a search using this Default Search Template, click on the default Search Template's name (which is displayed under the template's open tab) and select the required Search Template.
Standard Search
A standard search is initiated by opening a Search Template, displayed under the Search Templates (or Favourites) heading, by double-clicking it.
To start a search, you must enter at least one search parameter. If required, administrators can select, design and assign different search result views to suit each Search Template's results. For more information about this option, see “Search Results Tab”.
You can alphabetically sort the Search Templates list (A to Z, or Z to A) by clicking on the Search Templates or Favourites heading.
The following search methods are described below:
- Direct Input Searching
- Picklist Searching
- Date and Time Searching
When you have entered all the required information, see:
Direct Input
Type in the values you need to find, directly into the Search Template's text boxes. (Invalid entries will be displayed in red.)
To select search values from a Picklist or Calendar, follow the appropriate search procedure detailed below.
Picklist
A Picklist is generated from the Indexed values of the fields. For example, if the Index field Author were used to Index five documents with values Mark, John, James, Sally and Fred, the Picklist would display all five names.
- Click the required field's drop-down list arrow and, from the displayed list, select Pick Value.
- From the newly displayed Picklist Results window, choose a value for the search.

- To enter a single value in the search field, either select it from the Picklist and click OK or Double-click the selected item in the Picklist.
- To enter multiple values in the search field, do one of the following:
- To select a consecutive list: click on the first value, hold down the keyboard’s Shift key, then click on the last value.
- To select a non-consecutive list: click on the first value, hold down the keyboard’s Ctrl key, then click on each additional value you require.
To filter the Picklist, click Filter Results and, in the Search text box, type in part or all of the required value.
- Click OK to confirm the selection.
When you select multiple values from the Picklist, for example: A, B, C, etc., the search text box will display A [OR] B [OR] C, etc. These [OR] values are actually "Logical ORs". The actual search will retrieve all records containing any one of the selected values, i.e. in this example it broadens the search to return all field values equal to A or B or C, etc.
Conversely, a search displaying A [AND] B [AND] C will only retrieve records containing all of the selected values, i.e. in this example it narrows the search.
When a value in double-quotes is selected, two more sets of double-quotes are added around the double-quotes when the item is added to the search field. This is explained fully in “Using Double-Quotes in Search Strings”.
Export Picklist Values
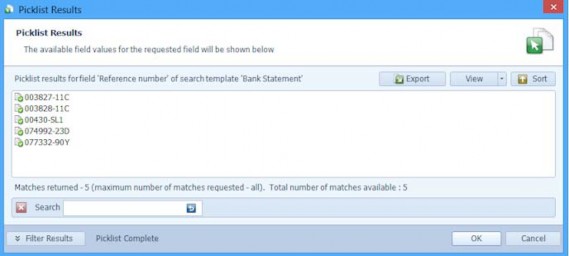
The Picklist Results window shows the name of the field the picklist values are for and the name of the selected Search Template.
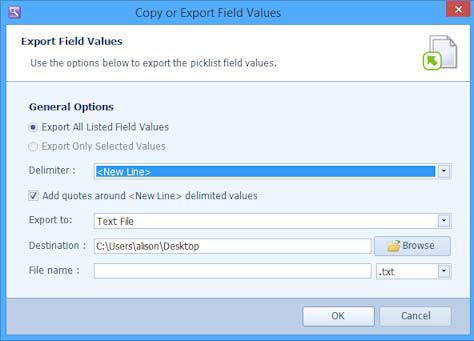
Click Export to export the values displayed in the picklist window. The Copy or Export Field Values window is displayed.
When picklist values are exported
- All pick list values are put inside double quotes. For example, exporting 003827-11C adds “003827-11C” to the export file.
- If the value you are exporting contains a double quote character, it is doubled up. For example, 003827-11C "reference" number adds “003827-11C ""reference"" number" to the export file and "reference" adds “””reference””” to the export file. This is explained fully in “Using Double-Quotes in Search Strings”.
- The export window, when started using the Export button, remembers your last used settings, although File name is always reset to blank.
- You can automatically open the export screen by selecting values from the Picklist Results window and pressing Ctrl+C on the keyboard to open the Copy or Export Field Values window with Clipboard selected as the Destination.
The Copy Or Export Field Values window is described in Table 197.
Table 197. Terminology: Copy Or Export Field Values
|
Term |
Meaning |
||
|---|---|---|---|
|
Export All Listed Values |
When no values are selected in the picklist window, only Export All Listed Values is available. This option exports all the values in the picklist results window. |
||
|
Export Only Selected Values |
When one or more picklist values are selected in the picklist results window, the option Export Only Selected Values is available. Select this option to export the selected picklist values only. |
||
|
Delimiter |
Select how the picklist values will be separated. That is, the character that will be inserted between each picklist value.
|
||
|
Add quotes around |
Quotes are added around all exported values. However, when <New Line> is selected as the delimiter, you can clear the option Add quotes around <New Line> delimited values to remove the quotes from around each value exported with the <New Line> delimiter.
|
||
|
Export to |
Select whether you want the values exported to the Clipboard or to a file. Clipboard – the values can then be pasted in to a file. The remaining options are unavailable when Clipboard is selected. Text File – the values are exported to a text file. |
||
|
Destination |
Click browse to navigate to the destination folder. When you have selected the folder you want the file to be stored in, click OK. |
||
|
File name |
Enter the name of the file the picklist values will be exported to. The file is given the extension .txt. |
||
|
OK |
Click OK to export the picklist values. When the picklist values are exported to a file, the file is opened. |
||
|
Cancel |
Click Cancel to close the window without exporting the picklist values. |
View Picklist Values
Click View to change how the picklist values are displayed. The values are displayed as a Large Icon, Small Icon or in a List.
Sort Picklist Values
Click Sort to change the order in which the picklist values are displayed. The values are sorted alphabetically. Click Sort again to reverse the sort order.
Filter Picklist Values
Click Filter Results.
A Search box is displayed. Enter the filter you want to apply. The filter is applied to the start of the values. For example, the reference numbers displayed above could be filtered by those starting with 00. Enter the filter text in the Search box. Do not press enter. As you enter text in the Search box, the results are filtered.
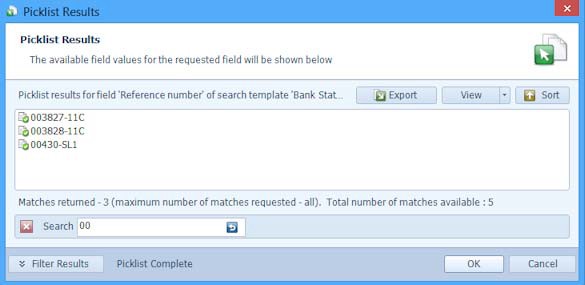
This example shows just three values start with 00.
When the Export button is used after picklist values are filtered, only the filtered values are exported.
Date and Time
- On a Date and Time field, do one of the following:
- Click the required field's drop-down list arrow and, from the displayed list, select Date Range.
- Click the field's calendar button, displayed on the field's right-hand side.
- From the Date Picker, select a Date and also a Time (if required).
- To select a range of dates, select the Use End Date tick-box, then select a Start and End Date. If required, enter an End Time also.
- To exclude the selected Date and Time (or Date and Time range), select the Exclude selected date & time or the Exclude selected date & time range tick-box (as appropriate).
- To make the dates and times inclusive, select the Include selected dates & times in date range tick-box.
- To enter the selected information in the search field, click OK. (If applicable, all required logical operators (i.e. [AND], [OR], etc.) will be added automatically.)