
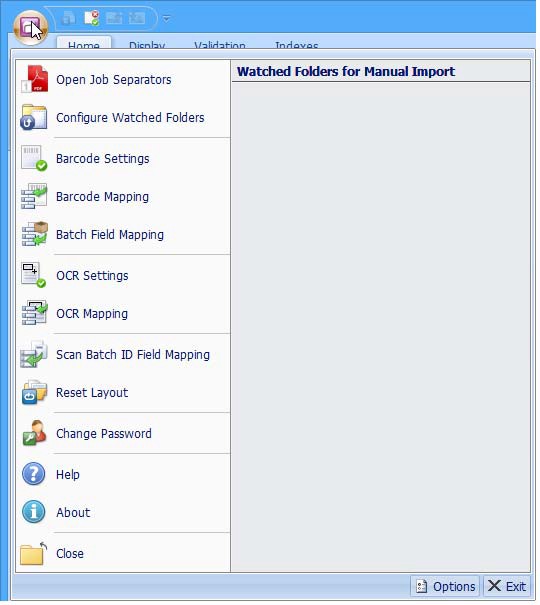
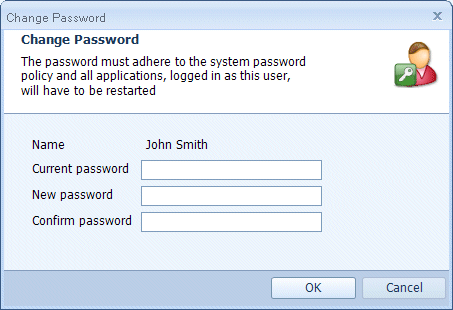
Application's Menu
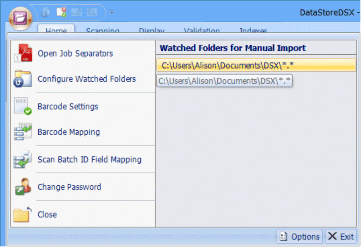
The menu is displayed on the left and manual Watched Folders are displayed on the right (see “Configure Watched Folders”).
Open Job Separators
Selecting Open Job Separators opens Adobe Acrobat with ten pages of DataStore®DSX Job Separator sheets. These can then be printed, as needed and used with Barcode Separation when Scanning documents to define when one document ends and a new document starts. See “Barcode Separation”.
Configure Watched Folders
Caution: Items in Watched Folders are deleted after import. Therefore, if you want to keep the documents on your computer, make sure you only put a copy of the documents in the Watched Folder.
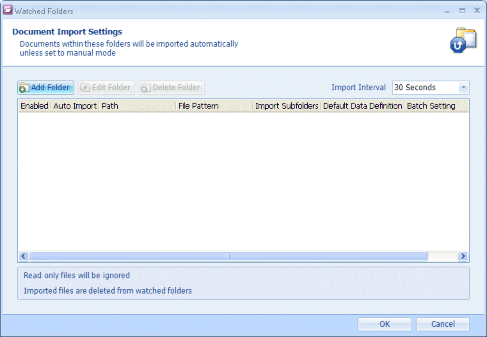
Click Add Folder to add a new Watched Folder.
The items shown in the Watched Folder Settings pane are described in Table 165.
Table 165. Terminology: Watched Folder Settings
|
Term |
Meaning |
|---|---|
|
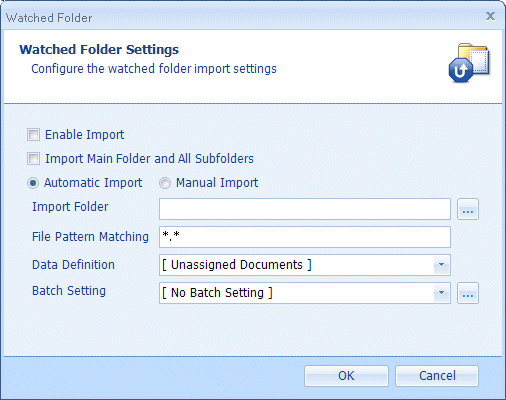
Enable Import |
When selected (and when Automatic Import is selected) the items in the configured Watched Folder matching the defined File Pattern Matching are imported and then deleted from the Watched Folder. |
|
Import Main Folder and All Sub Folders |
When selected, the contents of the Watched Folder and all sub-folders are imported. When cleared, only the contents of the Watched Folder are imported. Enable Import must be selected and the files must match the configured File Pattern Matching. |
|
Automatic Import |
When selected, the Watched Folder is monitored as defined by the Import Interval. When files are found in the Watched Folder they are imported. Enable Import must be selected and the files must match the configured File Pattern Matching. |
|
Manual Import |
When selected, items in the Watched Folder can be manually imported by selecting the Watched Folder from the list of Watched Folders For Manual Import on the Application’s Menu.
|
|
Import Folder |
Select … and browse to the folder you want to add as a Watched Folder. |
|
File Pattern Matching |
The default is *.* which matches all files. If you want to match files with a certain file extension or file name, use this field to define the File Pattern Matching. For example, *.txt will only match files with the txt file extension, while a*.* only matches file names beginning with an ‘a’. Only one file pattern can be specified for each Watch Folder Setting. |
|
Data Definition |
If required, select the Data Definition you want the imported files to be associated with from the drop-down list. If a Data Definition is not selected, the imported files will be listed under Unassigned. |
|
Batch Setting |
If required, select the Batch Setting you want the imported files to be used with from the drop-down list. See “Batch Settings”. |
Barcode Settings
Barcode Settings opens the Barcode Manager. See “Barcode Manager”.
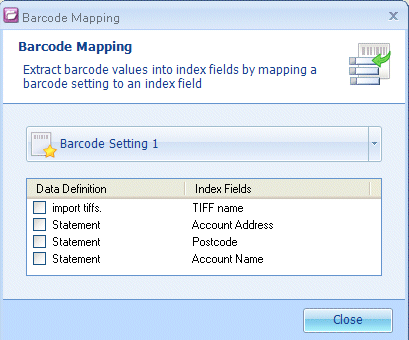
Barcode Mapping
Barcode Mapping enables you to map a configured Barcode Setting to one or more Index Fields in one or more Data Definitions. When a Barcode Mapping is configured, whenever a document is scanned or imported with a barcode which matches the mapping and the document is associated with a Data Definition which has Index fields mapped to the Barcode Setting, the value of that barcode is used as the value for the selected Index field(s)
Select a Barcode Setting from the drop-down list (any of the Barcode Settings created in the Barcode Manager can be selected), then scroll down the list to the required Data Definition and select the field(s) you want the barcode value to be used with. For example, a letter to a customer may include a barcode with the account number. The letter can be scanned and the barcode value can be automatically inserted as the value for the Index field: Account Number in a Bank Customer Data Definition. This example can be further expanded to make the account Number a trigger field for an Index Assistant which then completes the remaining Index fields by searching a database for the rest of the information such as Name, Address, Account Type, Overdraft limit and so on.
Batch Field Mapping
Batch Fields allow you to Index the mapped fields with the same values across all the selected files.
Note: By default, the Batch Field Mapping option is not available on the Application’s menu. To make this option available, the HitecLabs.DataStore.IndexingStudio.exe.config file must be edited. See “Indexing Studio Batch Fields” for more information.)
Click Batch Field Mapping to open the Batch Field Mappings window.
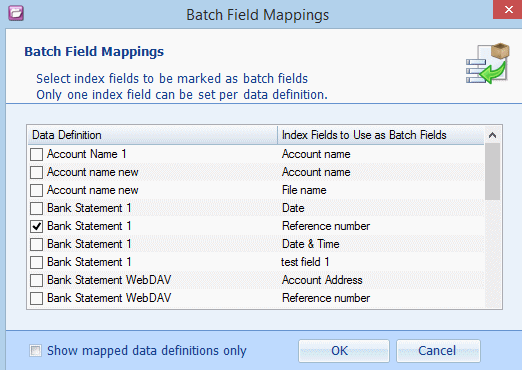
Scroll down the list to the required Data Definition then select the fields you want to use with Batch Fields (Reference number in Data Definition Bank Statement 1 in the above example).
Note: Only Document-level index fields are available to be used as Batch Fields – Page Level index fields are not displayed in the Batch Field Mappings window.
Files must be indexed (using Indexing Assistants, Held Values, Content fields and/or manually) and then Stored.
When a Batch Field’s value is the same across all selected files in the Data Definition, that value is used to Index that Batch Field.
However, when there are two or more Index values, or if a file is missing an Index value for a Batch Field, a window is displayed asking the user to select the value to be used for the Batch Fields.
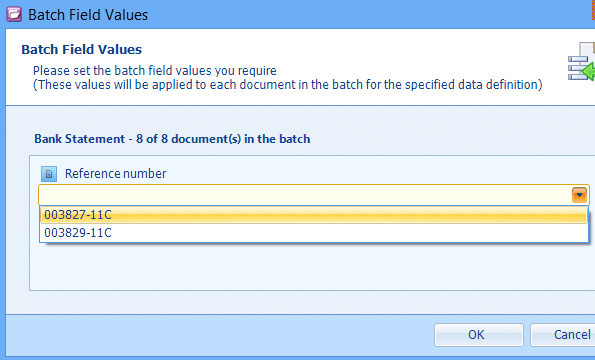
Either select the value you want to be used to index the field from the drop-down list or enter a value in the text box and click OK to Store the files.
A window is displayed showing the progress of the file storage.
When all the files have been Stored, click Close to exit the window. (Alternatively, in the above window, click Cancel to return to Indexing Studio without storing the files.)
OCR Settings
Optical Character Recognition (OCR) can be applied to areas of a page and the retrieved text can be stored in Index fields. OCR can be used on the following image formats:
- BMP
- JPG
- PNG
- TIF
Note: OCR is more accurate on high-quality graphics which have not been converted from another format.
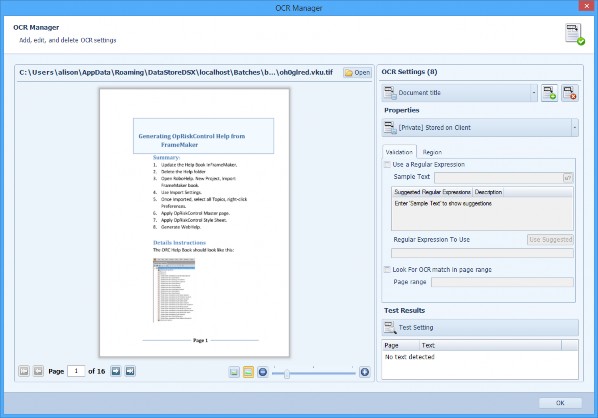
The OCR Settings are used to define the region of the page to which OCR is applied. Validation settings can also be applied.
Validation settings can define which pages of a document will have OCR applied to them.
Validation settings can include regular expressions to validate the text returned by OCR.
The OCR Manager settings are described in Table 166.
Table 166. Terminology: OCR Manager
|
Term |
Meaning |
|---|---|
|
Open |
By default, the document which is currently selected in Indexing Studio is opened as the test document for the OCR Setting. To change the test document, click Open and browse to the folder containing the required document. Click Open to open the selected document. The test document enables you to define the OCR region and test the OCR Setting. |
|
Navigation controls |
Document navigation controls are displayed below the test document.
|
|
Name of OCR Setting |
Select the name of the OCR Setting you wish to edit from the drop-down list. |
|
Properties |
|
|
Private or Public |
Select one of the following: [Private] Stored on Client – The OCR Setting is stored locally on the Client. Only Indexing Studio users who use the current Client machine can use this OCR Setting. [Public] Stored on Server – The OCR Setting is stored on the DataStoreDSX Server. All Indexing Studio users can use this OCR Setting. |
|
Validation |
|
|
Use a Regular Expression |
Select this option to use a regular expression to validate the text retrieved by OCR from the selected region. Only OCR text which matches the regular expression will be put in the mapped Index Field(s). See “OCR Mapping” on page 669 for more information. |
|
Sample Text |
Enter text which you would typically expect the OCR software to return from the defined region. The sample text is analysed to produce suggested regular expressions to use to validate the text returned by OCR. |
|
a? |
After entering Sample Text, click the a? button to create the suggested regular expressions. |
|
Suggested Regular Expressions |
Up to four regular expressions are listed after Sample Text has been entered and the a? button is clicked. (Often, only two regular expressions are listed.) Select the regular expression closest to the required regular expression, click Use Suggested and then edit the regular expression, as required. |
|
Description |
The description is one of the following Exact match Generic expression Exact match with format Generic expression with format |
|
Use Suggested |
Click Use Suggested to copy the selected regular expression to the Regular Expression To Use text box. |
|
Regular Expression To Use |
This is the regular expression which will be used to validate the text returned by OCR from the defined region. To copy a suggested regular expression to this text box, select the required regular expression in the Suggested Regular Expressions list and click the Use Suggested button. This regular expression can be edited, if required. Alternatively, enter the regular expression you want to use for validation in the text box. See “Regular Expressions” for more information about regular expressions. |
|
Look For OCR Match in page range |
Select this option if you want OCR to be applied to a range of pages only. Leave this option cleared if you want OCR to be applied to the whole document. |
|
Page range |
Enter the page numbers or the page range you want the OCR setting to be applied to. For example, to apply the OCR setting to pages 1-20, excluding pages 8 and 10, enter: 1-7, 9, 11-20 This option is only available when Look For OCR Match in page range is selected. |
|
Region |
|
|
Region |
Define the region by entering the values (in pixels) for the parameters:
Alternatively, use the mouse pointer to select the area on the test document (see “Open”) where the text is expected to be located. |
|
Test Results |
|
|
Test Setting |
This button is active when a test document has been opened, an OCR Setting has been created and a region has been defined. Click the Test Setting button to return the text detected in the defined Region and in the specified page range (if set).
When no text is are found in the defined region on any of the pages of the test document, No text detected is displayed. |


OCR Mapping
OCR Mapping enables you to map a configured OCR Setting to one or more Index Fields in one or more Data Definitions.
When an OCR Mapping is configured, whenever a document is scanned or imported to a Data Definition which has Index field(s) mapped to the OCR Setting, the text located by the OCR Setting is used as the value for the selected Index field(s).
For example, you might have a letter to a customer which includes the customer’s address.
The letter can be scanned and the address can be automatically inserted as the value for the Index field: Address in a Bank Customer Data Definition.

Select OCR Setting from the application’s menu then scroll down the list to the required Data Definition and select the fields you want to be mapped to the selected OCR Setting.Scan Batch ID Mapping.
Scan Batch ID Field Mapping
When files are imported or scanned in to Indexing Studio, it is sometimes useful to be able to see a unique batch id for the files.
A Scan Batch ID Custom Field Type is available which can be added to a Data Definition to record and view this information. (See “Data Definition with Scan Batch ID Field” for examples.)
Alternatively, you can select the application’s menu option Scan Batch ID Field Mapping to open the Scan Batch ID Field Mapping window.
See “Mapping a Field to the Scan Batch ID” for more information.
Reset Layout
It is possible to change the layout of the panes (Workspace, Documents, Index fields, etc.) in Indexing Studio. Panes can be moved, resized or closed.
Select Reset Layout to return all the panes to the default Indexing Studio layout. All closed panes will be opened, all moved panes will be returned to their original positions and all resized panes will be returned to their default sizes.
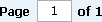
Change Password
Note: You must have Permissions configured to allow you to change your own password. If your Permissions are not set to allow you to change your password, the Change Password menu option will be dimmed and unavailable. See “Users and Groups” and ““Permissions Inheritance” for more information.
Select Change Password to change your own password. The Change Password window is opened.
Enter your current password in the Current password box. Enter the new password in the New password box. Re-type the new password in the Confirm password box. Click OK to save the new password or Cancel to keep your old password.
Help
Select Help to open the Indexing Studio Help. The online Help is opened in a browser window.
About
Select About to display the version and copyright information about Indexing Studio. Click OK to close the About window.
Close
Select Close to exit Indexing Studio.
Options Button
The Options button can be found in the Application’s menu.
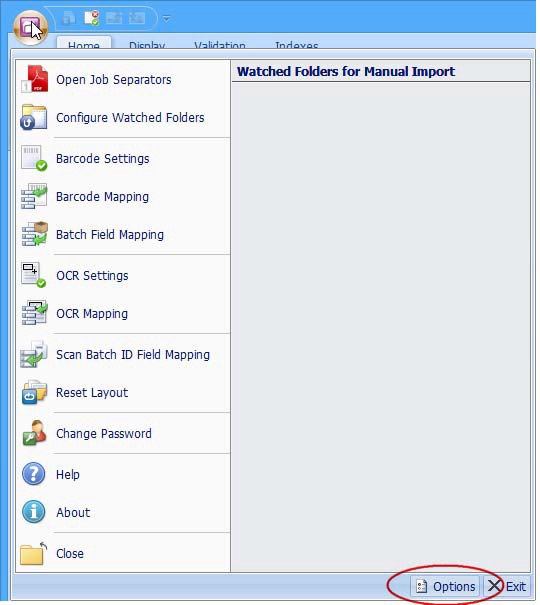
Popular Options Window
Click Options to open the Options window.
The options shown in the Popular Options window are described in Table 167.
Table 167. Terminology: Indexing Studio Options: Popular
|
Term |
Meaning |
|---|---|
|
Presentation |
|
|
Colour Scheme |
Select a colour scheme for the DataStore®DSX applications for the current user: Blue Theme Silver Theme Black Theme System Theme – applies the system colour scheme (set from the Windows Control panel) to the DataStore®DSX applications for the current user. |
|
Screen font |
If required, select a new screen font for the DataStore®DSX applications for the current user. Click … and then choose a font from the list of available fonts. |
|
Reset Default Font |
Changes the font back to the system default font. (Use this button if the Screen font has been inadvertently changed to an unreadable font.) |
|
Allow custom views for each data definition |
When selected, if the Documents pane and/or the Index Fields pane are rearranged for a selected Data Definition, the change only affects the selected Data Definition. The view for different Data Definitions can be customised. When cleared, if the Documents pane and/or the Index Fields pane are rearranged for a selected Data Definition, the change affects all the Data Definitions. |
|
Show index set mini toolbars |
When selected, the index set mini toolbar is displayed.
When cleared, the mini toolbar is not displayed.
|
|
Confirmations |
|
|
Show application exit confirmation |
When selected, when the User closes Indexing Studio, a confirmation window is displayed asking them to confirm they want to close Indexing Studio. When cleared, when the User closes Indexing Studio, it is immediately closed. |
|
Show ‘Cascade Complete’ confirmation |
When selected, when the User cascades Held Values to Index fields, a confirmation window is displayed when the cascade is complete. When cleared, when the User cascades Held Values to Index fields, a confirmation window is not displayed on completion. |
|
Show ‘Storing Documents’ confirmation |
When selected, when the User stores documents, a confirmation window is displayed asking them to confirm they want to store the documents. When cleared, when the User stores documents, they are immediately stored. |
|
Show icon for non stored fields |
When selected, Index fields which have the Is stored option cleared are displayed with a Not Stored icon in Indexing Studio. For example, in the graphic below, the Index field page is not stored and the Show icon for not stored fields is selected. (See “Data Definition Editor” for more information.)
|
|
Batch Management |
|
|
Reset Current Batch |
Use the Reset Current Batch button to remove all imported and/or scanned documents from Indexing Studio. Use this button when instructed to by your DataStore®DSX administrator. |


Documents Options Window
Select Documents from the Options window to display the Documents Options.
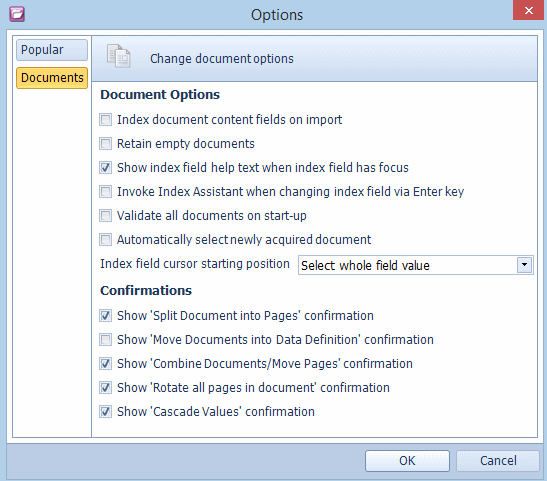
The options shown in the Document Options window are described in Table 168.
Table 168. Terminology: Indexing Studio Options: Documents
|
Term |
Meaning |
||||
|---|---|---|---|---|---|
|
Document Options |
|||||
|
Index document content fields on import |
When selected, when documents are imported against Data Definitions which have Content fields (i.e., automatically Indexed fields), these fields are populated on import.
|
||||
|
Retain empty documents |
When selected, empty documents (resulting from, for example, moving pages to another document) are kept in the Documents pane so that pages can be added to it.
When cleared, empty documents are automatically deleted from the document list. Therefore, if all the pages are removed from a document, the document is immediately deleted – preventing you from adding pages to the (now empty) document. |
||||
|
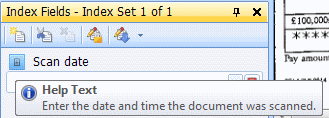
Show index field help text when index field has focus |
When selected, the Help Text created for the Index field is displayed when the Index field has focus.
See Table 79. |
||||
|
Invoke Index Assistant when changing index field via Enter key |
When cleared, Ctrl+Enter can be used to invoke the Index Assistant on the selected Index field. When selected, either Enter or Ctrl+Enter can be used to invoke the Index Assistant on the selected Index field. |
||||
|
Validate all documents on start-up |
When selected, if any Validation errors are found on startup, the error is displayed in the Validation pane. When cleared, if any Validation errors are found on startup, the documents are marked with a cross but not error is displayed in the Validation pane. Validation errors can be seen by clicking the Validate All Documents button in the Validation pane at any time. |
||||
|
Automatically select newly acquired document |
When cleared, the document at the top of the list of Documents is selected. When selected, the document at the bottom of the list of Documents is selected. That is, the last document to be acquired is selected. |
||||
|
Index field cursor starting position |
From the drop-down menu select one of the following options: Select whole field value (Default) - when moving between fields using the keyboard's Tab or Enter keys, the entire field value will be selected. Start of field value – when selected, when moving between fields using the keyboard's Tab or Enter keys, the cursor will automatically be positioned at the start of any field value that might exist. End of field value – when selected, when moving between fields using the keyboard's Tab or Enter keys, the cursor will automatically be positioned at the end of any field value that might exist. |
||||
|
Confirmations |
|||||
|
Show ‘Split Document into Pages’ confirmation |
When selected, when the User splits a document in to pages, a confirmation window is displayed asking them to confirm they want to split the document in to pages. When cleared, when the User splits a document in to pages, it is immediately split in to pages. |
||||
|
Show ‘Move Document into Data Definition’ confirmation |
When selected, when the User moves documents (from either [ Unassigned ] or from a Data Definition) to [ Unassigned ] or to a Data Definition in the Workspace view, a confirmation window is displayed asking them to confirm they want to move the documents. When cleared, when the User moves documents (from either [ Unassigned ] or from a Data Definition) to [ Unassigned ] or to a Data Definition in the Workspace view, the documents are immediately moved. |
||||
|
Show ‘Combine Documents/Move Pages’ confirmation |
When selected, when the User moves the pages of a document or combines documents, a confirmation window is displayed asking them to confirm they want to move the pages/combine documents. When cleared, when the User moves pages of a document or combines documents, it is done without a confirmation window. |
||||
|
Show ‘Rotate all pages in document’ confirmation |
When selected, when a user selects the document and then clicks a Rotate Options button, a confirmation is displayed asking the user to confirm they want to rotate all the pages in the selected document. When cleared, when a user selects the document and then clicks a Rotate Options button, all the pages in the selected document are rotated.
|
||||
|
Show ‘Cascade Values’ confirmation |
When selected, when the User selects an item from the Cascade Values menu, a confirmation window is displayed asking them to confirm they want to Cascade the values. When cleared, when the User selects an item from the Cascade Values menu, the values are populated in the Index fields immediately. |
||||
Exit Button
Click Exit to close Indexing Studio.