
Validation
Validation: Text
When Text is selected, the following options are available:
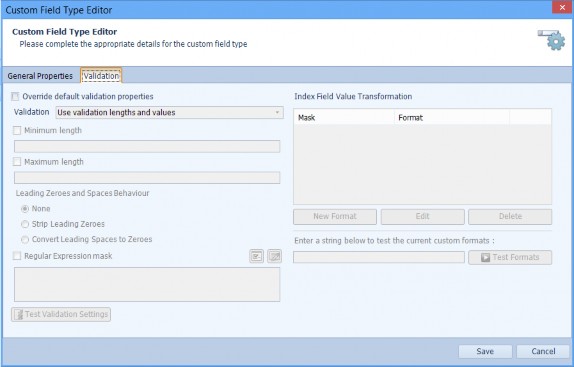
The options available when the field Type is set to Text are described in Table 49.
Table 49. Terminology: CFT Editor – Validation: Text
|
Term |
Meaning |
|---|---|
|
Override default validation properties |
When selected, the default Text validation properties are overridden. |
|
Validation |
Select the Validation by selecting an option from the drop-down list: Use allowable values – a window is displayed enabling you to enter a list of values. The validation process ensures the Custom Field Type has values from this list only. See Table 54. |
|
Minimum length |
When selected, enter the minimum number of characters in the text string. This defines the minimum length of a valid text string for this field. |
|
Maximum length |
When selected, enter the maximum number of characters in the text string. This defines the maximum length of a valid text string for this field. |
|
None |
Leading zeroes are not removed and leading spaces are not converted to zeroes. |
|
Strip Leading Zeroes |
When selected, if the text string starts with one or more zeroes, these are removed. |
|
Convert Leading Spaces to Zeroes |
When selected, if the text string starts with one or more spaces, these are converted to zeroes. |
|
Regular Expression mask |
When selected, enter a regular expression in the text box provided. Or click the icon to display the Regular Expression Generator window. See “Custom Field Type for Postcodes” for an example showing the Regular Expression Generator. When cleared, regular expressions are not used to define a valid string. Any entered regular expressions are removed from the box when this option is cleared. |
|
Test Validation Settings |
Click to open the Test Validation Settings window and test the validation settings you have entered are correct. See “Test Validation Settings” for details of the available options. |
|
Index Field Value Transformation |
Index Field Value Transformation is provided to enable you to manipulate data that might not pass validation. See “Index Field Value Transformation” for details. |
Note: The use of these controls enables you to configure precise validation criteria for the Custom Field Type. However, care should be taken when using a Regular Expression mask in conjunction with the other validation properties.
Validation: Currency
When Currency is selected, the following options are available:
The options available when the field Type is set to Currency are described in Table 50.
Table 50. Terminology: CFT Editor – Validation: Currency
|
Term |
Meaning |
|---|---|
|
Override default validation properties |
When selected, the default Currency validation properties are overridden. |
|
Validation |
Select the Validation by selecting an option from the drop-down list: Use allowable values – a window is displayed enabling you to enter a list of values. The validation process ensures the Custom Field Type has values from this list only. See Table 54. Use validation lengths and values – a number of additional settings are displayed. See the options described below. |
|
Minimum value |
When selected, enter the minimum value for the Currency that is valid. |
|
Maximum value |
When selected, enter the maximum value for the Currency that is valid. |
|
Non zero |
When selected, only non-zero values are valid. |
|
Test Validation Settings |
Click to open the Test Validation Settings window and test the validation settings you have entered are correct. See “Test Validation Settings” for details of the available options. |
|
Index Field Value Transformation |
Index Field Value Transformation is provided to enable you to manipulate data that might not pass validation. See “Index Field Value Transformation” for details. |
Validation: Whole Number
When Whole Number is selected, the following options are available:
The options available when the field Type is set to Whole Number are described in Table 51.
Table 51. Terminology: CFT Editor – Validation: Whole Number
|
Term |
Meaning |
|---|---|
|
Override default validation properties |
When selected, the default Whole Number validation properties are overridden. |
|
Validation |
Select the Validation by selecting an option from the drop-down list: Use allowable values – a window is displayed enabling you to enter a list of values. The validation process ensures the Custom Field Type has values from this list only. See Table 54. Use validation lengths and values – a number of additional settings are displayed. See the options described below. |
|
Minimum value |
When selected, enter the minimum value Whole Number that is valid. |
|
Maximum value |
When selected, enter the maximum value Whole Number that is valid. |
|
Non zero |
When selected, only non-zero values are valid. |
|
Test Validation Settings |
Click to open the Test Validation Settings window and test the validation settings you have entered are correct. See “Test Validation Settings” for details of the available options. |
|
Index Field Value Transformation |
Index Field Value Transformation is provided to enable you to manipulate data that might not pass validation. See “Index Field Value Transformation” for details. |
Validation: Date and Time
When Date and Time is selected, the following options are available:
The options available when the field Type is set to Date and Time are described in Table 52.
Table 52. Terminology: CFT Editor – Validation: Date and Time
|
Term |
Meaning |
||
|---|---|---|---|
|
Override default validation properties |
When selected, the default Date and Time validation properties are overridden. |
||
|
Validation |
Use validation lengths and values – a number of additional settings are displayed. See the options described below. |
||
|
Minimum date and time |
When selected, click the … button and select the earliest Date and Time that is valid.
|
||
|
Maximum date and time |
When selected, click the … button and select the latest Date and Time that is valid.
|
||
|
Expression to be used for validation (Indexing keywords, for example) |
Enter an expression, using date and time keywords, to be used to validate the date and time field. For example, for a day accuracy field, to ensure the date is only today’s date or yesterday’s date enter:
|
||
|
Test Validation Settings |
Click to open the Test Validation Settings window and test the validation settings you have entered are correct. See “Test Validation Settings” for details of the available options. |
||
|
Index Field Value Transformation |
Index Field Value Transformation is provided to enable you to manipulate data that might not pass validation. See “Index Field Value Transformation” for details. |
Test Validation Settings
The following options are not applied when the validation settings are tested:
- Strip Leading Zeroes
- Convert Leading Spaces to Zeroes
The options available when the Test Validation settings button is clicked are described in Table 53
Table 53. Terminology: CFT Editor – Test Validation Settings
|
Icon |
Meaning |
|---|---|
|
Enter the values to test |
Enter the values you want to test in the text box. To enter multiple values, put each new value on a new line. |
|
Test Validation |
Click the Test Validation button to test whether the values entered in the text box pass or fail the configured validation settings. |
|
Values |
Lists each of the values entered in the text box. An icon is displayed which indicates whether the value passed (a green icon) or failed (a red icon) validation. |
|
Validated |
Failed – the value failed validation. The value does not meet the configured validation requirements. |
|
Close |
Click Close to close the Test Validation settings window and return to the Custom Field Type Editor. |
Use Allowable Values
The icons available when Use Allowable values is selected are described in Table 54.
To use the Allowable Values for Searching, make sure the Search Parameter Choices is set to Use Linked Field’s allowed values.
Table 54. Terminology: CFT Editor – Use Allowable Values
|
Icon |
Meaning |
|---|---|
|
|
Add Value. Type the Allowed value in the text box and click the Add Value button. |
|
|
Edit Value. Select the Allowed value in the Allowed Values list, edit the value and click the Edit Value button. |
|
|
Delete Value. Select the Allowed value in the Allowed Values list and click the Delete Value button. |
|
|
Import Allowable Values.
Select From a text file to import the Allowable Values from a text file. Browse to the text or CSV file containing the list of Allowable Values and click Open. Select the Delimiter used in the selected file (the Delimiter is the character used to separate the individual values in the file) then click OK. Select From the clipboard to import the Allowable Values from the contents of the clipboard. Select the Delimiter used to separate individual values and then click OK. Valid values are imported to the list. Invalid values, that is, values which do not match the Base Field Type for the current field, are not imported. |
|
|
Export Allowable Values. Click Export to open a Windows directory navigation pane. Enter a name for the text file in which you want to save the allowable values and select a folder in which to save the text file. Click Save the text file, or Cancel to exit without exporting the allowable values to a text file. |
|
|
Click once to move selected value up one position in the list. |
|
|
Click once to move selected value down one position in the list. |
|
|
Sort the Allowable Values entries alphabetically. Use this button if you want the entries to be sorted alphabetically. However, if you want the entries to remain in the order in which you entered them (for example, days of the week) then do not use this button. |
Index Field Value Transformation
Caution: This feature is for advanced DataStore®DSX users.
Index Field Transformation is provided to enable you to manipulate data that might not pass validation. For example, consider you have a document in which the date is stored as 05072005. This, in its current state, is not a valid date. It needs to be transformed so it’s displayed as 05/07/2005.
Note: Transformations can be applied to Content fields only. That is, Transformations are not available for manually entered field values.
The options for Field Value Transformations are described in Table 55.
Table 55. Terminology: Custom Field Type Validation Field Value Transformations
|
Term |
Meaning |
|---|---|
|
New Format |
Click to create a new Custom Format. The Custom Format Editor is opened. |
|
Edit |
Click to edit the selected Format. The Custom Format Editor is opened. |
|
Delete |
Click to delete the selected format. |
|
Test Format |
Enter a string in the text box beside the Test Format button. Click the Test Format button to test how the string is transformed with the transformation mask. A window is displayed indicating whether the transformation was successful. If the transformation was successful, a window is displayed showing the output string. |
The options for the Custom Format Editor are described in Table 56.
Table 56. Terminology: Custom Field Type Field Validation Custom Format Editor
|
Term |
Meaning |
|---|---|
|
Mask to match index field |
Enter a Regular Expression mask to define how the string should be split in to components. In the above date example, this would be (\d{2})(\d{2})(\d{4}). |
|
Format to transform value |
Enter the order of the components and any separators you want to use. In the above date example, this would be {0}/{1}/{2}. |
|
String to be tested |
Enter the string to be tested. In the above date example, this would be 05072005. |
|
Test Custom Format |
Click the Test Custom Format button. A window is displayed indicating whether the transformation was successful. If the transformation was successful, the output string is displayed. |