
Create a Search Template
Field Linked to a Data Definition Field
Search Templates can be created which consist of search fields from different Data Definitions. For example, there could be a Data Definition called Bank Account with fields:
- Account Name
- Account Address
- Bank Balance
and another Data Definition called Mortgage Account with fields:
- Account Name
- Account Address
- Mortgage Outstanding
A Search Template can be created with the following Search fields:
- Account Name (which links to the Account Name fields in both of the Data Definitions)
- Address (which links to the Address fields in both of the Data Definitions)
- Bank Balance (which links to the Balance field in the Bank Account Data Definition)
- Mortgage Outstanding (which links to the Mortgage Outstanding field in the Mortgage Account Data Definition).
The Search Template can then be used to look for Customers who have both a Bank Account and a Mortgage Account.
- Right-click on Search Templates in the tree view and select New.
- On the General Properties tab, enter a Name for the Search Template (Bank and Mortgage in this example). Enter Help text if required.
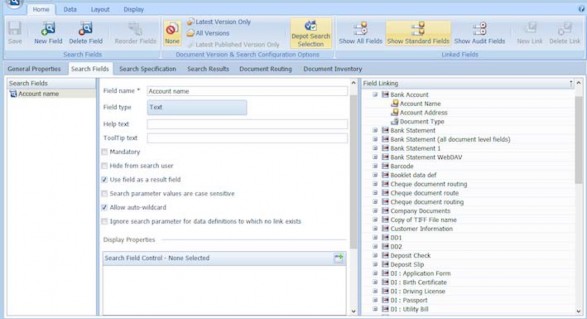
- Click on the Search Fields tab and click New Field on the Home ribbon.
- Enter a name for the search field. In this example Account Name.
- Select the Field type. In this example, Account Name’s Base Field Type is Text.
- Select Mandatory if you want to make it mandatory for the Searching Client user to enter something in this search field before the Search can begin. When a search field is set to Mandatory, the Start Search button in Searching Client is inactive until a value has been entered in the appropriate search field. (When selecting the Mandatory option for a search field, you should also set whether All mandatory fields must be provided or if At least one mandatory field must be provided. See “Mandatory options”)
- Select Hide from search user if you want to set a search field value automatically (via a Preset value, for example) which you do not want to show to the Searching Client user. In this example, leave it cleared.
- Select Use field as a result field if you want the search results to be displayed in the search results grid. When cleared, the search field is not displayed in the search results grid, although the documents which match the field are displayed. In this example, select the Use field as a result field tick-box.
- Select Search parameter values are case sensitive if you want the Searching Client only to return values which match the case of the text entered in the search field. In this example, leave this cleared.
- Select Allow auto-wildcard if you want a search string of, for example, Smi to match Smith. If cleared, a search for Smi will only match Smi. In this example, select this parameter to enable the auto-wildcard.
- Select Ignore search parameter for data definition to which no link exists. In this Search Template, the search fields are linked to Index Fields in two Data Definitions. The Bank Account Data Definition has three Index Fields:
- Account Name
- Account Address
- Bank Balance
The Data Definition called Mortgage Account also has three Index Fields:
- Account Name
- Account Address
- Mortgage Outstanding
If the User searches for * against Account Name, they would be shown data from both Data Definitions as both have Field values against Account Name and therefore data exists for both with an Account Name.
If the User then adds a * search against Bank Balance, only data from the Bank Account Data Definition will be returned as only data from this Data Definition has Field values against the Bank Balance field. To prevent this from happening, select Ignore search parameter for data definition to which no link exists. This ensures data from the Mortgage Account Data Definition is returned even if Bank Balance is provided.
In this example, Ignore search parameter for data definition to which no link exists should not be set for Account Name or Address. However, it should be set for both Bank Balance and Mortgage Outstanding.
- Select the new search field. All the Data Definitions which contain Index Fields of type Text (in this example) are displayed in the Source Data Definitions pane. Expand the Data Definitions to see all the Fields to which you can link the search field. Select the required
Data Definition (Bank Statement in this example) and then double-click the field you want to use in the Search Template (Account Name in this example). Repeat for any other Data Definition fields to which you want to link the search field (Mortgage Account: Account Name in this example).
- A green Linked to icon is displayed showing the new Search Template field has been linked to a field in a Data Definition.
- Repeat steps 3 to 13 for the Account Address field (making sure the field type matches the field type of the Data Definition’s field).
- Repeat steps 3 to 13 for the Bank Balance field. Link the search field to the Balance field in the Bank Account Data Definition (making sure the field type matches the type of the Data Definition’s field and Ignore search parameter for data definition to which no link exists is selected).
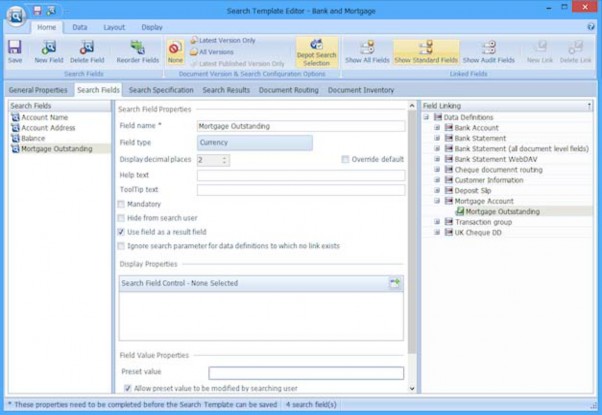
- Repeat steps 3 to 13 for the Outstanding Mortgage field. Link the search field to the Mortgage Outstanding field in the Mortgage Account Data Definition (making sure the field type matches the type of the Data Definition’s field and Ignore search parameter for data definition to which no link exists is selected).
- Click Save to save the new Search Template. It can be used immediately (by those who have Access Control configured for the Data Definition to which the search fields are linked).
Field Linked to a Custom Field
Custom Fields can be used in several Data Definitions. They can be included in a Search Template so that the data is found no matter which Data Definition was used to index it (as long as Access Control is configured to allow the user to view search results).
- Right-click on Search Templates in the tree view and select New Search Template.
- On the General Properties tab, enter a Name for the Search Template. Enter Help text if required.
- Click on the Search Fields tab and click New Field on the Home ribbon.
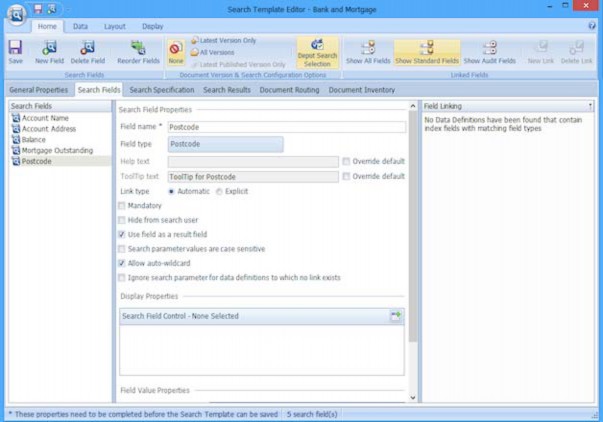
- Enter a name for the search field (Postcode in this example).
- Click on Field type and select the Custom Fields tab in the Field Type Picker. Select the Postcode Custom Field you created earlier.
- If required, select Override default and enter new Help text, or leave unchecked to use the Help text configured in the Custom Field. Likewise, if required, select Override default and enter new ToolTip text, or leave unchecked to use the ToolTip text configured in the Custom Field. Click OK.
- When a search field is set to the Field type of a Custom Field, you may set the Link type to Automatic or set it to Explicit. When Automatic is selected, the search field is automatically linked to the selected Custom Field Type in every Data Definition in which it is used. When Explicit is selected, no links are automatically configured and you have to link the search field to the selected Custom Field Type in the required Data Definition(s). In this example, set the Link type to Automatic.
- Set the remaining options as required. See “Field Linked to a Data Definition Field” for more information on how to use some of the other available options. See “Search Template Editor” for details on all the options available.
- Create more Search Template fields as required. Click Save to save the new Search Template. It can be used immediately by those users who have Access Control configured. The Search Template’s Access Control is determined by the Data Definition (using the Custom Field) that is used to index data.
Note: Custom Fields can belong to several Data Definitions. The Access Control for the Data Definition used to index the data is used to determine the Access Control for the search field.
Auditable Field
Auditable Fields provide a way of reviewing activity on a per-machine, per-user or per-activity basis. This can be very useful for Users who do not have access to the Resource Auditing functionality in Management Studio.
Note: Although it is possible to create Search Templates with Auditable Fields, the information returned will depend on the Resource Audit settings. See “Resource Auditing” for more information.
- Right-click on Search Templates in the tree view and select New Search Template.
- On the General Properties tab, enter a Name (Audit in this example) for the Search Template. Enter Help text if required.
- Click on the Search Fields tab and click New Field on the Home ribbon.
- Enter a name for the search field.
- Click on Field type. The Field Type Picker is displayed. In this example, select the Auditable Fields tab and then select the appropriate Auditable Field from the list provided:

- Client Machine – the machine used to perform the auditable activity.
- Create Date and Time – the date and time the auditable Create (Automatically Index documents, Import documents against a Data Definition, Create a Data Definition) activity occurred.
- Creating User – the DataStore®DSX User account used to create the document.
- Data Item Modification Date and Time – the date and time the document was re- indexed. See “Re-Index Selected/Re-Index All Buttons”
- Data Item Modifying User – the DataStore®DSX User account used to re-index the document. See “Re-Index Selected/Re-Index All Buttons”
- Field Value Modification Date and Time – the date and time a field value was modified in Searching Client using the Modify index values button. See “Modify Index Values”
- Field Value Modifying User – the DataStore®DSX User account used to modify a field value in Searching Client using the Modify index values button. See “Modify Index Values”
- Index Date and Time – the date and time the document was indexed.
- Indexing User – the DataStore®DSX User account used to index the document.
- Item Stored by User – the DataStore®DSX User account used to store the document.
- Item Stored Data and Time – the date and time the document was stored.
- Retrieval Date and Time – the date and time the search retrieved data.
- Retrieving User – the DataStore®DSX User account used to search for and retrieve data.
- System Date and Time – the date and time the auditable activity occurred.
- System User – the DataStore®DSX User account used for the auditable event.
- In this example, select System User.
- Most Auditable Fields can be linked either Automatically or Explicitly. However, the following Fields can only be linked Explicitly:
- Client Machine
- System Date and Time
- System User (These Fields cannot be linked Automatically because this would generate huge amounts of audit data.)
- If you are linking the search field explicitly, make sure the Show all fields button is selected. This displays all the fields which can be explicitly linked to the selected Auditable Field.

- Link the search field to the required field(s) by selecting the appropriate field(s) listed on the right and clicking the New Link button. (Expand the Data Definitions on the right, if required, to show all the fields available in that Data Definition.)
- Create more search fields as required. Click Save to save the new Search Template. It can be used immediately.
Fields Linked to Document Route Fields in a Different Search Template
Licence required: Document Routing requires a licence. If you do not see the options described here, contact support@mitratech.com about purchasing a licence.
A Search Template can be used to search for the Document Route fields of a different Search Template. A Search Template can be linked to one Document Route Search Template only.
- Right-click on Search Templates in the tree view and select New Search Template.
- On the General Properties tab, enter a Name for the Search Template (Linked To Document Route in this example). Enter Help text if required.
- Click on the Search Fields tab and click New Field on the Home ribbon.
- Enter a name for the search field, Document State in this example.
- Click on Field type. The Field Type Picker is displayed. In this example, select the Auditable Fields tab and then select Document State from the list provided. Click OK.
- Select the Search Fields tab and select Show Audit Fields (on the ribbon). Expand the Data Definition associated with the Document Route Search Template you want to link this Search Template to. Double-click on the Audit field Document State. In this example, the Document State field has been linked to the Document State audit field with the same name for the Data Definition checks.
- If required, add more fields, repeating the steps above.
- Select the Document Routing tab and select the option Link to existing Document Route.
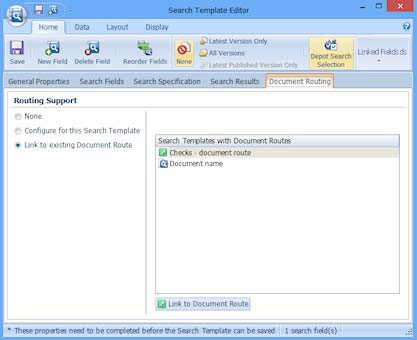
- All Search Templates which contain a Document Route are listed on the right. Double- click on the Search Template you want the current Search Template to be linked to. The linked Search Template is displayed with a linked icon
 . In this example, the Search Template Checks - document route is associated with the Data Definition checks which was used to link to the search field Document State.
- Save the Search Template.
Note: When a * search is performed on, for example, the Document State field, all the historic Document State values from the linked Document Route Search Template are returned.
This Search Template will not allow the searching user to change the state of any documents – this must be done from the Search Template which has the locally configured Document Route. See “Create Document Routes” for an example showing how to create a local Document Route.