
Document Versioning with a Document Route
Licence required: Document Routing and Index Assistants each require a licence. If you do not see the options described here, contact support@mitratech.com about purchasing a licence.
This example describes Document Versioning used with a Document Route which has the states:
- Draft
- In Review
- Published
This example shows the configuration steps required to ensure a newly stored document is put in the default state Draft. It can then be put in the state In Review. If, during the review process, changes are made, the document will be stored as a new version and it will then go to the default state of Draft. If, during the review process, no changes are made, the document is then Published.
In this example, when a search is performed, only the latest version of each document will be displayed in the results grid.
Create the Data Definition
In this example, the Data Definition has index fields for the Document name and Author. The information for these fields is automatically obtained from the Word document properties.
- Click on Data Definitions in the tree view, then right-click and select New. The Data Definition Editor is opened.
- Give the new Data Definition a name. On the General Details tab, enter a name for the Data Definition in the Name field. In this example, the Data Definition is called Document name.
- The ID is created automatically.
- Select the Store content for full text searching tick box if you require the documents which are stored using this Data Definition to be text searchable. See “Content Full Text Searchable” for more information.
- Select the option Allow Document Versioning. This option is required if you want to create new versions of a stored document.
- Click on the drop-down list beside Default Acceptance State and select Draft. This sets the default state of all documents which are indexed with this Data Definition to the state Draft. When a document is first stored in DataStoreDSX using this Data Definition and when a new document revision is created from Searching Client, the document will be put in the state Draft.
- Create a new field. With the General Details tab selected, click the New Text Field button.
- In this example, the first Index Field is for the Document name. Document name is a text field and it is a Document-level index. Enter the Field name, Type and Index level information.
- This field will be stored so select the Is Stored tick-box.
- In the Behaviour Properties section, make sure Values are extracted automatically (not externally provided) is cleared. The value for this field will be obtained from an Index Assistant but the Indexing Studio user must also be able to edit the field values, if necessary.
- Next, select the Single Field Value tick-box to set one value per field, as, in this example, there is only one document name for each document.
- Create a new field. With the General Details tab selected, click the New Text Field button.
- In this example, the next Index Field is for the Author. Author is a text field and it is a Document-level index. Enter the Field name, Type and Index level information.
- This field will be stored so select the Is Stored tick-box.
- In the Behaviour Properties section, make sure Values are extracted automatically (not externally provided) is cleared. The value for this field will be obtained from an Index Assistant but the Indexing Studio user must also be able to edit the field values, if necessary
- Next, clear Single Field Value tick-box and select No Limit, as, in this example, there can be several authors for each document.
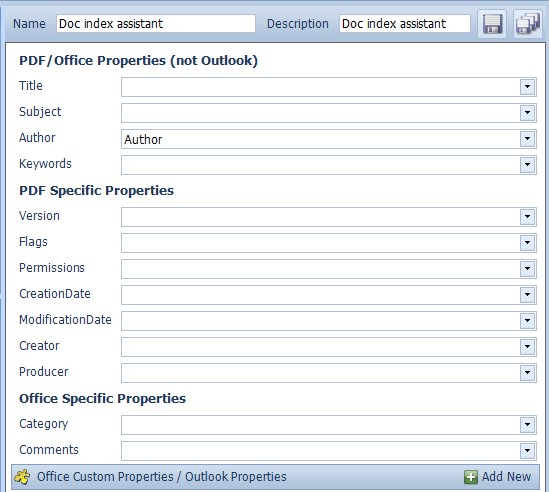
- Click the Manage Index Assistants button to configure the Index Assistants which will obtain the field values.
Note: If you are unable to manage the Index Assistant, ensure the Index Assistant Plug-in Options have been configured (see “Plug-in Options”) and that your DataStoreDSX user account has the Permission Manage Index Assistants (see “Permissions”).
- Click the plus button next to File Index Assistant. The File Index Assistant will be used to get the file name from the document being imported in to Indexing Studio. Provide a name for the File Index Assistant. Next, click in the Name field and select Document name from the drop-down list.

- Click the plus button next to Document Index Assistant. The Document Index Assistant will be used to get the author and the keywords from the document being imported into Indexing Studio.
Provide a name for the Document Index Assistant. Next, click in the Author field and select Author from the drop-down list.
- Save both Index Assistants by clicking the Save all Index Assistants button.

- Close the Index Assistant Configuration window.
- Save the Data Definition, then Publish it and create a Search Template.
Create the Document Route
- Select the Search Template you created when you Published the Data Definition and edit it.
- In this example, when this Search Template is used to search for stored documents, we want the latest version only of the stored document to be returned in the search results. Therefore, on the Home ribbon, select Search Latest Version. This button is highlighted to show it is selected and a new search field is automatically created called Document Version. This search field can be renamed (if required) and the option Use field as a result field can be selected or cleared, but no other field options can be edited. In this example, make sure the option Use field as a result field is selected so the Document Version is displayed in the search results.
- The next step is to create the Document Route to manage the document versions. Documents which are indexed and stored with the Data Definition Document name will automatically go to the state Draft because this is what was configured in “Create the Data Definition” step 6. Select the Document Routing tab, select Configure for this Search
Template and click Create New Route. The Document Routing Configuration window is opened.
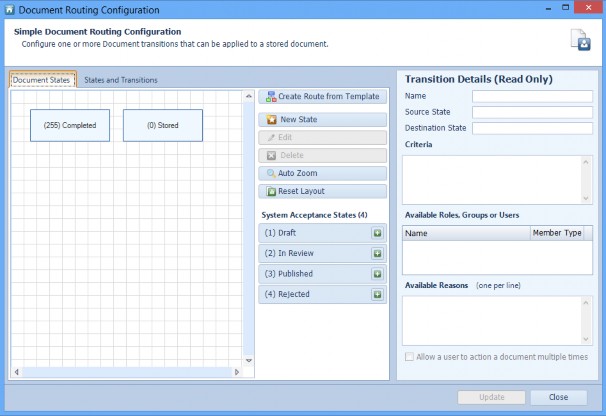
- In this example, the Document Route needs the system states Draft, In Review and Published. When creating a Document Route with the extra system states, only certain Transitions are permitted. Table 5 below, describes the permitted Transitions.
Table 5. Document Version State Change Rules
|
Starting State |
Possible Destination State |
|---|---|
|
Draft |
In Review – a user can manually transition a document from Draft to In Review. |
|
In Review |
User defined state – it is possible (but not required) to transition a document from the In review state to a user defined state. Rejected – if the document review includes comments, the document can be Rejected. Published – when a document has passed the review stage without comment, it can be Published. |
|
Published |
User defined state – it is possible (but not required) to transition a document from the Published state to a user defined state. Rejected – if the Published document needs to be updated it can be Rejected. |
|
Starting State |
Possible Destination State |
|
Rejected |
User defined state – it is possible (but not required) to transition a document from the Rejected state to a user defined state. Published – it is possible for a Rejected document to be transitioned back to Published. This should be done by an administrator only. |
|
User defined state |
User defined state – it is possible (but not required) to transition a document from a user defined state to a different user defined state. Rejected – if the document needs to be updated it can be Rejected. Published – when a document has passed the review stage without comment, it can be Published. |
Note: When a user attempts to create a Transition which does not obey these rules, a window is displayed informing them the Transition is not valid. The invalid Transition is then removed from the Transition Map.
The simplest way to create a Document Route for use with Versioning is to use the template. Click the button Create Route from Template. A Document Route is created.
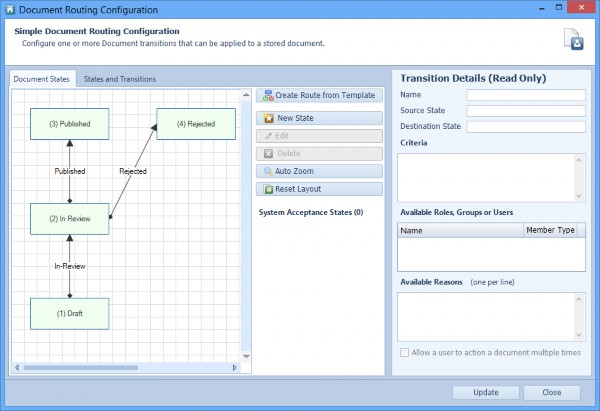
- This example does not use the Rejected state. Select the Transition between the states In Review and Rejected and then click the Delete button in the centre panel. The Transition between the states is deleted.
- Edit the Transitions as described in Table 6 below, referring to the configuration example “Document Route with Transition Criteria” if required.
Table 6. Example Document Version Transition Settings
|
Source |
Destination |
Transition Name |
Automatic/ Manual |
Member |
Reason |
|---|---|---|---|---|---|
|
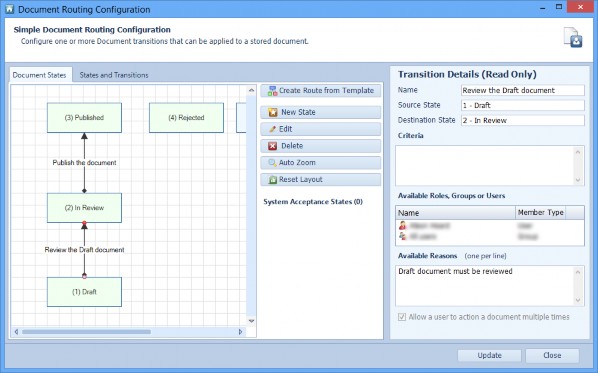
Draft |
In Review |
Review the Draft document |
Manually perform transition |
Add Users (and/or Groups) who will be permitted to move the document to the In Review state |
Draft document must be reviewed |
|
In Review |
Published |
Publish the document |
Manually perform transition |
Add Users (and/or Groups) who will be permitted to move the document from the In Review state to the Published state |
Draft document passes review |
- The Document Route should resemble this Transition Map.
- Click Update to save the Transition map changes and close the Document Routing Configuration window. You are returned to the Search Template Editor.
- The next step is to configure how Document Routing is accessed in Searching Client. This can be done using the Document Routing Panel and/or the Document Routing Toolbar. Both are described below.
Configure the Document Routing Panel in the Search Template
To add the Document Routing panel, follow these steps.
- Click on the Search Results tab. Click on the Layout ribbon at the top of the Search Template Editor. You must select a layout which allows three panels – either Header and Columns, Column and Rows or Rows and Column. In this example, select Header and Columns.
- One of the panels will be labelled No Module Selected. Click the Add Module button for that panel.

- Select Document Routing Panel and click OK. The Document Routing panel will be displayed in Searching Client.
- Resize the three panels to the required sizes and then save the Search Template by clicking the Save icon at the top of the Search Template Editor or by selecting Save from the application’s menu.
Configure the Document Routing Toolbar
To add the Document Routing toolbar, follow these steps.
- Click on the Display tab.
- Click the Document Routing Toolbar button. It will stay highlighted after the mouse pointer is moved away, to indicate it’s been selected.
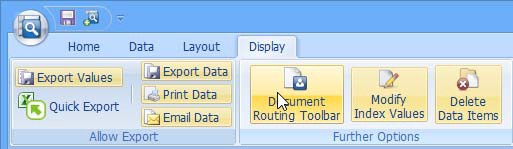
- The Document Routing toolbar will be displayed in Searching Client.

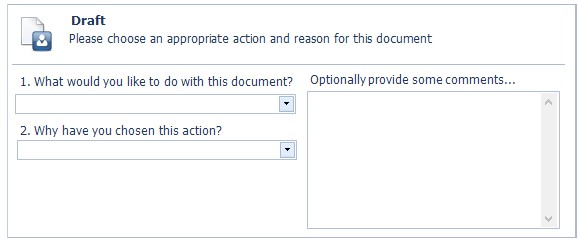
- To use the toolbar, click on the button and select what you would like to do with the document and then select the reason.
- A window is then displayed asking if you want to enter more information.
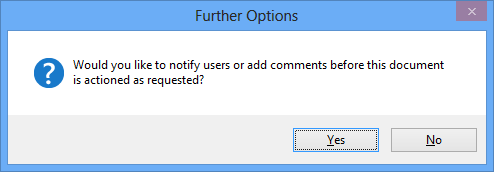
- Click No to move the selected document to the new state without entering more information, or click Yes to open the Transition options window.
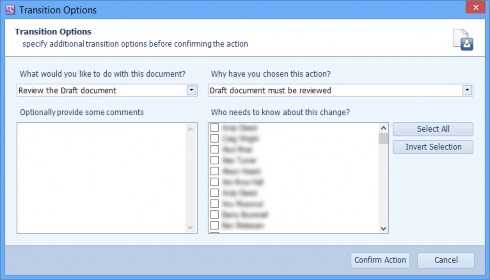
- In this window, you can add comments and select who to notify about the change.
Creating a New Document Version in Searching Client
The Data Definition can now be used to index and store Word docx files. Use Indexing Studio to import the docx documents. The document name and the Word document property author will automatically be put in the index fields. If any values need to be amended then edit them as required before storing the documents.
When the documents have been stored, you can use Searching Client to view the Document Version.
- Open Searching Client and load the Search Template Document name. Search for a document and select a search result.

- The results grid includes the Document Version because the option Use field as a result field was selected as the Document Version field in the Search Template.
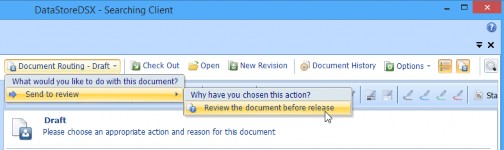
- To transition the selected document to the In Review state, click on the drop-down list below 1. What would you like to do with this document? and select Review the Draft document.
- Next, select the reason. Click on the drop-down list below 2. Why have you chosen this action? and select Draft document must be reviewed.
- Click Confirm Document Action. The document is now in the In Review state.
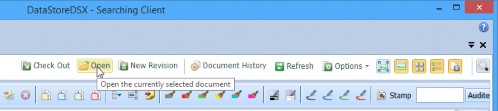
- A user can edit the document and create a new version. Click the Open button to open the docx file in Microsoft Word.
- A window is opened giving the options to either check-out and open the document, open it (in read-only mode) or download it to your computer.
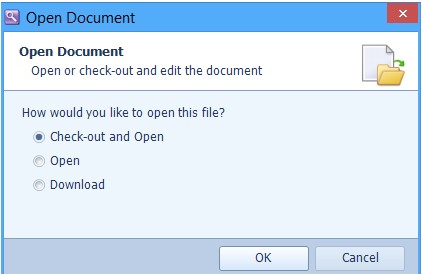
- Select Check-out and Open as you will be editing the document and creating a new version. Click OK.
Note: If you cannot open a document in Word, make sure you have added a user to Management Studio which has the required Windows permissions to edit files. In this example, user Slough\Alison was added to Management Studio because the user Slough\Alison has an account on the computer which is used to run Searching Client and Slough\Alison has the required Windows permissions to edit files on the computer.
If the window’s dialog does not offer the option to Check-out and Open, then make sure the WebDAV Endpoints are enabled for your method of login. For example, if users log in to DataStoreDSX using Forms authentication, the WebDAV Service must be enabled for Forms Endpoints. See “WebDAV Service Configuration” for more information.
Also, add this user to the Access Controls of the Data Definition (or to the category to which the Data Definition belongs) so the DataStoreDSX user can Store document and the user can also Store new document version (see Table 17, “Terminology: Data Definition Access Control List (ACLs)”).
- Make the required changes to the document, save the changes and close Word. To store the edited document as a new version of the document you opened, click Check-In. The Check In Document window is displayed.
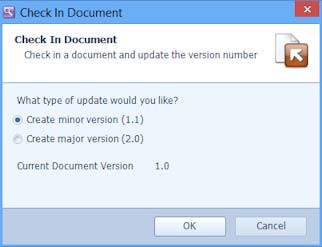
- In this example the original document was version 1.0. This new version can be stored as 1.1 or 2.0. In this example, select Create minor version to store the document as version 1.1. Click OK.
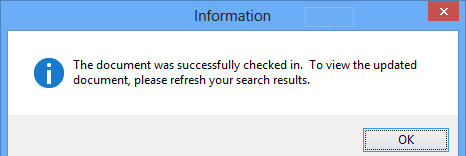
- The edited document is stored as a new version of the original document.
- Click the Refresh button to update the search results. The Document Version displayed is now 1.1.
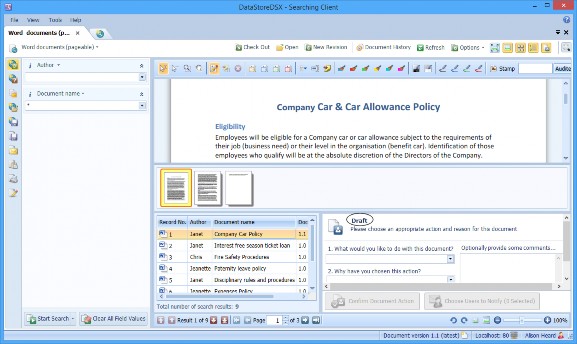
- The Company Car Policy version 1.1 is in the Draft state. This is because the edited document was stored in DataStoreDSX as a new document and the Default Acceptance State was set to Draft in the Data Definition.
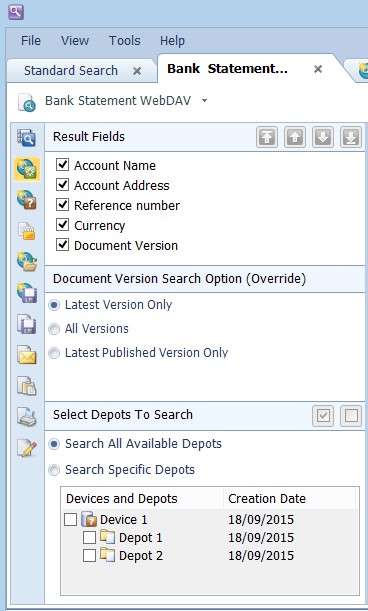
- Although the Search Template has been configured to Search Latest Version, this option can be overridden in Searching Client. Click the Show or hide search output configuration panel button.

- The Document Version Search Option (Override) panel enables you to change the Document Version search option.
- After making the required change, click the Show or hide search output configuration panel button again to hide these options. Click Start to repeat the last search with the new Document Version search option.