
Document Versioning (No Document Route)
This example describes the simplest way to use Document Versioning. It uses a Data Definition which requires the Indexing Studio user to manually enter Index information before the Word documents are stored. Searching Client users can then search for documents and edit them from Searching Client. The user then checks in the new version of the document and sets the new version number.
Create the Data Definition
In this example, the Data Definition has index fields for the Document name and Author. The information for these fields is automatically obtained from the Word document properties.
- Click on Data Definitions in the tree view, then right-click and select New. The Data Definition Editor is opened.
- Give the new Data Definition a name. On the General Details tab, enter a name for the Data Definition in the Name field. In this example, the Data Definition is called Document name & Author.
- The ID is created automatically.
- Select the Store content for full text searching tick box if you require the documents which are stored using this Data Definition to be text searchable. See “Content Full Text Searchable” for more information.
- Select the option Allow Document Versioning. This option is required if you want to create new versions of a stored document.
- Leave the Default Acceptance State set at Published. This does not need to be changed because Document Routes are not used in this example.
- Create a new field. With the General Details tab selected, click the New Text Field button.
- In this example, the first Index Field is for the Document name. Document name is a text field and it is a Document-level index. Enter the Field name, Type and Index level information.
- This field will be stored so select the Is Stored tick-box.
- In the Behaviour Properties section, make sure Values are extracted automatically (not externally provided) is cleared. The value for this field will be entered manually in Indexing Studio.
- Next, select the Single Field Value tick-box to set one value per field, as, in this example, there is only one document name for each document.
- Create a new field. With the General Details tab selected, click the New Text Field button.
- In this example, the next Index Field is for the Author. Author is a text field and it is a Document-level index. Enter the Field name, Type and Index level information.
- This field will be stored so select the Is Stored tick-box.
- In the Behaviour Properties section, make sure Values are extracted automatically (not externally provided) is cleared. The value for this field will be entered manually in Indexing Studio.
- Next, clear Single Field Value tick-box and select No Limit, as, in this example, there can be several authors for each document.
- Save the Data Definition, then Publish it and create a Search Template.
Searching for Versions
- Select the Search Template you created when you Published the Data Definition and edit it.
- In this example, when this Search Template is used to search for stored documents, we want the latest version only of the stored document to be returned in the search results. Therefore, on the Home ribbon, select Search Latest Version. This button is highlighted to show it is selected and a new search field is automatically created called Document Version. This search field can be renamed (if required) and the option Use field as a result field can be selected or cleared, but no other field options can be edited. In this example, make sure the option Use field as a result field is selected so the Document Version is displayed in the search results.
- Save and close the Search Template.
Using Document Versioning
Configure the Data Definition with the appropriate ACLs to enable users to store documents and search for results. See “Create ACLs for Data Definitions” for examples.
In this example, store Word documents using Indexing Studio. Enter the field values for the two Index fields. See “Import: Select Files” for an example showing how to use Indexing Studio to import files. See “Indexing User Supplied Fields” for an example showing how to manually enter field data.
When Word (or Excel or PowerPoint) documents have been stored in DataStoreDSX using the newly created Data Definition, these documents can be edited and new revisions can be created from Searching Client.
Creating a New Document Version in Searching Client
When the documents have been stored, you can use Searching Client to view the Document Version.
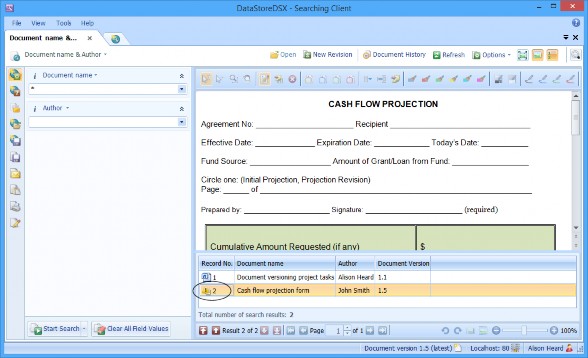
- Open Searching Client and load the Search Template Document name & Author. Search for a document and select a search result.
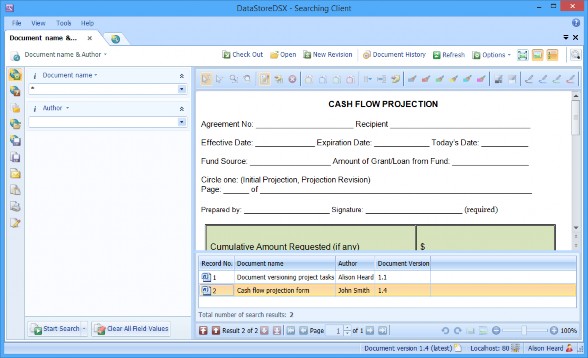
- The results grid includes the Document Version because the option Use field as a result field was selected as the Document Version field in the Search Template.
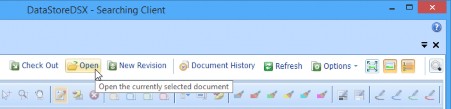
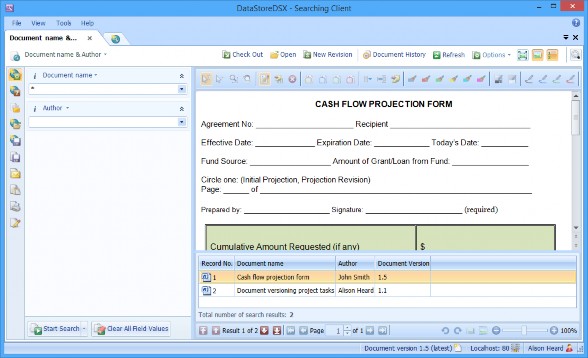
- A user can edit the document and create a new version. Click the Open button to open the docx file in Microsoft Word.
- A window is opened giving the options to either check-out and open the document, open it (in read-only mode) or download it to your computer.
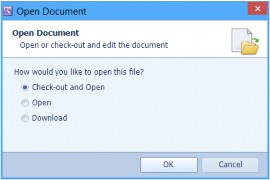
- Select Check-out and Open as you will be editing the document and creating a new version. Click OK.
Note: If you cannot open a document in Word, make sure you have added a user to Management Studio which has the required Windows permissions to edit files. In this example, user Slough\Alison was added to Management Studio because the user Slough\Alison has an account on the computer which is used to run Searching Client and Slough\Alison has the required Windows permissions to edit files on the computer.
If the window’s dialog does not offer the option to Check-out and Open, then make sure the WebDAV Endpoints are enabled for your method of login. For example, if users log in to DataStoreDSX using Forms authentication, the WebDAV Service must be enabled for Forms Endpoints. See “WebDAV Service Configuration” for more information.
Also, add this user to the Access Controls of the Data Definition (or to the category to which the Data Definition belongs) so the DataStoreDSX user can Store document and the user can also Store new document version (see Table 17, “Terminology: Data Definition Access Control List (ACLs)” ).
- Make the required changes to the document, save the changes and close Word. To store the edited document as a new version of the document you opened, click Check-In. The Check In Document window is displayed.
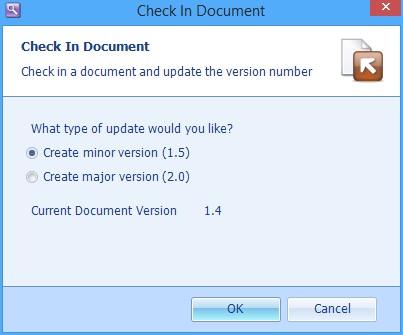
- In this example the original document was version 1.4. This new version can be stored as 1.5 or 2.0. In this example, select Create minor version to store the document as version 1.5. Click OK.
- The edited document is stored as a new version of the original document.
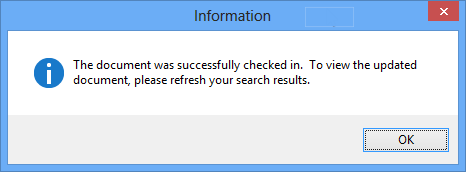
- The Document Version displayed is now 1.5. The icon in the search results indicates a search has not been performed since the document was edited.
- Click the Refresh button to update the search results.
- Although the Search Template has been configured to Search Latest Version, this option can be overridden in Searching Client. Click the Show or hide search output configuration panel button.
- The Document Version Search Option (Override) panel enables you to change the Document Version search option.
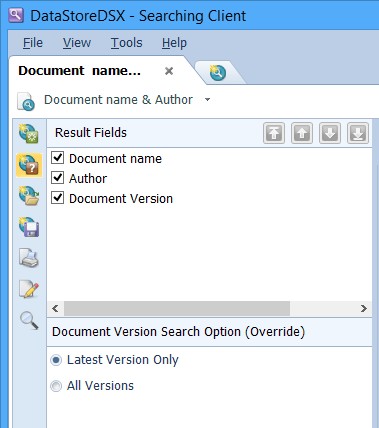
- After making the required change, click the Show or hide search output configuration panel button again to hide these options. Click Start to repeat the last search with the new Document Version search option.
Scanning a Document to Create a New Document Version in Searching Client
Licence required: Scanning requires a licence. If you do not see the options described here, contact support@mitratech.com about purchasing a licence.
A document can be scanned and checked in to Searching Client to create a new version of a document.
In Searching Client, perform a search and, in the search results, select the document you want to create a new version of. Click the New Revision button.

The Upload New Document Revision window is opened.
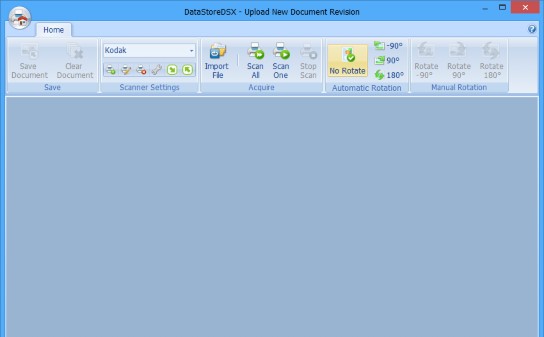
Select the required scanner setting. See “Scanner Settings” for more information on configuring the scanner.
Click the appropriate Scan button to scan the document in the scanner. The scanned image is displayed. To discard the image (to enable you to re-scan the document), click Clear Document. Put the document to be scanned in the scanner and click the appropriate Scan button to start the scan. To accept the scanned image and return to Searching Client to check in the document, click Save Document. The Upload New Document Revision window is closed and you are returned to Searching Client.
The Check In Document window is displayed.
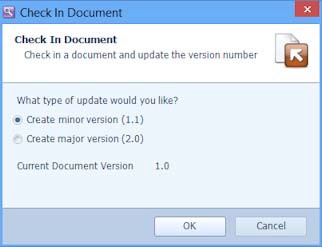
You can create a minor version change (for example, if the old version is 1.0, the new version will be 1.1) or you can create a major version change (for example, if the old version is 1.1, the new version will be 2.0). Select the new version and click OK. A confirmation window is displayed. The new version will be displayed when you click Refresh or when you click Start Search. To cancel the check-in, but keep the document checked out, click Cancel.
To discard the scanned image and check in the existing document version, click Revert Check Out.