
Transaction Group
Transaction fields are used in a similar way to Index fields. However, they can be grouped in Transaction Groups and Groups can be nested to define a hierarchical structure to the data. A Transaction Group must have a Transaction Boundary. The Transaction Boundary consists of criteria which determine when a new Transaction begins or a Transaction ends.
Licence required: Transaction Groups require a licence. If you do not see the options described here, contact support@mitratech.com about purchasing a licence.
Transaction data is indexed via Automated Indexing. Therefore a Data Definition containing a Transaction Group will be displayed in Automated Indexing (in Management Studio) but it will not be displayed in Indexing Studio.
Transactions are neither indexed at Page-level nor at Document-level. Therefore, Transaction search results are displayed in Searching Client’s results grid but the Transaction data is not highlighted on the page.
A Data Definition containing one or more Transaction Groups must also contain a Document- level field (or the Data Definition cannot be saved).
This example shows how a Bank Statement can be indexed using a Transaction Group (instead of standard Index Fields).
- Create a new Data Definition. Click on Data Definitions in Management Studio’s tree view, right-click and select New from the menu.
- Enter a suitable name. In this example, enter Transactions Bank Statement in the Name field on the General Details tab.
- Create a Document-level Index field, providing a name and entering a Regular Expression in the Position box to define how the value will be determined.
- Select the Transaction Fields tab and click Start New Transaction Chain.
- Click the New Field button on the Transaction Fields tab. The General Details pane shows the parameters required for the new Transaction field. Enter the name Account name.
- Notice the parameter Values are extracted automatically (not externally provided) is selected but dimmed. This is because all Transaction fields must be automatically extracted from a document.
- In this example, Account name is Mandatory and has a Single field value.
- Select the Sample Document(s) tab and open a sample bank statement. Set the Position to highlight the Account name on the bank statement (following the steps provided in “Input Source”, if required).
- Enter Help text and ToolTip text as required.
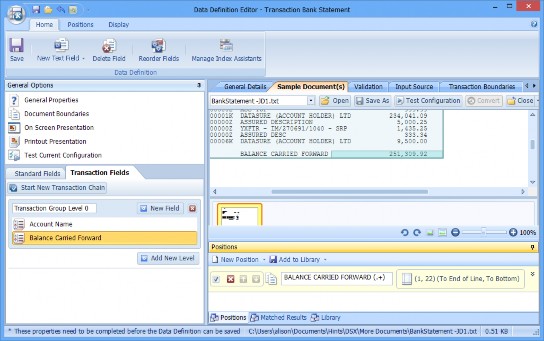
- Select the General Details tab and create a new Transaction field by clicking the New Field button. This field will store the Balance Carried Forward, so use that as the Name of the new Transaction field. Set the Type to Currency.
- This field is not Mandatory and can have multiple values, so clear Single field value and then select No limit.
- Select the Sample Document(s) tab. The Position needs to be set for the Balance Carried Forward. The Balance Carried Forward can be on one of several lines – depending on how many items are on the bank statement. However, the words BALANCE CARRIED FORWARD will always precede the value, so select a large enough area on the sample bank statement and type in BALANCE CARRIED FORWARD (.+) in the Position box. This locates the words BALANCE CARRIED FORWARD and then stores what comes next on the line (the value of Balance Carried Forward).
- On the last page of a customer’s bank statement, TOTAL is displayed instead of BALANCE CARRIED FORWARD. Create a Transaction field and give it the Name Total (following the procedures outlined in Steps 10, 11 and 12 above).
- The Transaction Group must have Transaction Boundary Criteria set before the Data Definition can be saved. Select a Transaction field in the Transaction Group. Then select the Transaction Boundary tab. For this Transaction Group, a new Transaction starts whenever the Account name changes. Select Fields define transaction beginning. Click Add Criteria. Click Please select a field to be used and select Account name from the drop- down list. Next, click Has a different value, excluding values that are missing.
- Save the Data Definition, Publish it and create a Search Template.