Document Route with Transition Criteria
This example describes a document route for cheques.
- Cheques for amounts under 500 are approved automatically.
- Cheques for amounts of 500 or more, but under 10,000 are approved by Operators.
- Cheques for amounts of 10,000 or more, but under 50,000 are approved by Supervisors.
- Cheques for amounts of 50,000 or more are approved by Managers.
- When approved, a cheque can be denied within 2 days of the Transaction Date.
- When the Transaction Date is more than 2 days ago, a cheque can be marked as Complete by an Operator.
This example assumes you have a Data Definition for indexing cheques and that this Data Definition has the following index fields:
- Amount Paid, Base Field Type: Currency.
- Transaction Date, Base Field Type: Date and Time, Day accuracy.
This example also assumes the following Roles have been created:
- Operator
- Supervisor
- Manager.
(See “Create Data Definitions” for examples showing how to create Data Definitions. See “Create Roles” for examples showing how to create Roles.)
Create the Document States
In the following examples, Document States and Transitions are created on the grid view’s Transition Map, displayed under the Document States tab.
For information about creating Document States and Transitions in tabular form, from under the States and Transitions tab, see “States and Transitions Tab”
To create states and transitions from under the Document States tab:
- Open the Search Template you want to configure with Document Routing in the Search Template Editor.
- Select the Document Routing tab, then select Configure for this Search Template and click the Create New Route button to open the Document Routing Configuration window.
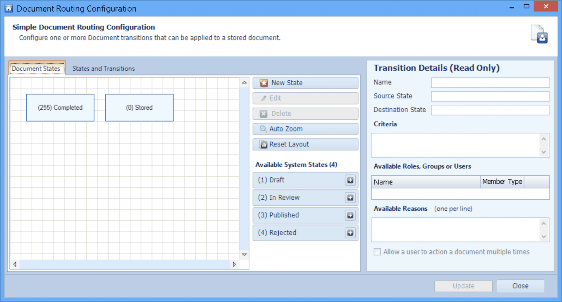
From under the Document States tab, when a new Document Route is being configured, two system states are displayed: (0) Stored and (255) Completed. These states cannot be deleted and they must be used. If (0) Stored is not used as the first state or if (255) Completed is not used as the last state, no transitions (or a limited number of transitions) will be displayed in Searching Client’s drop-down list. (The system states Draft, In Review, Published and Rejected are not used in this example.)
- Click the New State button to add this example’s states to the Document States Map.
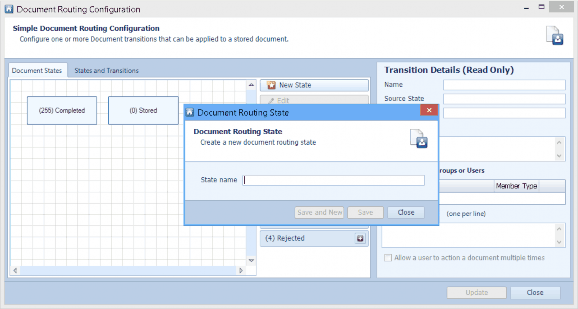
- Type in a document state name into the State Name text box. In this example, type in: 500 or more, but under 10,000.
- Press the Enter key and type in the next new state name: 10,000 or more, but under 50,000.
- Press the Enter key and type in the next new state name: 50,000 or more.
- Press the Enter key and type in the next new state name: Approved.
- Press the Enter key and type in the next new state name: Denied. Click Save.
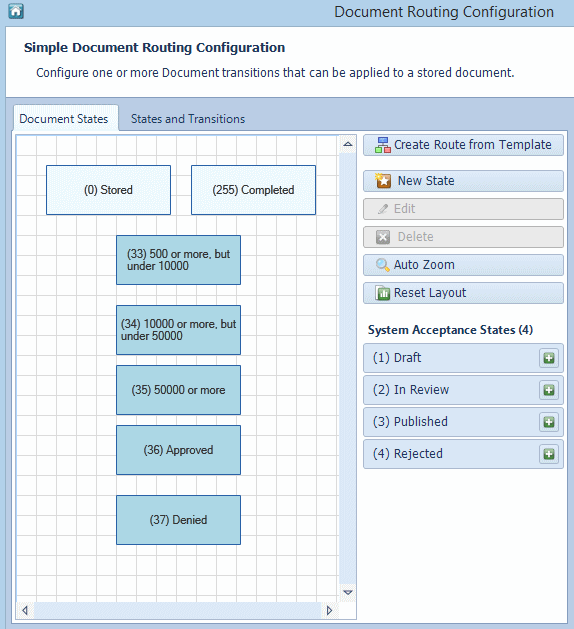
- The new states are displayed as blue boxes labelled with a state number and the assigned name.
Note: States 0-32 are system states. User defined states are numbered 33-254. State 255 is the system state Completed.
- If required, you can re-arrange the state boxes to make it easier to link the states with transitions. Using the mouse pointer, click on the state box you want to move and drag it to a new position. Guide lines are displayed to help you position the box in line with other state boxes, as required.
Create Automatic Transitions and Criteria
In this example, all the transitions with the Source state Stored happen automatically. These transitions are triggered by criteria.
- Cheques for amounts under 500 do not need approval and automatically go to the state Approved.
- Cheques for amounts of 500 or more, but under 10,000 go to the state 500 or more, but under 10,000.
- Cheques for amounts of 10,000 or more, but under 50,000 go to the state 10,000 or more, but under 50,000.
- Cheques for amounts of 50,000 or more go to the state 50,000 or more.
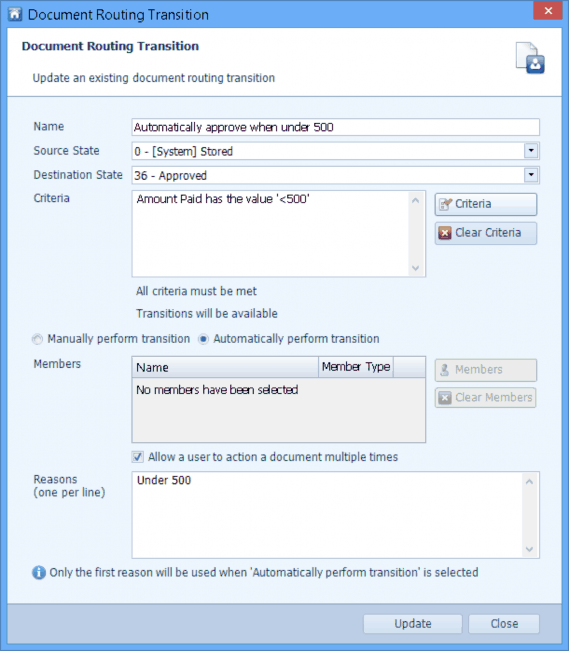
- Create an automatic transition between the state Stored and the state Approved (for amounts Less than 500). Select the state Stored (the source state) and click on a circle in the middle of one of the sides. Hold down the mouse button and drag the line to a circle on the state named Approved (the destination state) then release the mouse button. The Document Routing Transition window is displayed.

- Enter a name for the transition to make it easily identifiable. In this example, name the transition Automatically approve when under 500.
- The Source State shows the name of the state on which the transition line started. This cannot be edited when creating a transition in this way.
- The Destination State shows the state on which the transition line ended. This cannot be edited when creating a transition in this way.
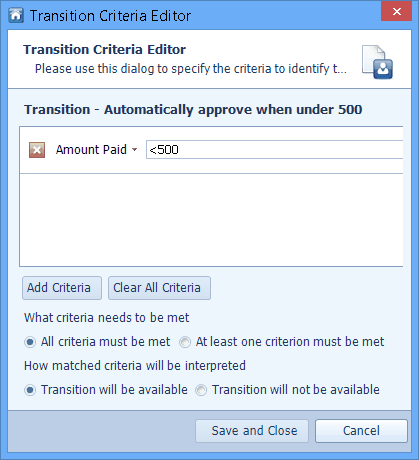
- This transition happens automatically when the Amount Paid is less than 500. This is configured using criteria. Click the Criteria button.
- Click the Add Criteria button.
- Click on the Select a field... text and select the Amount Paid field from the drop-down list, then type <500 in the text box.
- Since there is just one criterion, it does not matter if All criteria must be met is selected, or if At least one criterion must be met is selected.
- In this example, when the entered criterion is met, the transition will be available. Select Transition will be available and then click Save and Close.
- The Transition Criteria Editor closes and you are returned to the Document Routing Transition window.
- This transition happens automatically when the entered criterion is met. Select Automatically perform transition. (Members are not required when the transition is automatic.)
- The option Allow a user to action a document multiple times is ignored for automatic transitions, so the next step is to add a reason for the transition.
- Because every transition needs to have a reason, type in a reason into the text box beside Reason (one per line). In this example, Under 500. (Although several reasons can be entered, for automatic transitions only the first reason is ever used, so just enter one.)
- This transition configuration is now complete.
- Click Update to keep the changes you have entered for the transition. The Document Routing Transition window closes.
- Repeat the above steps to create transitions between:
- Stored and 500 or more, but under 10,000
- Stored and 10,000 or more, but under 50,000
- Stored and 50,000 or more using the criteria and settings in the table below. (You have just created the transition defined in the first row of the table.)
Table 1. Example Automatic Transition Settings
|
Source |
Destination |
Transition Name |
Criteria |
Automatic/ Manual |
Reason |
|---|---|---|---|---|---|
|
Stored |
Approved |
Automatically approve when under 500 |
Amount Paid: <500 |
Automatically perform transition |
Under 500 |
|
Stored |
500 or more, but under 10,000 |
Automatically move to ‘500 or more, but under 10,000’ |
Amount Paid: >=500 [AND]<10000 |
Automatically perform transition |
500 or more, but under 10,000 |
|
Stored |
10,000 or more, but under 50,000 |
Automatically move to ‘10,000 or more, but under 50,000’ |
Amount Paid: >=10000 [AND] <50000 |
Automatically perform transition |
10,000 or more, but under 50,000 |
|
Stored |
50,000 or more |
Automatically move to ‘50,000 or more’ |
Amount Paid: >=50000 |
Automatically perform transition |
50,000 or more |
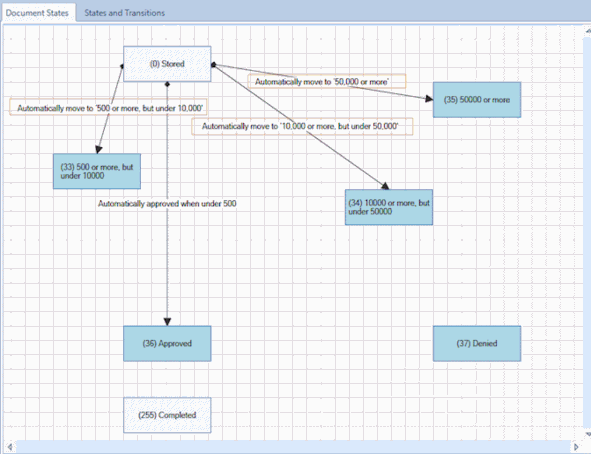
- The Transition Map should now resemble this.
Create Manual Transitions with Members
The automatic transitions have been defined which put the stored cheques in the appropriate state, depending on the value of the stored cheque.
- Cheques for amounts of 500 or more, but less than 10,000 can be manually approved by a User belonging to the Role Operator.
- Cheques for amounts of 10,000 but less than 50,000 can be manually approved by a User belonging to the Role Supervisor.
- Finally, cheques for amounts of 50,000 or more can be manually approved by a User belonging to the Role Manager.
- Create a transition between the state 500 or more, but under 10,000 and the state named Approved. Select the state 500 or more, but under 10,000 (the source state) and click on a circle in the middle of one of the sides. Hold down the mouse button and drag the line to a circle on the state named Approved (the destination state) then release the mouse button. The Document Routing Transition window is displayed.
- Enter a name for the transition to make it easily identifiable. In this example, name the transition Operator: Manually move to ‘Approve’.
- The Source State shows the name of the state on which the transition line started. This cannot be edited when creating a transition in this way.
- The Destination State shows the state on which the transition line ended. This cannot be edited when creating a transition in this way.
- This transition happens when a User belonging to the Role Operator manually changes the state of the document (a cheque in this example) to the Approved state. This is configured using Members. Click the Members button to open the Membership Selection window.
- The Members button enables you to change the users who can action the selected transition. Members can also be notified when a document is available for them to action (see “Using a Document Route” on page 111 for more information). Members are used with manual transitions only.
- Select the Roles tab and then select Operator from the list of Roles and click Add Member >>. The selected Role is displayed in the Contains the following pane and can now action the selected transition in Searching Client.

- An item can be removed from the Contains the following list by selecting the item in the right-hand pane and clicking the << Remove Member button.
Note: You will only be allowed to add and remove Users, Groups and Roles to which you have been configured Access Control. There may be Users, Groups or Roles which are members of the selected Transition, but which you cannot see if you do not have Access Control configured for them.
- Click Confirm to save the Membership changes or Cancel to cancel the Membership changes. The members of the Role Operator will see the selected transition options and be able to action them. Users who are not members of the Role Operator will not see the selected transition options and will not be able to action the transition.
- Enter one or more reasons. The person who manually actions this transition can select one of the entered reason for the transition. In this example, enter one reason. Click in the text box beside Reason and type in Operators approve amounts of 500 or more, but under 10,000.
- This transition configuration is now complete.

- Click Update to keep the changes you have entered for the transition. The Document Routing Transition window closes.
- Repeat the above steps to create transitions between 10,000 or more, but under 50,000 and Approved and between 50,000 or more and Approved using the criteria and settings in the table below. (You have just created the transition defined in the first row of the table.)
Table 2. Example Manual Transition Settings
|
Source |
Destination |
Transition Name |
Members |
Automatic/ Manual |
Reason |
|---|---|---|---|---|---|
|
500 or more, but under 10,000 |
Approved |
Operator: Manually move to ‘Approve’ |
Role: Operator |
Manually perform transition |
Operators approve amounts of 500 or more, but under 10,000 |
|
10,000 or more, but under 50,000 |
Approved |
Supervisor: Manually move to ‘Approve’ |
Role: Supervisor |
Manually perform transition |
Supervisors approve amounts of 10,000 or more, but under 50,000 |
|
50,000 or more |
Approved |
Manager: Manually move to ‘Approve’ |
Role: Manager |
Manually perform transition |
Managers approve amounts of 50,000 or more |
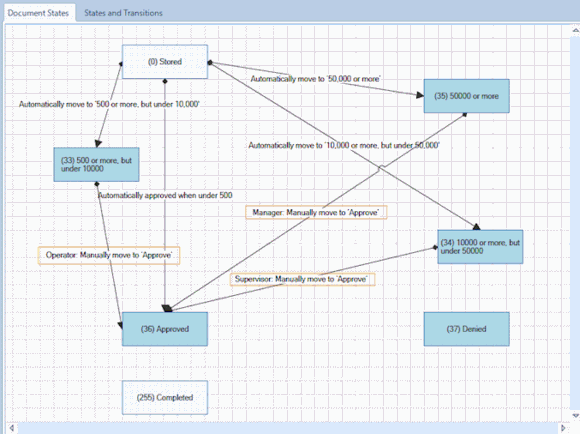
- The Transition Map should now resemble this.
Configure Criteria for Transitions to ‘Deny’ and ‘Completed’ States
In this example, once a cheque has been approved, it can be Denied for up to 2 days after the Transaction Date. Once those 2 days have passed, the cheque can be transitioned to Complete.
- Create a transition from Approve to Denied.
- Name the transition Deny.
- This transition requires a criterion to be configured. Click the Criteria button to open the Transition Criteria Editor and then click the Add Criteria button.
- Click on Select a field... and select the Transaction Date field. The criterion has to specify the transition can occur only when the transaction date was 2 days ago or less.
Enter>=#now(-2d) in the criterion text box.
(#now specifies today’s date. #now(-2d) specifies 2 days before today.) - As there is just a single criterion, it does not matter if All criteria must be met or if At least one criterion must be met is selected so leave this at the default setting.
- This transition is available when the criterion is met so select Transition will be available.
- Click Save and Close to save the criterion and close the Transition Criteria Editor.
- Select Manually perform transition and then click the Members button to open the Membership Selection window.
- The Members button enables you to change the users who can action the selected transition. Members are used with manual transitions only.

- Select the Roles tab and then select Operators from the list of Roles and click Add Member >>. The selected Role is displayed in the Contains the following pane and can now action the selected transition in Searching Client.
- An item can be removed from the Contains the following list by selecting the item in the right-hand pane and clicking the << Remove Member button.
- Click Confirm to save the Membership changes or Cancel to cancel the Membership changes. The members of the Role Operators will see the selected transition options and be able to action them. Users who are not members of the Role Operators will not see the selected transition options and will not be able to action the transition.
- Enter one or more reasons. The person who manually actions this transition can select one of the entered reasons for the transition. In this example, enter one reason. Click in the text box beside Reason and type in Operator has denied this payment.
- This transition configuration is now complete.
- Create a transition between the states Approved and Completed using the information in the table below. (You have just created the transition for Denied defined in the first row of the table.)
Table 3. Example Manual Transition Settings
|
Source |
Destination |
Transition Name |
Criteria |
Members |
Automatic /Manual |
Reason |
|---|---|---|---|---|---|---|
|
Approved |
Denied |
Deny |
>=#now(- 2d) |
Role: Operators |
Manually perform transition |
Operator has denied this payment. |
|
Approved |
Completed |
Complete |
<#now(-2d) |
Role: Operator |
Manually perform transition |
Complete |
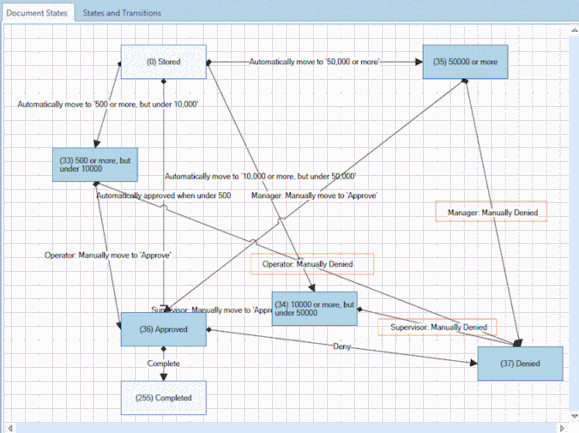
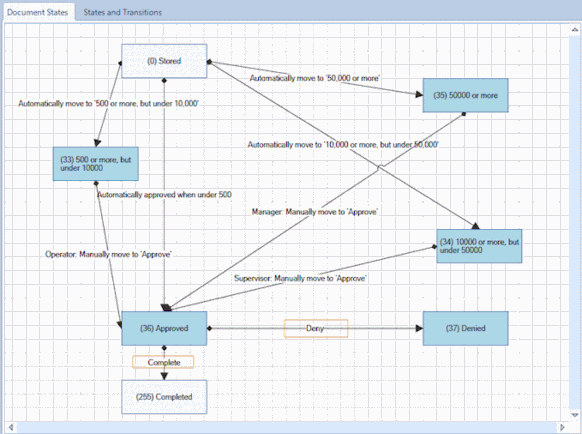
- The Transition Map should now resemble this.
Configure Additional ‘Deny’ States
The above steps can be repeated to create transitions between:
- 500 or more, but under 10,000 and Denied
- 10,000 or more, but under 50,000 and Denied
- 50,000 or more and Denied using the criteria and settings in the table below.)
Table 4. Example Manual Transition Settings
|
Source |
Destination |
Transition Name |
Members |
Automatic/ Manual |
Reason |
|---|---|---|---|---|---|
|
500 or more, but under 10,000 |
Denied |
Operator: Manually Denied |
Role: Operator |
Manually perform transition |
Operator’s reason should be stated here |
|
10,000 or more, but under 50,000 |
Denied |
Supervisor: Manually Denied |
Role: Supervisor |
Manually perform transition |
Supervisor’s reason should be stated here |
|
50,000 or more |
Denied |
Manager: Manually Denied |
Role: Manager |
Manually perform transition |
Manager’s reason should be stated here |
- The Transition Map should now resemble this.