
Inventory Items
New Item
Click New Item to add a document to the list of required documents for the selected business entity. The Inventory Item window is displayed.
General Properties
Selecting the General Properties tab enables you to select the type of document and the number of documents required.
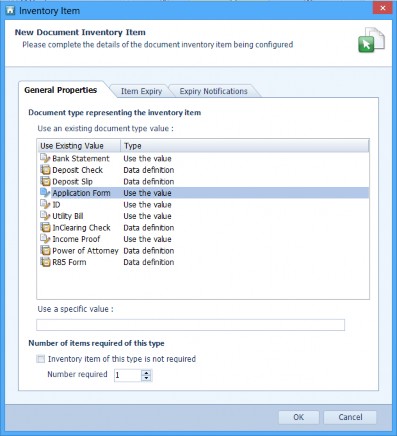
The items shown on the General Properties tab of the Inventory Items window described in Table 119.
Table 119. Terminology: Inventory Items window: General Properties
|
Term |
Meaning |
||
|---|---|---|---|
|
Use an existing document type value |
When the Document Type is set to the Data Definition name or to a specific value, select the Document Type from the list. |
||
|
Use a specific value |
When the Data Definition’s Document Type was set to use the contents of a field, type in the value the Index Field could be given in the Use a specific value text box. For example, if the Data Definition Utility Bill’s Document Type is set to the value of the Index Field Utility Bill Type and the Utility Bill Type field is configured with allowable values Water, Gas and Electricity, you can enter Water in the text box to specify that a water bill is required. |
||
|
Number of items required of this type |
|||
|
Inventory item of this type is not required |
Select this option when the selected item is optional. That is, the Document Inventory can be valid even when no items of this type are present.
|
||
|
Number required |
Enter the number of documents with this Document Type which are required. For example, if several Data Definitions have the Document Type Proof of identity and two documents which prove identity are required, set this to 2.
|
||
Item Expiry
The Item Expiry tab sets when the document expires.
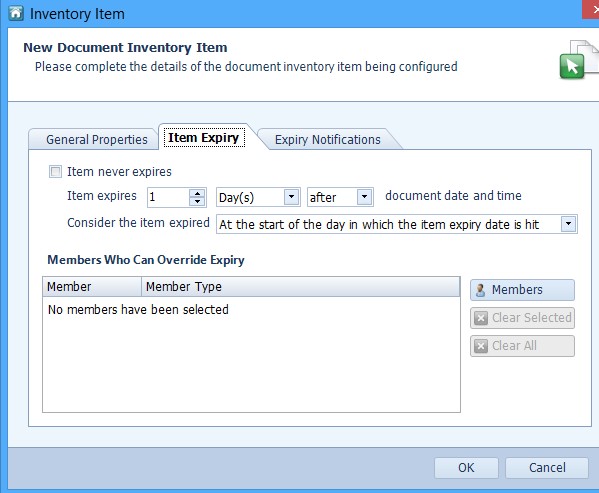
A calculation is made taking the Document Date and adding the number of days, months or years to determine when the item expires. See “Document Date” for more information on the Document Date.
The items shown on the Item Expiry tab of the Inventory Items window are described in Table 120.
Table 120. Terminology: Inventory Items window: Item Expiry
|
Term |
Meaning |
|---|---|
|
Item never expires |
Select this option when all the Documents with the selected Document Type never expire. Selecting this option disables the remaining options on the Item Expiry tab. |
|
Item expires x Day(s) after/before document date and time |
Enter the number of days, months or years in the number box. |
|
Consider the item expired |
This option changes, depending on whether Day(s), Month(s) or Year(s) is selected in the option above. Select this option to set the expiry date to the start or end of the day, month or year. |
|
When Day(s) is selected (see Item expires x Day(s) after/before document date and time above), select an option from the drop-down box. |
|
|
At the start of the day in which the item expiry date is hit |
For example, if the item expiry date is calculated to be 1st July, selecting this option sets document to expire as the day changes from the 30th June to the 1st July. |
|
At the end of the day in which the item expiry date is hit |
For example, if the item expiry date is calculated to be 1st July, selecting this option sets document to expire just before the day changes from the 1st July to the 2nd July. |
|
When Month(s) is selected (see Item expires x Day(s) after/before document date and time above), select an option from the drop-down box. |
|
|
At the start of the day in which the item expiry date is hit |
For example, if the item expiry date is calculated to be 1st July, selecting this option sets document to expire as the day changes from the 30th June to the 1st July. |
|
At the end of the day in which the item expiry date is hit |
For example, if the item expiry date is calculated to be 1st July, selecting this option sets document to expire just before the day changes from the 1st July to the 2nd July. |
|
At the start of the month in which the item expiry date is hit |
For example, if the item expiry date is calculated to be 1st July, selecting this option sets document to expire as the day changes from the 30th June to the 1st July. |
|
At the end of the month in which the item expiry date is hit |
For example, if the item expiry date is calculated to be 1st July, selecting this option sets document to expire just before the day changes from the 31st July to the 1st August. |
|
When Year(s) is selected (see Item expires x Day(s) after/before document date and time above), select an option from the drop-down box. |
|
|
At the start of the day in which the item expiry date is hit |
For example, if the item expiry date is calculated to be 1st July, selecting this option sets document to expire as the day changes from the 30th June to the 1st July. |
|
At the end of the day in which the item expiry date is hit |
For example, if the item expiry date is calculated to be 1st July, selecting this option sets document to expire just before the day changes from the 1st July to the 2nd July. |
|
Members Who Can Override Expiry |
|
|
Members |
Click to add members to the list. The members in this list can override the expiry date, enabling a document that has expired to remain valid. See “Validity” for more information. A window is opened enabling Users, Roles and Groups to be added to the list. Select one or more Users from the Users tab, Groups from the Groups tab or Roles from the Roles tab as necessary and then click Add Member >>. Repeat to add more Users, Groups and/ or Roles. The selected Users and Groups are displayed in the Contains the following pane. Click Confirm to return to the Item Expiry window. |
|
Clear Selected |
Click to remove the selected member from the list of who can override a document expiry. |
|
Clear All |
Click to remove all members from the list of who can override a document expiry. |
Expiry Notifications
The Expiry Notifications tab sets who is notified when documents are about to expire.
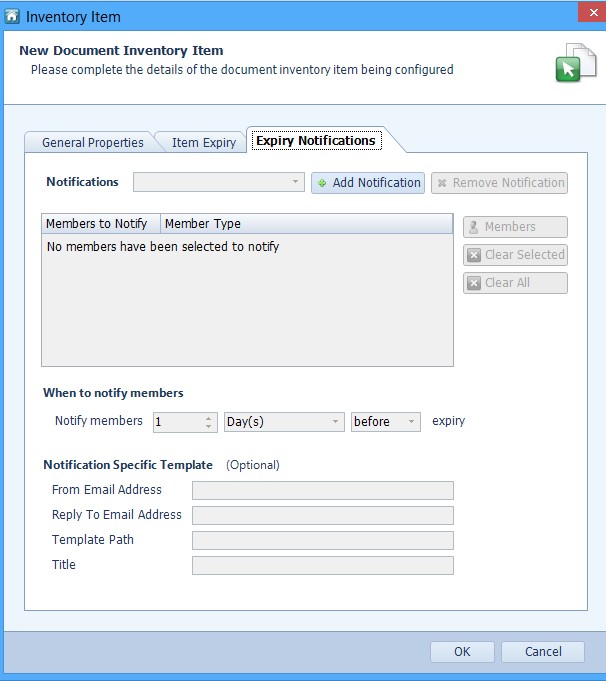
The items shown on the Expiry Notifications tab in the Inventory Items window are described in Table 121.
Table 121. Terminology: Inventory Items window: Expiry Notifications
|
Term |
Meaning |
||
|---|---|---|---|
|
Notifications |
Click Add Notification to add a new notification setting. Select the Notification setting from the drop-down list and click Remove Notification to delete the selected Notification setting. Notification settings are named Notification 1, Notification 2, etc. |
||
|
Members |
Click to add members to the list for the currently selected Notification setting. The members in this list are notified when a document will soon expire. A window is opened enabling Users, Roles and Groups to be added to the list. Select one or more Users from the Users tab, Groups from the Groups tab or Roles from the Roles tab as necessary and then click Add Member >>. Repeat to add more Users, Groups and/ or Roles. The selected Users and Groups are displayed in the Contains the following pane. Click Confirm to return to the Item Expiry window. |
||
|
Clear Selected |
Click to remove the selected member from the list of who will be notified when a document is soon to expire. |
||
|
Clear All |
Click to remove all members from the list of who will be notified when a document is soon to expire. |
||
|
Notify members x Day(s)/ Month(s)/Year(s) before/ after expiry |
Enter the number of days, months or years in the number box. Click on Day(s) and select either Day(s), Month(s) or Year(s) from the drop down list. Click on before and select either before or after from the drop- down list, as required. |
||
|
Notification Specific Template (Optional) |
|||
|
From Email Address |
Enter the email address you want to be displayed in the From field of the email sent for the selected Notification setting.
|
||
|
Reply To Email Address |
Enter the email address you want replies to the notification email to be sent to for the selected Notification setting.
|
||
|
Template Path |
Enter the path and the name of the mail merge document which will be used to format the email sent for the selected Notification setting. The document InventoryExpiryNotifica- tionDefault.docx is provided. This document can be edited to customize the email notification which is sent.
|
||
|
Title |
Enter the title of the email. This is used as the email Subject and can be added to the body of the email. See “Changing the Document Email Contents” for details about setting up the mail merge document.
|
||
Click OK to save the changes, or Cancel to close the window without saving the changes.
Note: See “Create Document Inventory Expiry Email Notifications” for details on how to configure email notifications.
Edit Item
The Inventory Items window is opened. Edit the settings as required. See “New Item” for a description of all the items displayed.
Click OK to save the changes, or Cancel to close the window without saving the changes.
Note: The Edit Item button becomes active when an item is selected from the Inventory Items list.
Delete Item
Click Delete Item to delete the selected Inventory item from the list.
Note: The Delete Item button becomes active when an item is selected from the Inventory Items list.
The items beside the list of Inventory Items are described in Table 122.
Table 122. Terminology: Document Inventory Items
|
Term |
Meaning |
|---|---|
|
Document Type |
The type of document which is required for the selected Document Inventory. |
|
# Required |
The number of documents required of the type Document Type. |
|
Validity |
The amount of time after the Document Date for which the document remains valid. |
|
Overrides |
Shows the number or Groups, Roles and/or Users who have been granted the permission to override whether a document is valid. |
|
Expiry Notifications |
Shows the number or Groups, Roles and/or Users who have been granted the permission to override whether a document is valid. |
|
Move to First |
Moves the selected document to the top of the list. Documents can be reordered to determine the order they are displayed on the screen when multiple documents are required. |
|
Move Up |
Moves the selected document up one position in the list. Documents can be reordered to determine the order they are displayed on the screen when multiple documents are required. |
|
Move Down |
Moves the selected document down one position in the list. Documents can be reordered to determine the order they are displayed on the screen when multiple documents are required. |
|
Move to Last |
Moves the selected document to the bottom of the list. Documents can be reordered to determine the order they are displayed on the screen when multiple documents are required. |