
Data Definitions and Search Templates
When a long list of Custom Field Types, Data Definitions, Search Templates and Style Sheets is displayed, you can use the filtering text box (positioned at the bottom of the list) to reduce the number displayed, thus making it easier to find a specific item.

To filter the displayed list of items, type in part or all of the item’s name into the filter's text box.
When the filtered list is displayed, filtered is added to the number of items found, displayed at the top of the page.

Categories
Note: A Data Definition can be assigned to one Category only.
Categories are used to simplify the management of Data Definition ACLs and to configure Custom Security. When a number of Data Definitions are assigned to the same Category, the user simply assigns the required Access Controls or Custom Security to the Category. This is then applied to the Data Definitions which are assigned of the selected Category.
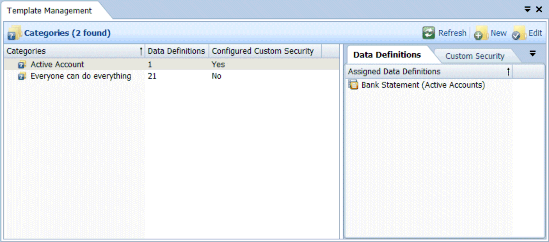
Select Categories in the tree view to display the list of Categories on the Data Definitions tab.

The Categories are listed showing the Category’s name, the number of Data Definitions assigned to it and whether or not Custom Security has been configured for it.
Note: If a Data Definition has Access Controls configured on it, those Access Controls are applied before the Category Access Controls are applied. See “Access Control Lists Inheritance” for more information.
Template Management Tab Buttons
Refresh
Click the Refresh button to refresh the list of Categories on the Template Management tab.
New
Click New to create a New Category.
To create a new top-level Category, click in the empty area below any existing categories so that no existing Categories are selected and then click the New button.
To create a new Category which is a level below an existing Category, select the existing Category and click the New button.
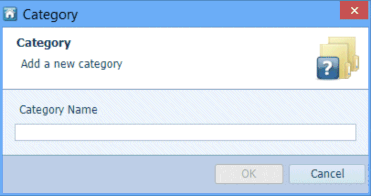
Type in the Category name into the Category Name text box and click OK to save the Category, or Cancel to close the window without saving the new Category.
Edit
Select a Category and click the Edit button to edit the name of the Category.
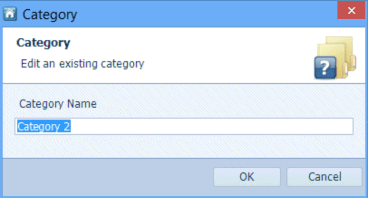
Type in the new name into the Category Name text box and click OK to save the Category, or Cancel to close the window without saving the changes to the Category name.
Template Management Categories Right-Click Menu
On the Template Management tab select a Category and right-click to see the following menu.
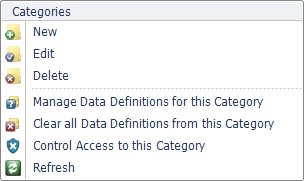
New
Select New to create a New Category. See “New” for more information.
Edit
Select Edit to edit the name of the selected Category. See “Edit” for more information.
Delete
When a Category is deleted, the Data Definitions which are assigned to it are no longer assigned to any Category. Therefore, the Access Controls for the member Data Definitions are likely to change after a Category has been deleted.
When a Category which contains other Categories is deleted, the selected Category and all member Categories are deleted. All member Data Definitions are no longer assigned to a Category and Access Controls for the member Data Definitions are likely to change as a result.
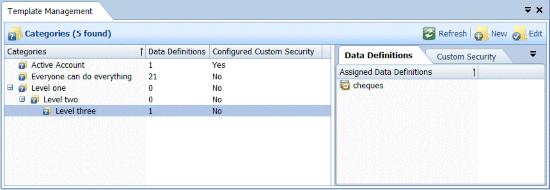
In the above example, the Category Level one contains the Category Level two. Category Level two contains Category Level three. Category Level three is assigned the Data Definition cheques. If Category Level three is deleted, Data Definition cheques is no longer assigned to any Category. If Category Level one is deleted, then Categories Level one, Level two and Level three are deleted and Data Definition cheques is no longer assigned to any Categories.
Manage Data Definitions for this Category
Select Manage Data Definitions for this Category to add Data Definitions to, or remove Data Definitions from, the selected Category.
Note: If you select a Data Definition which is already assigned to another Category, the Data Definition will be moved to the selected Category. A Data Definition can be assigned to one Category only.
The Data Definition Selection window is displayed.
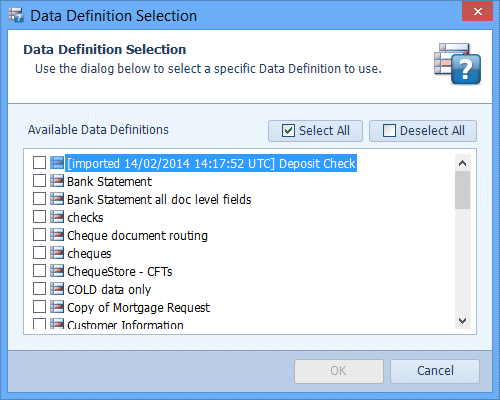
Scroll through the list of Data Definitions and select those you want to assign to the selected Category and clear the selection for the Data Definitions you want to remove from the Category. Click OK to close the window. The selected Data Definitions are now assigned to the selected Category. Alternatively, click Cancel to close the window without changing the Data Definitions assigned to the selected Category.
Note: When this option is used to remove Data Definitions from the Category, those Data Definitions are no longer assigned to any Category. Therefore, the Access Controls for those Data Definitions are likely to change after they are removed from the Category.
Clear All Data Definitions from this Category
Select Clear all Data Definitions from this Category to remove all Data Definitions from this Category. This Category will then indicate that 0 Data Definitions are assigned to it.
Note: When this option is used, the Data Definitions which were assigned to it are no longer assigned to any Category. Therefore, the Access Controls for the member Data Definitions are likely to change after this option is used.
Control Access to this Category
Select Control Access To This Category from the menu to set the access controls for all the Data Definitions assigned to the selected Category.
The items used to configure the Access Control Lists for the selected Data Definition Category are described in Table 13.
Table 13. Terminology: Category Access Control List (ACLs)
|
Operation |
Meaning |
||
|---|---|---|---|
|
Users/Groups/Roles |
The name of the Users/Groups/Roles who are being given default access to all Data Definitions assigned to the selected Category. |
||
|
Search for results |
Allows the selected User, Group or Role to use any Search Templates (in Searching Client) which are associated with Data Definitions which have been assigned to the selected Category. |
||
|
View results |
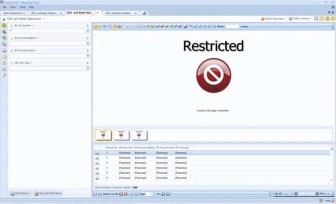
Allows the selected User, Group or Role to view the results of any searches performed with Search Templates associated with Data Definitions which have been assigned to the selected Category. When set to Deny, the number of search results is displayed but the results grid contains [restricted] instead of the index values. The Document or Page view is replaced with the Restricted graphic.
Cannot be set to Allow unless Search for results is set to Allow. |
||
|
View documents and pages |
Allows the selected User, Group or Role to see documents and pages which match the search criteria of any searches performed with Search Templates associated with Data Definitions which have been assigned to the selected Category. When set to Deny for a User, Role or Group, the Document or Page view is replaced with the Restricted graphic for those users. Cannot be set to Allow unless View results is set to Allow. |
||
|
Change field values |
Allows the selected User, Group or Role to modify index field values in Searching Client for search fields which are linked to Index fields which belong to a Data Definition assigned to the selected Category. Cannot be set to Allow unless View results is set to Allow. See “Modify Index Values” |
||
|
Store document |
Allows the selected User, Group or Role to store documents via Indexing Studio or Management Studio automated Indexing. When set to Deny for a User, Role or Group, Data Definitions assigned to the new Category are not listed in the Automated Indexing pane nor are they listed in Indexing Studio for those users. |
||
|
Store new document version |
Allows the selected User, Group or Role to check out a document (which was stored with a Data Definition belonging to this Category) from Searching Client, edit it and then check-in a new version. This access control also enables users of the WebDAV file explorer to edit documents and save them as new revisions. |
||
|
Undo other users’ document check-outs |
When a user checks out a document revision in Searching Client, a document lock is created and no other users can edit the selected document. Setting Undo other users’ document check-outs to Allow enables the selected User, Group or Role to unlock documents which have been Indexed using Data Definitions assigned to the selected Category and which have been checked out from Searching Client. Unlocking a document discards all edits made to the document by the Searching Client user. This Access Control is usually assigned to administrators only. See “System Locks” for information on unlocking documents. |
||
|
Set access control |
Allows the selected User, Group or Role to set the access controls (configure ACLs) for the selected Category. When set to Allow, the user has access to the settings described in this table for the selected Category. When set to Deny for a User, Role or Group, the menu item Control Access to this Data Definition is not displayed in the right-click menu for the those users when they click on a Data Definition belonging to the selected Category. |
||
|
View attachments |
Allows the selected User, Group or Role to view attachments that have been added to documents in Searching Client using a Search Template which is associated with a Data Definition belonging to the selected Category. |
||
|
Toggle attachments |
Allows the selected User, Group or Role to toggle attachments on and off that have been added to pages in Searching Client using a Search Template which is associated with a Data Definition belonging to the selected Category (see “Attachments Toolbar”).
|
||
|
Add attachments |
Allows the selected User, Group or Role to add attachments to pages in Searching Client using a Search Template which is associated with a Data Definition belonging to the selected Category (see “Attachments Toolbar”). |
||
|
Edit own attachments |
Allows the selected User, Group or Role to edit attachments the User has added to pages in Searching Client using a Search Template which is associated with a Data Definition belonging to the selected Category (see “Attachments Toolbar”). |
||
|
Edit attachments |
Allows the selected User, Group or Role to edit attachments added to pages in Searching Client using a Search Template which is associated with a Data Definition belonging to the selected Category (see “Attachments Toolbar”). |
||
|
Delete own attachments |
Allows the selected User, Group or Role to delete attachments the User has added to pages in Searching Client using a Search Template which is associated with a Data Definition belonging to the selected Category (see “Attachments Toolbar”).
|
||
|
Delete attachments |
Allows the selected User, Group or Role to delete attachments added to pages in Searching Client using a Search Template which is associated with a Data Definition belonging to the selected Category (see “Attachments Toolbar”). |
Refresh
Click the Refresh button to refresh the list of Categories on the Template Management tab.
Data Definitions Tab
When a Category is selected on the Template Management tab, the Data Definitions tab displays all the Data Definitions assigned to the selected Category.
Right-click on a Data Definition to display the menu.

Select Control Access to this Data Definition to select which Users, members of Groups or members of Roles have access to the selected Data Definition and associated Search Templates. See “Control Access to this Data Definition” for a description of this option.
Custom Security Tab
Selecting the Custom Security tab enables you to configure Custom Security settings for the Data Definitions contained within the selected Category.
Custom Security settings are used with Custom Fields and dynamic access control configuration to limit the access a user has on search results depending on data in a linked external database table or view.
A configuration example is described in “Create Custom Security for a Data Definition” which explains all the configuration steps required when configuring Custom Security for a Data Definition.
Configure Button
Click Configure to create new Custom security settings.
Refresh Available Databases Button
Click this button to enable the drop-down list of available databases.
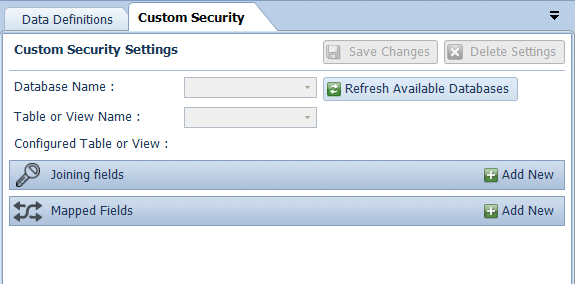
Database Name
Click on the triangle to display a drop-down list of available databases. Select the appropriate database from the drop-down list. This activates the Table or View Name drop-down list.
Note: If the drop-down list is not available, click the Refresh Available Databases button to populate the drop-down list and make it available.
Table or View Name
Click on the triangle to display a drop-down list of available databases. Select the required database Table or View from the drop-down list.
Note: If the drop-down list is not available, make sure you have selected a Database. SeeDatabase Name above for details.
Add New Joining Field
A joining field provides the link between a Custom Field (from a Data Definition in the selected Category) and a database column which is used to identify the extra data associated with that search result.
Click the Add New button on the Joining field header to add a new joining field. 
Enter a Name in the text box.
Select a Custom Field from the Type drop-down list. All the Custom Fields in any of the Data Definitions assigned to the selected Category are included in the drop-down list.
Select the database View or Table column name from the Column drop-down list. A field can be deleted by clicking the delete button. 
Note: If you need to create multiple Joining fields, they must all be Document-level fields, or they must all be Page-level fields. Therefore, you will not be allowed to use a field which has been configured as both a Document-level field and as a Page-level field and has had data stored against the Data Definition for both index levels.
Add New Mapped Field
Mapped fields link extra data in the external database to a Custom Field. This mapped field can then be used to configure dynamic access controls for the Data Definitions which belong to the Category which is configured with Custom Security settings.
Click the Add New button on the Mapped field header to add a new mapped field.
Enter a Name for the mapped field. This is the field name used when configuring the dynamic access controls for the Data Definitions which contain the specified Joining field.
Select a Custom Field from the Type drop-down list. All the Custom Fields in any of the Data Definitions assigned to the selected Category are included in the drop-down list.
Select the database View or Table column name from the Column drop-down list.
A field can be deleted by clicking the delete button.
Right-Click Menu
In the tree view, select Categories (below Data Definitions and Search Templates) and right-click to see the following menu.
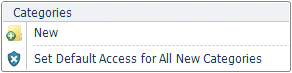
New
Click New to create a new Category. See “New” for a description of this option.
Set Default Access for all New Categories
Select Set Default Access for All New Categories from the menu to set the default access to all Data Definitions assigned to new Categories. When default access controls are set up, new Data Definition Categories are automatically configured with the selected access controls. A Data Definition Category can be edited to change the Access Control settings, or it can be left at the default Access Control setting. The items used to configure the default Access Control Lists for new Data Definition Categories are described in Table 14.
Table 14. Terminology: Default Category Access Control List (ACLs)
|
Operation |
Meaning |
||
|---|---|---|---|
|
Users/Groups/Roles |
The name of the Users/Groups/Roles who are being given default access to all new Data Definition Categories. |
||
|
Search for results |
Allows the selected User, Group or Role to use any Search Templates (in Searching Client) which are associated with Data Definitions which have been assigned to new Categories. |
||
|
View results |
Allows the selected User, Group or Role to view the results of any searches performed with Search Templates associated with Data Definitions which have been assigned to new Categories. When set to Deny, the number of search results is displayed but the results grid contains [restricted] instead of the index values. The Document or Page view is replaced with the Restricted graphic.
Cannot be set to Allow unless Search for results is set to Allow. |
||
|
View documents and pages |
Allows the selected User, Group or Role to see documents and pages which match the search criteria of any searches performed with Search Templates associated with Data Definitions which have been assigned to new Categories. When set to Deny for a User, Role or Group, the Document or Page view is replaced with the Restricted graphic for those users. Cannot be set to Allow unless View results is set to Allow. |
||
|
Change field values |
Allows the selected User, Group or Role to modify index field values in Searching Client for search fields which are linked to Index fields which belong to a Data Definition assigned to a new Category. Cannot be set to Allow unless View results is set to Allow. See “Modify Index Values” |
||
|
Store document |
Allows the selected User, Group or Role to store documents via Indexing Studio or Management Studio automated Indexing. When set to Deny for a User, Role or Group, Data Definitions assigned to the new Category are not listed in the Automated Indexing pane nor are they listed in Indexing Studio for those users. |
||
|
Store new document version |
Allows the selected User, Group or Role to check out a document (which was stored with a Data Definition belonging to a new Category) from Searching Client, edit it and then check-in a new version. This access control also enables users of the WebDAV file explorer to edit documents and save them as new revisions. |
||
|
Undo other users’ document check-outs |
When a user checks out a document revision in Searching Client, a document lock is created and no other users can edit the selected document. Setting Undo other users’ document check-outs to Allow enables the selected User, Group or Role to unlock documents which have been Indexed using Data Definitions assigned to new Categories and have been checked out from Searching Client. Unlocking a document discards all edits made to the document by the Searching Client user. This Access Control is usually assigned to administrators only. See “System Locks” for information on unlocking documents. |
||
|
Set access control |
Allows the selected User, Group or Role to set the access controls (configure ACLs) for the new Categories. When set to Allow, the user has access to the settings described in this table for Data Definitions assigned to new Categories. When set to Deny for a User, Role or Group, the menu item Control Access to this Data Definition is not displayed in the right-click menu for the those users when they click on a Data Definition belonging to a new Category. |
||
|
View attachments |
Allows the selected User, Group or Role to view attachments that have been added to documents in Searching Client using a Search Template which is associated with a Data Definition belonging to a new Category. |
||
|
Toggle attachments |
Allows the selected User, Group or Role to toggle attachments on and off that have been added to pages in Searching Client using a Search Template which is associated with a Data Definition belonging to a new Category (see “Attachments Toolbar”).
|
||
|
Add attachments |
Allows the selected User, Group or Role to add attachments to pages in Searching Client using a Search Template which is associated with a Data Definition belonging to a new Category (see “Attachments Toolbar”). |
||
|
Edit own attachments |
Allows the selected User, Group or Role to edit attachments the User has added to pages in Searching Client using a Search Template which is associated with a Data Definition belonging to a new Category (see “Attachments Toolbar”). |
||
|
Edit attachments |
Allows the selected User, Group or Role to edit attachments added to pages in Searching Client using a Search Template which is associated with a Data Definition belonging to a new Category (see “Attachments Toolbar”). |
||
|
Delete own attachments |
Allows the selected User, Group or Role to delete attachments the User has added to pages in Searching Client using a Search Template which is associated with a Data Definition belonging to a new Category (see “Attachments Toolbar”).
|
||
|
Delete attachments |
Allows the selected User, Group or Role to delete attachments added to pages in Searching Client using a Search Template which is associated with a Data Definition belonging to a new Category (see “Attachments Toolbar”). |

The calculations for determining the access settings for a Data Definition are explained in “Access Control Lists Inheritance”
Note: The default access controls for a Category can be set to Allow or Deny – Dynamic is not supported.
Custom Field Types
Custom Field Types (CFTs) are based on Base Field Types or existing Custom Field Types and are used like Index fields. They allow the user to create a specially defined field type which can be used in several Data Definitions and Search Templates.
An example of a very simple Custom Field Type is Days of the week. This could simply be based on the Base Field Type Text and have the list of Allowable values: Sunday, Monday, Tuesday, Wednesday, Thursday, Friday and Saturday.
A more complicated Custom Field Type could be created with the use of Regular Expressions (see “Custom Field Type for Postcodes”).
Template Management Tab Buttons
Refresh
Click the Refresh button to refresh the list of Custom Field Types on the Template Management tab.
View
Click the View button to change the way the list of Custom Field Types is displayed. Alternatively, select one of the following views from the menu which is displayed when the View menu button is clicked. 
Large Icons
Each Custom Field Type is displayed as a large icon with the Name under the icon.
Details
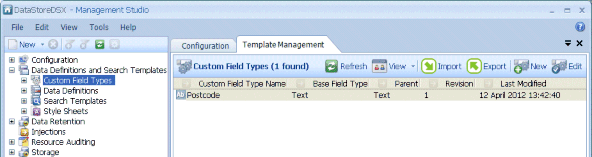
Each Custom Field Type is displayed with the Name, Base Field Type, Parent, Revision and Last Modified information listed (as shown in the above example).
Tile
Each Custom Field Type is displayed as a tile with the Name, Base Field Type, Parent, Revision and Last Modified information listed to the right of the tile.
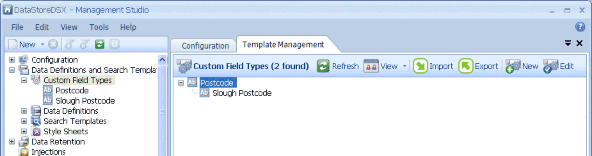
Tree
Each Custom Field Type is displayed in a tree. This is useful when a Custom Field Type is based on a Parent Custom Field Type. In the example below, Slough Postcode is a Custom Field Type which is based on the Custom Field Type Postcode.
Import
An exported Custom Field Type can be imported. See “Export” for more information on exporting a Custom Field Type.
Select Custom Field Type in the tree view and click the Import button on the Template Management tab (or select Import from the File menu). The Package Import window is opened.

The items shown in the Package Import window are described in Table 15.
Table 15. Terminology: Custom Field Type Import
|
Term |
Meaning |
||
|---|---|---|---|
|
If a name conflict occurs, do the following |
|||
|
Prompt for new name |
When selected, if the name of the imported object is the same as the name of an object (but their IDs are different), you will be prompted for a new name. If the IDs are the same, see Force new revision, below. Either this option is selected or the option Rename automatically with prefixed date and time stamp is selected. |
||
|
Rename automatically with prefixed date and time stamp |
When selected, if the name of the imported object is the same as the name of an existing object (but their IDs are different), the imported object will keep the same name but it will have a date and time prefix. If the IDs are the same, see Force new revision, below. Either this option is selected or the option Prompt for new name is selected. |
||
|
Please select the option below if you want to update any existing objects when there is an ID conflict |
|||
|
Force new revision |
When selected, if the ID of the imported object is the same as the ID of an existing object, the revision of the existing object will be increased and the existing object will be updated to the imported object. If the names of the two objects are different, the name of the imported object is used. If this option is cleared, if the ID of the imported object is the same as the ID of an existing object, the object in the package is ignored (that is, it is not imported). |
||
|
Types to import |
Custom Field Types – when selected, all Custom Field Types in the selected Package are imported. Style Sheets – when selected, all Style Sheets in the selected Package are imported. Data Definitions – when selected, all Data Definitions in the selected Package are imported. Search Templates – when selected, all Search Templates in the selected Package are imported.
|
||
Select the required options and click OK. A window is displayed enabling you to select the .dsx Package file you want to import. Click Browse and navigate to the location where the file is stored. Select the file and click Open.
Click Start Import to start importing the objects listed under Name. (The Type and Status for each object is also listed.) The Status column displays the following:
- Pending – the import has not yet begun. If required, click Start Import to begin the import.
- Importing – the object is being imported.
- Success – the object has been imported successfully. When all the objects have been successfully imported, click Close to close the Package Import window.
- Ignored (double click for more details) – the object has not been imported. Double-click Ignored... to see the reason.
Export
When no Custom Field Types are selected on the Template Management tab when the Export button is clicked, all Custom Field Types are exported in a single package.
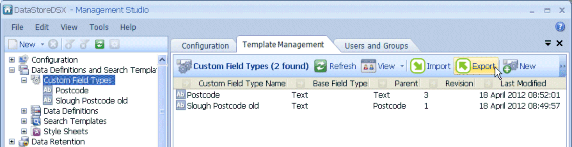
If a Custom Field Type is selected on the Template Management tab, just that Custom Field Type is exported. (If the selected Custom Field Type has a Parent Custom Field Type, both the selected Custom Field Type and the Parent Custom Field Type are exported.)
Click the Export button to open the Custom Field Type(s) Export Progress window.
Click Browse and navigate to the location where the file will be stored. Enter a file name and click Save.
The selected Custom Field Types and all the Parent Custom Field Types are listed.
The Custom Field Type(s) Export Progress window is displayed. Click Start Export to start the export.
The Status column displays the following:
- Pending – the export has not yet begun. Click Start Export to begin the export.
- Exporting – the item is being exported.
- Success – the item has been exported successfully. When all the items have been successfully exported, click Close to close the Custom Field Type(s) Export Progress window.
New
The New button creates a new Custom Field Type and opens the Custom Field Type Editor. See “Custom Field Type Editor”
Edit
The Edit button is active when a Custom Field Type is selected on the Template Management tab. It causes the currently selected Custom Field Type to be opened in the Custom Field Type Editor. See “Custom Field Type Editor”
Right-Click Menu
New
Select New from the menu to create a new Custom Field Type and open it in the Custom Field Type Editor. See “Custom Field Type Editor”
New (Based on this Field Type)
Select New (Based on this Field Type) from the menu to create a new Custom Field Type with its Field type is set to the currently selected Custom Field Type. The new Custom Field Type is opened in the Custom Field Type Editor. See “Custom Field Type Editor”
Edit
Select Edit from the menu to open the currently selected Custom Field Type in the Custom Field Type Editor window. See “Custom Field Type Editor”
Copy
Select Copy from the menu to create a copy of the currently selected Custom Field Type. The copy of the Custom Field Type has the original Custom Field Type name with the prefix Copy of.
Copy and Open for Edit
Select Copy and Open for Edit from the menu to create a copy of the currently selected Custom Field Type and open the copy in the Custom Field Type Editor. See “Custom Field Type Editor”
Revert to Previous Revision/Delete
The menu option Revert to Previous Revision is displayed when the selected Custom Field Type is at Revision 2 or later. Selecting Revert to Previous Revision from the menu removes the changes made when the Custom Field Type was last saved and reverts it back to the state it was in when it was saved at the previous revision.
The menu option Delete is displayed when the Custom Field Type is at Revision 1. Selecting Delete from the menu deletes the current Custom Field Type.
Note: A Custom Field Type can only be deleted or reverted when it is not being used by any Data Definitions and when there are no Custom Field Types which were created based on this Custom Field Type.
Update Related Data Definitions
Select Update Related Data Definitions to update the Data Definitions (which are using the currently selected Custom Field Type) with any changes made to the Custom Field Type.
When this option is selected, the Data Definition Selection window is displayed which enables you to select which Data Definitions (which currently use the selected Custom Field Type) should be updated with the latest version of the selected Custom Field Type. Select the Data Definitions which require updating and click OK.
Import
Select Import from the menu to import a Custom Field Type which had previously been exported.
See “Import” for more information about Importing a Custom Field Type. See “Export” for more information on exporting a Custom Field Type.
Export
Select Export from the menu to export the currently selected Custom Field Type.
See “Export” for more information on exporting a Custom Field Type. Exported Custom Field Types can be imported. See “Import” for more information about Importing a Custom Field Type.
Refresh
Select Refresh from the menu to refresh the list of Custom Field Types in the tree view.
Data Definitions
A Data Definition is a user configured template which enables information to be indexed and stored in a structured manner. Data Definitions are used to create Search Templates which are used to extract the stored information for analysis.
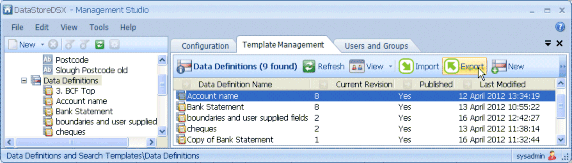
A Data Definition must be Published before it can be used and it must have Access Control configured to make it available to users other than the creator/publisher. When Data Definitions is selected in the tree view, all the Data Definitions are listed on the Template Management tab.
Data Definition Summary Information
When a Data Definition is selected, the summary information is displayed on the Template Management tab.
The summary information shows the Data Definition name, ID, Creation date, Last modified date, Revision, whether it is Published, whether Full text indexing is supported and the Category it is assigned to (or None if it is not assigned to a Category). When a Data Definition is assigned to a Category which is nested inside another Category, the Categories are listed with the top-level Category first, then the separator | followed by the next level Category and so on until the Category to which the Data Definition belongs is listed.
For example, Top-level | Level One | Level Two indicates the Category is assigned to Category
Level Two which is in the Category Level One which belongs to the category Top-Level.
The summary shows the Default Acceptance state which has been set for this Data Definition. The Default Acceptance State is used with Document Versioning and Document Routing. This sets the state a document (which is indexed and stored with this Data Definition) is moved to by default.
More text describing the field value related boundary conditions defined for this data definition are available by clicking the >> button in the right border of the summary screen. This provides a quick way of viewing all the details without editing.
Data Definition Field Summary Information
Summary information for a field can be viewed by expanding the Data Definition and selecting a field.
When a field which extracts the information from a document is selected, three tabs are displayed: Validation, Position and Input Source.
When a field is selected which has its value entered manually, the Validation tab is displayed.
Template Management Tab Buttons
Refresh
Click the Refresh button to refresh the list of Data Definitions on the Template Management tab.
View
Click the View button to change the way the list of Data Definitions is displayed. Alternatively, select one of the following views from the menu which is displayed when the View menu button is clicked. 
Large Icons
Each Data Definition is displayed as a large icon with the Name under the icon.
Details
Each Data Definition is displayed with the Name, Current Revision, Published and Last Modified information listed (as shown in the above example).
Tile
Each Data Definition is displayed as a tile with Name, Current Revision, Published and Last Modified information listed to the right of the tile.
Import
An exported Data Definition can be imported. See “Export” for more information on exporting a Data Definition.
Select Data Definitions in the tree view and click the Import button on the Template Management tab (or select Import from the File menu). The Package Import window is opened.

The items shown in the Package Import window are described in Table 16.
Table 16. Terminology: Data Definition Import
|
Term |
Meaning |
|---|---|
|
If a name conflict occurs, do the following |
|
|
Prompt for new name |
When selected, if the name of the imported object is the same as the name of an object (but their IDs are different), you will be prompted for a new name. If the IDs are the same, see Force new revision, below. Either this option is selected or the option Rename automatically with prefixed date and time stamp is selected. |
|
Rename automatically with prefixed date and time stamp |
When selected, if the name of the imported object is the same as the name of an existing object (but their IDs are different), the imported object will keep the same name but it will have a date and time prefix. If the IDs are the same, see Force new revision, below. Either this option is selected or the option Prompt for new name is selected. |
|
Please select the option below if you want to update any existing objects when there is an ID conflict |
|
|
Force new revision |
When selected, if the ID of the imported object is the same as the ID of an existing object, the revision of the existing object will be increased and the existing object will be updated to the imported object. If the names of the two objects are different, the name of the imported object is used. If this option is cleared, if the ID of the imported object is the same as the ID of an existing object, the object in the package is ignored (that is, it is not imported). |
||
|
Types to import |
|
Select the required options and click OK. A window is displayed enabling you to select the .dsx Package file you want to import. Click Browse and navigate to the location where the file is stored. Select the file and click Open.
Click Start Import to start importing the objects listed under Name. (The Type and Status for each object is also listed.) The Status column displays the following:
- Pending – the import has not yet begun. If required, click Start Import to begin the import.
- Importing – the object is being imported.
- Success – the object has been imported successfully. When all the objects have been successfully imported, click Close to close the Package Import window.
- Ignored (double click for more details) – the object has not been imported. Double-click Ignored... to see the reason.
Export
When no Data Definitions are selected on the Template Management tab when the Export button is clicked, all Data Definitions are exported in a single package.
If a Data Definition is selected on the Template Management tab, just that Data Definition is exported.
Click the Export button to open the Data Definition(s) Export Progress window.
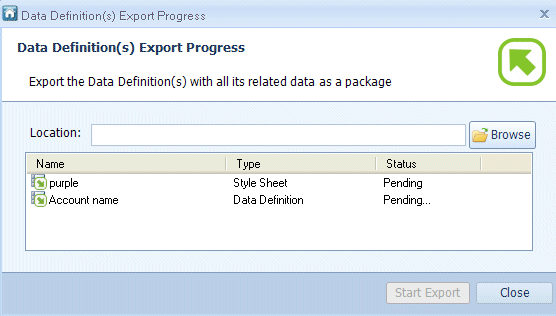
Click Browse and navigate to the location where the file will be stored. Enter a file name and click Save.
The selected Data Definitions and all the related items are listed.
The Data Definition(s) Export Progress window is displayed. Click Start Export to start the export. The Status column displays the following:
- Pending – the export has not yet begun. Click Start Export to begin the export.
- Exporting – the item is being exported.
- Success – the item has been exported successfully. When all the items have been successfully exported, click Close to close the Data Definition(s) Export Progress window.
New
The New button creates a new Data Definition and opens the Data Definition Editor. See “Data Definition Editor”
Edit
The Edit button is active when a Data Definition is selected on the Template Management tab. It causes the currently selected Data Definition to be opened in the Data Definition Editor. See “Data Definition Editor”
Right-Click Menu
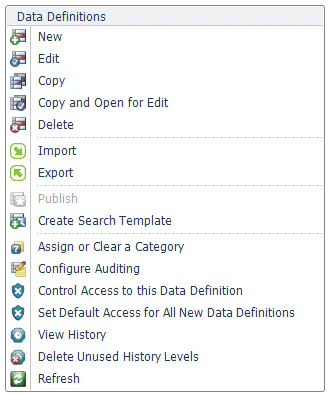
New
Select New from the menu to create a new Data Definition and open it in the Data Definition Editor. See “Data Definition Editor”
Edit
Select Edit from the menu to open the currently selected Data Definition in the Data Definition Editor. See “Data Definition Editor”
Copy
Select Copy from the menu to create a copy of the currently selected Data Definition. The copy of the Data Definition has the original Data Definition name with the prefix Copy of.
Copy and Open for Edit
Select Copy and Open for Edit from the menu to create a copy of the currently selected Data Definition and open the copy in the Data Definition Editor. See “Data Definition Editor”
Delete
Select Delete from the menu to delete the currently selected Data Definition.
Note: Unpublished Data Definitions can be deleted. Published Data Definitions can be deleted only if they have not been used to Index any data and all links to Search Templates, Retention Policies and Automated Indexing Watched Folders have been deleted.
Import
Select Import from the menu to import a previously exported Data Definition.
See “Import” for more information about importing Data Definitions.
Export
Select Export from the menu to export the currently selected Data Definition.
See “Export” for more information about exporting Data Definitions.
Publish
Select Publish from the menu to Publish the currently selected Data Definition. Once Published, a Data Definition can be used to Index files.
Publish is available in the menu only when the selected Data Definition has not been published since the last changes to it were made.
Create Search Template
Select Create Search Template from the menu to create a default Search Template from the currently selected Data Definition.
Assign or Clear a Category
A Category is used to configure Access Controls for all the Data Definitions which have been assigned to it. This enables you to easily change the Access Controls for a number of Data Definitions. See “Categories” for information on creating a Category.
Select Assign or Clear a Category from the menu to open the Data Definition Category Assignment window. This window enables you to add the selected Data Definition to a Category, change the Category to which the Data Definition is assigned or to Clear the Category to which the Data Definition is assigned (so that it is no longer assigned to any Category).
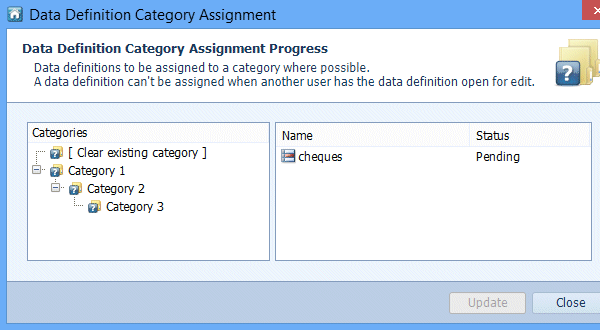
The Data Definition’s Status is shown as Pending.
Select the Category to which you want to assign the Data Definition and click the Update button. The Data Definition is assigned to the selected Category and the Status is shown as Assigned. No update required is displayed as the status for a Data Definition which is already assigned to the selected Category.
Note: When several Data Definitions are selected and the Assign or Clear a Category option is selected, all the selected Data Definitions are assigned to the selected Category when the Update button is clicked.
To clear the assigned Category, select [ Clear existing category ] and click the Update button. The Status is shown as Cleared category. Click Close to close the window.
Configure Auditing
Select Configure Auditing from the menu to configure Auditing for the currently selected Data Definition. Selecting this option opens the Data Definition Audit window which enables you to configure Audit, No Audit or Default audit operations for each of the auditable fields listed.
See “Resource Auditing” for more information about configuring auditing for the selected Data Definition.
Control Access to this Data Definition
Select Control Access to this Data Definition from the menu to select which Users, members of Groups or members of Roles have access to the selected Data Definition and associated Search Templates.
By default, users do not have access to Data Definitions (unless Set Default Access for All New Data Definitions is configured). Therefore, once you have created the Data Definition and Published it, you must configure access.
You can control who has access to the current Data Definition by configuring an Access Control List. Select Control Access to this Data Definition. The Access Control Security Configuration window is displayed.
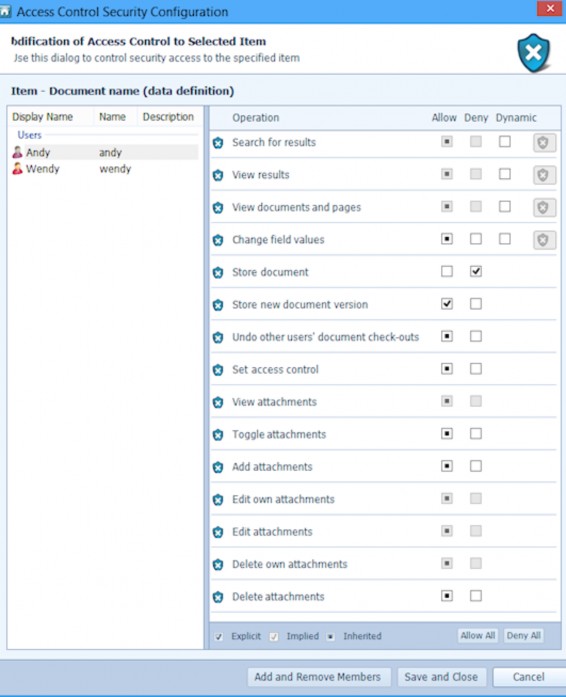
Users, Groups and Roles which have been given access to the Data Definition are listed on the left. To see what access the User, Group or Role has been given, select the Name and view the settings for the Operations listed on the right.
Note: Adding individual users to each Data Definition's Access Control List and configuring their permissions can be time consuming. However, by creating a Group named, for example, Data Definitions Creators and adding the users to the Group, granting access to the Data Definitions can become much simpler. In this case, you would simply configure access to the Group named Data Definitions Creators.
The items used to configure Access Control Lists for Data Definitions are described in Table 17.
Table 17. Terminology: Data Definition Access Control List (ACLs)
|
Operation |
Meaning |
||
|---|---|---|---|
|
Item |
The selected Data Definition to which access control is being configured (the Data Definition Document name in the above example). |
||
|
Users/Groups/Roles |
The name of the Users/Groups/Roles (Users Andy and Wendy in the above example) who are being given access to the Data Definition in the above example). |
||
|
Search for results |
Allows the selected User, Group or Role to see and use any associated Search Templates in Searching Client. When set to Deny, Search Templates associated with the selected Data Definition are not available to the selected User, Group or Role in Searching Client. This operation can also be set to Dynamic. See “Dynamic Access Control Criteria” |
||
|
View results |
Allows the selected User, Group or Role to view the results of any searches. When set to Deny, the number of search results is displayed but the results grid contains [restricted] instead of the index values. The Document or Page view is replaced with the Restricted graphic.
This operation can also be set to Dynamic. See “Dynamic Access Control Criteria”
|
||
|
View documents and pages |
Allows the selected User, Group or Role to see documents and pages which match the search criteria. When set to Deny for a User, Role or Group, the Document or Page view is replaced with the Restricted graphic for those users. This operation can also be set to Dynamic. See “Dynamic Access Control Criteria”
|
||
|
Change field values |
Allows the selected User, Group or Role to modify index field values in Searching Client (see “Modify Index Values”) for search fields which are linked to Index fields which belong to the currently selected Data Definition. This operation can also be set to Dynamic. See “Dynamic Access Control Criteria”
|
||
|
Store document |
Allows the selected User, Group or Role to store documents via Indexing Studio or Management Studio Automated Indexing. When set to Deny for a User, Role or Group, the Data Definition is not listed in the Automated Indexing pane nor is it listed in Indexing Studio for those users. |
||
|
Store new document version |
Allows the selected User, Group or Role to check out a document from Searching Client, edit it and then check-in a new version. This access control also enables users of the WebDAV file explorer to edit documents and save them as new revisions. |
||
|
Undo other users’ document check-outs |
When a user checks out a document revision in Searching Client, a document lock is created and no other users can edit the selected document. Setting Undo other users’ document check-outs to Allow enables the selected User, Group or Role to unlock documents which have been Indexed using the selected Data Definition and have been checked out from Searching Client. Unlocking a document discards all edits made to the document by the Searching Client user. This Access Control is usually assigned to administrators only. See “System Locks” for information on unlocking documents. |
||
|
Set access control |
Allows the selected User, Group or Role to set the access controls (configure ACLs) for the Data Definition. When set to Allow, the user has access to the settings described in this table for the selected Data Definition. When set to Deny for a User, Role or Group, the menu item Control Access to this Data Definition is not displayed in the right-click menu for the those users. |
||
|
View attachments |
Allows the selected User, Group or Role to view attachments that have been added to documents in Searching Client. |
||
|
Toggle attachments |
Allows the selected User, Group or Role to toggle attachments on and off that have been added to pages in Searching Client (see “Attachments Toolbar”).
|
||
|
Add attachments |
Allows the selected User, Group or Role to add attachments to pages in Searching Client (see “Attachments Toolbar”). |
||
|
Edit own attachments |
Allows the selected User, Group or Role to edit attachments the User has added to pages in Searching Client (see “Attachments Toolbar”). |
||
|
Edit attachments |
Allows the selected User, Group or Role to edit attachments added to pages in Searching Client (see “Attachments Toolbar”). |
||
|
Delete own attachments |
Allows the selected User, Group or Role to delete attachments the User has added to pages in Searching Client (see “Attachments Toolbar”).
|
||
|
Delete attachments |
Allows the selected User, Group or Role to delete attachments added to pages in Searching Client (see “Attachments Toolbar”). |

The calculations for determining the access settings for a Data Definition are explained in “Access Control Lists Inheritance” on page 9.
Add and Remove Members Button
To allow a User, Group or Role access to the selected Data Definition, click Add and Remove Members.
To add access to Users, select the Users tab, select one or more users and click Add Member >>.
To add access to Groups, select the Groups tab, select one or more groups and click Add Member >>.
To add access to Roles, select the Roles tab, select one or more roles and click Add Member >>. To remove a User, Group or Role from the list, select the item in the right-hand pane and click << Remove Member.
Once you have selected all the Users, Groups and/or Roles to which you want to give access to the current Data Definition, click Confirm. If you want to exit without adding any Users, Groups or Roles to the list click Cancel.
You are returned to the Access Control Security Configuration window. See “Control Access to this Data Definition” on page 301 for details on how to configure Access Control to the current Data Definition for each User, Group and/or Role.
Save and Close Button
To save all the changes made, click Save and Close. The changes are saved and the Access Control Security Configuration window is closed.
Cancel Button
To exit without saving any of the changes made, click Cancel. The changes are discarded and the Access Control Security Configuration window is closed.
Note: View results can only be set to Allow or to Dynamic when Search for results has been set to Allow or Dynamic.
View documents and pages can only be set to Allow or to Dynamic when View results has been set to either Allow or Dynamic.
Dynamic Access Control Criteria
This window enables you to configure the criteria which must be met to allow access to the Data Definition. The items used to configure Dynamic Access Control Criteria are described in Table 18.
Table 18. Terminology: Data Definition Dynamic Access Control Entry Configuration
|
Operation |
Meaning |
||
|---|---|---|---|
|
|
Click to delete the selected criterion. |
||
|
Select a field... |
Click on Select a field... to display a list of all the Index fields in the selected Data Definition which can be used to define when access is given. The following Audit fields can also be used to define when access is given: Create Date and Time If the selected Data Definition belongs to a Category which has Custom Security configured, the Custom Security fields are also listed.
|
||
|
Field value |
Enter a value or range of values in the text box. See “Regular Search Field Syntax” for examples of syntax which can be used with the different field types. |
||
|
Add Criteria |
Click to add more Criteria to the dynamic access control configuration. |
||
|
Clear All Criteria |
Click to delete all the criteria.
|
||
|
What criteria needs to be met |
All criteria must be met – select this option if, when you have defined two or more criteria, all the criteria must be met. This option has no effect when only one criterion has been defined. At least one criterion must be met – select this option if, when you have defined two or more criteria, at least one of the criteria must be met. This option has no effect when only one criterion has been defined. |
||
|
How matched criteria will be interpreted |
Access will be allowed – select this option if, when the criteria are met, you want access to be allowed. Access will be denied – select this option if, when the criteria are met, you want access to be denied. |
||
|
Save and Close |
Click to save the defined criteria and close the window. |
||
|
Cancel |
Click to close the window without saving the changes. |


Set Default Access for all new Data Definitions
Select Set Default Access for All New Data Definitions from the menu to set the default access to all new Data Definitions by Users, Groups and Roles.
When default access controls are set up, new Data Definitions are automatically configured with the selected access controls.
A Data Definition can be edited to add or remove access from Users, Groups or Roles, or it can be left at the default Access Control setting.
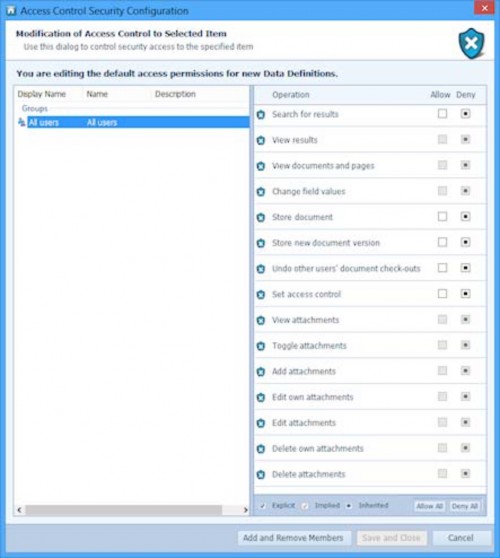
The items used to configure Access Control Lists for Groups are described in Table 19.
Table 19. Terminology: Default Data Definition Access Control List (ACLs)
|
Operation |
Meaning |
||
|---|---|---|---|
|
Users/Groups/Roles |
The name of the Users/Groups/Roles (All users in the above example) who are being given default access to all new Data Definitions. |
||
|
Search for results |
Allows the selected User, Group or Role to use any Search Templates in Searching Client which are associated with any new Data Definitions. |
||
|
View results |
Allows the selected User, Group or Role to view the results of any searches performed with Search Templates associated with new Data Definitions. When set to Deny, the number of search results is displayed but the results grid contains [restricted] instead of the index values. The Document or Page view is replaced with the Restricted graphic.
Cannot be set to Allow unless Search for results is set to Allow. |
||
|
View documents and pages |
Allows the selected User, Group or Role to see documents and pages which match the search criteria specified with Search Templates associated with new Data Definitions. When set to Deny for a User, Role or Group, the Document or Page view is replaced with the Restricted graphic for those users. Cannot be set to Allow unless View results is set to Allow. |
||
|
Change field values |
Allows the selected User, Group or Role to modify index field values in Searching Client for search fields which are linked to Index fields which belong to new Data Definitions. Cannot be set to Allow unless View results is set to Allow. See “Modify Index Values” |
||
|
Store document |
Allows the selected User, Group or Role to store documents via Indexing Studio or Management Studio automated Indexing. When set to Deny for a User, Role or Group, the new Data Definition is not listed in the Automated Indexing pane nor is it listed in Indexing Studio for those users. |
||
|
Store new document version |
Allows the selected User, Group or Role to check out a document from Searching Client, edit it and then check-in a new version. This access control also enables users of the WebDAV file explorer to edit documents and save them as new revisions. |
||
|
Undo other users’ document check-outs |
When a user checks out a document revision in Searching Client, a document lock is created and no other users can edit the selected document. Setting Undo other users’ document check-outs to Allow enables the selected User, Group or Role to unlock documents which have been Indexed using a new Data Definition and which have been checked out from Searching Client. Unlocking a document discards all edits made to the document by the Searching Client user. This Access Control is usually assigned to administrators only. See “System Locks” for information on unlocking documents. |
||
|
Set access control |
Allows the selected User, Group or Role to set the access controls (configure ACLs) for the new Data Definition. When set to Allow, the user has access to the settings described in this table for the new Data Definition. When set to Deny for a User, Role or Group, the menu item Control Access to this Data Definition is not displayed in the right-click menu for the those users. |
||
|
View attachments |
Allows the selected User, Group or Role to view attachments that have been added to documents in Searching Client using a Search Template associated with a new Data Definition. |
||
|
Toggle attachments |
Allows the selected User, Group or Role to toggle attachments on and off that have been added to pages in Searching Client using a Search Template associated with a new Data Definition (see “Attachments Toolbar”).
|
||
|
Add attachments |
Allows the selected User, Group or Role to add attachments to pages in Searching Client using a Search Template associated with a new Data Definition (see “Attachments Toolbar”). |
||
|
Edit own attachments |
Allows the selected User, Group or Role to edit attachments the User has added to pages in Searching Client using a Search Template associated with a new Data Definition (see “Attachments Toolbar”). |
||
|
Edit attachments |
Allows the selected User, Group or Role to edit attachments added to pages in Searching Client using a Search Template associated with a new Data Definition (see “Attachments Toolbar”). |
||
|
Delete own attachments |
Allows the selected User, Group or Role to delete attachments the User has added to pages in Searching Client using a Search Template associated with a new Data Definition (see “Attachments Toolbar”).
|
||
|
Delete attachments |
Allows the selected User, Group or Role to delete attachments added to pages in Searching Client using a Search Template associated with a new Data Definition (see “Attachments Toolbar”). |

The calculations for determining the access settings for a Data Definition are explained in “Access Control Lists Inheritance”
Note: The default access controls for a Data Definition can be set to Allow or Deny – Dynamic is not supported.
Add and Remove Members Button
To allow a User, Group or Role access to the new Data Definition, click Add and Remove Members.
To add access to Users, select the Users tab, select one or more users and clickAdd Member >>.
To add access to Groups, select the Groups tab, select one or more groups and click Add Member >>.
To add access to Roles, select the Roles tab, select one or more roles and click Add Member >>. To remove a User, Group or Role from the list, select the item in the right-hand pane and click << Remove Member.
Once you have selected all the Users, Groups and/or Roles to which you want to give access to the new Data Definition, click Confirm. If you want to exit without adding any Users, Groups or Roles to the list click Cancel.
You are returned to the Access Control Security Configuration window. See “Set Default Access for all new Data Definitions” for details on how to configure the default Access Control for all new Data Definitions for each User, Group and/or Role.
Save and Close Button
To save all the changes made, click Save and Close. The changes are saved and the Access Control Security Configuration window is closed.
Cancel Button
To exit without saving any of the changes made, click Cancel. The changes are discarded and the Access Control Security Configuration window is closed.
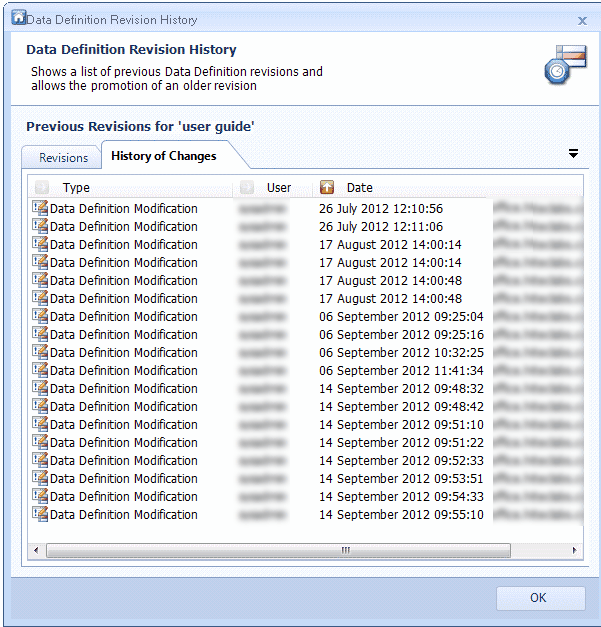
View History
When View History is selected from the menu, the Revision History window is displayed. This window has two tabs – Revisions and History of Changes.
Revisions
The Revisions tab displays the following information.
- Date created – the date the revision was created,
- Revision – the revision number. A Data Definition's Revision number increases each time it is Published.
At the bottom of the window are the following buttons:
- Delete Unused History Levels – see “Delete Unused History Levels”
- Copy As New – copies the selected Revision and creates a new Data Definition.
- Publish – Publishes the selected Revision.
- Promote – Makes the selected Revision the latest Revision.
- If you perform a promotion and the highest level revision is unpublished, it will be replaced by the newly created copy.
- If you perform a promotion and the highest level revision is published, a new revision will be created.
- Show Summary – shows a summary of information about the selected Revision of the Data Definition (ID, Creation date, Last modified, Revision, Published, Full text, Category and a list of fields)
History of Changes
The History of Changes tab displays the following information.
- Type – Data Definition Modification.
- User – shows the user used to make the changes.
- Date – the date on which the Data Definition was edited.
- Machine – the name of the computer used to make the edits.
Delete Unused History Levels
Any previous history levels of a Data Definition that are not used (that is, no data has been indexed against them, there are no Retention Policies using them and there are no explicit links from Search Templates to them) are redundant. To delete unused history levels, select the Data Definition, right-click and select this option from the menu.
Refresh
Select Refresh from the menu to refresh the list of Data Definitions in the tree view.
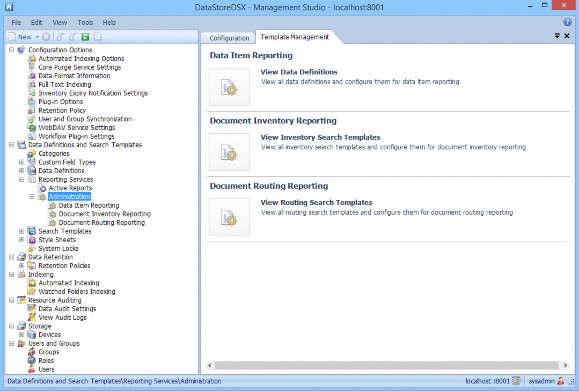
Reporting Services
There are two selections within Reporting Services:
- “Active Reports”.
- “Administration”.
There are three selections within Administration:- “Data Item Reporting”.
- “Document Inventory Reporting”.
- “Document Routing Reporting”.
Active Reports
Active Reports are used to view all reports currently in the system. It is used to examine documents that are queued, pending or in error.
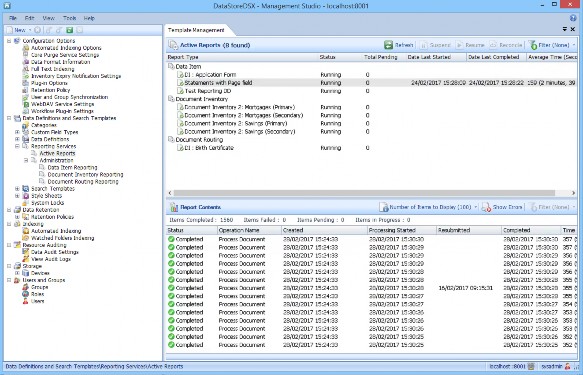
The Active Reports screen shows report requests that are stored ready to go into the reporting database. When data is entered, requests are sent to a holding database to be processed for reporting. The Active Reports screen provides information on what is stored ready to be processed and if required, lets you pause the processing of these entries for investigation.
By default, Active Reports are not enabled in DataStore®DSX. To enable Active Reporting for any Data Definition, Search Templates or Routing Templates they must first be enabled, see “Administration” below for more information.
To manage and read reports see “Users and Groups” to enable and disable User and Group Permissions.
Table 20. Terminology: Active Reports
|
Operation |
Meaning |
|---|---|
|
Active Reports |
|
|
Suspend |
With a reporting item selected, Suspend will stop processing the item. |
|
Resume |
Once processing has been suspended, the Resume button is available to allow processing to continue. |
|
Reconcile |
This button clears processing for the selected item and restarts it. |
|
Filter |
Provides the ability to display reports with a Status; Error, Missing, Running, Suspended, or Unknown. Clear Filter; Select this option to remove the filter setting. This option is only available when a Filter setting has been selected. |
|
Report Type |
Shows which Reports are enabled. There are three reporting types that can be enabled; Data Item, Document Inventory and Document Routing, see “Administration” below for details. |
|
Status |
Displays which reports are in Error, Missing, Running, Suspended or Unknown. |
|
Total Pending |
Shows the total number of reports against a Status condition. |
|
Date Last Started |
Shows the time the report was last reconciled. This will be the last time it was cleared and restarted. |
|
Date Last Completed |
Displays the time taken for a document to go into the system and appear in the reporting database. |
|
Average Time (Seconds) |
Shows the average time, in seconds (minutes and seconds in parenthesis) taken for a document to be put into the system and appear in the reporting database. |
|
Report Contents |
|
|
Number of Items to Display |
The number of items displayed in the pane. The choices are; 50, 100, 250 or 500 items per page. |
|
Show Errors |
This button shows any items that have an Error. The selection opens an error detail pane which shows the date and time of the Error and any associated error message. The system will log the Error and put the item to the back of the queue as a pending item. |
|
Filter |
This selection provides the ability to display reports with one of following Status; Completed, Failed, Pending or Processing. Clear Filter; Select this option to remove the filter selection. The option is only available when a Filter setting has previously been selected. |
|
Status |
This column displays all items that are Pending or have Completed for the selected report type. |
|
Operation Name |
The operation name of the item that has been processed. |
|
Processing Started |
The time that the process started. |
|
Resubmitted |
The time that the process was resubmitted. |
|
Completed |
The time that the process completed. |
|
Time Taken (Seconds) |
The time taken for an item to be put into the system and appear in the reporting database. |
Administration
Administration provides the ability to control and configure reporting plugins. This function identifies which Data Definitions, Search Templates and Routing Templates appear in Active Reports.
Data Item Reporting
To enable a Data Definition in Active Reports, select Data Item Reporting in the tree menu. This will open the Data Item Reporting pane containing all Data Definitions in the system.
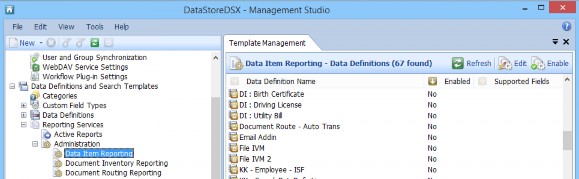
A Data Definition must be Enabled to be included in Active Reports. If it is not Enabled, select the Data Definition and then select the Enable button.
With a Data Definition selected, select the Edit button. The Reporting Plugin Configuration window will open.
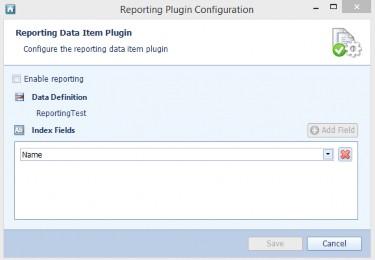
Select Enable reporting and then select Save. Active Reports are now enabled for the Data Definition.
Document Inventory Reporting
To enable Document Inventory Reports, select it from the tree menu. This will open the Documentary Inventory Reporting pane containing all Inventory Search Templates in the system.
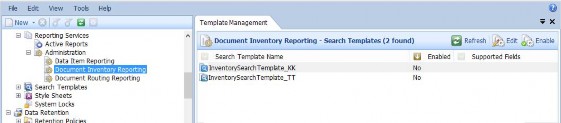
A Document Inventory Report must be Enabled to be included in Active Reports. If it is not Enabled, select the Search Template and then select the Enable button.
With the Search Template selected, select the Edit button. The Reporting Plugin Configuration window will open.

Select Enable reporting and then select Save. Active Reports are now enabled for Document Inventory Reporting.
Document Routing Reporting
To enable Document Routing Reports, select it from the tree menu. This will open the Documentary Routing Reporting pane containing all Routing Search Templates in the system.

A Document Routing Report must be Enabled to be included in Active Reports. If it is not Enabled, select the Search Template and then select the Enable button.
With the Search Template selected, select the Edit button. The Reporting Plugin Configuration window will open.
Select Enable reporting and then select Save. Active Reports are now enabled for Document Routing Reporting.
Search Templates
Search Templates are used to define the search fields used to retrieve information and documents.
Search Templates can be created in two ways:
- From Data Definitions (either at the time of publication or at a later time) – “Publish Data Definition and Create Search Template”
- As a separate Search Template which consists of one or more:
- Fields from Data Definitions
- Custom Fields
- Auditable Fields
See “Create a Search Template” for an example configuration.
Template Management Tab Buttons
Options Button
By default, Document Routing Support, Document Inventory Support and Document Version Search Support summary information is not displayed for all Search Templates.
To show the support summary information, select Search Templates in the tree view and then click the Options button.
From the drop-down list, select one or more of the following options, then click Refresh:
Note: When an Option is selected, its corresponding Option Icon is highlighted. In the following example, the Document Version Search Support option has been selected.
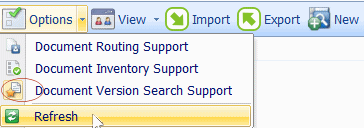
When you have completed your selections, remember to click Refresh.
Each selected option is displayed as a Column Heading and each Search Templates' Document Routing, Document Inventory and or Document Version Search support details are displayed next to each Search Template.
The selection process can be repeated to show or hide one or more of the options.
Document Routing Support Options:
- None – the Search Template has no Document Route configured. See “None” for information on deleting an existing linked or local Document Route.
- Owned – the Search Template has a local Document Route configured. See “Configure for this Search Template” for information about creating a local Document Route.
- Linked – the Search Template has a link to a Document Route in another Search Template. See “Link to Existing Document Route” for information on linking a Search Template to a Document Route in another Search Template.
Document Inventory Support Options:
- No
- Yes
Document Version Search Support Options:
- None
- Latest Version Only
- All Versions
- Latest Published Version Only
Refresh
Click the Refresh button to refresh the list of Search Templates on the Template Management tab and, if selected, the support options.
View
Click the View button to change the way the list of Search Templates is displayed. Alternatively, select one of the following views from the menu which is displayed when the View menu button is clicked. 
Large Icons
Each Search Template is displayed as a large icon with the Name under the icon.
Details
Each Search Template is displayed with the Name and Last Modified information listed (as shown in the above example).
Tile
Each Search Template is displayed as a tile with the Name and Last Modified information listed to the right of the tile.
Import
An exported Search Template can be imported. See “Export” for more information on exporting a Search Template.
Select Search Templates in the tree view and click the Import button on the Template Management tab (or select Import from the File menu). The Package Import window is opened.

Note: When the Search Template you are importing contains a Document Route, a message is displayed informing you that imported Document Routes do not have any membership information. Manual Transitions are exported as Automatic Transitions (with no membership information). When you have imported the Search Template, edit the Document Route, change the Transitions to Manual Transitions (as required) and add the required membership information.
Note: When Document Routes are imported, their Document Route IDs are preserved. If a Search Template already exists on the system with a Document Route with the same ID as the Document Route you are attempting to import, the Search Template is not imported.
The items shown in the Package Import window are described in Table 21.
Table 21. Terminology: Search Template Import
|
Term |
Meaning |
||
|---|---|---|---|
|
If a name conflict occurs, do the following |
|||
|
Prompt for new name |
When selected, if the name of the imported object is the same as the name of an object (but their IDs are different), you will be prompted for a new name. If the IDs are the same, see Force new revision, below. Either this option is selected or the option Rename automatically with prefixed date and time stamp is selected. |
||
|
Rename automatically with prefixed date and time stamp |
When selected, if the name of the imported object is the same as the name of an existing object (but their IDs are different), the imported object will keep the same name but it will have a date and time prefix. If the IDs are the same, see Force new revision, below. Either this option is selected or the option Prompt for new name is selected. |
||
|
Please select the option below if you want to update any existing objects when there is an ID conflict |
|||
|
Force new revision |
When selected, if the ID of the imported object is the same as the ID of an existing object, the revision of the existing object will be increased and the existing object will be updated to the imported object. If the names of the two objects are different, the name of the imported object is used. If this option is cleared, if the ID of the imported object is the same as the ID of an existing object, the object in the package is ignored (that is, it is not imported). |
||
|
Types to import |
Custom Field Types – when selected, all Custom Field Types in the selected Package are imported. Style Sheets – when selected, all Style Sheets in the selected Package are imported. Data Definitions – when selected, all Data Definitions in the selected Package are imported. Search Templates – when selected, all Search Templates in the selected Package are imported.
|
||
Select the required options and click OK. A window is displayed enabling you to select the .dsx Package file you want to import. Click Browse and navigate to the location where the file is stored. Select the file and click Open.
Click Start Import to start importing the objects listed under Name. (The Type and Status for each object is also listed.) The Status column displays the following:
- Pending – the import has not yet begun. If required, click Start Import to begin the import.
- Importing – the object is being imported.
- Success – the object has been imported successfully. When all the objects have been successfully imported, click Close to close the Package Import window.
- Ignored (double click for more details) – the object has not been imported. Double-click Ignored... to see the reason.
Export
When no Search Templates are selected on the Template Management tab when the Export button is clicked, all Search Templates are exported in a single package.
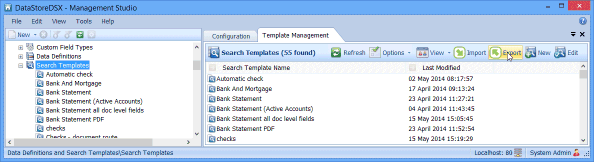
If a Search Template is selected on the Template Management tab, just that Search Template is exported.
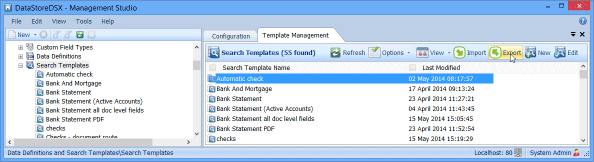
Click the Export button to open the Search Template(s) Export Progress window.

Click Browse and navigate to the location where the file will be stored. Enter a file name and click Save.
The selected Search Templates and all the related items are listed.
The Search Template Export Progress window is displayed. Click Start Export to start the export. The Status column displays the following:
- Pending – the export has not yet begun. Click Start Export to begin the export.
- Exporting – the item is being exported.
- Success – the item has been exported successfully. When all the items have been successfully exported, click Close to close the Search Template Export Progress window.
Note: When a Search Template which contains a Document Route is exported, Manual Transitions are exported as Automatic Transitions (with no membership information). When the Search Template is imported, the Document Route must be edited, Automatic Transitions must be changed to Manual Transitions (as required) and the appropriate membership information must be added.
The Layout information is not retained when a Document Route is exported.
Note: When a Search Template which is linked to a Document Route in another Search Template is exported, the linked Search Template is also exported.
New
The New button creates a new Search Template and opens it in the Search Template Editor. See “Search Template Editor”
Edit
The Edit button is active when a Search Template is selected on the Template Management tab. It causes the currently selected Search Template to be opened in the Search Template Editor. See “Search Template Editor”
Right-Click Menu
Select a Search Template in the tree view. Right-click to display the following menu.
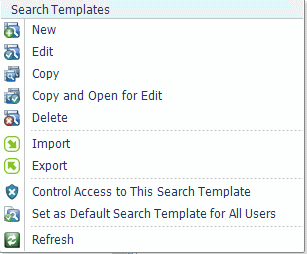
New
Select New from the menu to create a new Search Template and open it in the Search Template Editor. See “Search Template Editor”
Edit
Select Edit from the menu to open the currently selected Search Template in the Search Template Editor. See “Search Template Editor”
Copy
Select Copy from the menu to create a copy of the currently selected Search Template. The copy of the Search Template has the original Search Template name with the prefix Copy of.
Copy and Open for Edit
Select Copy and Open for Edit from the menu to create a copy of the currently selected Search Template and open the copy in the Search Template Editor. See “Search Template Editor”
Delete
Select Delete from the menu to delete the currently selected Search Template.
Import
Select Import from the menu to import a previously exported Search Template. See “Import” for information on how to import Search Templates.
See “Export” for more information on exporting a Search Template.
Export
Select Export from the menu to export the currently selected Search Template. See “Export” for more information on exporting a Search Template.
Control Access to this Search Template
Select Control Access to this Search Template from the menu to select which Users, members of Groups or members of Roles have viewing access to the selected Search Template.
As an Administrator, you can control who has viewing access to the currently selected Search Template by configuring an Access Control List. Select Control Access to this Search Template. The Access Control Security Configuration window will be displayed.

Note: When setting up viewing permission for a Search Template for the first time, you will need to Add Members to the Search Template Access Control List. When you have added all the required Users, Groups and or Roles, you can set up the Viewing Access Permissions.
Add Members to the Search Template Access List
- In the tree view, expand Data Definitions and Search Templates.
- Expand and select Search Templates to display a list of all available search templates.
- Right-click the required Search Template and select Control Access to this Search Template. (Users, Groups and Roles that have been given access to the Search Template are listed on the left. To see what access the User, Group or Role has been given, select the Name and view the setting listed on the right.)
- In the Access Control Security Configuration window, click Add and Remove Members.
- In the Add New Members window, select the required Users/Groups/Roles tab.
- From the listed Users/Groups/Roles, select in turn, the Users/Groups/Roles to be added to the members' list.
- To select a consecutive list: click on the first member, hold down the keyboard’s Shift key, then click on the last member.
- To select a non-consecutive list: click on the first member, hold down the keyboard’s Ctrl key, then click on each additional member you require.
- Click the Add member >> button to add the selected members.
- Click the <<Remove member button to delete your selected members or <<Remove all button to delete all your members.
- Click Confirm to view your selected members' permissions in the Access Control Security Configuration window (or Cancel, to exit the Add new members window).
Set Up Viewing Permission for the Selected Search Template
To set up or modify the Access Control List Permissions for this search template:
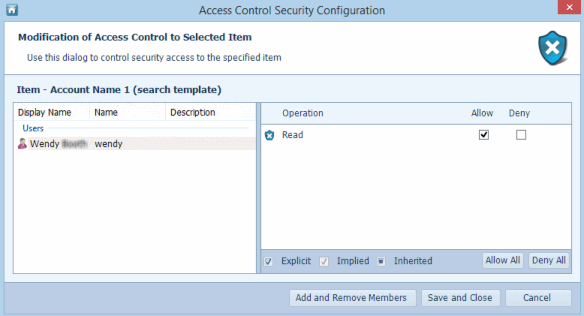
- Select each User/Group/Role in turn (in the Access Control Security Configuration window, see above) and select the required Allow or Deny tick-box next to the displayed operation.
- Read
- Allow – the member can see and use the selected Search Template to search for results.
- Deny – the member cannot see and use the selected Template to search for results.
- Read
- Click Save and Close.
Set as Default Search Template for all Users/Clear Default Search Template
Select Set as Default Search Template for all Users from the menu to set the currently selected Search Template to automatically open when a user starts Searching Client. The default Search Template is also opened when a user selects a new Searching tab.
If the user does not want to initiate a search using this Default Search Template, they can click on the default Search Template's name (which is displayed under the template's open tab) and select the required Search Template.
To stop a Search Template being automatically opened when a user starts Searching Client, select the Search Template which is set as the default Search Template, right-click on it and select Clear default search template from the menu.
Refresh
Select Refresh from the menu to refresh the list of Search Templates in the tree view.
Search Template Summary
Select a Search Template in the tree view. Summary information for the selected Search Template is listed on the Template Management tab.
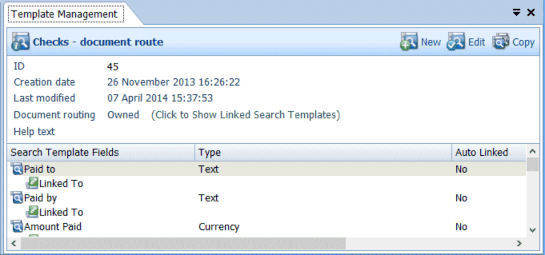
The items shown for the Search Template Summary are described in Table 22.
Table 22. Terminology: Search Template Summary
|
Term |
Meaning |
||
|---|---|---|---|
|
ID |
The unique identifier automatically assigned to the Search Template by the system. |
||
|
Creation date |
The date and time the Search Template was created. |
||
|
Last modified |
The date and time the Search Template was last modified. |
||
|
Document routing |
Owned – the Search Template has a local Document Route configured. See “Configure for this Search Template” for information about creating a local Document Route. Linked – the Search Template has a link to a Document Route in another Search Template. See “Link to Existing Document Route” for information on linking a Search Template to a Document Route in another Search Template. None – the Search Template has no Document Route configured. See “None” for information on deleting an existing linked or local Document Route. |
||
|
(Click to Show Linked Search Templates) |
Click to open the Search Template Linked To Document Route window. See Table 23 on page 332 for details.
|
||
|
Linked Search Template |
The name of the Search Template containing the Document Route to which the current Search Template is linked.
|
||
|
Help text |
The help text configured for this Search Template. See “Help text” |
||
|
Search Template Fields |
Shows the search fields in this Search Template. |
||
|
Type |
Indicates the type of the field (for example, Text, Currency or Date and Time). |
||
|
Auto Linked |
Indicates whether the search field has been linked automatically (Yes) or manually (No) to an Index field or an audit field. |
Click on (Click to Show Linked Search Templates) to open the Search Template Linked To Document Route window. This window shows the Search Templates which are linked to the selected Search Template which contains a local Document Route (Checks - document route in the example below).
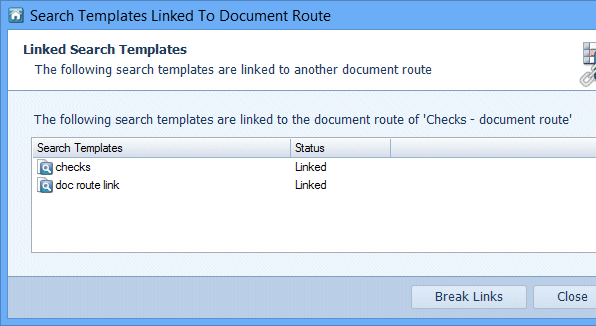
The items in the Search Template Linked To Document Route window are described in Table 23.
Table 23. Terminology: Search Template Linked To Document Route
|
Term |
Meaning |
||
|---|---|---|---|
|
Search Templates |
The Search Templates which are linked to the Document Route in the selected Search Template. If there are no Search Templates linked to the Document Route in the selected Search Template, No linked search templates were found is displayed. |
||
|
Status |
Linked – the Search Template is linked to the selected Document Route. Link Remove – the Break Links attempt was successful and the Search Template is no longer linked to the Document Route in the selected Search Template. Failed – the Break Links attempt was unsuccessful. The Search Template is still linked to the Document Route in the selected Search Template. |
||
|
Break Links |
Click to attempt to remove the links between all the listed Search Templates and the Document Route in the selected Search Template.
|
||
|
Refresh List |
Click to refresh the list of Search Templates which are linked to the Document Route in the selected Search Template. Any Search Templates which are no longer linked to the Document Route in the selected Search Template are removed from the list.
|
Style Sheets
Style Sheets are created in Management Studio and used to customise the display of Index fields in Indexing Studio and Searching Client.
Once a Style Sheet has been created and saved, it can be selected in the On Screen Presentation and Printout Presentation areas of the Data Definition Editor.
Template Management Tab Buttons
Refresh
Click the Refresh button to refresh the list of Style Sheets on the Template Management tab.
View
Click the View button to change the way the list of Style Sheets is displayed. Alternatively, select one of the following views from the menu which is displayed when the View menu button is clicked. 
Large Icons
Each Style Sheet is displayed as a large icon with the Name under the icon.
Details
Each Style Sheet is displayed with the Name and Last Modified information listed (as shown in the above example).
Tile
Each Style Sheet is displayed as a tile with the Name and Last Modified information listed to the right of the tile.
Import
An exported Style Sheet can be imported. See “Export” for more information on exporting a Style Sheet.
Select Style Sheets in the tree view and click the Import button on the Template Management tab (or select Import from the File menu). The Package Import window is opened.

The items shown in the Package Import window are described in Table 24.
Table 24. Terminology: Style Sheet Import
|
Term |
Meaning |
||
|---|---|---|---|
|
If a name conflict occurs, do the following |
|||
|
Prompt for new name |
When selected, if the name of the imported object is the same as the name of an object (but their IDs are different), you will be prompted for a new name. If the IDs are the same, see Force new revision, below. Either this option is selected or the option Rename automatically with prefixed date and time stamp is selected. |
||
|
Rename automatically with prefixed date and time stamp |
When selected, if the name of the imported object is the same as the name of an existing object (but their IDs are different), the imported object will keep the same name but it will have a date and time prefix. If the IDs are the same, see Force new revision, below. Either this option is selected or the option Prompt for new name is selected. |
||
|
Please select the option below if you want to update any existing objects when there is an ID conflict |
|||
|
Force new revision |
When selected, if the ID of the imported object is the same as the ID of an existing object, the revision of the existing object will be increased and the existing object will be updated to the imported object. If the names of the two objects are different, the name of the imported object is used. If this option is cleared, if the ID of the imported object is the same as the ID of an existing object, the object in the package is ignored (that is, it is not imported). |
||
|
Types to import |
Custom Field Types – when selected, all Custom Field Types in the selected Package are imported. Style Sheets – when selected, all Style Sheets in the selected Package are imported. Data Definitions – when selected, all Data Definitions in the selected Package are imported. Search Templates – when selected, all Search Templates in the selected Package are imported.
|
||
Select the required options and click OK. A window is displayed enabling you to select the .dsx Package file you want to import. Click Browse and navigate to the location where the file is stored. Select the file and click Open. Click Start Import to start importing the objects listed under Name. (The Type and Status for each object is also listed.)
The Status column displays the following:
- Pending – the import has not yet begun. If required, click Start Import to begin the import.
- Importing – the object is being imported.
- Success – the object has been imported successfully. When all the objects have been successfully imported, click Close to close the Package Import window.
- Ignored (double click for more details) – the object has not been imported. Double-click Ignored... to see the reason.
Export
When no Style Sheets are selected on the Template Management tab when the Export button is clicked, all Style Sheets are exported in a single package.
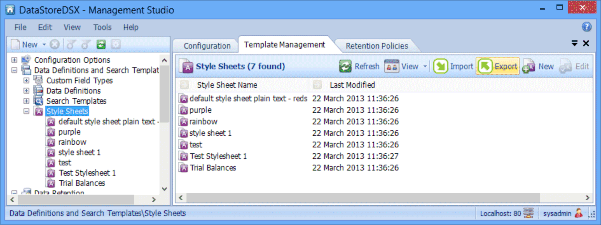
If a Style Sheet is selected on the Template Management tab, just that Style Sheet is exported.
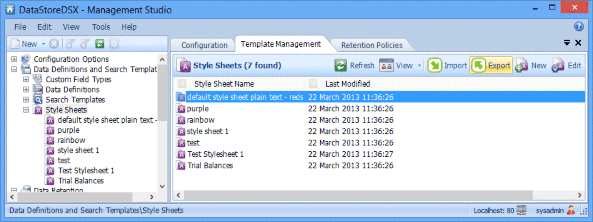
Click the Export button to open the Style Sheet(s) Export Progress window.
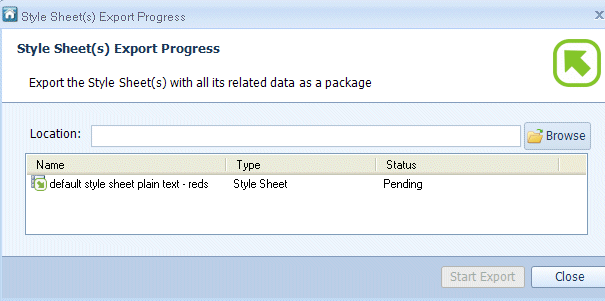
Click Browse and navigate to the location where the file will be stored. Enter a file name and click Save.
The selected Style Sheets are listed.
The Style Sheet Export Progress window is displayed. Click Start Export to start the export. The
Status column displays the following:
- Pending – the export has not yet begun. Click Start Export to begin the export.
- Exporting – the item is being exported.
- Success – the item has been exported successfully. When all the items have been successfully exported, click Close to close the Style Sheet Export Progress window.
New
The New button creates a new Style Sheet and opens it in the Style Sheet Editor. See “Style Sheet Editor”
Edit
The Edit button is active when a Style Sheet is selected on the Template Management tab. It causes the currently selected Style Sheet to be opened in the Style Sheet Editor. See “Style Sheet Editor”
Right-Click Menu
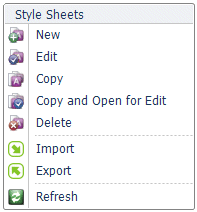
New
Select New from the menu to create a new Style Sheet and open it in the Style Sheet Editor. See “Style Sheet Editor”
Edit
Select Edit from the menu to open the currently selected Style Sheet in the Style Sheet Editor. See “Style Sheet Editor”
Copy
Select Copy from the menu to create a copy of the currently selected Style Sheet. The copy of the Style Sheet has the original Style Sheet name with the prefix Copy of.
Copy and Open for Edit
Select Copy and Open for Edit from the menu to create a copy of the currently selected Style Sheet and open the copy in the Style Sheet Editor. See “Style Sheet Editor”
Delete
Select Delete from the menu to delete the currently selected Style Sheet.
Note: A Style Sheet cannot be deleted if it is being used by a Data Definition in either the On Screen Presentation or the Printout Presentation. See “On Screen Presentation – General Details” for more information.
Import
Select Import from the menu to import a previously exported Style Sheet. See “Import” for information on importing a Style Sheet. See “Export” for information on exporting a Style Sheet.
Export
Select Export from the menu to export the currently selected Style Sheet. See “Export” for information on exporting a Style Sheet.
Refresh
Select Refresh from the menu to refresh the list of Style Sheets in the tree view.
System Locks
Select System locks in the tree view to display the list of system locks.
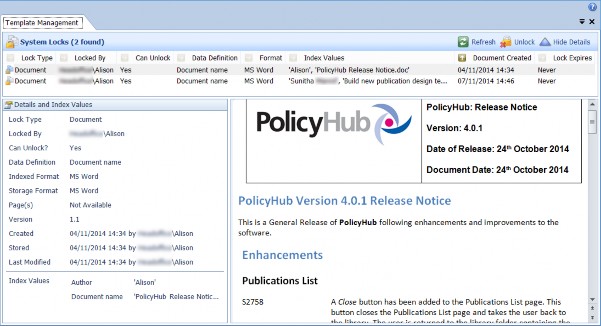
Refresh
Click Refresh to update the list of system locks.
Unlock
Select a document and click Unlock to unlock the selected document.
Caution: Unlocking a document will discard any changes made to the document which have not been checked in.
Hide Details
When the details of the selected document are shown below the list of locks, the Hide Details button is displayed. Click the Hide Details button to hide the Details and Index Values panel and hide the view of the selected document.
Show Details
When the details of the selected document are hidden, click the Show Details button to display the Details and Index Values panel and show the view of the selected document.
System Locks
The items shown in the System Locks are described in Table 25.
Table 25. Terminology: System Locks
|
Term |
Meaning |
|---|---|
|
Lock Type |
The Lock Type is always Document. This indicates a document has been checked out of Searching Client which prevents other users from editing the document. |
|
Locked By |
The user who checked out the document version from Searching Client. |
|
Can Unlock |
Yes – you have the required access control permission which allows you to delete this lock. No – you do not have the required access control and cannot delete this lock. See “Undo other users’ document check-outs” for information of the required access control. |
|
Data Definition |
The name of the Data Definition used to Index the selected document. |
|
Format |
The type of the document. This will always be MS Word. |
|
Index Values |
The values stored in the Index Fields for the document. |
|
Document Created |
The date and time the selected document was either automatically Index documents or imported into DataStoreDSX against the “Data Definition”. |
|
Lock Expires |
The date and time the selected lock expires. If the lock will never expire, Never is displayed. |
|
Details and Index Values |
|
|
Lock Type |
The Lock Type is always Document. This indicates a document has been checked out of Searching Client which prevents other users from editing the document. |
|
Locked By |
The user who checked out the document version from Searching Client. |
|
Can Unlock |
Yes – you have the required access control permission which allows you to delete this lock. No – you do not have the required access control and cannot delete this lock. See “Undo other users’ document check-outs” for information on the required access control. |
|
Data Definition |
The name of the Data Definition used to Index the selected document. |
|
Indexed Format |
The format the document was in when it was indexed. |
|
Storage Format |
The format the document was stored in. |
|
Page(s) |
For Word documents, this is Not Available (as the preview pane does not support pages). |
|
Version |
The version number of the checked out document version. |
|
Created |
The date and time the selected document was either automatically Index documents or imported into DataStoreDSX against the listed Data Definition (see “Data Definition”) and the name of the user who created the document version. |
|
Stored |
The date and time the document was stored in DataStoreDSX and the name of the user who stored the document version. |
|
Last Modified |
The date and time the document was last modified in DataStoreDSX and the name of the user who modified the document version. |
|
Index Values |
Each line shows an Index field and the index value(s) for the field. |
The document is displayed beside the Details and Index values.