
Create a Category and Configure Custom Security Settings
Custom Security is configured on a Category. Create the Category and then configure the Custom Security settings.
- Right-click on Categories in the tree view and select New from the menu. Enter a name for the new Category in the text box – Active Account in this example. Click OK.
- Select the Category Active Account, select the Custom Security tab and click Configure.
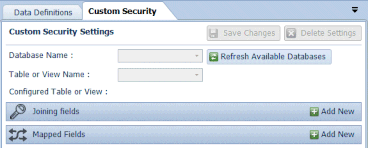
Note: Only users who are proficient in using SQL Server should attempt to configure Custom Security settings.
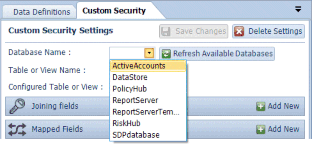
- Click the Refresh Available Databases button and then click the arrow to the left of it to display a drop-down list of available databases.

- Select the database which contains the required table or view. (ActiveAccounts in this example.)
- Select the required table or view from the drop-down list.
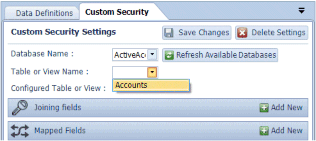
- The selected table or view is displayed beside Configured Table or View.

- A Joining field provides the link between an Index Field and a database column which is used to identify the extra data associated with that search result. The defined view defines the mapping between the database field and the Joining field’s External Column. Select Add New.
- Enter a name for the Joining field. From the Type drop-down list, select the Custom Field used in the Bank Statement Data Definition – Account Number (UK). From the Column drop-down list, select the column (from the selected table or view) to be used with the Custom Field Type – AccountNumber in this example.
Note: If you need to create multiple Joining fields, they must all be Document-level fields, or they must all be Page-level fields. Therefore, you will not be allowed to use a field which has been configured as both a Document-level field and as a Page-level field and has had data stored against the Data Definition for both index levels.
- The mapped field is used to store the data from the external database. In this example, create a mapped field to get the Active/Dormant data from the external table. Click Add New on the Mapped Fields header. Enter a name for the mapped field, Active Account? in this example. From the Type drop-down list, select the Custom Field created for the mapped field – Active Account? in this example. From the Column drop-down list, select the column (from the selected table or view) to be used with the Custom Field Type – Active in this example.
- Click the Save Changes button
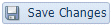 to save the Custom Security settings.
Note: Once saved, Joining fields and Mapped fields cannot be edited (except for the Column settings). Delete the old field and add a new field with the required configuration.
Dynamic Access Control Criteria
Dynamic Access Controls are used with the Custom Security settings to define whether a Searching Client user has access to a search result when the defined criteria are met. In this example, Searching Client users cannot view the search results for inactive accounts.
Dynamic Access controls can be configured on Data Definitions but they cannot be configured on Categories.
- Select the Data Definition you added to the Category which was configured with Custom Security – Bank Statement in this example. Right-click on it and select Control Access to this Data Definition from the menu.
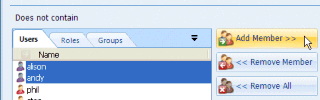
- Click Add and Remove Members.

- Select the User(s), Group(s) or Role(s) you want to allow access to the Data Definition and click Add Member.
Note: Adding individual users to each Data Definition's Access Control List and configuring their permissions can be time consuming. However, by creating a Group and adding the users to the Group, granting access to the Data Definitions can become much simpler. In this case, you would simply configure access to the Group instead of the individual members of the Group.
- The selected members are displayed in the Contains the following list. Click Confirm to close the Add New Members window.
- For each User/Group/Role, select whether the member can perform any of the listed operations.
- In this example, set
- Search for results – Allow
- View results – Dynamic
- View documents and pages – Allow
- Change field values – Allow
- Click the blue shield button next to the selected Dynamic option to open the Dynamic Access Control Entry Configuration window.
- Click Add Criteria to add a criterion. In this example, if Active Account? contains the value No, the search result must not be displayed. Click Select a field... and select the Custom Security field from the drop-down list – Active Account? in this example.
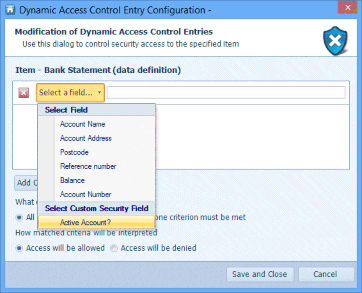
- Click Please select a value and select No from the list.
- Decide whether All criteria must be met or At least one criterion must be met. In this example, there is just one criterion, so it doesn’t matter whether you choose All criteria must be met or At least one criterion must be met.
- Decide whether Access will be allowed or Access will be denied. In this example, if the account in not active, Access will be denied.
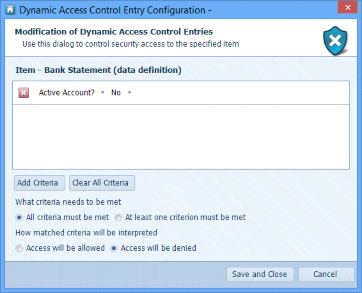
- Click Save and Close to exit the Dynamic Access Control window. Configure Access Control for other users, Groups and Roles, as required. Click Save and Close to exit the Access Control window.