
Add Timekeeper with Rates Manually
You can upload many new Timekeepers along with rates by clicking the Add Timekeepers with Rates link on the Timekeepers with Rates tab.
Add New Timekeeper with Rates Manually
| Instructions | Screenshot for Reference |
|---|---|
|
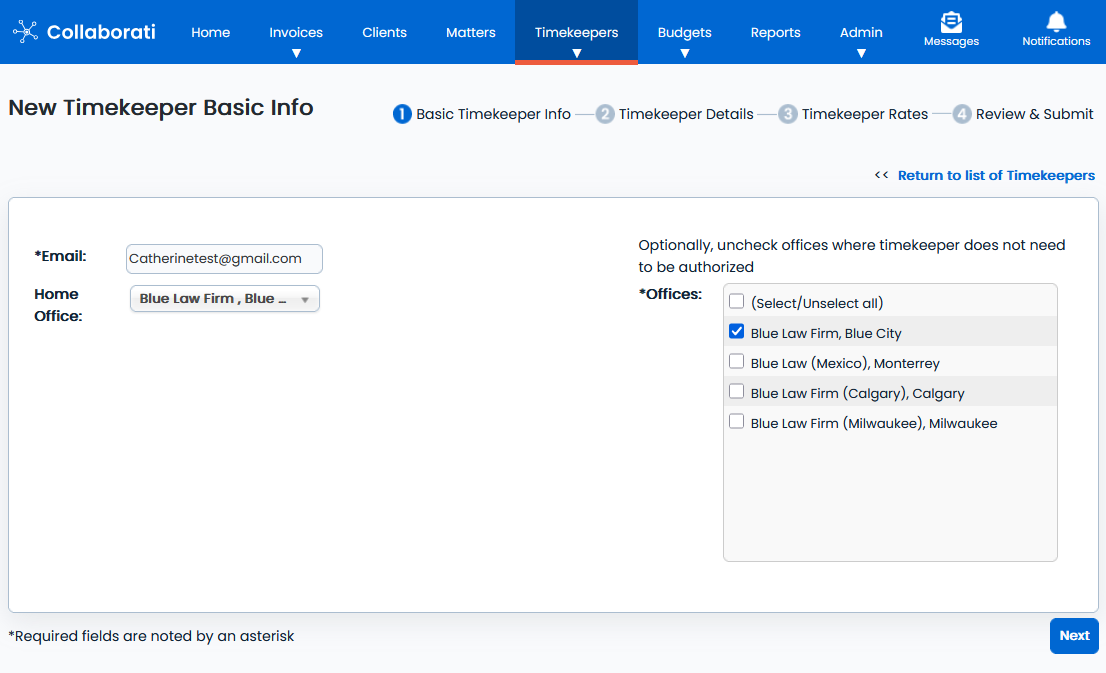
1) Enter Email Address for Timekeeper (email address must be unique and cannot be used by another timekeeper), then check the Offices information to ensure the Timekeeper is authorized for the necessary offices. Click Next button to add Timekeeper details. Note: You have an option to Select/Unselect all the offices. |
 |
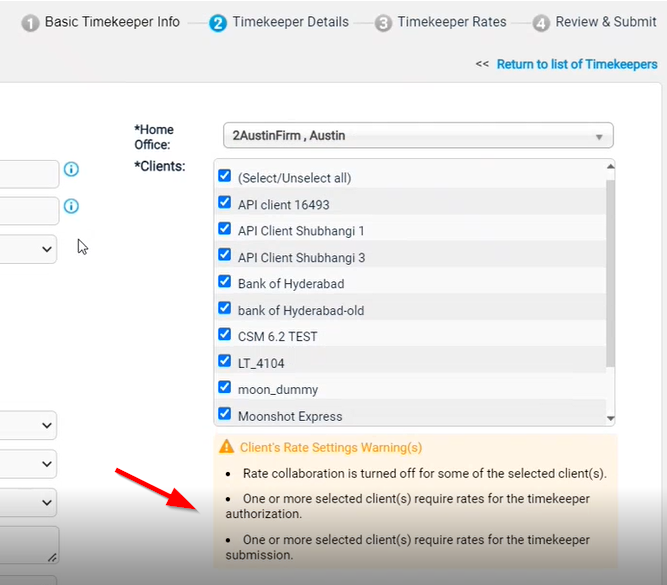
2)Enter required information for Timekeeper
Note: A warning message is displayed if Rate collaboration is turned off for some of the selected clients. If client has configured that Rate is required for timekeeper submission or for authorization, a warning message is displayed based on the client selection. |
 |
| 3) For each entry, you will need to manually enter the basic information about the timekeeper rate as below:
Office: Choose the associated office from the dropdown. Client: Choose the associated client for the office (Client with rate collaboration turned ON are displayed in the dropdown.) Type: Invoice Task Rate/Timekeeper Rate Rate: Enter the value. Currency: Currency will be displayed* Start Date: optional End Date: optional Matter: Optional Note: Optional Click "Add Item" button. Client Settings block: You can view the client configured settings here whether Timekeeper rates are required for Client- Office combination for Timekeeper Submission and for Timekeeper Authorization. Note: Based on the office selection, Rate currency gets changed. You can review all the rate items added on the preview screen. *Firm admins can choose the Currency if their client's setting "Timekeeper Rate Currency Selection Supported" is set to "On" and there are no other rate items in a different currency. Otherwise, the Currency will default to the Billing Currency on the Office Settings. |
 |
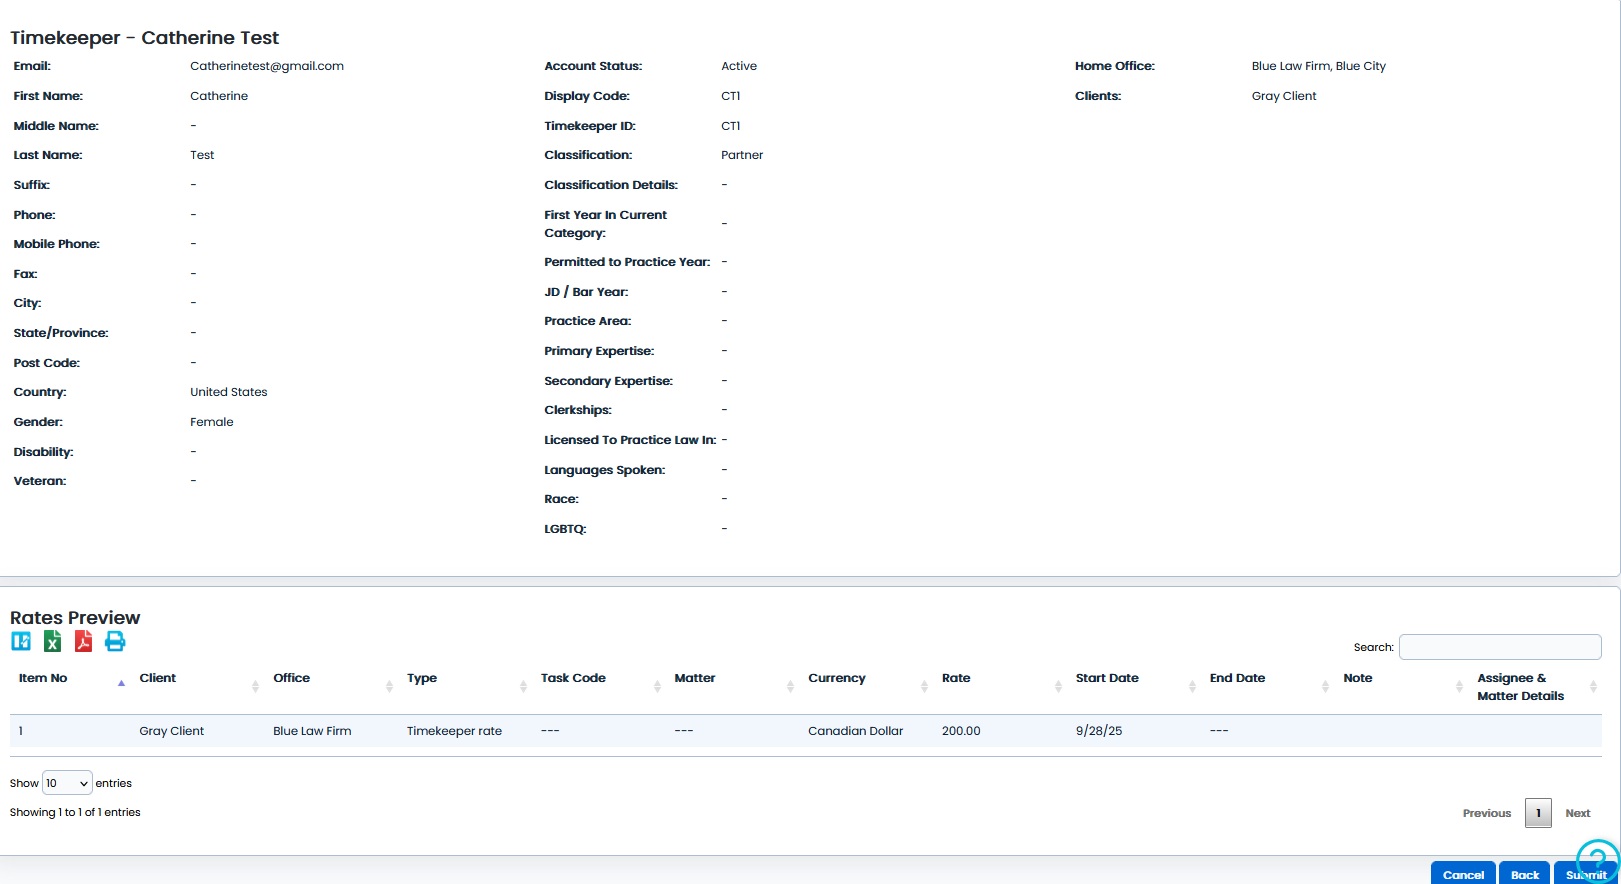
| 4) Verify the information on the preview screen and click Submit button to send a timekeeper information along with rates for client authorization. |
|
How to add rates to an Existing Timekeeper
Follow the below instructions to add rates and submit for client authorization for the existing timekeeper:
| Instructions | Screenshot for reference |
| 1). On Collaborati main menu, select Timekeepers. |  |
| 2). A list of timekeepers in Collaborati will be displayon the screen. Users can select the required timekeeper from a list. |  |
| 3). The Timekeeper edit screen will appear, allowing users to assign or unassign clients based on their requirements. Once adjustments are made, users can click the "Add Timekeeper Rates" button. |  |
|
4). For each entry, you will need to manually enter the basic information about the timekeeper rate as below: Office: Choose the associated office from the dropdown. Client: Choose the associated client for the office (Client with rate collaboration turned ON are displayed in the dropdown.) Type: Invoice Task Rate/Timekeeper Rate Rate: Enter the value. Currency: Currency will be displayed Start Date: optional End Date: optional Matter: Optional Note: Optional Assignee and Matter Details: Optional Click "Add Item" button. Note: Based on the office selection, Rate currency gets changed. You can review all the rate items added on the preview screen. |
|
| 5). Verify the information on the preview screen and click Submit button to send a timekeeper information along with rates for client authorization. |  |

List of Error/Warning messages
| Error/Warning messages | Action needed |
|---|---|
|
(Error) You are trying to submit a timekeeper with existing rate item(s). Remove the rate item(s) to only submit the timekeeper. |
This error appears if you try to submit the timekeeper information on the step 2 page after adding rate item(s) on the step 3 page. Delete the rate items added on the step 3 page before performing the action to submit the timekeeper information. |
|
(Error) You are trying to uncheck a client that has an existing rate item(s). Remove the rate item(s) to uncheck the client. |
This error appears if you try to uncheck a client on step 2 page after adding rate item(s) on the step 3 page for that specific client. To uncheck the client, first you need to delete the rate item(s) added for that client before performing the action to uncheck the client on step 2 page. |
|
(Error) You are trying to uncheck an office that has an existing rate item(s). Remove the rate item(s) to uncheck the office. |
This error appears if you try to uncheck a office on step 1 page after adding rate item(s) on the step 3 page for that specific office. To uncheck the office, first you need to delete the rate item(s) added for that office before performing the action to uncheck the office on step 1 page. |
| (Warning) One or more selected client(s) require rates for the timekeeper submission | If rate collaboration is ON and if client has configured that Rates are required for Timekeeper Submission. This warning appears on the screen if the selected client requires rates to submit a new timekeeper from Collaborati. |
| (Warning) One or more selected client(s) require rates for the timekeeper authorization | If rate collaboration is ON and if client has configured that Rates are required for Timekeeper Authorization. This warning appears on the screen if the selected client requires rates to submit a new timekeeper for client authorization from Collaborati. |
|
(Warning) The following clients allow the timekeepers to be submitted without a timekeeper rate, but they won’t be authorized until a Rate has been approved. <Client 1 Name> - Office1; Office2;… <Client 2 Name> - Office1; Office2;… |
If a client has enabled Rate Required for Timekeeper Authorization for a particular office then a warning message is displayed when you try to submit the Timekeeper without a rate. Office and Client combination is displayed in the warning message that requires a timekeeper rate for Timekeeper Authorization. |