
How to Import Obligations in the system
Goal
To assist the user to Import Obligations with the associated information in the system. It removes the need to add the Obligations manually in the system via the User Interface.
The steps provided in the article is performed by the user with the role permission to Access the Obligation module and perform the Import of the Obligations in the system.
The user must review excel sheet data sheet before importing.
Note: There should be only 1 row for headers above the import data.
Please refer the following image as an example for importing obligation excel sheet
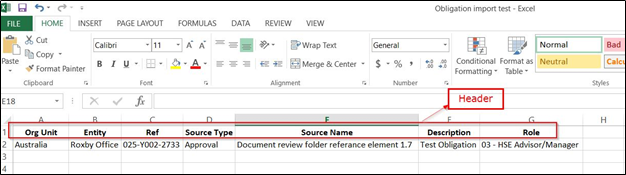
Note: The fields in the excel sheet header have to be matched against the Obligation fields (see image in the sixth step in Steps to Import Obligations section) while importing the excel file.
1. Steps to Import Obligations
1. Login to the CMO Application.
2. Go to Obligations > Obligation List. Click Import (Import menu Item is available only if User has rights to create obligations).

3. The Import Obligation window will open.
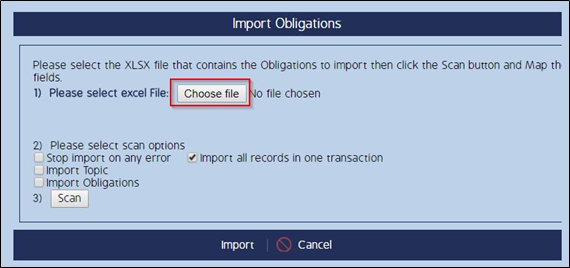
4. Click Choose file to Import the excel file created with the Obligation data.
5. Click Scan and select Import option shown in the following image.

6. Extending the Import Obligations screen, a list of Obligations Fields will be shown with the XLS Column fields against it as shown in the following image.

7. Select the right Sheet Name before selecting the relevant column from the excel file against the Obligation field (Excel file can have one or more sheets, by default first one is selected).
8. Click Import. The Obligation(s) are imported successfully as shown in the figure below.
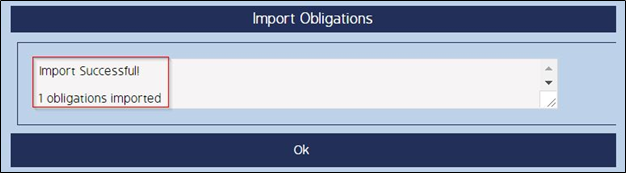
9. Click Ok. The imported obligation can be seen in the Obligations > Obligation List.
2. Obligation Fields
|
S. No |
Obligation Fields |
Description |
|
1 |
Org Unit* |
The text in this field must specifically match the name of an Org Unit in the system. |
|
2 |
Entity |
The text in this field must specifically match the name of an Entity in the system. If this column is left blank, the system will associate that specific obligation with all Entities under the Org Unit. |
|
3 |
Type |
CMO Compliance allows for the tracking of multiple sources of compliance requirements (obligations), so this gives us a way to filter information. Typical values are contract, license, regulation, policy. |
|
4 |
Name* |
This is the name given to the Source of the Obligation for identification purposes. |
|
5 |
Ref – Obligations/Sources* |
This is a reference indicator, letting CMO Compliance Manager know how to identify the specific Obligation in the event that it needs to be updated or revised in a future upload. Ref value must be unique for each Obligation coming from the same Source. |
|
6 |
Area |
Source Area, custom dictionary which allows for client to add any Areas. It can be Locations. |
|
7 |
Obligation Description* |
High level way of describing the specific Obligation. |
|
8 |
Authority |
Who is the 'governing body' for this Source? |
|
9 |
Topic 1 |
This is a way to further classify each obligation. During import up to 3 topics can be assigned to the Obligation. |
|
10 |
Topic 2 |
This is a way to further classify each obligation. During import up to 3 topics can be assigned to the Obligation. |
|
11 |
Topic 3 |
This is a way to further classify each obligation. During import up to 3 topics can be assigned to the Obligation. |
|
12 |
Obligation Details |
Allows to enter additional details for obligation. |
|
13 |
Risk |
CMO Compliance Manager provides a configurable risk matrix for calculating risk levels based on consequence and likelihood. CMO current configuration is a 5x5 (default) matrix (but risk matrix is fully configurable it can be 2x9 or any other dimension), so this field should be two numbers separated by a comma. The first number is consequence and the second number are likelihood, both on a 1-5 scale. |
|
14 |
Compliance Status |
allows to associate compliance status with Obligation (there are 5 pre-defined Obligation status. Status can be turned on or off or renamed). User can do it on Obligation module "Obligation Status" Menu item. |
|
15 |
Import Status |
Control import behavior. it can have one of three values Revised/New/No- Revised. Each row will update an existing record if the existing record has the same Org Unit, Source, Ref - Obligations/Sources, and current user combination. If no match is found, row will create new record.
|
|
16 |
Responsible |
This is the user in the system who is responsible for ensuring compliance with the obligation. This may be different from the user who is responsible for completing actions required to comply with the obligation so based on what you told me about sample users this should likely be Janet for each one. |
Note:
1. * Implies required fields.
2. There is Business Rule which allows to remove links between Source and Obligations. If this Business Rule is disabled and there is no license/Source with name defined in Name field then application uses Org Unit / Type / Area / Authority / Responsible / Name Fields to create new License/Source and assign to Obligation.
3. How to Add Obligation Custom Fields
The Obligation fields can be configured from Custom Fields.
3.1 Steps to Configure Custom Fields
1. Go to Admin module.
2. Click Custom Fields from the side menu bar located on the left of the screen.

3. Click New to create new custom field.

4. Enter the Name and Field Type information in the Additional Field screen as shown in the following image.
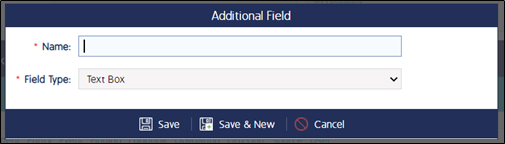
5. Click Save. The new custom field is created but it has to be associated with the respective module.
6. The newly created custom field is shown along with the other custom fields section. Go to the custom field created and associate the custom field to the desired module (Obligations).
The following image illustrates the example of the custom fields associated to the modules and custom fields that are just created but not associated.

The top five custom fields in the above image are associated to the modules mentioned under Associations and the last two custom fields are just created but are not associated.
7. Click on the chain icon to associate a custom field to a desired module. Select Association screen appears as shown in the following image.

8. Select on the desired module check box and click Save.
9. The created custom field is now associated to the desired module.
Note: Also, there are Custom fields for obligations when "applicable for all" option is configured, these fields will be available on Import obligations screen.
Video Guide
Coming soon...