Event Import/Export Guide
The information below applies only applies to the web application.
Role Permissions and Terminology
- Make sure the columns are named correctly according to the terminology that is set up in your environment. To check this, go to Admin > Business Rules > Your Company > Terminology (in the Operations Menu). As an additional resource, see the Standard Terminology of Features page for a list of Best Practice Terminology.
- Ensure the Allow Import Event role permission is enabled for the role that will be doing the import. Find this in Admin > Roles > Select the respective role > Navigate to Event Permissions > Select Allow Import.
Best Practices for Preparing to Import Events
- [Best Practice Suggestion] Complex Forms and Events are exceptionally harder to configure in the Event Import Tool and will most likely contain an error. Consider manually entering the Event into CMO if your Form/Event is particularly complex or has several sections, sub-sections, questions, answers, actions, and/or attachments.
- [Best Practice Suggestion] Log into your CMO instance, perform and complete the Form(s)/Event(s), then generate a Full Event Excel Summary report from the Event Register. This excel report will serve as a template for you to since all of the correct headers will be exported with the Event. These instructions are explained in detail in the Setting Up the Excel Sheet section of this guide

Excel Checklist
- Remove all empty rows except for those that have data. Ensure all hidden lines are removed by doing a formal highlight > right click > Delete.
- Make sure there are no filters on the import sheet.
- If the "Remember the State Of" checkbox is checked, mapping will automatically clear after you change the Excel sheet and upload a new file.
- Ensure the first line of the sheet is the column headers.
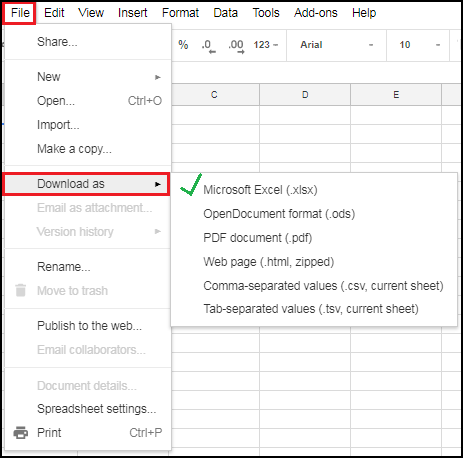
- [Not suggested] If the Event list is created in Google Sheets, export it as a an Excel (.xlsx).
[Suggested] Export a Full Event Summary Report to use as a Template
Exporting a completed Event as a Full Event Excel Report will provide a full, correctly configured Excel template to use for import. This method is suggested versus manually creating the Excel sheet (although it is possible for you to manually configure and upload).
Note: The instructions below were written to upload a single Event/Form.
- Log into your CMO instance and complete an Event using the same Form that you want to upload with your imported Events.
- Find the Event on the Event Register and select the checkbox to highlight the Event.
- Click the Export drop-down menu and select Full Event Excel Export.
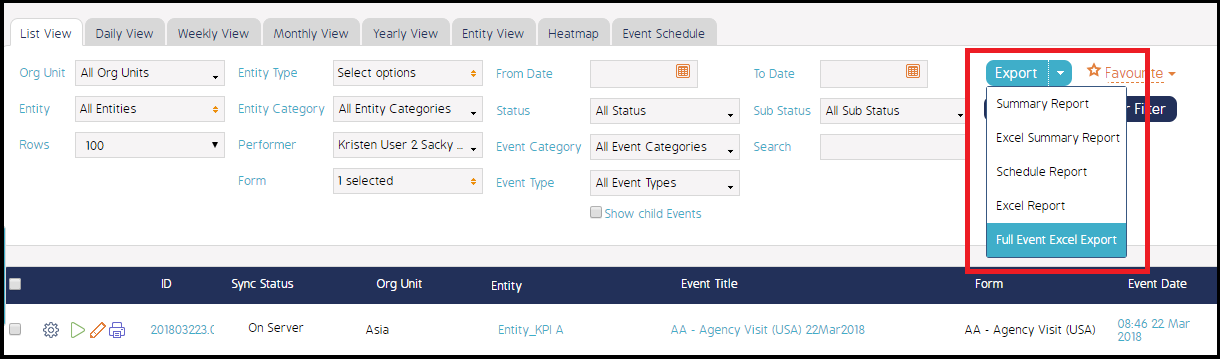
- The completed Event will download into an Excel file. Save it on your machine and open it to edit and reconfigure to import a new Event(s).
- Open the Excel sheet and delete all of the rows above the headers. (This should be the first two rows).
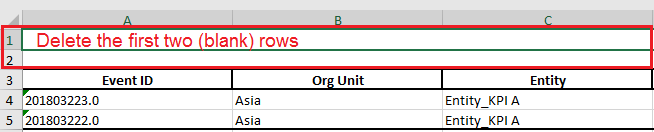
- Erase the Event information that is populated under the headers, then re-enter the new Event information that you want to import. The headers should not be adjusted or deleted.
Important Note: Ensure all of the new information is entered correctly, without spelling errors, and without any additional formatting.
- This completes the Excel setup for Event Import. See the Steps to Import to import the Event into CMO.
Steps to Import
The step-by-step instructions below detail how to manually import Events into CMO using Excel. The instructions are broken down by the sections that appear in the Event Import screen within your CMO web application.
Step 1: Upload the Excel File
- Log and navigate to the Events module, then click the Excel Import menu option (located on the top banner menu).
- Click Choose File and upload your saved Excel sheet. Click the small blue X to delete the uploaded sheet, if necessary.
Important Note: Mapping and settings will be lost if you un-select or change the Event Form while in the middle of configuring the Import settings. Ensure the correct Excel file is uploaded before continuing on to the next steps. - The message window that appears is simply an informational message. Click Ok to exit the screen and continue with the upload process.
- Do not adjust the Excel Sheet dropdown menu.
- Leave the First row contains headers checkbox checked.

Step 2: Configure the Import Settings
- Select the form that will be associated to the Event.
(Notice the Event Fields mapping section appears on the other side of the screen after a Form is selected. These settings will be configured last - See Event Fields).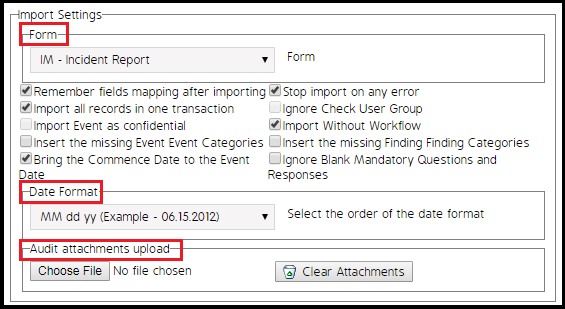
- [Suggested] Remember fields mapping after importing - If checked, the mapping settings will save when a new Excel sheet is uploaded.
- [Suggested] Import all records in one transaction - If checked, import will be complete after the last record, or each record is imported separately.
- Import Event as confidential - If checked, Events will be imported as confidential.
- [Suggested] Insert the missing Event (or Finding) Category - If checked, the system will add an Event or Finding category that is in the Excel sheet but has not yet been created in CMO.
- [Suggested] Bring the Commence Date to the Event - Commence date will be the same as the Event Date.
- Stop Import on any Error - If checked, import will stop at first error. If unchecked, import tool goes to the next row if current get an error.
- [Suggested] Ignore Check User Group - Check this box if you are not importing users connected to user groups, or if you are importing users who WERE in a different user group than they currently are assigned to. If this box is not activated, (you or an administrator) go to Business Rules Fields > Events > and check the Allow Ignore Check User Group by Import Event.
- Import Without Workflow - Leave this box blank. This setting will not create or initiate an Event Workflow.
- [Suggested] Ignore Blank Mandatory Questions and Responses - Best Practice is to check this box since there are often mandatory questions left blank upon import.
- Choose the import settings you want applied to the imported Event by placing check marks next to the respective options. Each option is defined above with Best Practice Suggested settings.
- Select a date format in the Date Format section.
Note: Ensure the dates entered on the Excel sheet match the selected format.
- Add any Audit Attachments relevant to this Event or the Form in the Audit Attachments Upload section.
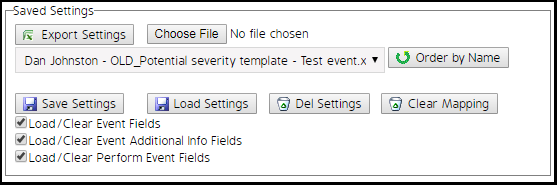
Step 3: Configure the Saved Settings
If this is your first time importing Events into CMO, you will configure these settings last. This section of the Event Import screen is used to save the mapping configurations that are set up in Step 4: Map the Event Fields.
This step is not mandatory and does not have to be configured at all. However, this setting will save you a lot of time if you are planning on doing multiple Event Imports.
If you have saved settings from a previous import, click the drop-down menu and select the settings you want to load, then click the Load Settings button. If you want to save current settings click Save Settings.
Step 4: Map the Event Fields
This section of the import screen is used to map the columns in the Excel sheet to the Event data fields (fields in the New Event screen and in the Event Register).
- Ensure that the *mandatory fields* are filled in. Additional fields can also be added, but your upload will not complete if any mandatory fields are missing or have errors (spelling, formatting, or otherwise). All mandatory fields on this screen must be included in the Excel sheet.
- [Best Practice Suggestion] Match the XLS column to the Event Data Field column, unless you are using a Default Value.
- You can specify a default value for any Event field. If using a default value, leave the XLS column blank and the import tool will use the information listed in the Default Value column. For example, Date Fields can have specific default values such as "Now", "Today", "Tomorrow", "Yesterday".
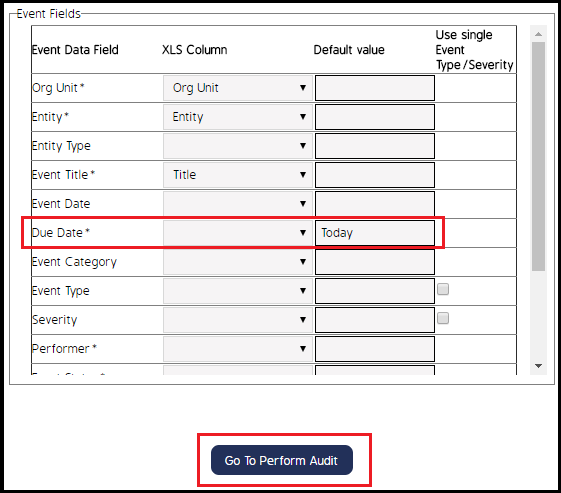
Click the Go To Perform Audit button to begin mapping the Event Form.
Mapping the Form Fields
Mapping the form fields is the final step in configuring the Event Import. This is the most complex step in the process and should be done with precision and great attention to detail. In this screen you will map each section, question, and answer from the Excel Sheet to CMO.
We are mapping the Question to the respective answer choice in each XLS column. The Perform Event column is used to select the Question while the XLS column is used to define the answer choice that you want imported into CMO.
It is typical for some Form sections to have multiple question and answer fields. In the instructions below, the example Form only has one section but has several questions within the section. Repeat this process for as many sections/sub-sections as your form has.
This process is easier to complete and export the form via the Full Event Summary Report mentioned in the Setting Up the Excel Sheet section of this guide.
- Select a section of the Form from the drop-down menu.
Best Practice is to start from section 1 and work your way through the sections in descending order.
- Select Question from the Perform Type field.
The other drop-down menus will appear after you enter the Perform Type field.
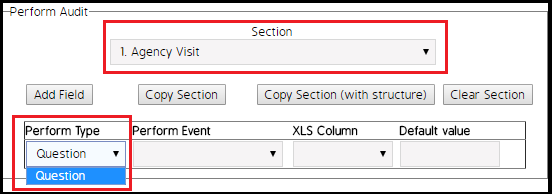
- In the Perform Event drop-down menu, select the first question within that section.
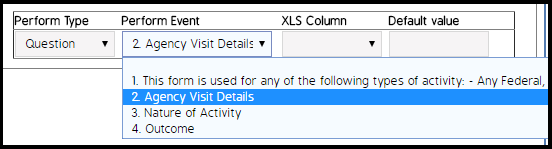
The "1. This form is used for any of the following types of activity..." section is technically an introduction to the Form and should not be included in the Excel import. This is detailed in the image below.
All sections of a Form will appear in the drop-down, even if the Form has a dedicated "introduction" section, as the Form in the example does.
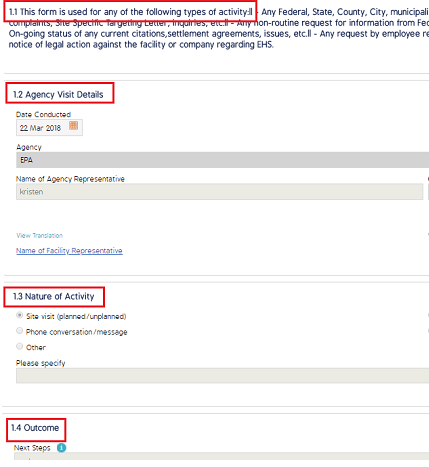
CMO Form with each section outlined
- Next, you will need to reference the Excel Sheet. Find the column that the first answer choice is listed under and add that column name to the XLS drop-down menu.
For example,
In the image above, Date Conducted is the first answer option.
In the Excel Sheet, Date Conducted is also the column header.
This means that Date Conducted should be the option selected in the Event Import screen.

Repeat this process to add actions, findings, and other answer choices to the question. Some questions will have several answer options associated with it, and each answer must be added in this screen.
- If your form has multiple sections, use the Section drop-down menu at the top of the screen to select the next section and repeat steps 1-4.
Adding Actions, Forms, Attachments, and Responses
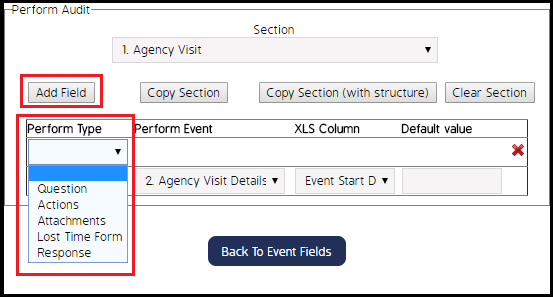
Once a question is added (steps 1-4 listed above), you can add actions, forms, responses, and attachments to the screen. The process for adding these additional items to the import screen is the same as steps 1-4 above.
Click the Add Field button, then use the drop-down to select a Type. Ensure the headings match between the Event Import screen and the Excel sheet.