
Managing Timekeepers
Add a New Timekeeper
Firms will add timekeeper information, including timekeeper IDs and hourly billable rates, directly into Acuity on their firm’s profile page.
On the Landing Page, click the Create New Timekeeper action button, or click the FIRMS/VENDORS navigation link at the top of the page. For video instructions on adding timekeepers, see How to Create a Timekeeper Profile

On the Firm Profile page, click  to open a new timekeeper profile window.
-
Enter all required information on the profile as follows:
-
Name- first name, middle initial (optional), last name
-
TK ID- the identification code assigned by the firm’s time and billing system. This should match the TK ID included on the firm’s LEDES files. Can be numbers and/or letters, but must be a unique value for each timekeeper
-
Status- This field will default to ‘active’
-
Email address- Acuity uses this address to send notifications and communications from the client directly to the timekeeper. Do not use a generic email address
-
Office (optional) - if the firm has more than one office, this selection should match the home office of the timekeeper
-
CV/Resume- may be optional
-
Category- firm must select from the categories defined by the client
-
Default Rate/Practice Area Rates- the timekeeper’s hourly rate(s). The client may ask for rates by practice area or a single default rate
-
Rate Start Date- the rate effective date
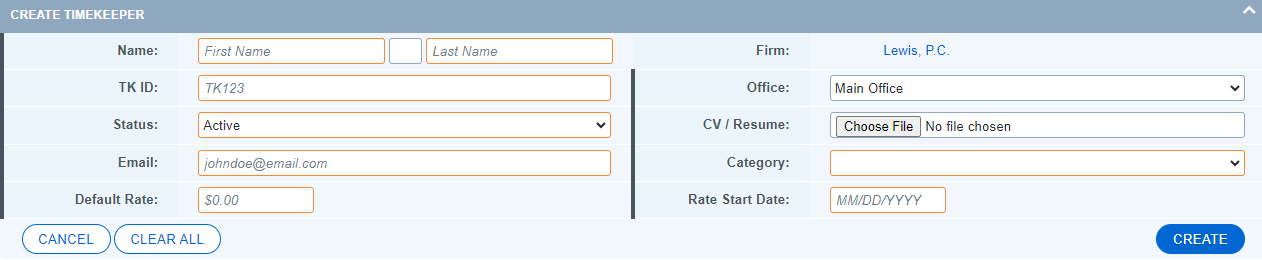
Note: The rate start date should begin on or preceding any fees that will be submitted for payment.
-
After filling in all required fields (indicated by the citrus/orange border around the field), click “Create” to save and create the timekeeper profile.
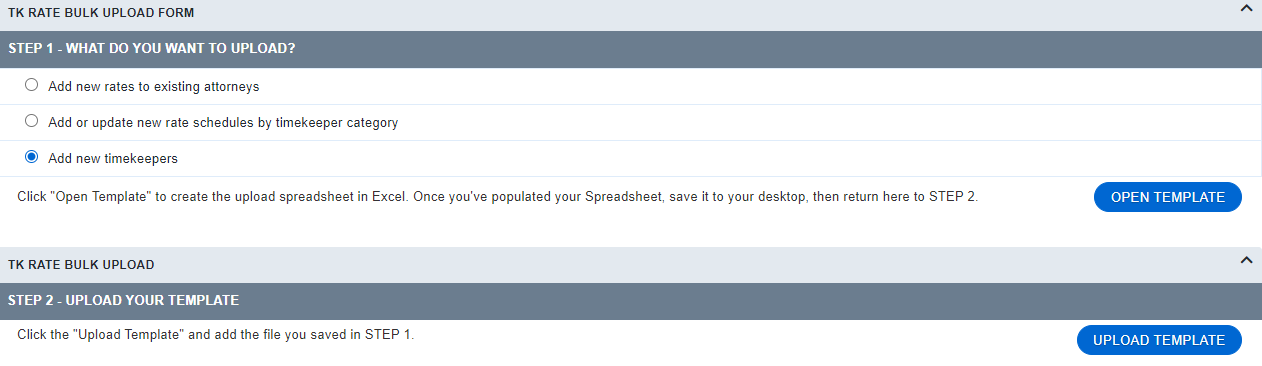
Multiple timekeeper profiles can be submitted at once using the TK Rate Bulk Upload Form.
-
Navigate to your firm profile page.
-
Select the TK/ Rate Upload tab.

-
Under “Step 1”, select the “Add new timekeepers” option.
-
Open the template.
-
Input your timekeeper information into the form. Please note, if you change the formatting of the form, you will not be able to successfully upload.
-
Upload the completed form using the “Upload Template” option under “Step 2”.
Notifications:
1. Acuity will send notices of new timekeepers/rates to the client.
2. Acuity sends rate approval/rejection notices to the firm user who added the new rates.
Note: Acuity does not approve timekeeper rates. This action is performed solely by the client.
Edit an Existing Timekeeper
Timekeeper profiles can be edited individually or updated via the TK Rate Bulk Upload form.
To edit an individual timekeeper, click on the timekeeper’s name on the Firm Profile page under FIRMS/VENDORS.
-
The timekeeper’s name, timekeeper ID, status, category, etc. can be edited at the top of the Timekeeper Profile using the edit icon.
-
A new rate can be added under the “Rates” tab by selecting the “Create” button. An existing rate that has not yet been approved by the client can be edited using the
 edit icon to the far right of the rate. After making edits, the “Save” option will be located where the edit button was.

Note: If a rate has been approved or rejected by the client, firm users will not be able to make edits to that rate.
To submit changes to multiple timekeepers at once, select the TK/Rate Upload tab on your firm’s profile.
-
Under “Step 1”, select the “Add new rates to existing attorneys” option.
-
Open template. Only certain fields will be open for editing.
-
Make the desired updates and save the template. Note: If you change the formatting of the form, you will not be able to re-upload.
-
Upload the completed template using the “Upload Template” option under “Step 2”.
-
Acuity will notify the client of the request. Acuity will also send a notification to the firm user who submitted the change when the client approves or rejects the request.