|
1. Create a Google Cloud Project
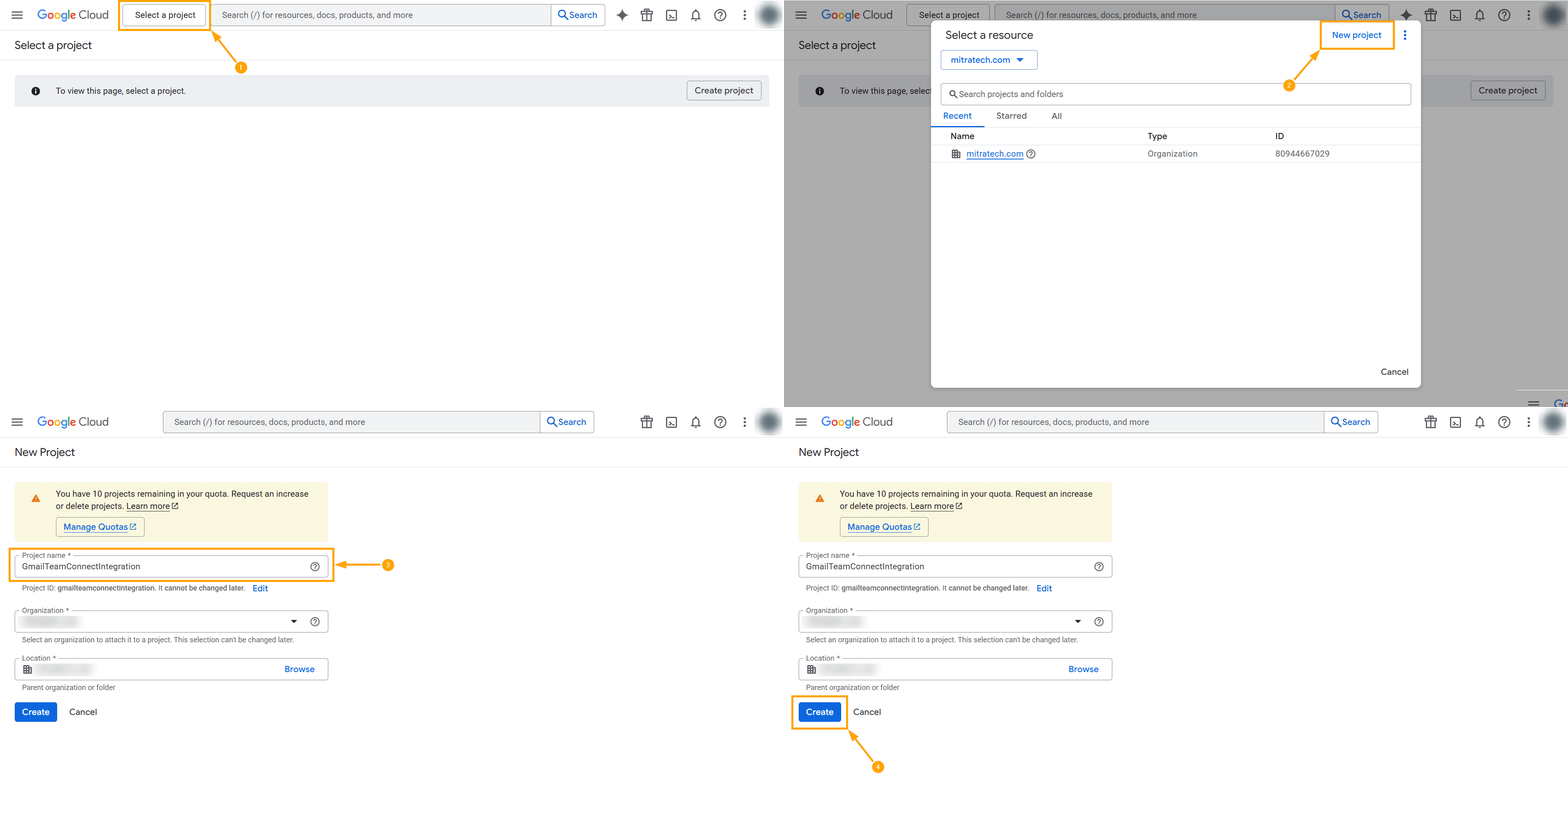
- Go to the Google Cloud Console: Navigate to https://console.cloud.google.com/. You will need to be logged into a Google account or and sign in with your admin account.
- Create a New Project:
- At the top of the page, you'll see a project dropdown menu, usually to the right of the "Google Cloud" logo. Click on it.
- In the dialog that appears, click the "New Project" button.
- Enter a Project Name: Give your project a descriptive name, for example, GmailTeamConnectIntegration. The project ID below the name will be automatically generated, but you can edit it if you wish.
- Location (Optional): You can specify an organization or folder if you use Google Workspace, but for most individual users, this can be left as is.
- Click "Create". Google Cloud will take a moment to provision your new project.
|
|
|
2. Enable the Gmail API
- Navigate to the API Library:
- Ensure your newly created project is selected in the project dropdown at the top of the page.
- Click the navigation menu (hamburger icon ☰) in the top-left corner.
- Go to "APIs & Services" and then select "Library".
- Find and Enable the Gmail API:
- In the search bar at the top of the API Library, type "Gmail API".
- Click on the "Gmail API" result from the search list.
- On the Gmail API page, click the "Enable" button. This will activate the API for your project.
|


|
|
3. Configure the OAuth Consent Screen
- Go to the OAuth Consent Screen Setup: In the left-hand menu, under "APIs & Services", click on "OAuth consent screen".
- Branding:
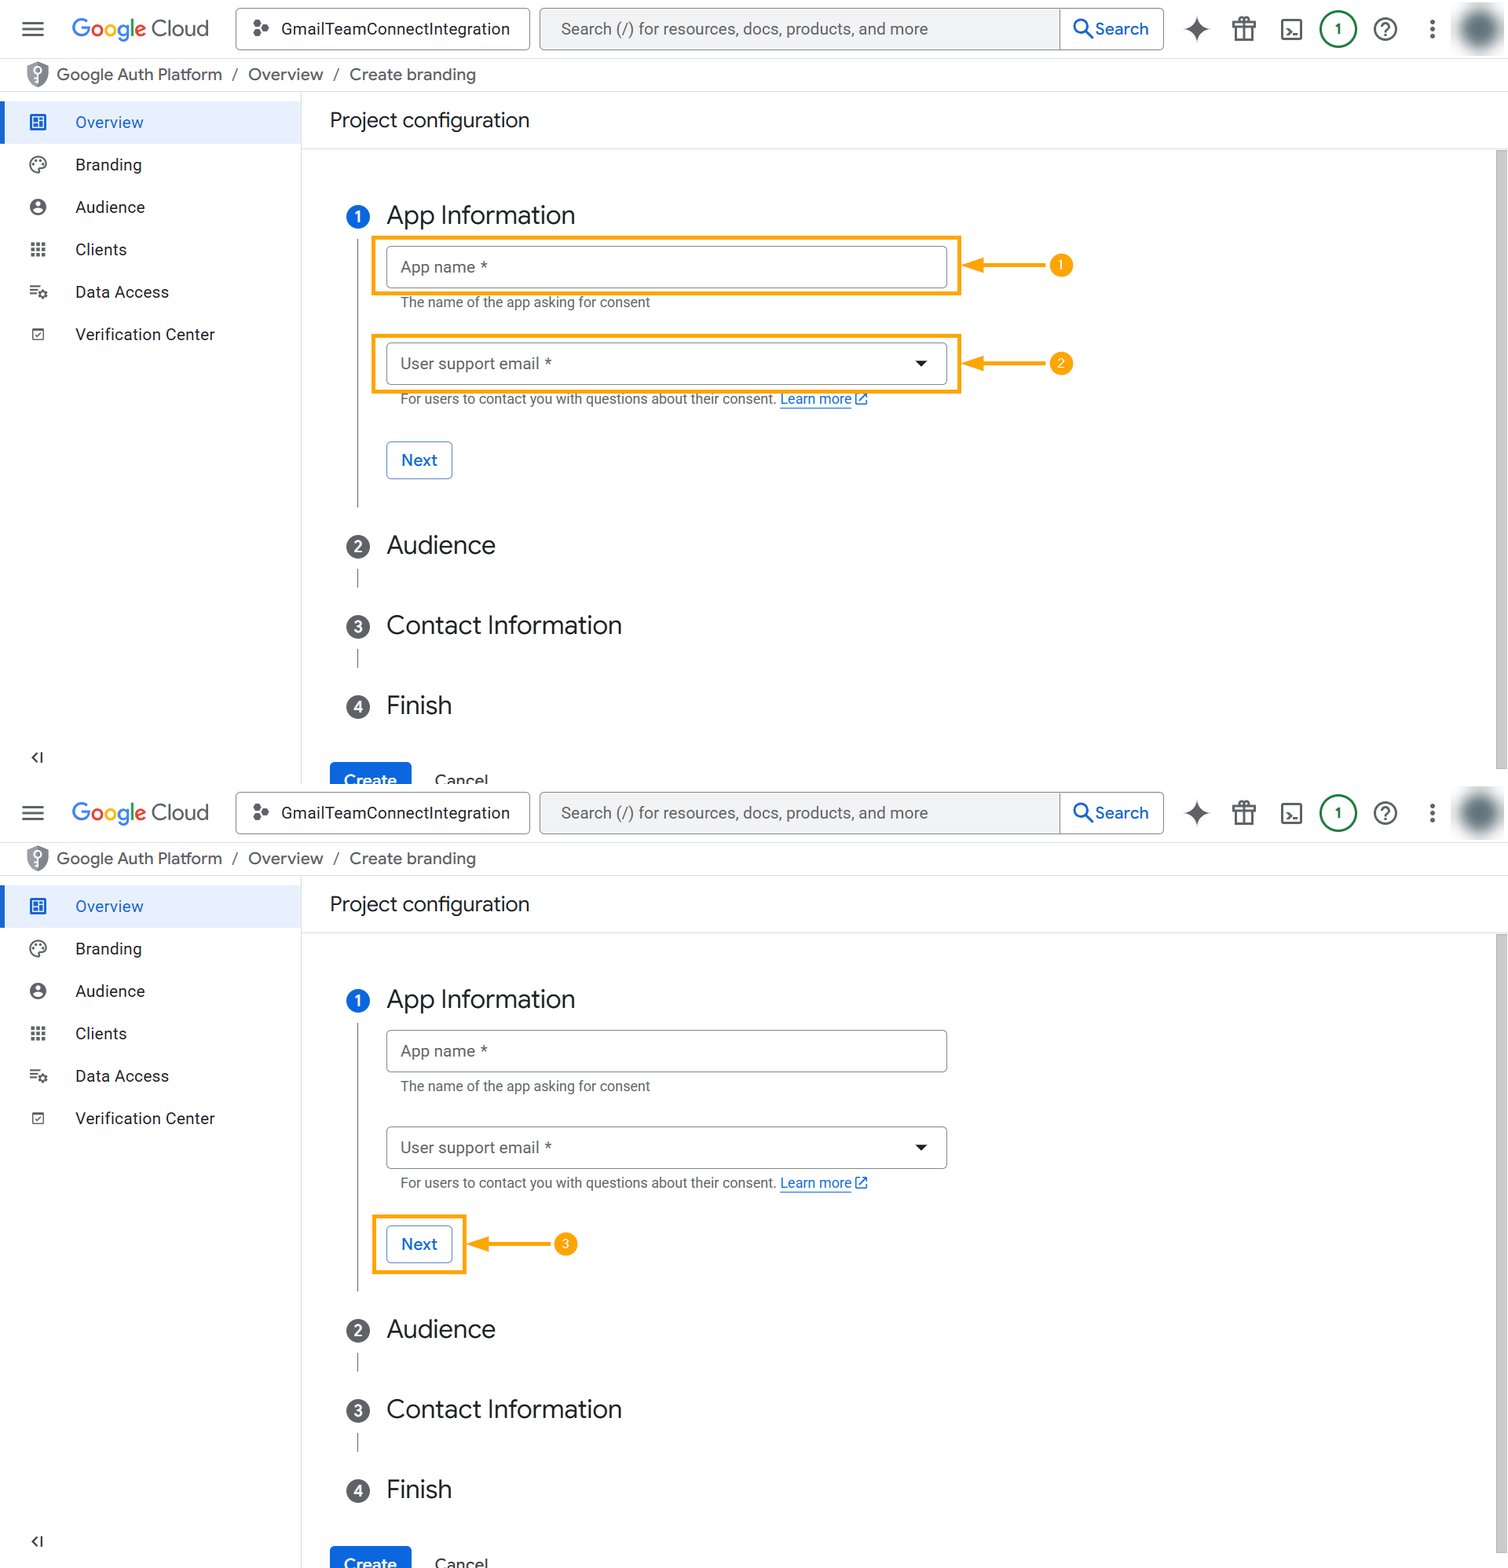
- Fill in the required branding information:
- App name: Enter the name of the application, such as Teamconnect.
- User support email: Select your email address. This is where users can seek help.
- Click "Next".
- Audience:
- User Type: Select "External". This allows any Google account (specifically your designated test users) to authorize the application. "Internal" is restricted to users within your own Google Workspace organization. Click "Next".
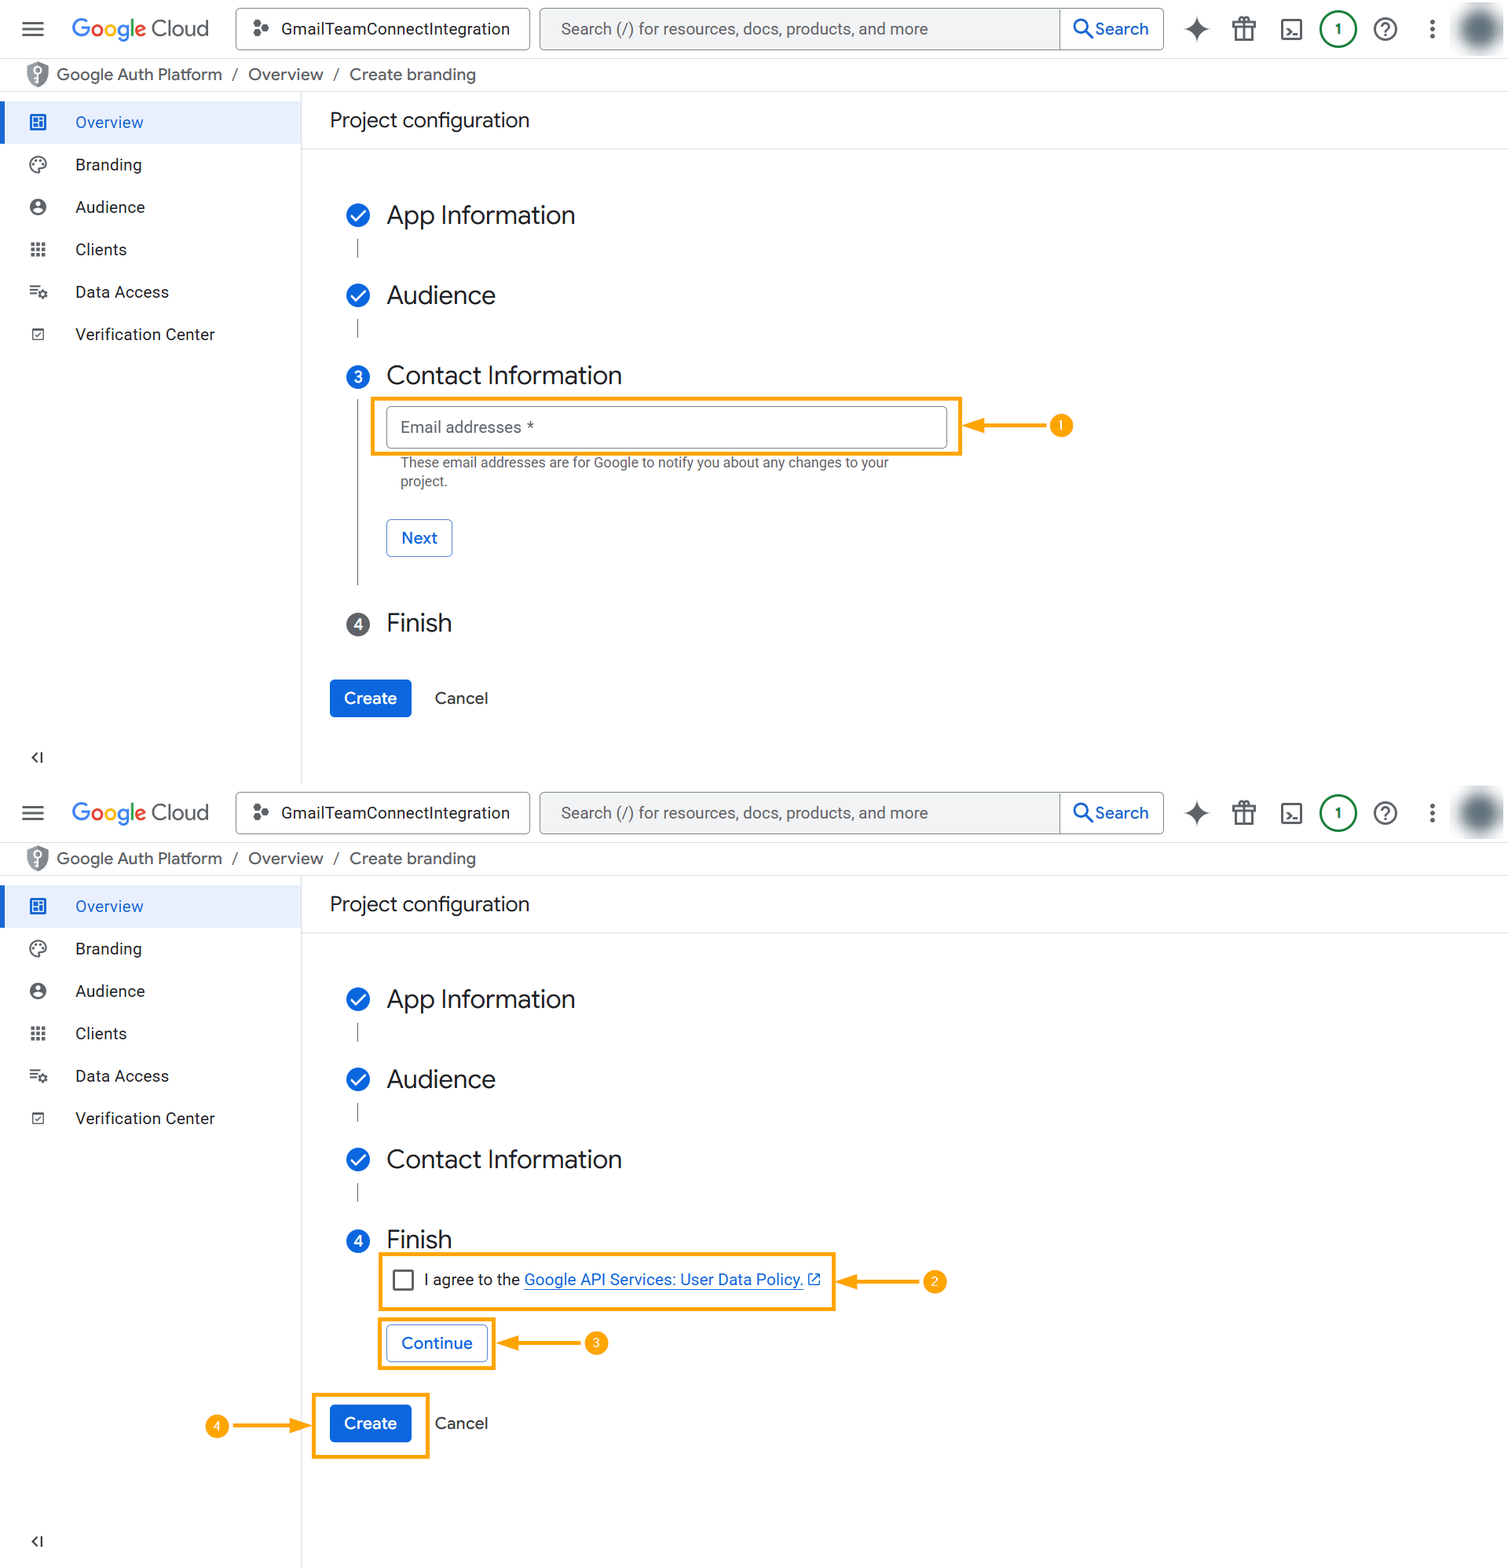
- Contact Information:
- Developer contact information: Enter your email address again. Google will use this to send you important project notifications.
- Finish: Agree the policy and click "Continue and Create".
- Data Access (Scopes):
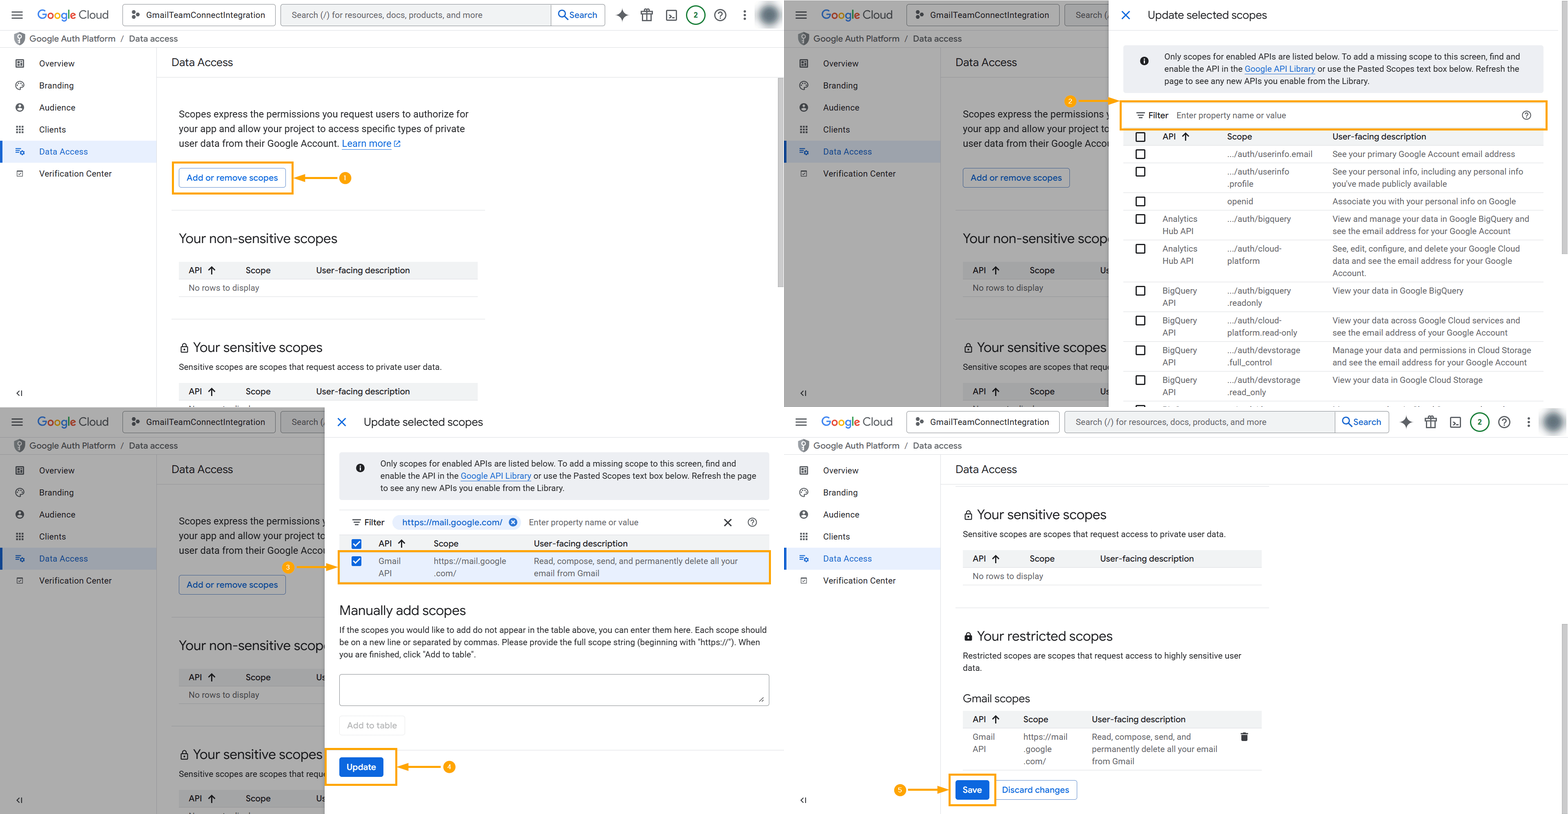
- Click "Add or Remove Scopes".
- A side panel will appear. In the filter box, type or find "https://mail.google.com/."
- Check the box next to this scope and click "Update". You will see the selected scope added to the list.
- Click "Save".
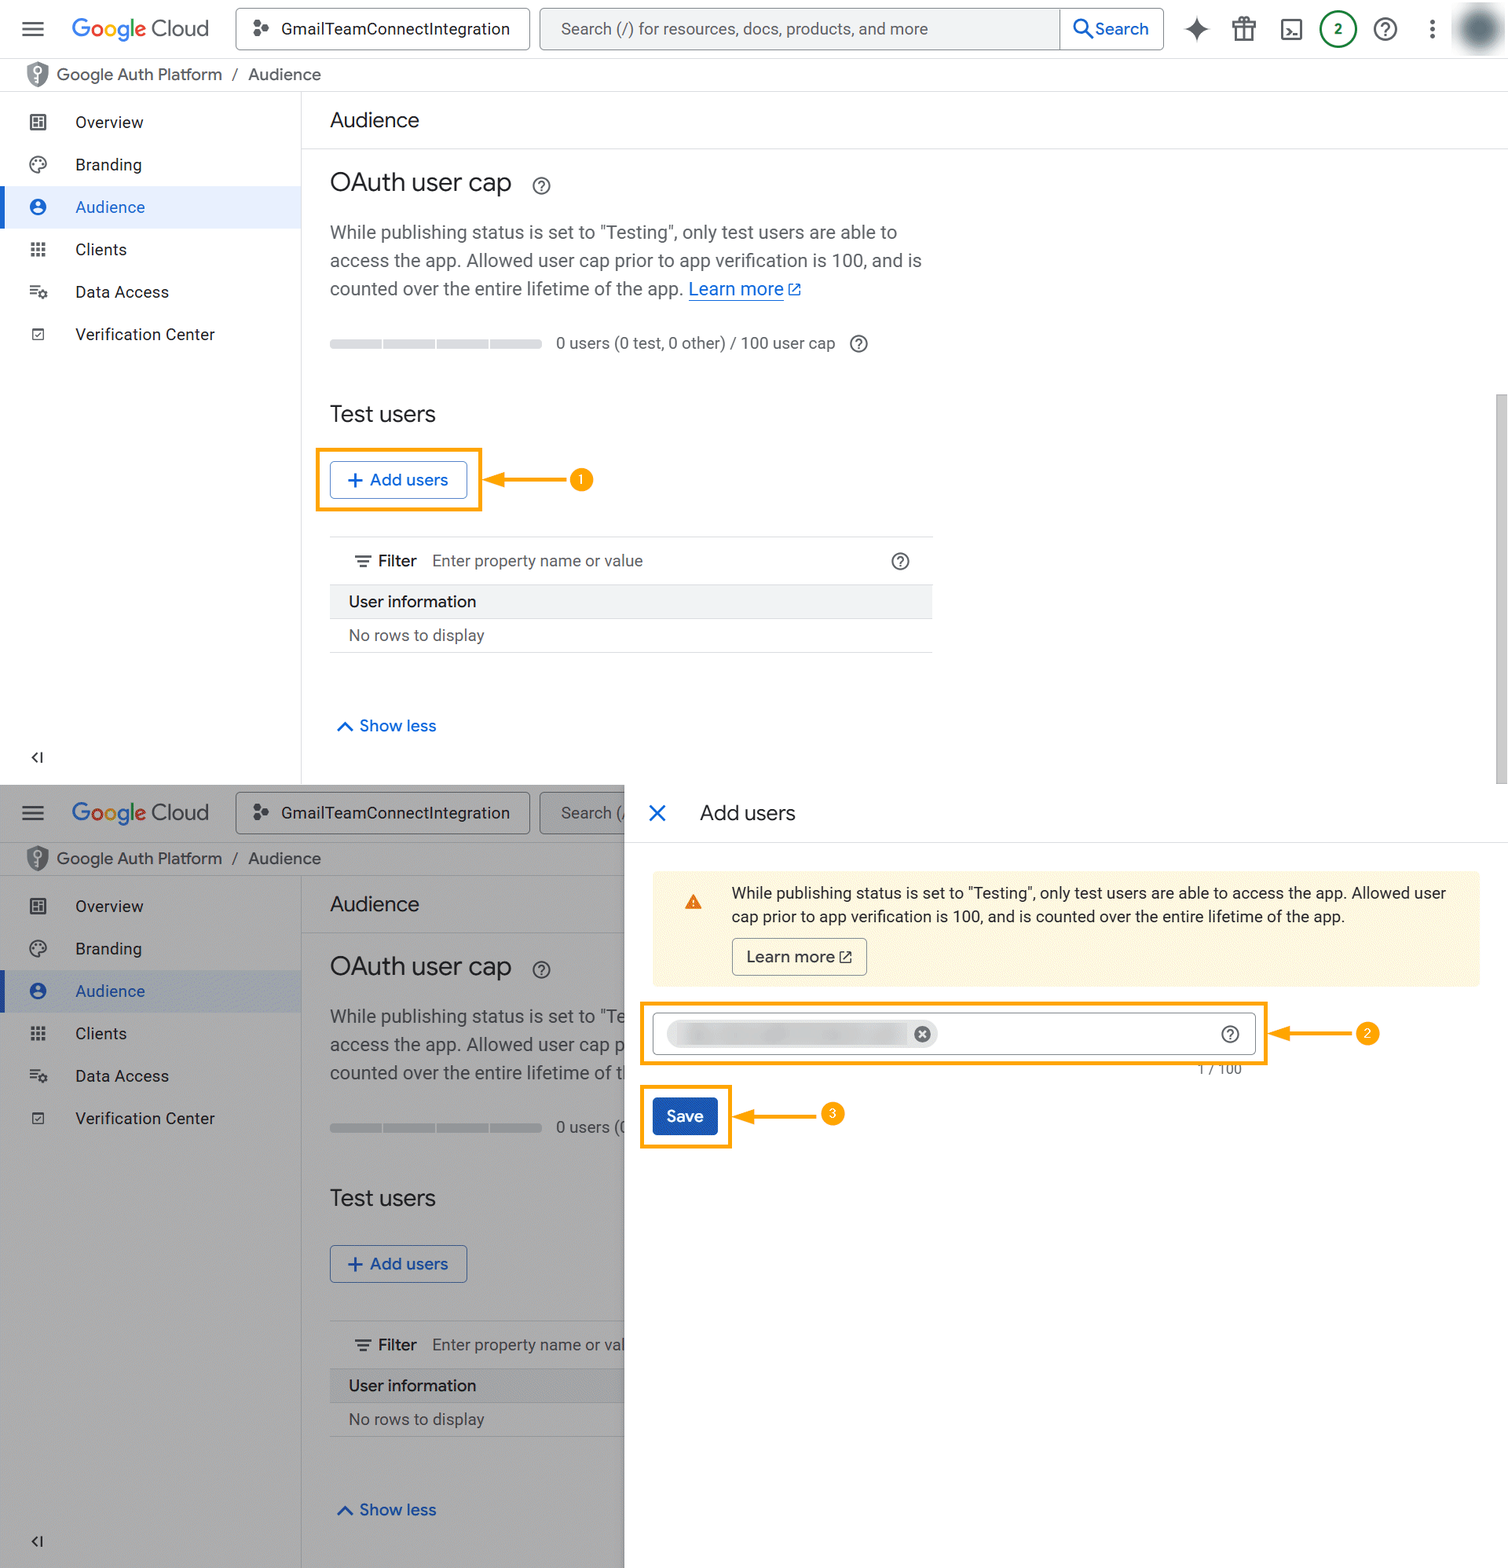
- Audience (Test Users):
- While your application is in "testing" mode, only explicitly added test users can authorize it. Click "Add Users".
- Enter the full Gmail address of the account you plan to integrate (e.g., your own Gmail address) and click "Add".
|


.gif?revision=1)
.gif?revision=1)
|
|
4. Create an OAuth 2.0 Client ID
- Go to Credentials:
- From the left-hand navigation menu, under "APIs & Services," click on "Credentials".
- Create a New Client:
- At the top of the page, click "+ Create credentials" and select "OAuth client ID".
- Configure the Client ID:
- Application type: Select "Web application or Desktop app" from the dropdown. Using "Web application" is recommended as it allows you to specify redirect URIs, which is a crucial security step.
- Name: Give it a descriptive name, like Teamconnect Web Client.
- Authorized redirect URIs:
|


|
|
5. Generate a Refresh Token
Note: A Refresh Token is a special credential that allows your application to obtain new, short-lived Access Tokens without repeatedly asking for your password. You will use Google's OAuth Playground to generate this token.
- Go to OAuth 2.0 Playground: Open a new browser tab and navigate to https://developers.google.com/oauthplayground.
- Configure Playground to Use Your Credentials:
- Click the gear icon (⚙️) in the top-right corner.
- Check the box labeled "Use your own OAuth credentials".
- Enter the Client ID and Client Secret you just saved from your Google Cloud Project.
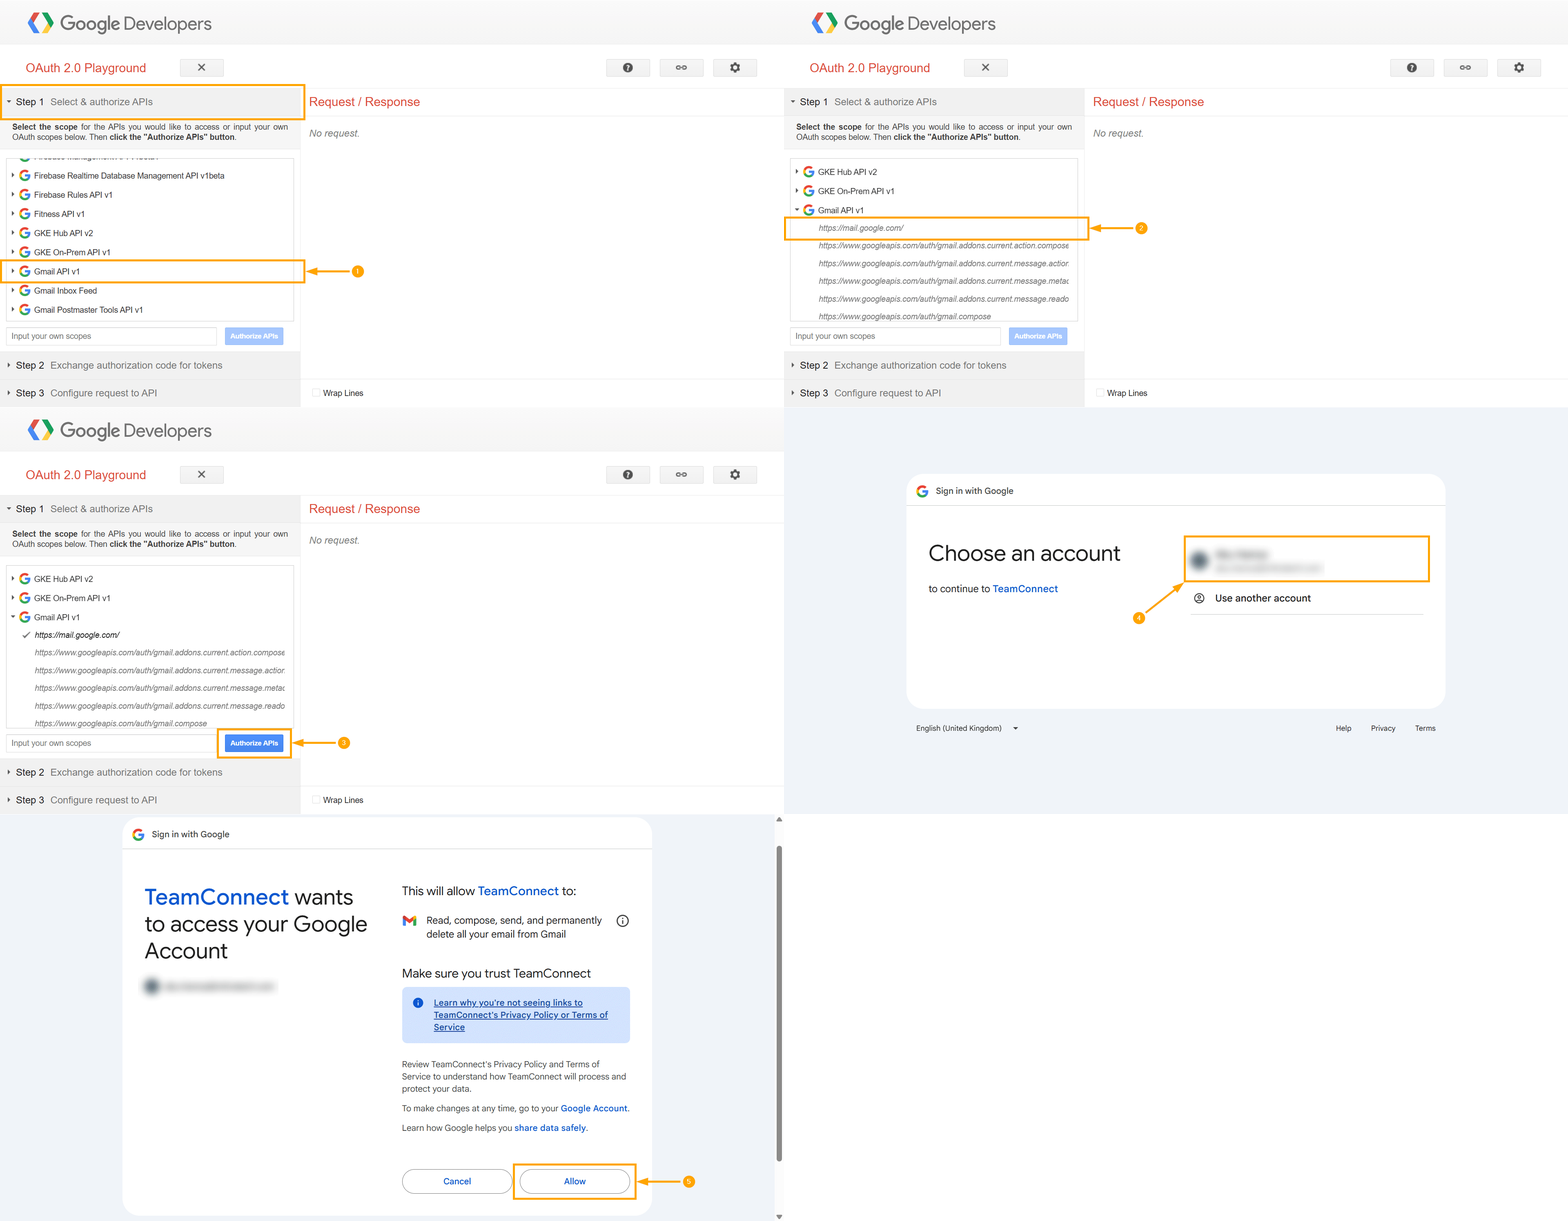
- Step 1: Authorize APIs:
- On the left-hand panel under "Step 1", scroll down to "Gmail API v1".
- Select the scope "https://mail.google.com/."
- Click the "Authorize APIs" button.
- A Google sign-in window will appear. Log in with the test user account you specified earlier.
- You will be presented with the consent screen. Click "Allow" to grant your application permission.
- Step 2: Exchange for Tokens:
- After being redirected back to the Playground, you will see an authorization code has been received.
- Click the "Exchange authorization code for tokens" button.
- On the right side, the Refresh token and Access token will now be visible.
Note: Copy the Refresh token and save it securely. This is the long-term credential your application needs.
To learn more about the lifespan of the refresh token, see here ↗.
|


|
|
6. Configure Outgoing Email Server Settings
- Log in to your TeamConnect instance as an Admin.
- Go to Admin → Admin Settings → Email → Outgoing Email Server Settings.
- In the left column:
- Outgoing Mail Server: Enter "smtp.gmail.com" in the "Outgoing Mail Server" field.
- Reply-To Address: Enter a reply address, such as "noreply@company.com" (for example, noreply@mitratech.com).
- Security/Encryption:
- Default value is None.
- If you select Use SSL, the Port field is automatically set to 465.
- If you select Use TLS, the Port field is automatically set to 587.
- Port: The default SMTP port is 25. The value updates based on the selected security option.
- Outgoing Server Requires Authentication: Select this check box to enable authentication for sending email.
- Username: Input your Google mailbox email in the "Username" field.
- Password: If you're using the Google oAuth 2.0, the "Password" field is not required and can be left blank.
- In the right column:
- Enable OAuth: From the dropdown, select one of the following options:
- No – No authentication required.
- Google OAuth 2.0 – Use this to configure it with Google authentication.
- If you selected Google OAuth 2.0, enter the following credentials:
- Application Client ID: Enter the Client ID from your Google Cloud project.
- Application Client Secret: Enter the Client Secret from your Google Cloud project.
- Refresh Token: Enter the Refresh Token generated from the Google OAuth Playground.
- Select Test Connection to verify the authentication details.
- If successful, a Success message appears next to the Test Connection button. The authentication token is securely stored for future email retrieval.
- If unsuccessful, a Failure message appears. Verify your credentials and try again.
Note: The Test Connection button can be used without clicking Update on this page. Clicking Update will overwrite previous values with the new ones, so please be mindful.
|

|
|
7. Configure Incoming Email Server Settings
- Log in to your TeamConnect instance as an Admin.
- Go to Admin → Admin Settings → Email → Incoming Email Server Settings.
- In the left column:
- Use SSL: Select the Use SSL check box to enable a secure connection.
- Incoming Mail Server: Enter "imap.gmail.com" in the "Incoming Mail Server" field.
- Username: Enter your Gmail mailbox email in the "Username" field.
- Password: (Optional) You can leave the Password field blank when using OAuth.
- Password: If you're using Google oAuth 2.0, the "Password" field is not required and can be left blank.
- In the right column:
- Enable OAuth: From the dropdown, select one of the following options:
- No – No authentication required.
- Google OAuth 2.0 – Use this to configure it with Google authentication.
- If you selected Google OAuth 2.0, enter the following credentials:
- Application Client ID: Enter the Client ID from your Google Cloud project.
- Application Client Secret: Enter the Client Secret from your Google Cloud project.
- Refresh Token: Enter the Refresh Token generated from the Google OAuth Playground.
- Select Test Connection to verify the authentication details.
- If successful, a Success message appears next to the Test Connection button. The authentication token is securely stored for future email retrieval.
- If unsuccessful, a Failure message appears. Verify your credentials and try again.
Note: The Test Connection button can be used without clicking Update on this page. Clicking Update will overwrite previous values with the new ones, so please be mindful.
|

|
|
8. Enable IMAP in Gmail
- Open your Gmail inbox (https://mail.google.com/).
- Click the settings gear icon (⚙️) in the top-right and select "See all settings".
- Click the "Forwarding and POP/IMAP" tab.
- In the "IMAP access" section, check the bubble for "Enable IMAP".
- Scroll to the bottom and click "Save Changes".
|

|
|
Your setup is now complete. TeamConnect is securely configured to access your Gmail account via OAuth 2.0 and integrated with Google Exchange Services. Please initiate an email approval workflow to test the connection.
|
|


.gif?revision=1)
.gif?revision=1)


