
Object Navigator Window
These fields display the Object Navigator icon  .
.
Some screens always display the Object Navigator icon, such as the Qualifier tab in rule screens. Other screens only display the Object Navigator icon when certain selections are made. For example, the Fields section of the Templates screen only displays the Object Navigator icon when particular operators are selected, such as Attribute in the Value field.
To start Object Navigator, click the Object Navigator icon  next to the field for which you want to define an attribute path. Object Navigator appears in a separate window that displays the starting table in the object model from which your path will originate. You can create a simple path by selecting an attribute in the starting table or a complex path by selecting a bridge or bridge attribute and traversing to open the next table. For details, see Creating Paths.
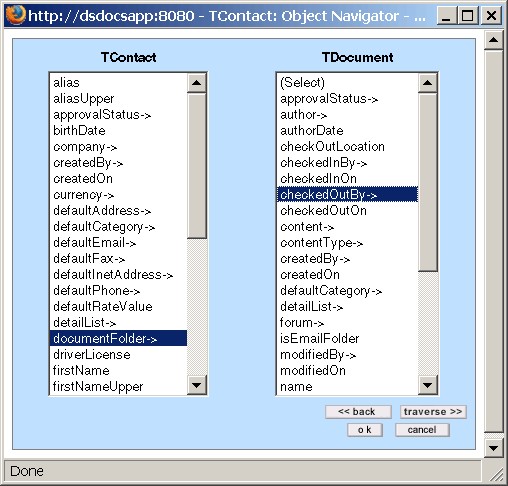
Object Navigator displays the active table on the right, each table you have traversed on the left, and highlights each attribute that you add to the path.
The following table describes the items in the Object Navigator window.
Object Navigator Window
|
Item |
Description |
|---|---|
|
Table name |
Name of traversed tables or current table. The table names of system objects appear as they are defined in the object model, such as TAppointment. The starting tables of custom objects are named after the custom object, such as Dispute. |
|
Current table |
Displays the available attributes and bridges in the currently selected table. Select an attribute or bridge to add it to your path. |
|
Traversed table |
Displays a traversed table with the selected bridge or bridge attribute highlighted in the table. |
|
traverse |
First select a bridge or a bridge attribute and then click traverse to:
|
|
back |
Click to go back to the previous table. When you click back, the selection is removed from the path. This button is only displayed after you have traversed at least one table. You can click back and traverse as needed to select different attributes or to traverse to different tables. |
|
ok |
After you have selected your final attribute, click ok to complete the path. |
|
cancel |
Click to close Object Navigator and cancel the path. |
Starting Tables
The first table that you see when you open Object Navigator is the starting table, which is the point from which your path originates.
Specifying your starting table is important because it corresponds to a table in the object model. Object Model: Read This First explains each table's attributes and where any bridges and bridge attributes lead. Using this information about your starting table, you can make selections that navigate to the desired attribute.
The starting table typically depends on the object for which you are building the path. For example, if you are defining rules, templates, search views, or wizards for an object, the starting table is the main table of that object (usually with the prefix T). There are 'T" tables for eleven system objects, including Involved (for example, TInvolved).
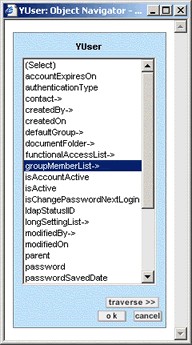
For custom objects, the starting table is TProject. The TProject starting table is labeled with the name of the custom object, such as Matter or Claim, unless the specific custom object is not known. If you are building a path for a current user, the starting table is YUser.
The following table provides a list of starting tables that appear in Object Navigator in different screens. If you are not sure which attribute, bridge, or bridge attribute to select from these tables, refer to Object Model: Read This First.
Object Navigator Starting Tables
|
Screen |
Tab |
Object drop-down list options |
Starting table |
|---|---|---|---|
|
Conditions |
General |
Current Object Current User |
T-table of the object you are working with, such as TAccount. YUser |
|
Custom Object Definition |
Name |
N/A |
TProject (labeled with the name of the current custom object for which you are creating the naming pattern, such as Dispute). |
|
Any Object Definition |
Custom Fields, for custom fields of type Custom Object |
this.
container. |
TProject (labeled with the name of the custom object selected for the field's definition). T-table of the object you are working with, such as TAppointment. |
|
Rules |
Qualifiers |
Current Object Current User |
T-table of the object you are working with, such as TAccount. YUser |
|
Routes |
Stops |
N/A |
T-table of the object with which the route is associated, such as TTask. |
|
Templates |
Fields |
N/A |
T-table of the object you are working with, such as TTask. |
|
Sub-Objects |
N/A |
J-table of the sub-object, except categories, such as JContAddress EDetail table for categories, such as EContDetail. |
|
|
Related Objects |
N/A |
T-table of the related object you are adding to the template, such as TAccount. |
|
|
Wizards |
Page Actions |
Current Object
Related Objects (from template)
Sub-Objects (from template)
|
T-table of the object you are working with, such as TAccount. TProject (labeled with the name of the custom object) is the starting table for custom objects. In Object Navigator, it is always displayed with the name of the custom object, such as Case, Matter, and Policy, except in cases where it is representing all available custom objects. T-table of the related object added to the associated template, such as TAppointment.
J-table of the sub-object, such as JProjAssignee. |
|
Qualifiers (accessed by Page Transitions) Parameters of type: |
Lookup table items Category Custom object User Group Account Contact |
The corresponding L-table of the item, such as LContPHoneType. WObjdCategory TProject (labeled with the name of the custom object for which you are creating the wizard). YUser YGroup TAccount TContact |
Filtering Sub-objects and Related Objects
If an attribute links to a list of sub-objects or related objects, you have the option of incorporating a filter into the path. The filter could be the sub-object's role or related object's category. For example, you may want to filter matter assignees by role or involved parties by category (role). This is done with the use of a special intermediary table that appears in Object Navigator but is not actually part of the object model.
In this intermediary table between the starting table and the related or sub-object table, you can do either of the following:
- Choose the specific item for the filter.
- Select (Any)->, meaning that you do not want the list to be filtered.
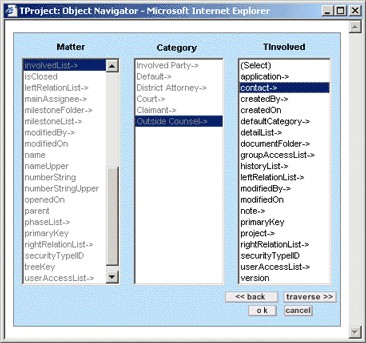
For example, to create a path from a matter to its involved parties' contact records which have the role Outside Counsel, you could specify the following:
involvedList-> Outside Counsel-> contact-> (ok)
This would result in the following path:
.involvedList(Outside Counsel).contact
The following image shows what this path looks like in Object Navigator:
If you want to create a path from a matter to its involved parties without filtering them by their role, you could make the following selections:
involvedList-> (Any)-> contact-> (ok)
This would result in the following path:
.involvedList(Any).contact
The following image shows what this path looks like in Object Navigator:
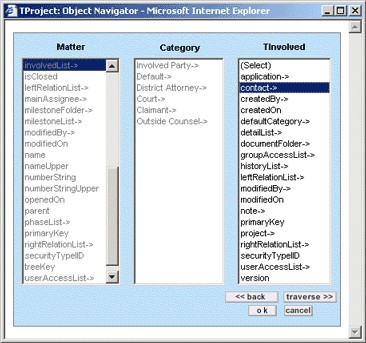
The third table, which represents the involved parties, is the same whether you filter the list with an involved role or not. From the TInvolved table, you can access the contact information for the involved parties, such as their phone numbers or rates, through the contact-> attribute.
The following table indicates which attributes lead to intermediary, filtering tables in Object Navigator and the table to which the attribute links in the object model.
Object Navigator Attributes That Link to Intermediary Tables
|
Object table |
Attribute |
Leads to this intermediate table in the user interface |
Then leads to this table in the object model |
|---|---|---|---|
|
TProject |
|
Category |
TAccount |
|
|
Category |
TAppointment |
|
|
|
Assignee Role |
JProjAssignee |
|
|
|
Child Object |
TProject (labeled with the custom object's name) |
|
|
|
Category |
TExpense |
|
|
|
Involved Role |
TInvolved |
|
|
|
Category |
TTask |
|
|
|
Relation Type |
JProjRelation |
|
|
|
Relation Type |
JProjRelation |
|
|
TContact |
|
Address Type |
JContAddress |
|
|
Email Type |
JContEmail |
|
|
|
Fax Type |
JContFax |
|
|
|
Phone Type |
JContPhone |
|
|
|
Internet Address Type |
JContInetAddress |
|
|
|
Skill Type |
JContSkill |
|
|
|
Task Category |
JContRate |
|
|
|
Relation Type |
JContRelation |
|
|
|
Relation Type |
JContRelation |
|
|
TInvolved |
|
Relation Type |
JInvlRelation |
|
|
Relation Type |
JInvlRelation |
|
|
TAppointment |
|
Resource Type |
JApptResource |
Creating Paths
Before you create a path with Object Navigator, make sure that you are familiar with the following:
- Object Navigator and its components
- The concept of your starting table
- The location of the end of path attribute that you need
- Attributes, bridges, and bridge attributes the path requires
For details about starting tables, attributes, and the TeamConnect object model, see the Object Model: Read This First.
- Necessary settings in the screen where you are creating a path (for example, wizards, templates and rules)
Tip: If you know the attributes to include in the path, you can type the path into the field.
Separate each attribute with a period (.)
To create a path with Object Navigator
- In the screen where you want to create a path, click the Object Navigator
 icon.
icon.
Object Navigator opens, displaying the starting table. - If you know how to reach the necessary attribute, build the path and go to step 6.
- If you are not sure which attribute to select, find the your starting table in Object Model: Read This First.
Tip: For custom objects, look up the TProject table in Object Model: Read This First. - Look through the Comments column of the selected table in Object Model: Read This First and determine whether there is an attribute in the current object table that contains the value you need. If you find the necessary attribute or bridge attribute in current table, select it in Object Navigator and go to step 6.
- If you do not find the attribute in the current table:
- Find the bridge that can link you to the appropriate table. If necessary, look up the tables to which the bridges link in Object Model: Read This First to see if they contain the attribute you need.
- Select the bridge and click traverse.
- A new table appears to the right of the starting table.
- Repeat steps 2 through 4 until you have navigated to the necessary attribute.
Tip: If you have traversed more than three tables but have not found the necessary attribute, you might be on the wrong track. Click cancel and start over.
- Click ok.
Object Navigator closes and the path that you have created appears in the field. - To complete the settings for the path, make other selections required in the screen you are using.
The path is completed and displayed in the field. You can click the Object Navigator icon again and edit the path if necessary. Object Navigator opens, returning to the table where you left off. You can then select a different attribute, click back, or traverse to a different table.