
Working with Tab Bar Appearance
Each tab represents a high-level grouping of main pages. You may wish to alter the appearance of the tool bar to show more or fewer tabs, or change the positions of tabs. The description here explains how to do those tasks.
To learn how to change the navigation items associated with a specific tab, see Working with Tab Bar Contents.
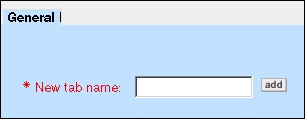
To create a new tab
- Type the name of the new tab in the New tab name field.
- Click Add.
- Your new tab appears to the right of all existing tabs. In the end-user interface, it will be to the right of all tabs except Admin and All Services.
- Click Save or Save and Close.
To reposition tabs
- Click on the tab that you wish to reposition.
- Click on the left-arrow button to move the tab more to the left, or the right-arrow button to move the tab more to the right.
- If more than one tab needs repositioning, repeat steps 1 and 2 for each tab.
- Click Save or Save and Close.

To delete a tab
- Click on the tab that you wish to delete.
- Click on the delete ("X") button to delete the tab.
- In the confirmation message pop-up window, click Yes. The remaining tabs adjust to the fill in the gap.
- Click Save or Save and Close.
Important: If you delete a tab, end users do not have any way of accessing the navigation items that were associated with that tab, except by finding them in the All Services tab or if you associate those navigation items with another tab.
To rename a tab
- Click on the tab that you wish to rename.
- Click on Rename.
- A pop-up window asks you to for the new name of the tab. Type the name and press OK to close the pop-up window.
- Click Save or Save and Close.