New Home Page Portal Panes - TCE 7.1
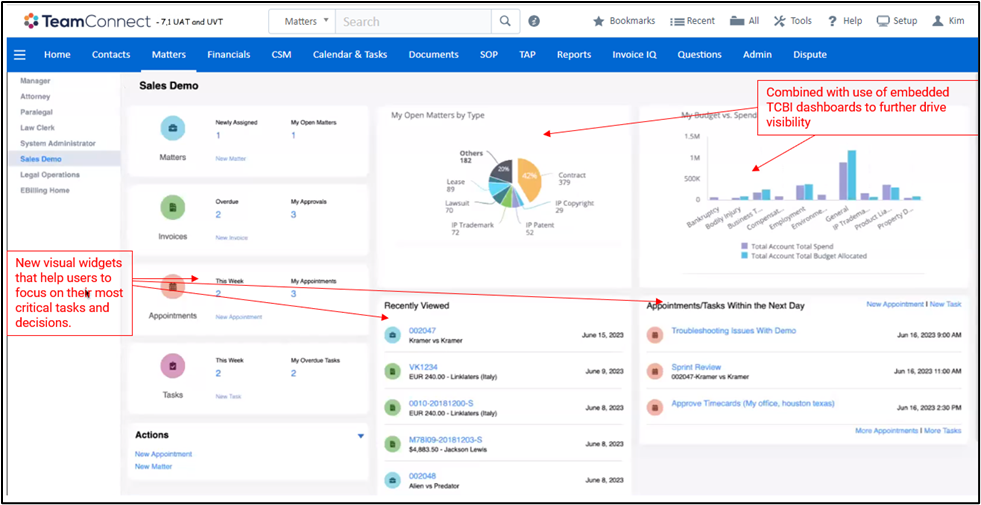
As part of the revamped user experience in TeamConnect 7.1, ten new portal panes have been introduced to the library of components that can be used to create home pages. These redesigned portal panes were designed to assist users quickly understand data and focus on the most important tasks and decisions.
Please see the video for the updates to working with Home pages and Portal panes.
Introduced New Portal Panes
|
Name |
Portlet Code Name |
Description |
|---|---|---|
|
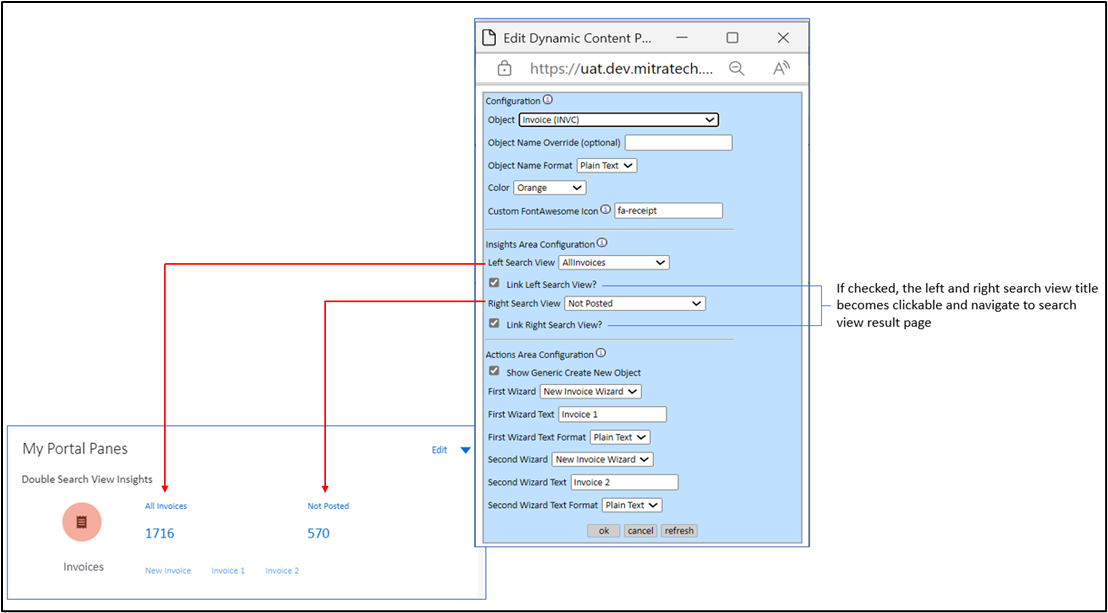
Double Search View Insights |
DoubleSearchViewInsightPortlet |
Similar to Single Search View, but with two search view options instead of one.
|
|
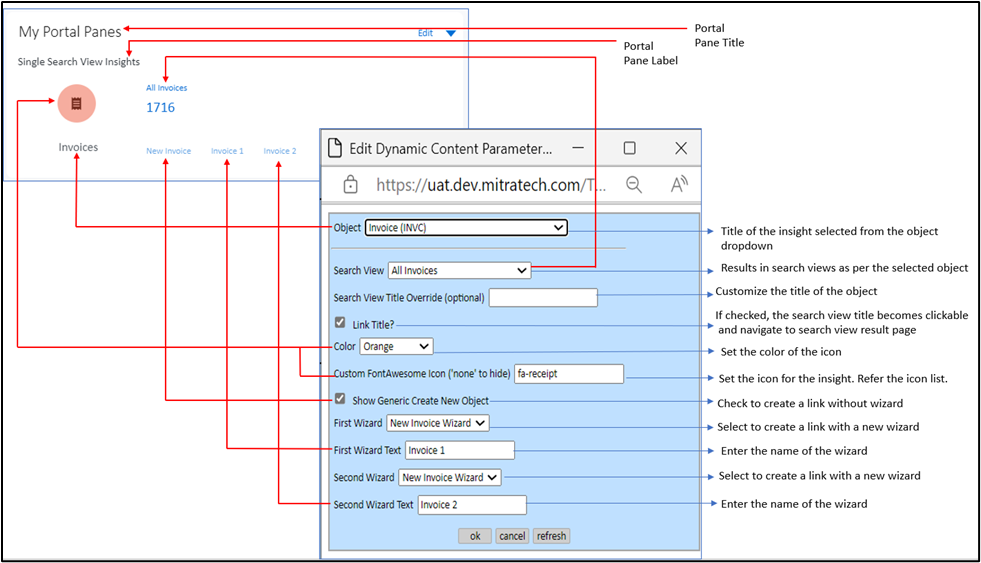
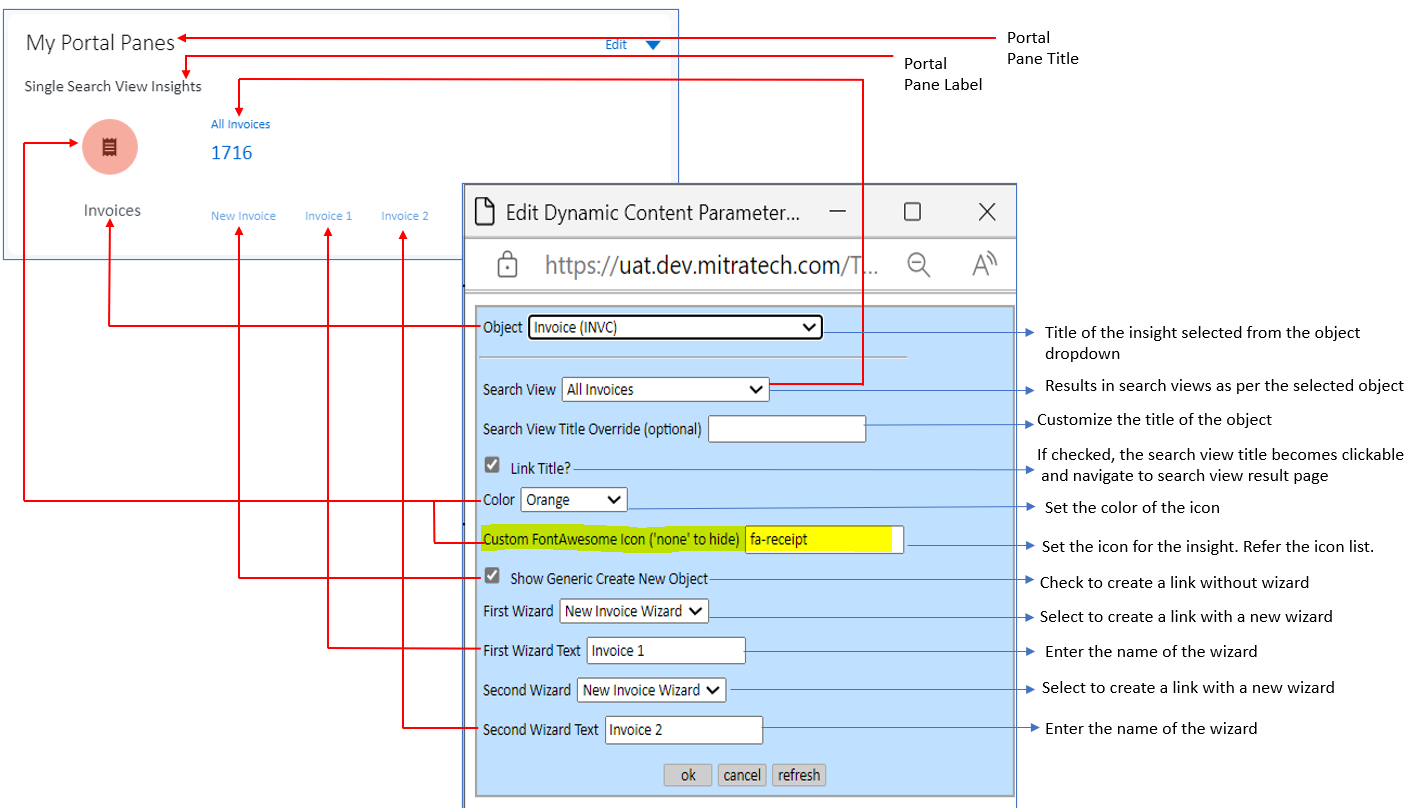
Single Search View Insights |
SearchViewSingleInsightPortlet |
Displays a record count from an object search view, such as My Matters. By clicking on the value, the user will get to the search results. Also, it is possible to provide a wizard link, such as Create New Matter. Intended for users that monitor and update multiple records and need to swiftly take action or refer to critical information.
|
|
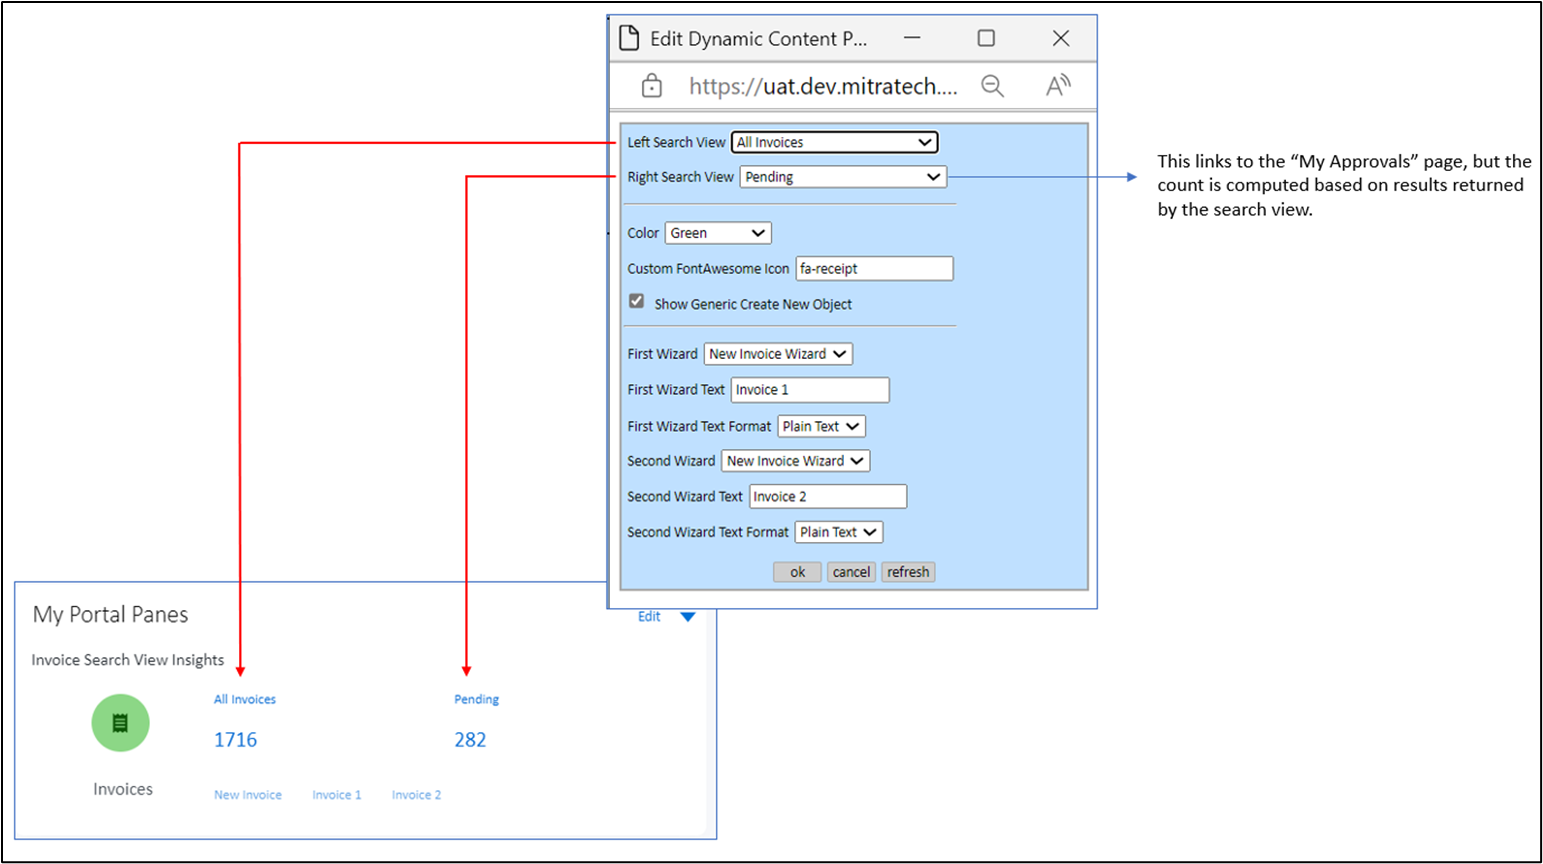
My Invoices Insights |
InvoiceSearchViewInsightPortlet |
Similar to Search View insights, but specifically for invoices filtered by the logged-in user. Intended for invoice approvers to view how many invoices require their attention. Provides count of invoices based on configured search views such as Pending, Rejected, Approved, and any custom search view.
|
|
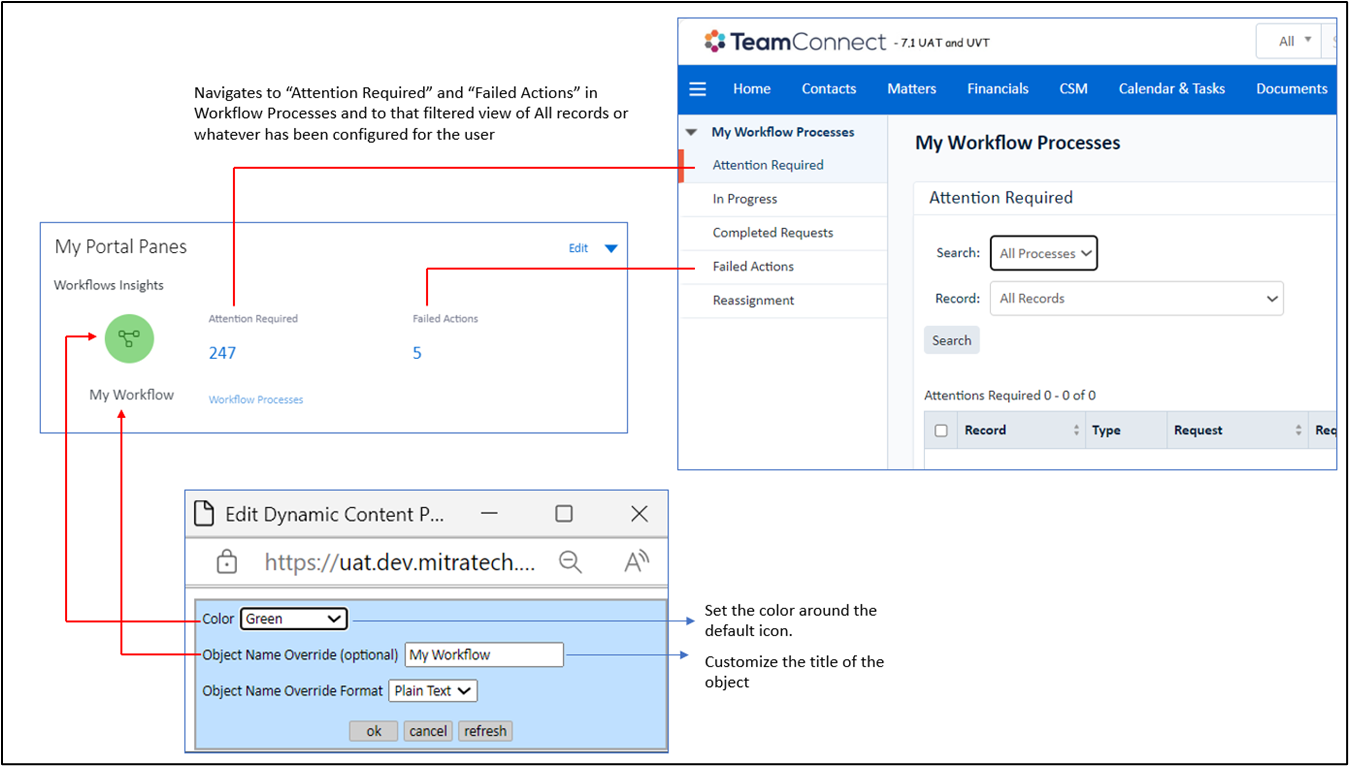
Workflows Insights |
WorkflowInsightPortlet |
Similar to Search View Insights, but specifically for workflows. It is intended for workflow managers to ensure that appropriate data actions are performed.
|
|
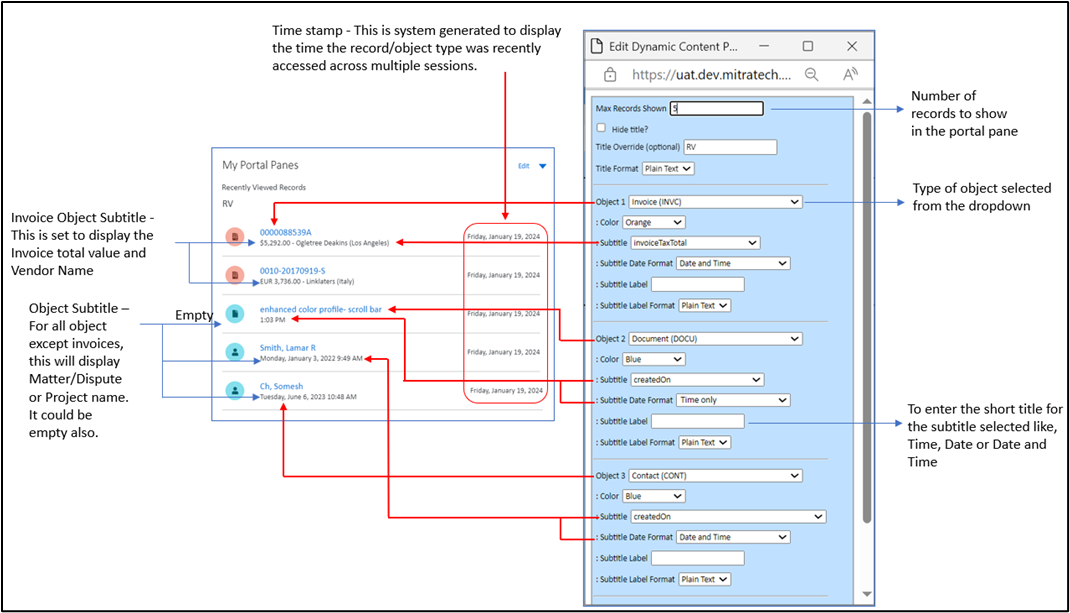
Recently Viewed Records List |
RecentlyViewedInsightPortlet |
Displays a combined list of the logged-in user's most recently seen records. Includes a variety of record kinds and up to five objects.
|
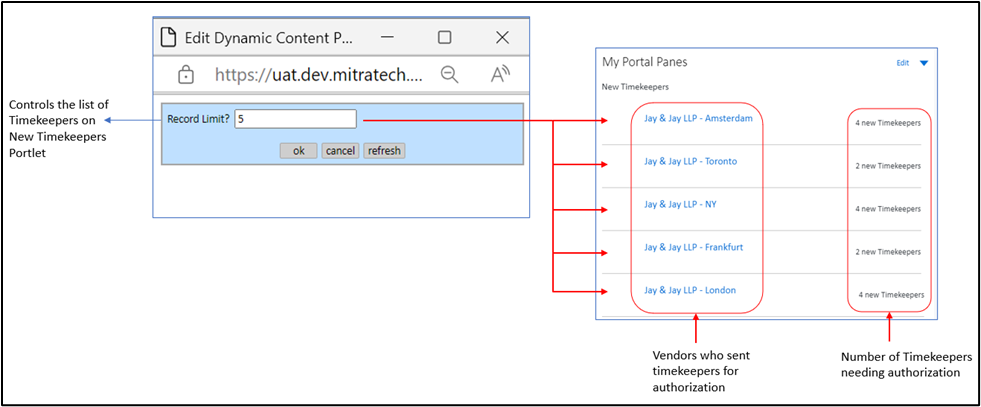
| New Timekeepers | TimekeepersPortlet |
A list of vendors who have submitted new timekeepers for authorization through Collaborati, along with the number of timekeepers that require approval. Intended to help e-billing managers stay on top of the vendor and timekeeper authorization processes.
|
|
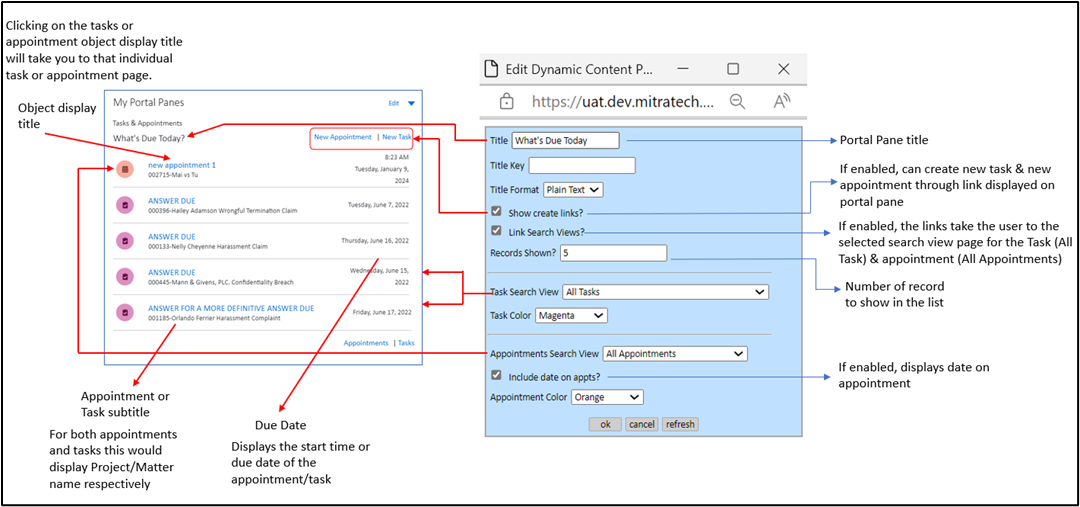
Tasks & Appointments List |
UpcomingEventsAndTasksPortlet |
Similar to Search View insights, but specifically for tasks and appointments filtered to the logged in user. Intended to give users a quick insight into their scheduled work.
|
|
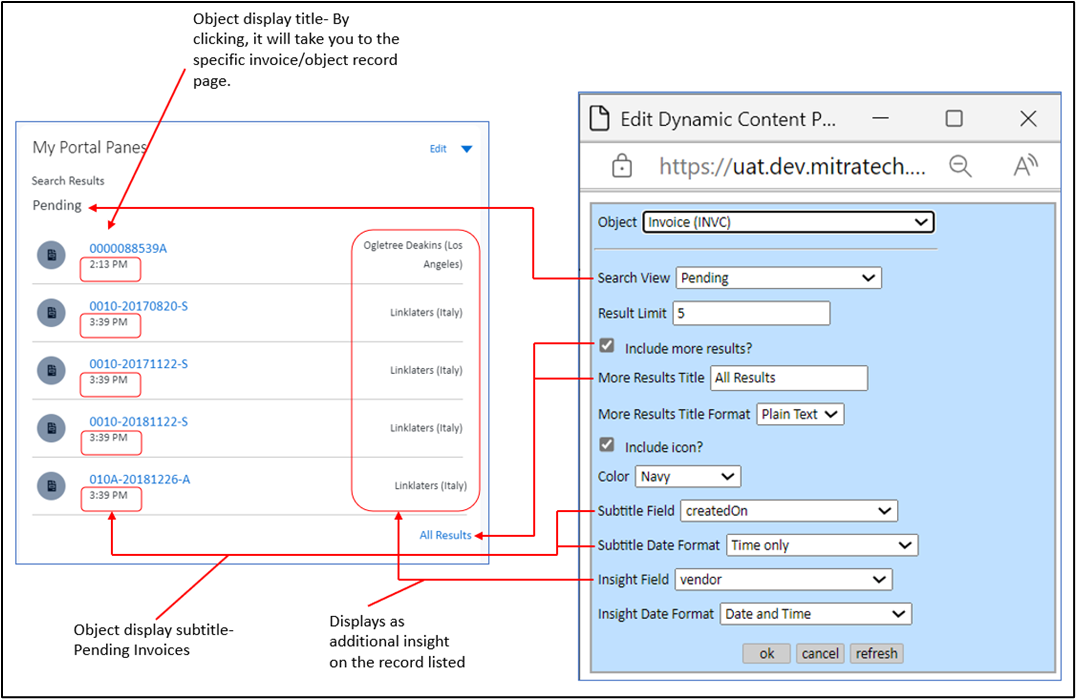
Search Results |
SearchViewListInsightPortlet |
Displays a list of records based on an object search view, such as My Matters. Intended to allow users to quickly access critical records. This widget is similar to the current list portal pane, except it is stylized like the other new portlets, rather than a table view.
|
|
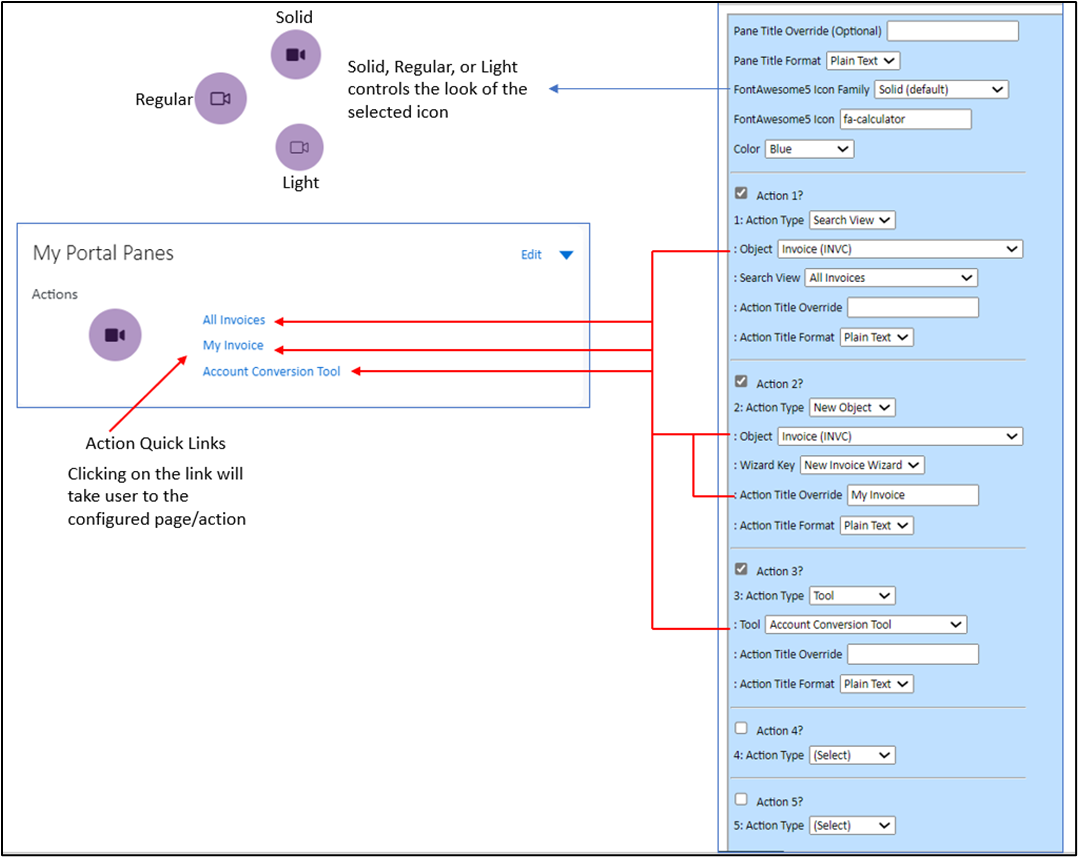
Actions |
ActionsInsightPortlet |
Contains links to tools or wizards. Intended to allow users to take quick actions from the home page such as creating a new matter. This widget is similar to the current actions portlet, but it is styled to match the other new portlets.
|
|
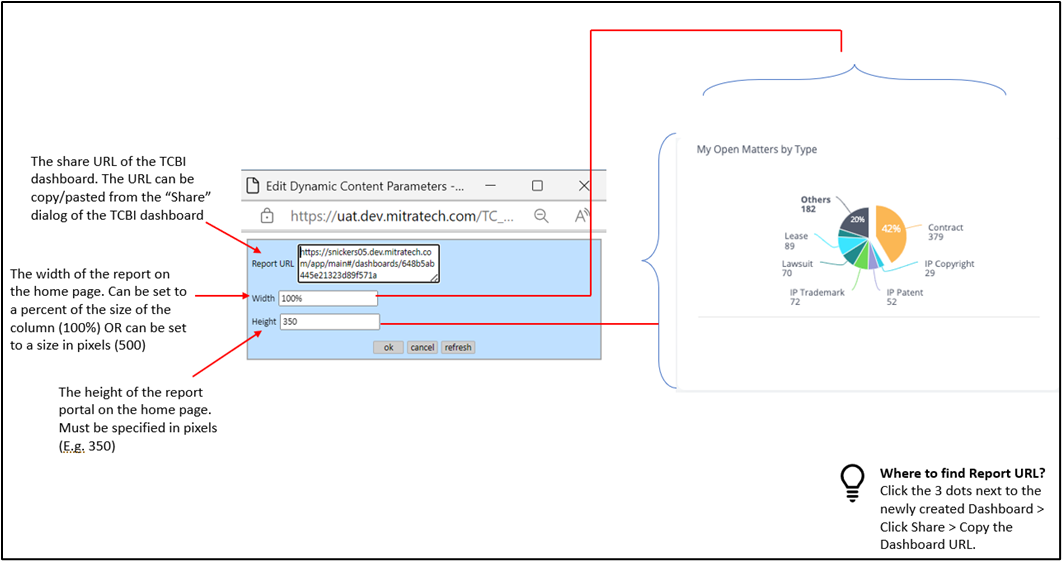
TCBI Dashboard |
TCBIDashboardPortlet |
Allows the user to embed a TCBI Dashboard to display analytics. Intended to accelerate decision-making using the most critical key metrics.
|
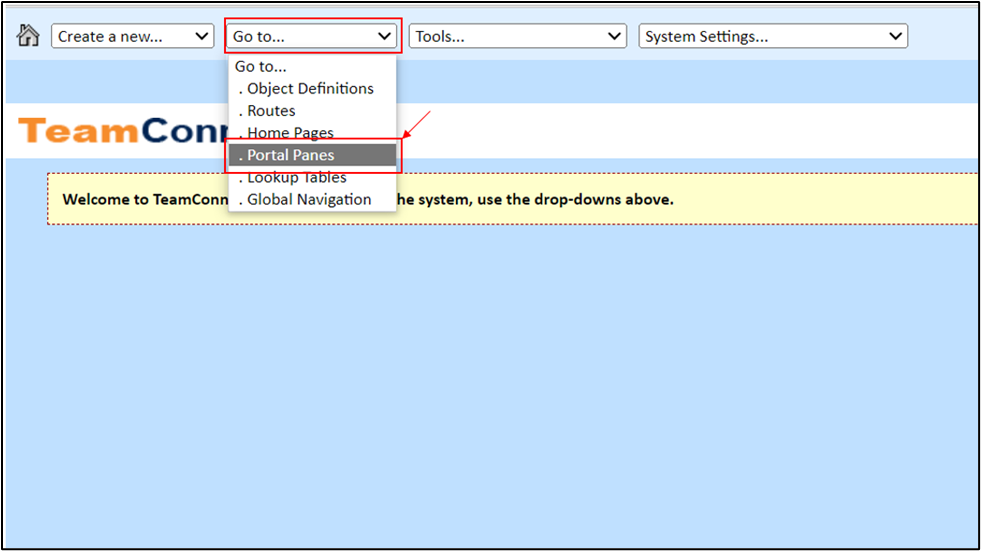
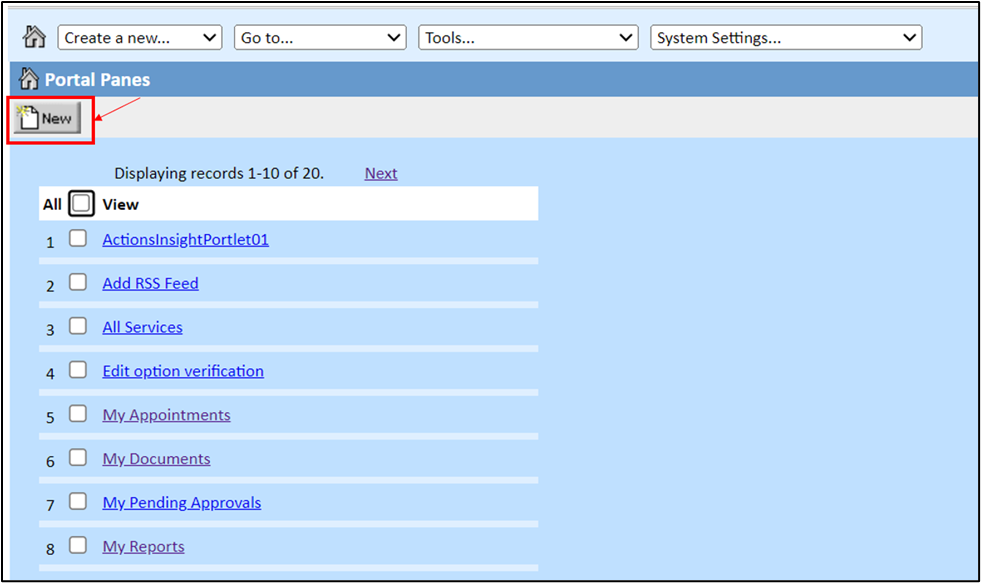
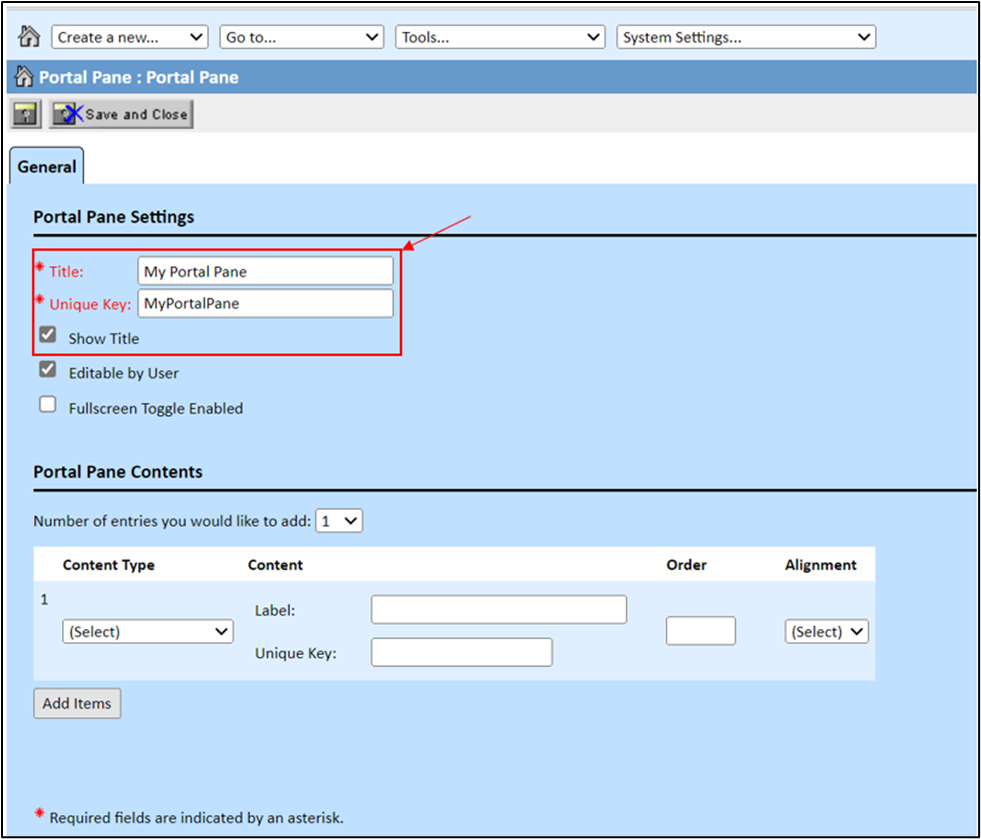
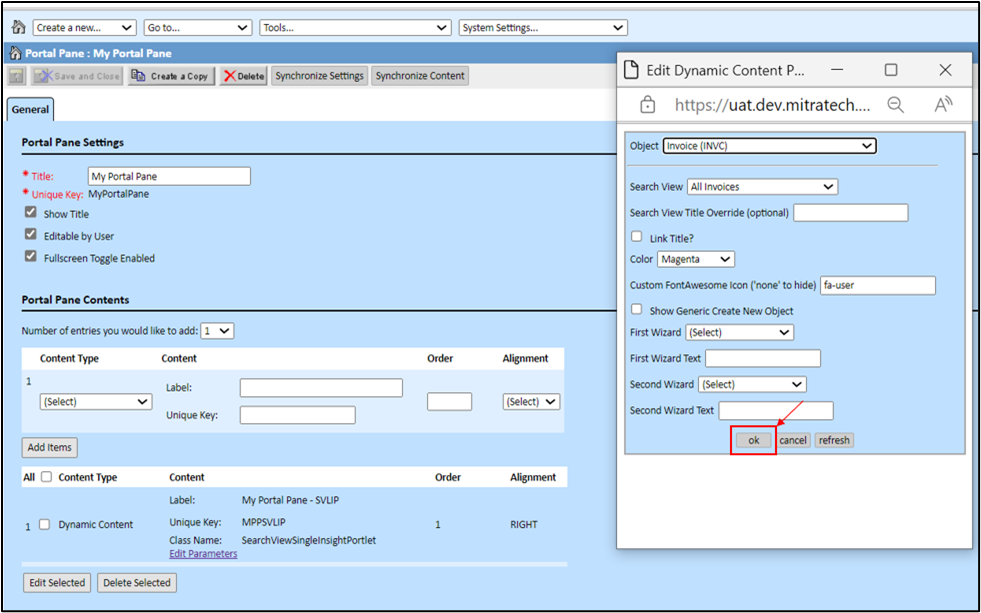
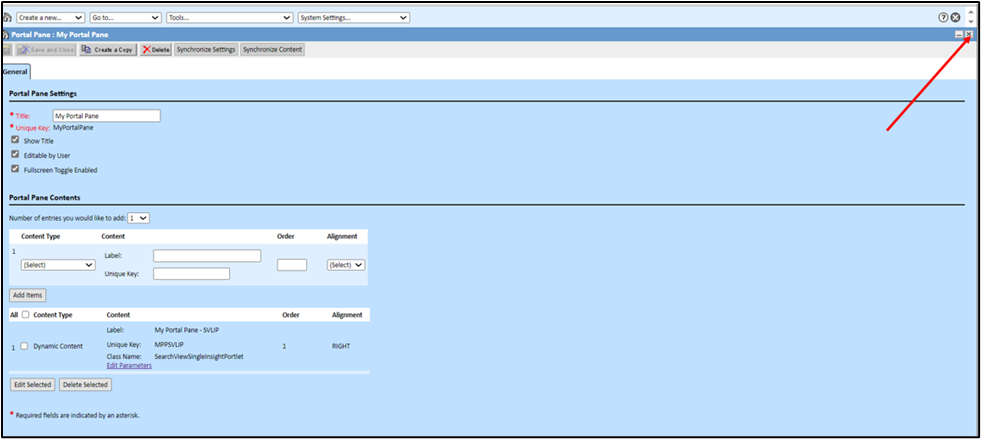
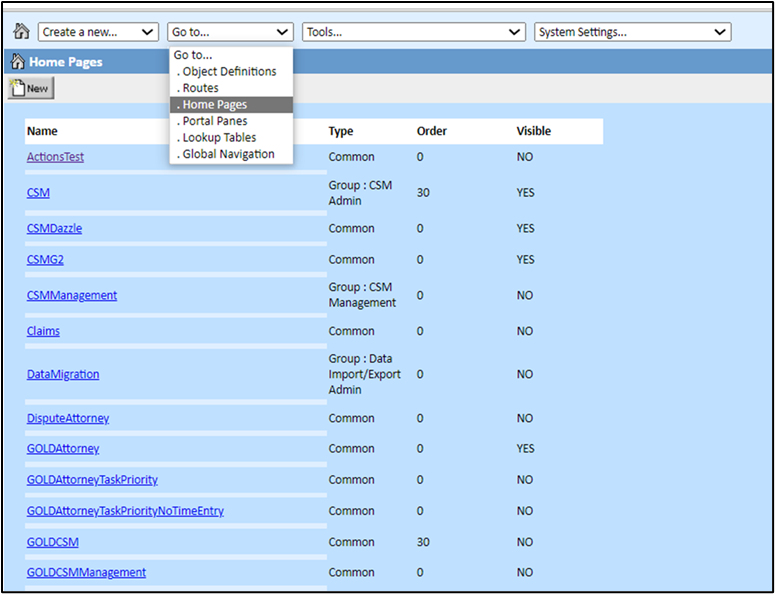
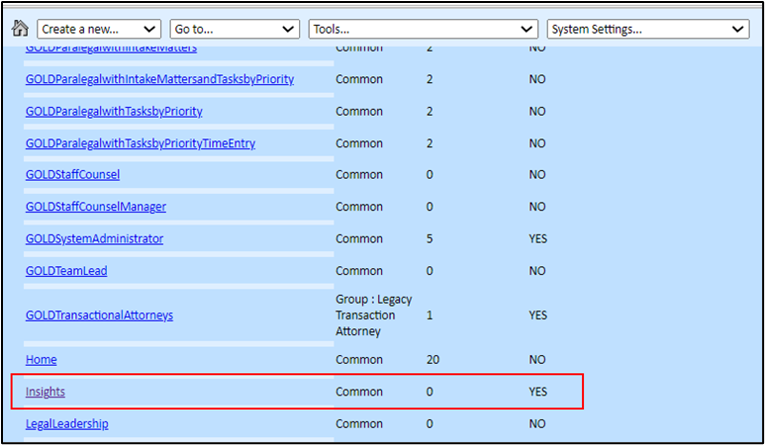
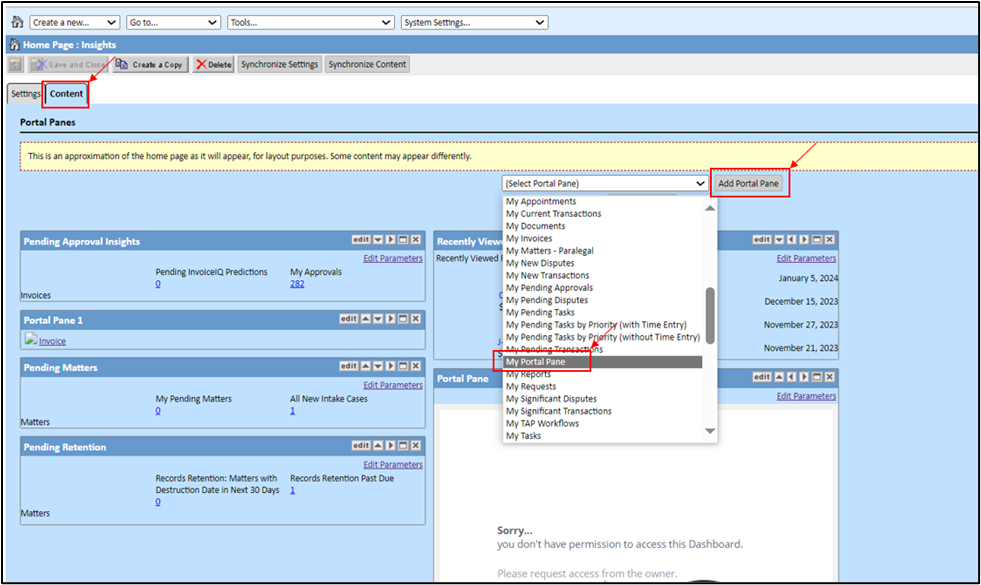
How to create a new Portal Pane
To build a new portal pane, the user should follow the instructions below:
Note: To test the home page, the administrator must first ensure that they have the necessary rights and permissions, then log out and log back into TeamConnect.
| Steps to follow | Screenshots for reference |
|
 |
|
 |
Note:
|
 |
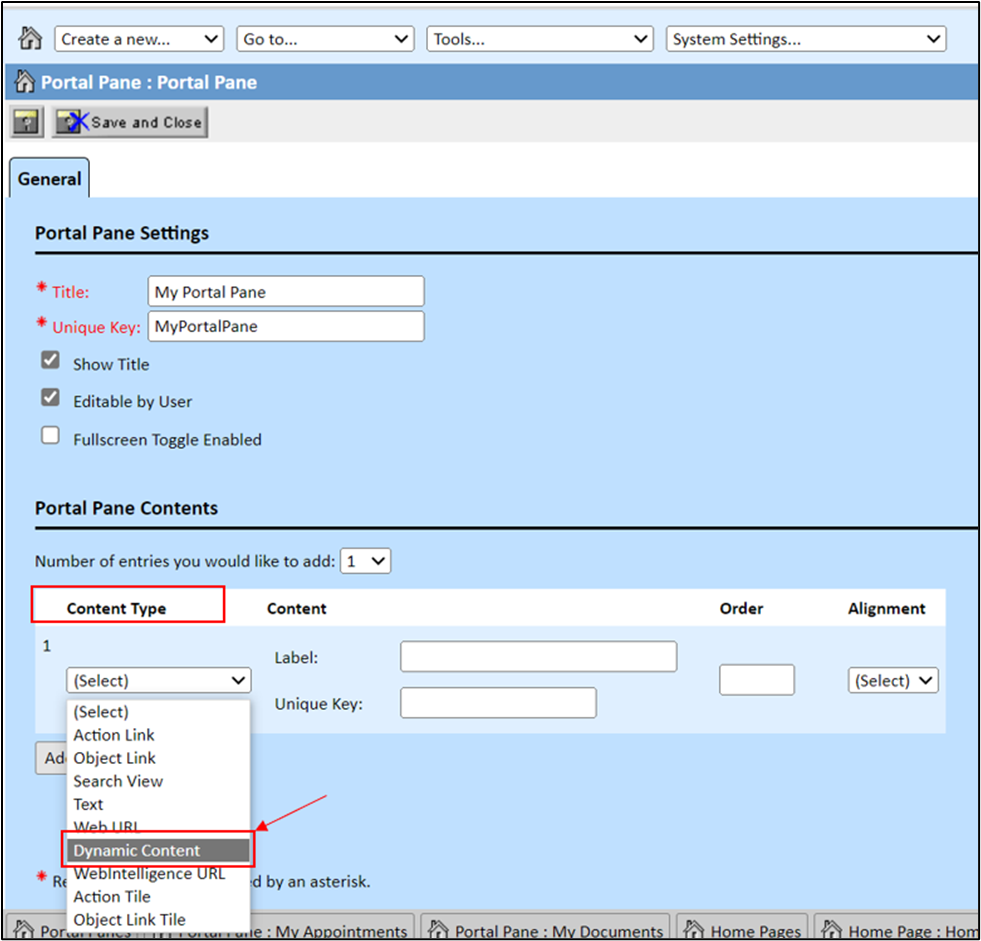
Note: Following the TCE 7.1 PB1 upgrade, Custom Content is now referred to as Dynamic Content which functions the same manner as picking Custom Content, only the name has been changed. |
 |
Note: The “Class Name” field is displayed as a dropdown with a combination of the pre-defined portal panes as well as class files found in the portal panes directory of the TeamConnect file structure. |
 |
|
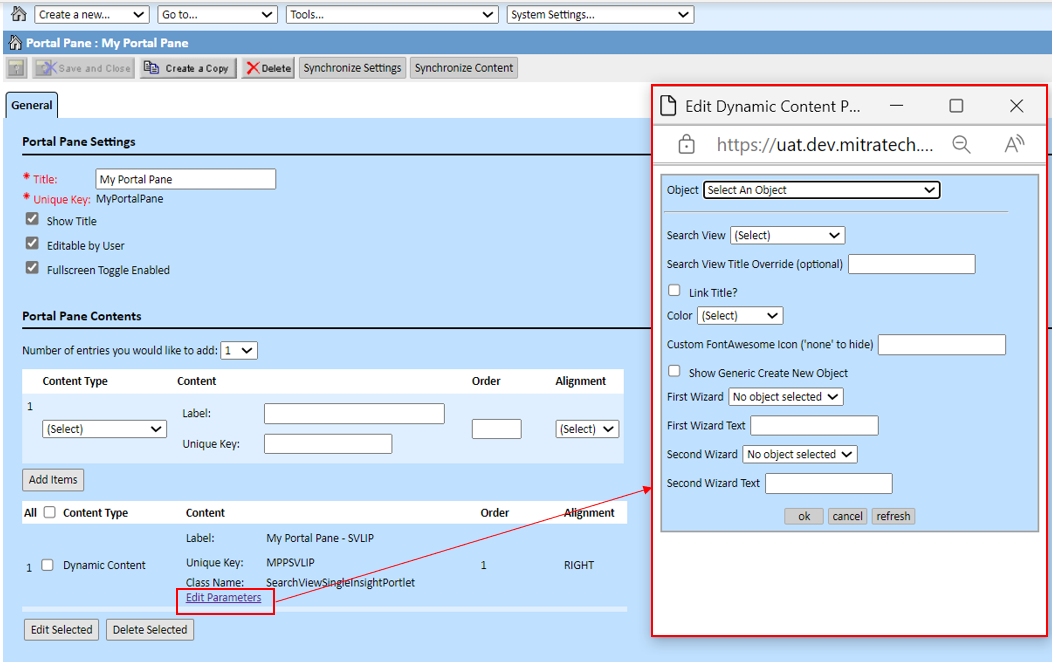 |
Important: To enter the FontAwesome icon field, the user can type or copy/paste the name of the font awesome icon they want to use, with the “fa-” as a prefix following with the required icon name by referring to the article “List of Font Awesome icons”. For example: fa-user, fa-file, fa-calculator, etc. Note: To refer to the detailed information on parameters for all the 10 newly created portal panes, refer to the article “Introduced New Portal Panes”.
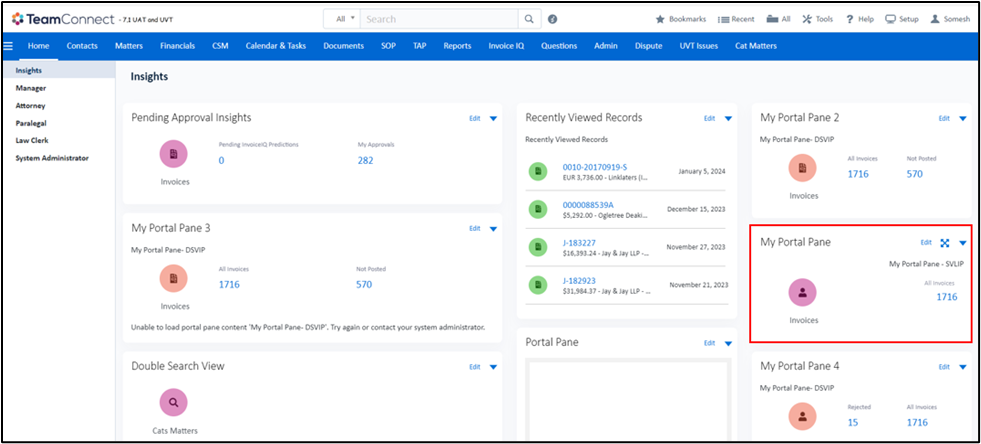
Important: The user should enter edit parameters for each dynamic content type. Empty edit parameters will result in a blank portal pane and an error message will appear on the portal pane after adding to the homepage. |
  |
|
 |
|
 |
|
 |
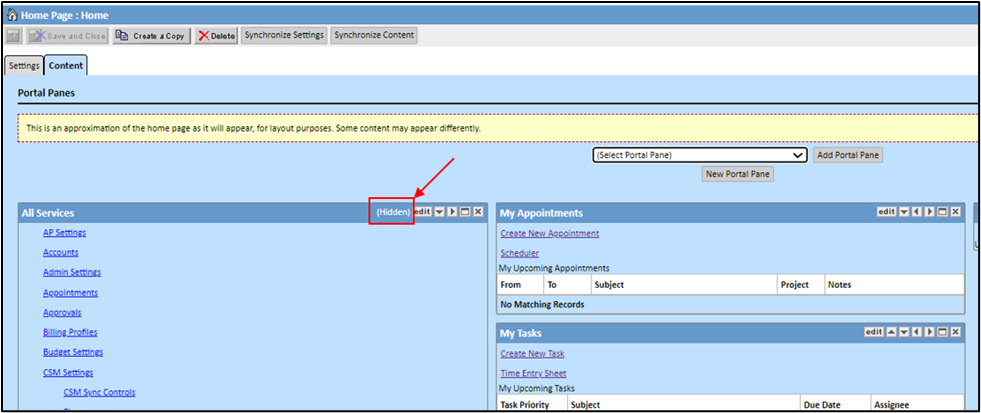
Note: When a user edits a portal pane in setup > home pages > content and uncheck "Show Title", the title remains visible on the content page. There will be an indicator after the name of the portal pane indicating that the title is hidden. This functionality allows the user to edit and move portal panes around on the home page content even if they don’t want the title bar to appear on users' home pages via the front end. |
  |
|
 |
Note:
-
When showing two or three columns, the width of each column does not alter dynamically in response to the contents of the portal panes; instead, they display according to the percentage of width specified in the setup. Introduced two new options to regulate the number of columns (dropdown for 1, 2, or 3) and the relative percentage of widths. The user can use 33:33:33 to ensure that the portal panes are split evenly.

Note: The user can edit all the parameters except the object of the portal pane in TeamConnect’s frontend homepage as the refresh functionality is only available at setup side and not at frontend side.
Font Awesome icons
When editing parameters for portal pane, there are two Font Awesome icon fields:
For more information, please see the video.
- Font Awesome Family dropdown - specifically in the Action portal pane where Solid, Regular, or Light controls the look of the selected icon.
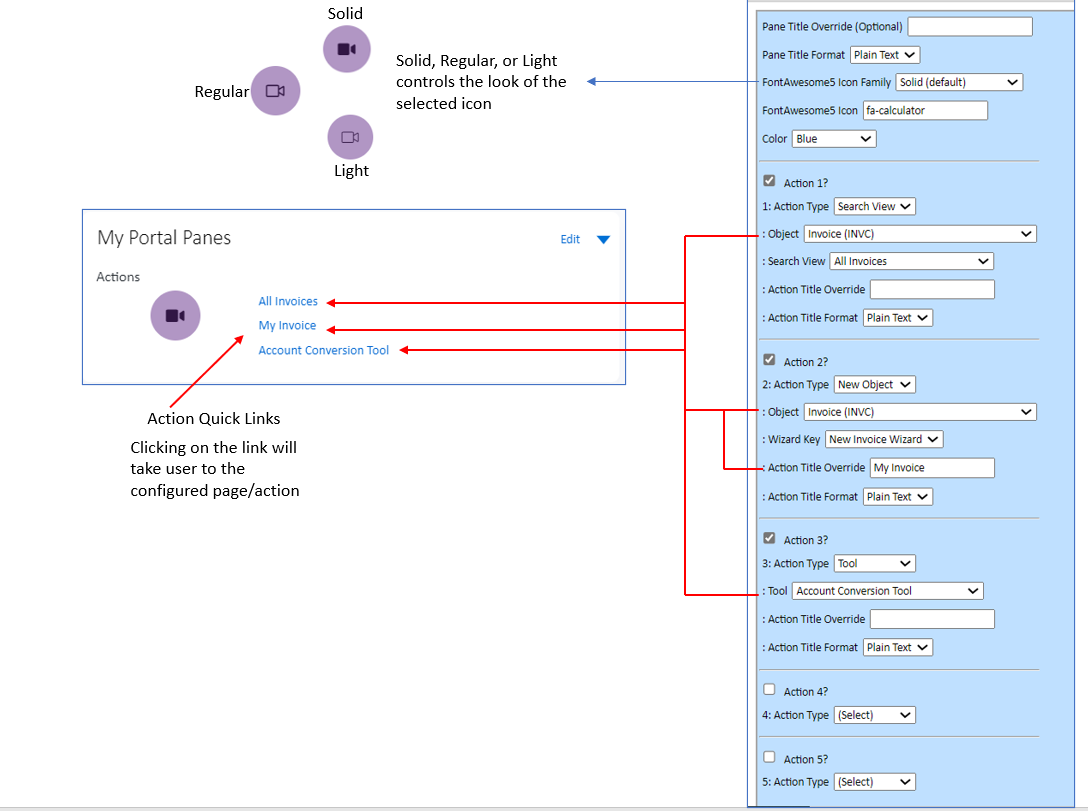
- Font Awesome Icon text field - The user can type or copy/paste the name of the font awesome icon they want to use, with the “fa-” as a prefix following with the required icon name.
- The user can use “far-” for regular, “fal-” for light and “fas-” for default appearance of the icon.
Note: Not all the portlets have the family field; we recommend to use the standard styling. Custom icon style family is missing in below mentioned portlets:
- ActionsInsightPortlet
- InvoiceSearchViewInsightsPortlet
- SearchViewSingleInsightPortlet
- SearchViewlistInsightPortlet
- DoubleSearchViewInsightPortlet
Note: Below are some lists of examples. You can use the full list of font awesome icons from here “https://fontawesome.com/v5/search”.
|
FA ICON NAME |
ICON IMAGE |
TEAMCONNECT DEFAULT |
|
fa-calculator |
|
Account |
|
fa-calendar |
|
Appointment |
|
fa-user |
|
Contact |
|
fa-file |
|
Document |
|
fa-receipt |
|
Expense |
|
fa-file-invoice |
|
Invoice |
|
fa-clipboard-check |
|
Task |
|
fa-briefcase |
|
Generic Default |
|
fa-address-card |
|
|
|
fa-alarm-clock |
|
|
|
fa-archive |
|
|
|
fa-business-time |
|
|
|
fa-cabinet-filing |
|
|
|
fa-clipboard-list |
|
|
|
fa-comment-lines |
|
|
|
fa-balance-scale |
|
|
|
fa-boxes |
|
|
|
fa-car-side |
|
|
|
fa-cash-register |
|
|
|
fa-chart-pie |
|
|
|
fa-clock |
|
|
|
fa-database |
|
|
|
fa-envelope |
|
|
|
fa-file-chart-line |
|
|
|
fa-file-image |
|
|
|
fa-folder |
|
|
|
fa-globe |
|
|
|
fa-hospital |
|
|
|
fa-lightbulb |
|
|
|
fa-lock |
|
|
|
fa-phone |
|
|
|
fa-plane |
|
|
|
fa-question-circle |
|
|
|
fa-shapes |
|
|
|
fa-shield |
|
|
|
fa-sitemap |
|
|
|
fa-star |
|
|
|
fa-taco |
|
|
|
fa-truck |
|
|
|
fa-university |
|
|
|
fa-unicorn |
|
|
|
fa-usd-circle |
|
|
|
fa-users |
|
|
|
fa-video |
|
|
|
fa-warehouse |
|
|
|
fa-watch |
|
|
|
fa-wrench |
|