
Elasticsearch Configuration and Best Practices
Global Search Filters
System administrators can improve global search by adding list, multi-list, and check-box fields as filters on global search views. Note: Only these three types of custom field are able to be selected here. Each field must also be enabled for global search.
Configuring Global Search Filters
- In the Setup tool, click the Go to... dropdown menu, select Object Definitions, and then click the name of the object.
- Click the Search Views tab on the selected object.

- Click the desired existing search view. Verify that the Global Search checkbox is selected. For more information, see Configuring Global Search Views.
- Click the Filter Display tab.
- On the Filter Display tab, add a filter by selecting a custom field from the Field dropdown menu. For custom objects, the Global Search View is not created by default; create your own search view wand classify it for Global Search use.
- After adding your fields with labels and order values, select Save and Close.
For information on using the filters, see Filtering on the Results Page.
Global Search Views
The following sections detail Global Search Views and tasks associated with configuring these views.
Configuring Global Search Views
TeamConnect Search allows for robust customization of search views. Users are able to set up custom views for global search as well as add custom fields to the search results of an object. Users can also omit custom fields from being searchable or entire objects.
Adding Custom Fields to Objects for Global Search
The procedure below outlines the preliminary steps to adding custom fields to search views. For more detail, see Creating Custom Fields. If you have already added custom fields to your object, proceed to Selecting and Updating Global Search View for documentation on including these custom fields in global search.
- In the Setup tool, click the Go to... dropdown menu, select Object Definitions, and then click the name of the object.
- Click Custom Fields.
- Enter in the details of the custom field (Name, Label, Type, Is Required?, Default Value (if applicable), Exclude from Custom Search, Exclude from Global Search). Make sure to leave Exclude from Global Search at the default "No" setting. More information on this screen can be found at Custom Fields Tab of Object Definitions.
- Click Save or Save and Close.
- Update the new field within your object and click Save.
- Note:
- If you are using TeamConnect 6.0 or earlier, re-index this record type for the changes to reflect in Global Search results. See Global Search Index Tool Help for more information.
- If you are using TeamConnect 6.1 or later, update the mappings in the Global Search Index Tool.
These fields can be viewed on the Details page of the object.
Selecting and Updating Global Search View
The following procedure outlines how to add existing custom fields on objects to global search.
- In the Setup tool, click the Go to... dropdown menu, select Object Definitions, and then click the name of the object.
- Click Search Views.
- Select the desired existing search view or create a new search view.
- From the General tab, select Global Search from the "Used for:" section. Note: Global Search and Custom Search are exclusive options; selecting either of these will automatically remove any selected check-boxes below.
- Select the Results Display tab.
- Type in the desired column name. Select the custom field from the Custom drop-downs and the desired Order and Column Number. The Order selection will determine where the selected field will exist within the set column. Save the record.
- Navigate back to the Search Views tab on the object. On the "Use this search view's results display for global search:" dropdown menu, ensure that the recently edited search view is selected.
- Save and close. Note: If your search view is not present, go back to Step 5 of this procedure.
- Re-index the selected object using the Global Search Index Tool. Refresh page. Custom field will now be visible in search results.
Removing Objects from Global Search
Removing an object from Global Search prevents the object from appearing in the search dropdown options, search results, or the Global Search Index Tool. Users may want to remove objects from Global Search for security reasons or to enhance the performance of the search. Removing the object from Global Search removes the object and all associated files from the search server.
To remove an object from Global Search:
- In the Setup tool, click the Go to... dropdown menu, select Object Definitions, and then click the name of the object.
- On the General tab, select Remove from Global Search.
- Click Save and Close. You may need to log out of TeamConnect and then log in again to see the changes.
- Note:
- If using TeamConnect 6.0 or earlier, navigate to the Global Search Index Tool and click the Clean Search Database button from the Search Server subsection at the bottom of the page.
- You may need to log out and log back into the application for changes to be reflected in TeamConnect.
Individual items can be removed from Global Search by adjusting the Privacy setting in Security. To do so, select the Security tab on the record, click edit, and change the radio button to Private. Private items that have been indexed will still be searched, but will be shown as "Secured" to users without access to those items.
Removing Custom Fields from Global and Custom Search
Custom fields can be excluded from TeamConnect global search and custom search for security reasons or to enhance the performance of the search. Omission of custom fields may be helpful for administrators seeking to clarify search results or to use some custom fields as hidden fields.
- In the Setup tool, click the Go to... dropdown menu, select Object Definitions, and then click the name of the object.
- Click the Custom Fields link to view the custom fields associated with the object.
- Click the check-box next to the field you would like to omit from search and select Edit.
- Change the dropdown menus for Exclude from Custom Search and Exclude from Global Search to Yes.
- Save and close.
- Note:
- If you are using TeamConnect 6.0 or earlier versions, any changes to the custom fields on a record type require a re-index of this record type for the changes to reflect in Global Search results. See Global Search Index Tool Help for more information.
- If you are using TeamConnect 6.1 or later, you will need to update the mappings in the Global Search Index Tool.
Elasticsearch Configuration
Nodes
Each time an instance of Elasticsearch starts, it starts a node. A collection of nodes forms a cluster. If the system is running a single node of Elasticsearch, then the cluster consists of only one node.
By default, every node in the cluster can handle the following types of traffic:
- The transport layer is used exclusively for communication between nodes and the Java TransportClient.
- The HTTP layer is used only by external REST clients.
Nodes are aware of other nodes in the cluster and can forward client requests to the appropriate node.
- The master node is the node that controls the state of the cluster. All nodes within the cluster report to the master node.
- A master-eligible node (node.master:true) can temporarily replace the function of the master node if the master node stops or encounters a problem.
- A data node (node.data:true) holds data and performs data related operations such as CRUD, search, and aggregations.
For more detailed information on Elasticsearch clusters and nodes and how the global search indexing functions outside of TeamConnect, visit the Elasticsearch Reference for Elasticsearch 5.3.
Preventing Split Brain
Mitratech recommends having at least 3 master-eligible nodes with discovery.zen.minimum_master_nodes set to 2. A general rule of thumb is to have this setting set to (number of master-eligible nodes / 2) + 1.
Background: If a configuration has more than one master-eligible node, a condition called "split brain" can occur. For example, if a cluster has 2 master-eligible nodes and one of the node loses communication but does not crash, the lost node now has no communication with a master node so it elects itself as master. When communication is regained between the nodes, there are now 2 Master Nodes. When data is sent to one node for indexing and search requests are sent to another node that does not have the recently indexed information, data can be corrupted.
To prevent this issue, Elasticsearch has a discovery.zen.minimum_master_nodes setting that allows you to set the minimum number of Master Eligible Nodes that need to be present for a new Master Node to be elected. For example, in a configuration with 3 Master Eligible Nodes and discovery.zen.minimum_master_nodes=2, the cluster still runs if one node loses connection because 2 Master Eligible Nodes are still available. The one node that lost communication will try to elect itself as master but cannot succeed because it needs at least one more Master Eligible Node in the cluster to become Master.
Note: This setting does not work if you have only 2 Master Eligible Nodes in the cluster. A value of 2 would mean that if one node goes down, the entire cluster is inoperable. A value of 1 does not protect against split brain.
Shards
A shard is a subdivision of an index which is in itself a fully-functional and independent "index" that can be hosted on a node in the cluster. Dividing an index into shards prevents creating an index with a large amount of data that exceeds the hardware limits of a single node. (For example, a single index of a billion documents taking up 1 TB of disk space might not fit on the disk of a single node or might be too slow to serve search requests from a single node alone.) The number of primary and replica shards can be configured in the Elasticsearch Configuration Properties.
An ideal maximum shard size is 40 - 50 G. For example, if an index size is 500 G, you would have at least 10 primary shards.
One index should be spread across 3 nodes (ideally across 3 different servers) with 3 primary and 3 replica shards.
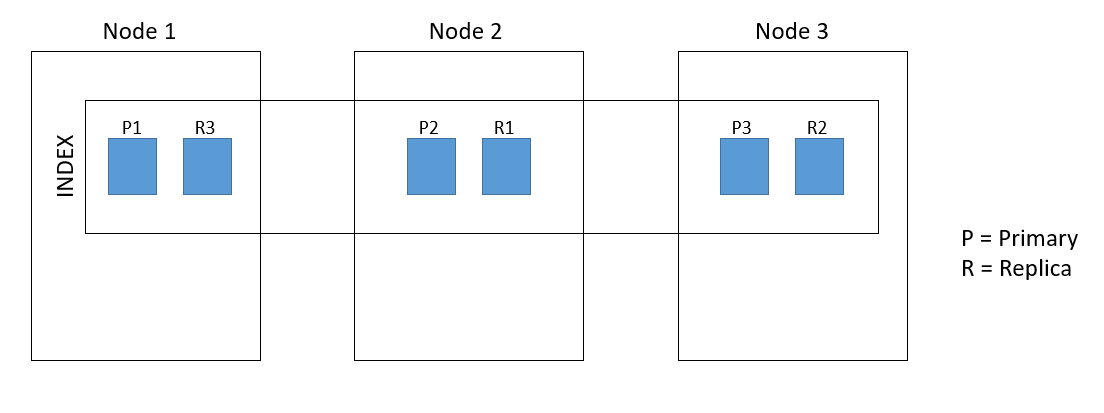
Primary Shards
Each document is stored in a single primary shard. When you index a document, it is indexed first on the primary shard, then on all replicas of the primary shard. You can specify fewer or more primary shards to scale the number of documents that your index can handle. You cannot change the number of primary shards in an index, once the index is created.
Replica shards
A replica shard is a copy of the primary shard and has two purposes:
- Increases failover: a replica shard can be promoted to a primary shard if the primary fails.
- Increases performance: get and search requests can be handled by primary or replica shards. By default, each primary shard has one replica, but the number of replicas can be changed dynamically on an existing index. A replica shard will never be started on the same node as its primary shard.
Elasticsearch Best Practices
Indexing and Performance
Your Elasticsearch indexing time may vary significantly based on the objects and fields selected to be indexed. For example, memo fields containing large volumes of text will be indexed exponentially slower than numeric-type fields.
For performance reasons, discern which fields you plan to leverage for global search before your initial indexing. Limiting the indices to these fields results in quicker indexing times while also reducing the load on the memory required for indexing.
In an existing installation, you can remove unnecessary object indices or remove objects from Global Search.
Indexing of documents stored in external DMS systems may also slow performance times. Users are encouraged to appropriately schedule their indexing if they have a significant volume of documents being indexed from an external DMS.
Allocated Memory/Java Heap Size
Allocate up to 50% of your available memory to Elasticsearch and make sure that the owner of the process is allowed to use this limit. The other half should be reserved for Lucene caching, which uses ANY free memory on the machine. It loads segments (inverted indices) into memory for faster searching, so definitely keep that in mind when calculating Elasticsearch memory requirements.
Set the minimum and maximum java heap settings to the same value in the jvm.options file, typically located in .../elasticsearch/elasticsearch-5.3.0/config/jvm.options.
Nodes
Mitratech recommends having at least 3 master-eligible nodes with discovery.zen.minimum_master_nodes set to 2 so that if one of the nodes go down, the cluster still functions. If a node goes down in a 2-node cluster anddiscovery.zen.minimum_master_nodes is set to 2, no incoming data is processed until a second node becomes available.
A general rule of thumb is to have this setting set to (number of master-eligible nodes / 2) + 1. For more information, see Preventing Split Brain.
Elasticsearch FAQ
|
Question |
Answer |
|---|---|
|
Is the full-text search in TeamConnect the same as Elasticsearch? |
No. Elasticsearch provides global searching based on an index stored on a dedicated server. Full text search can still be achieved directly from your database, though it may not be as robust as the new global search. |
|
How many shards should I use? |
The default value of 5 primary shards should be more than sufficient for almost all clients. For more information, see Shards. |
|
Can Elasticsearch work with clustered instances? What infrastructure is needed on premise? |
Yes. On-premise clients will need one instance of TeamConnect Enterprise (clustered or not) and one instance of Elasticsearch. |
|
Are there words which Elasticsearch will not search on? |
Elasticsearch/Lucene has the following words filtered out of searches: "a", "an", "and", "are", "as", "at", "be", "but", "by", "for", "if", "in", "into", "is", "it", "no", "not", "of", "on", "or", "such", "that", "the", "their", "then", "there", "these", "they", "this", "to", "was", "will", "with" |
Troubleshooting
Why aren't users getting any search results?
If the connection to the Elasticsearch server is broken, TeamConnect considers the objects to be "not indexed" and does not show any search results. If users are not getting any search results, make sure the connection to the Elasticsearch server is not broken or restart the server.