

TeamConnect Business Intelligence (Linux) Integration Guide
Prerequisites
Below are the prerequisites that are required to install TCBI Linux in your system:
- Supported browsers: Microsoft Edge, Google Chrome, Firefox and Safari version 7 and higher - Sisense supports Safari 10 and higher when embedding iFrames.
- X86-64/AMD64 Architecture
- Rocky Linux 9
- Boot Mode: Make sure your system is configured to boot from USB or DVD, supporting either UEFI or BIOS boot modes.
- Kubernetes 1.33
- Minimum 8 CPUS
- Two Disk Partition Disk1 450 GB, Disk 2 450 GB
- Disk IOPS 100MB/s 1600 IOPS
- Memory initial 128 GB with scope to expand up to 256 GB
Artifacts
Below are the artifacts that are required to install Sisense Linux in your system:
Linux L2025.4 SP1
Installation of Linux
To install Sisense Linux in your system you must have Linux installed. We will walk you through the installation of Rocky Linux 9. The instructions cover everything from downloading the ISO to completing the post-installation setup, ensuring a smooth and successful installation experience.
1. Preparing for Installation
Before starting, it's essential to ensure your system meets the minimum requirements for Rocky Linux 9.6:
- Processor: A 64-bit (x86_64) processor.
- Memory: At least 6 GB of RAM.
- CPU Allocation: 2500m
- Storage: Minimum of 10 GB free disk space, though more is recommended for practical use.
- Boot Mode: Make sure your system is configured to boot from USB or DVD, supporting either UEFI or BIOS boot modes.
Additionally, you'll need a medium to install from a USB drive (minimum 4 GB) or a writable DVD.
2. Downloading the ISO
The installation begins by obtaining the official ISO file for Rocky Linux 9.6. You can download it directly from the official Rocky Linux Downloads page. If you prefer using the command line, you can download the minimal ISO using:
wget https://download.rockylinux.org/pub/rocky/9/isos/x86_64/Rocky-9.6-x86_64-minimal.iso
The minimal ISO is recommended for server installations, as it provides a lightweight, flexible starting point.
3. Verifying the ISO Integrity
It's crucial to verify that your downloaded ISO is not corrupted or tampered with. This can be done using checksum verification:
- Download the checksum file:
wget -O CHECKSUM https://download.rockylinux.org/pub/rocky/9/isos/x86_64/CHECKSUM
- Verify the ISO against the checksum:
sha256sum -c CHECKSUM --ignore-missing
- If the file is intact, the output will confirm:
Rocky-9.6-x86_64-minimal.iso: OK
This step ensures that your installation medium will function correctly without errors.
4. Creating a Bootable Installation Medium
Once the ISO is verified, you need to create a bootable USB or DVD:
- For Linux/macOS users, the dd command works efficiently:
sudo dd if=Rocky-9.6-x86_64-minimal.iso of=/dev/sdX bs=4M status=progress oflag=sync
Replace /dev/sdX with your USB device identifier (e.g., /dev/sdb).
- For Windows users, tools like Rufus are ideal:
- Open Rufus, select the ISO and your USB device.
- Click "Start" to create the bootable media.
5. Booting from the Installation Media
With the bootable media ready, insert it into the system you want to install Rocky Linux on. Restart your computer and access the boot menu (typically via F12, Esc, or Del keys). Choose the USB or DVD as the boot device, and the Rocky Linux installation screen should appear.
Select "Install Rocky Linux 9" from the menu using the arrow keys and press Enter to start the installation.
6. Configuring the Installation
The Rocky Linux installer (Anaconda) guides you through several configuration screens:
- Localization: Choose your preferred language and keyboard layout. Set your timezone to ensure the system clock is accurate.
- Software Selection: Select the software to install. For servers, the Minimal Install option is recommended. For desktop systems, additional environments like GNOME may be chosen.
- Installation Destination: Select the target disk. You can configure automatic partitioning or create custom partitions if required.
- Network & Hostname: Configure network settings. Assign a hostname for your system.
- User Setup: Set a strong root password and optionally create a standard user account for daily use.
7. Installing the System
Once all configurations are complete, click "Begin Installation". The installation process will start, copying files and configuring the system according to your selections. Depending on your hardware, this may take a few minutes.
8. Post-Installation Steps
- Reboot the system.
- Remove the installation media to avoid booting from it again.
- Log in using the root or user credentials created during setup.
9. Post-Installation Configuration
Once logged in:
- Update the system packages to ensure you have the latest security and software updates:
sudo dnf update -y
- Install any additional software packages you need for your system.
Note:
- Ensure the boot mode (UEFI/BIOS) matches the installation media mode.
- Configure network settings correctly, especially for servers requiring remote access.
- Consider using SSH for remote administration if installing Rocky Linux as a server.
Installation of Sisense Linux
As explained in the previous section of this document, installing and configuring a Linux environment is the first step. Since Sisense is deployed on top of Linux, having a stable Linux setup is a prerequisite. With the operating system already installed and ready, you can now proceed with installing Sisense Linux on your system.
This section provides step-by-step instructions for setting up Sisense on your Linux system, including prerequisites, configuration, and deployment options.
Prerequisites
- Supported OS & Version (check with hostnamectl)
- x86-64 / AMD64 architecture
- Sudo-enabled non-root user (preferably UID/GID = 1000)
- Correct ownership of install directory & package files (not root)
- Use same user for upgrades/reinstalls
- Permanent secondary disk mount for single-node setups (/etc/fstab)
- Reboot after uninstall before reinstalling
- No port conflicts / dedicated server recommended
- Unmodified OS kernel (no hardened/custom kernels)
- Supported Kubernetes version (if using K8s)
For more information refer to Minimum Requirements for Sisense in Linux Environments and Checking the Prerequisites before installation.
Installation Process
To install Sisense:
- Always back up your Sisense servers before starting the installation to enable rollback if needed.
- In Linux, create a sudo enabled user account for each server that Sisense will be deployed on. Check which privileges each user has to run sudo:
sudo -l -U <installation user>
The response to this command must include the following:
(ALL : ALL) NOPASSWD: ALL
It is recommended that the user has a UID/GID of 1000. Run the following command to check user's UID/GID:
id -u <installation user>
If you need to use a user with a UID/GID other than 1000.
- Log in via SSH using the installation user and navigate to the installation directory:
cd sisense-installation-files
-
We are going to proceed to install:
-
Single-node
Linux archive, which includes:
- Five configuration files (one for each deployment type)
- A generic config.yaml containing all deployment parameters
- You are going to configure the single_config.yaml
Single-Node Deployment on RKE
Note:
-
Before you set up Sisense on your single Linux machine, you must mount /opt on a dedicated disk. For instructions on how to mount /opt, see Mounting on a Dedicated Disk for Sisense Single Nodes.
-
If using Portworx for storage, see Integrating Sisense with Portworx.
-
All Linux non-root users must have sudo privileges. From Sisense Linux v8.2.1, services run under the Sisense user only.
-
Make sure you have enough disk space on the disk you mount. The disk must include 50GB + 2*(size of the ElasticCube data), with no less than 50GB.
To initialize Sisense in a Linux environment:
- Using the sudo user you created, in the Linux CLI, enter the following command to download the Sisense tar.gz file.
wget [sisense-linux-deployment-link]
- Extract the tar.gz file into the {sisense-version} folder:
tar zxf [sisense-linux-deployment-package-name]
- Navigate to the {sisense-version} directory where you extracted the tar.gz file.
cd sisense-[sisense-version]
- Edit the single_config.yaml file.
vim single_config.yaml
- In the single_config.yaml file, you must enter values for the following parameters:
| Parameter | Description |
|---|---|
| k8s_nodes | List of K8S nodes with DNS name, internal and external IPs. Node names must be lowercase letters, digits, or hyphens (not ending in a hyphen). |
| deployment_size | "small" or "large" to adjust pod resource limits. |
| cluster_visibility | true or false to allow/disallow Sisense workflows like node monitoring and logging updates. |
| offline_installer | true if using an offline installer. |
| docker_registry, docker_username, docker_password, pull_secrets_name |
Required if using a private Docker registry. |
| remote_installation | true for installation from a remote/bastion machine. |
| update | true if upgrading Sisense. Skips K8S installation if cluster exists. |
| Notify_On_Upgrade | true to show maintenance notification during upgrades. |
| update_k8s_version | true to upgrade K8S version. |
| cni_plugin | calico (default) or flannel. Must match current CNI if upgrading K8S. |
| .application_dns_name | DNS name of your server or external load balancer. Required for SSL connections. |
| linux_user | Sisense Linux user (non-root, sudo-enabled). |
| ssh_key | SSH key for the linux_user in .pem format. |
| namespace | Kubernetes namespace, default is Sisense. |
| gateway_port | API gateway port (default 30845). Do not set to 443 if SSL is not configured. |
| timezone | System timezone (TZ database name). |
| is_ssl | true to enable SSL, otherwise false. |
| ssl_key_path, ssl_cer_path | Paths to SSL key and certificate if SSL is enabled. |
| http_proxy, https_proxy, no_proxy | Optional proxy settings. |
| internal_monitoring, external_monitoring |
Enable or disable Prometheus/Grafana dashboards and external monitoring. |
| uninstall_cluster, uninstall_sisense, remove_user_data |
Flags to remove services, cluster infrastructure, and user data. |
| signature_validation | Enable image signature validation. |
| delete_local_images | For offline customers, deletes local images after upload to save disk space. |
Example of Single_config.yaml
### INSTALLATION PARAMETERS

## Single Node - define the following:
#1. Internal IP of the machine.
#2. External IP of the machine.
k8s_nodes:
  - { node: node1, internal_ip: 10.7.13.74, external_ip: 10.7.13.74 }

## Deployment size is used to determine the maximum pod limits for application
## Possible values: small/large
deployment_size: "small"

## Sisense will use Kubernetes ClusterRole in order to manage the tenant
cluster_visibility: true

## In case of offline installation (private or public docker registry is required) - true/false
## If your docker registry is private Sisense will generate a pull secret for you
offline_installer: false

## Relevant for offline installer only, to save space on current server
## Delete local images and the images .tar files after upload to registry - true/false
delete_local_images: false

docker_registry: "quay.io/sisense_release"
docker_username: ""
docker_password: ""

## Whether installer should pull RKE and Sisense images from your own private registry
private_docker_registry: false

## If below is true and k8s secret for pull Docker images (${pull_secrets_name}) already exists, then it'll overwrite it
overwrite_docker_secret: false

## In case of running installation from Bastion/Remote machine define to yes/true.
remote_installation: false

## Update current installation. - true/false
update: false

## show maintanace page during upgrade process
notify_on_upgrade: true

## Update current Kubernetes version - true/false
update_k8s_version: false

## Recover Kubernetes componentes - true/false
# This will restore from the last existing ETCD snapshot (up to 12 hours back)
# (ETCD snapshots location: /opt/rke/etcd-snapshots)
recover_kubernetes: false

## Container network interface  - calico/flannel
cni_plugin: calico

## Enable delta approach for shared dashboards/widgets
enable_widget_deltas: false

## Application DNS Name.
#1. When empty, first node external_ip will be configured
#2. When is_ssl is true, configure the CN name
#3. Add http:// or https:// as a prefix when using external Load Balancer for Common name
application_dns_name: ""

## Linux user of the servers (UID 1000)
linux_user: "tcbi"

## SSH Key Path or Password is required, when ssh_key is empty, password will be prompted
ssh_key: "/home/tcbi/.ssh/id_rsa"

## To define user other than UID 1000, configure the following parameters
run_as_user: 1000
run_as_group: 1000
fs_group: 1000

## Name of Namespace
namespace_name: sisense

## Gateway port of api-gateway service - endpoint of Sisense in Non-Secured mode.
gateway_port: 30845

## System time zone.
## Format for example: UTC | US/Central | US/Pacific | US/Eastern | Asia/Jerusalem | Asia/Tokyo | Etc/GMT+6
timezone: "UTC"

### SSL SETUP
## Activate Secured Sisense in HTTPS, define key and cert certificates. - true/false
is_ssl: false
ssl_key_path: ""
ssl_cer_path: ""

### PROXY SETTINGS
# Set these proxy values in order to update package manager and docker daemon to use proxies
# http_proxy:
# https_proxy:
# no_proxy:

## Enable Horizontal Pod Autoscaler (HPA) with CPU-based scaling.
## Note: On non-RKE clusters, ensure metrics-server is installed.
hpa:
  enabled: false

### MONITORING
## Grafana and Prometheus - true/false
internal_monitoring: true

## Fluentd With Logz.io Dashboards - true/false
external_monitoring: true

## Enable image signature validation - true/false
## When enabled, Kyverno will validate the signatures of all pods images in the 'sisense' namespace
## and in the 'monitoring' namespace (if enabled)
signature_validation: false

### UNINSTALL SISENSE
## In cluster installed by Sisense - Uninstall whole K8S cluster with Sisense services - true/false
## In cluster installed by customer - Uninstall Cluster services such as: kube-prometheus-stack, nfs
uninstall_cluster: false

## Uninstall Sisense, Removing only Sisense services and remaining K8S Cluster alive, true/false
uninstall_sisense: false

## Removing all Sisense data - true/false
remove_user_data: false
- Run the configuration script. Your configuration settings are displayed with a message to confirm that you want to deploy Sisense with these settings.
./sisense.sh single_config.yaml

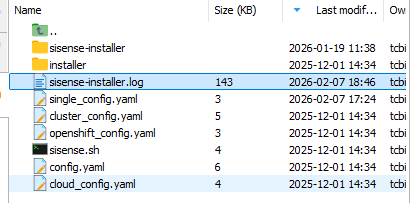
- Enter Yes to confirm that you want to deploy Sisense, or enter No to abort the deployment. If there are any issues when the deployment script finishes, view the installation logs as follows:
[installation-dir]/sisense-installer.log
- After the installation completes, a list of endpoints for accessing and managing Sisense will be displayed.

- You can also retrieve the Sisense application URL using:
kubectl cluster-info
- Open this URL in your browser to access Sisense. To verify that all services are running correctly, append /app/test to the URL along with the port number. For example:
0.0.0.0:PORT/app/test

- To connect to your Kubernetes dashboard, enter the following URL in your browser:
https://{IP}:6443/api/v1/namespaces/kube-system/services/https:kubernetes-dashboard:/proxy
- Once the installation is complete, some Sisense pods will remain in the Init state until the license activation.

- To activate the license, navigate to the Sisense web application URL (without extra paths such as /app/account/login) in your browser and enter your license credentials.

Native/Legacy Reports Link Configuration
The TCBI Landing page includes a Legacy Report link, also referred to as the Native Reports option. You can control whether this link displays for a client, depending on whether the client uses Data Warehouse (DW) and the Legacy Report feature.
How does it work?
The dwh.db.product property in the teamconnect.properties file controls the visibility of the Legacy Report link. Specify the type of database used for the data warehouse as the value of this property.
| Property Value | Result |
|---|---|
| Populated | The Legacy Report link displays on the TCBI Landing page. |
| Empty | The Legacy Report link doesn't display. |

Enable the Legacy Report link
- Open the
teamconnect.propertiesfile for the client environment. - Set the
dwh.db.productproperty to the appropriate value i.e the type of database used for the data warehouse. - Save the file.
- Apply the configuration change according to your environment's standard deployment process (for example, restart or redeploy the application).

Disable the Legacy Report link
- Open the
teamconnect.propertiesfile for the client environment. - Clear the value of the
dwh.db.productproperty. - Save the file.
- Apply the configuration change according to your environment's standard deployment process.
dwh.db.product value. Data Warehouse continues to run on BOE after this property is removed.TCBI Linux Server Configuration
How to Install the Plugins?
To install the Sisense plugins in a Linux environment:
- Using a sudo-enabled user, in the Linux CLI, verify that wget is installed by entering the following command:
[tcbi@node1 ~]$ wget
-bash: wget: command not found
- If the command returns
-bash: wget: command not found, install wget.
sudo dnf install wget

- Make sure the plugin package is available on the server and includes install.sh. From the directory that contains install.sh, run below command:
sh install.sh

- When prompted, enter the required parameters:
| Parameter | Description |
|---|---|
| Username | Sisense admin username |
| Password | Sisense admin password |
| Sisense URL | The Sisense site URL. Note: If you are unsure which URL to use, check the REST API URL shown in the Sisense site |
| Sisense Install path | Typically /opt/sisense/storage (press Enter to accept the default, if applicable) |
| Brand name | Typically Mitratech (press Enter to accept the default, if applicable) |
| Do you want to make report manager available (y/n) [Y] | Enter Y to make the Report Manager available on the homepage, or n to keep it hidden. |
- After you provide all parameters, the installer completes the plugin installation.


Fix plugin folder permissions
After installation, verify the plugin folders are owned by the same user used during the Sisense installation.
- Go to the plugins directory:
cd /opt/sisense/storage/plugins
- Check folder ownership and permissions:
ls -la

- If any installed plugin folder is owned by a different user (for example, root), change ownership to the user used during the Sisense installation (example below uses tcbi):
tcbi@node1:/opt/sisense/storage/plugins$ sudo chown -R tcbi:tcbi TeamConnect
tcbi@node1:/opt/sisense/storage/plugins$ sudo chown -R tcbi:tcbi manageColors
tcbi@node1:/opt/sisense/storage/plugins$ sudo chown -R tcbi:tcbi metadata
- To ensure new files created under these folders inherit the correct group, set the setgid bit:
tcbi@node1:/opt/sisense/storage/plugins$ sudo chmod g+s TeamConnect
tcbi@node1:/opt/sisense/storage/plugins$ sudo chmod g+s manageColors
tcbi@node1:/opt/sisense/storage/plugins$ sudo chmod g+s metadata
External plugins
For external plugins usually the addon comes with its own package that is the case of:
Expand Pivot on PDF
External plugins typically include their own installation package and instructions. The Expand Pivot on PDF add-on is delivered as a separate package Sisense.ExpandPivotOnDashboardPDF.1.1.14.zip
Extract the add-on package and follow the installation instructions included with the package. If the package includes the l-addon-script.sh installer script, use the following commands.
Script Flags Description
- To run script command use:
bash ./l-addon-script.sh {command-key}- replace{command-key}with one of keys listed from-hcommand.
- Show available commands:
bash ./l-addon-script.sh -h- shows a list of available command keys and their description.
- Common commands:
bash ./l-addon-script.sh -i- install add-on or rewrite existing add-on files.bash ./l-addon-script.sh -r- remove add-on from the system. Configuration in Mongo and Configuration page will persist.bash ./l-addon-script.sh -u- update the currently installed add-on by removing it and then installing a new version.
All needed pods will be restarted automatically. This may take a few minutes.
Enable FileManager option
To enable the File Management option in Sisense:
- In the Sisense application, go to Admin > System Management > Configuration.
- On the Configuration page, press the Sisense logo five times to open the advanced configuration options.
- Go to Base Configuration > FileManagement, and then set enable to Enabled.

- After you enable FileManagement, go to Admin > App Configuration > FileManagement > Plugins.
- Inside the folder you can upload the folder of the add-on from a previous functional Working Sisense Server.
- For this case you upload the folder
expandPivotOnDashboardPDF— this folder is different from the installation package.

Email configuration
To configure email settings in Sisense:
In the Sisense application, go to Admin > Server & Hardware > Email Configuration.
Update the required email settings for your environment, and then save your changes.

Display name deactivation
To deactivate the display name feature in Sisense:
- In the Sisense application, go to Admin > System Management > Configuration.

- On the Configuration page, press the Sisense logo five times to open the advanced configuration options.

- In Base configuration, search for displayname.

- Set
displayname.enabledto Disabled (or False), and then save your changes.


SSO configuration
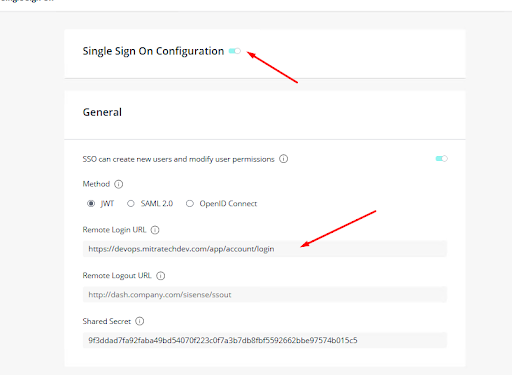
To configure Single Sign-On (SSO) in Sisense:
- In the Sisense application, go to Admin > Security & Access > Single Sign On.
- Enable Single Sign-On Configuration.
- In the Remote Login URL, enter your current Sisense site URL.
- Save your changes.
Team Connect Embedding Sisense page Support
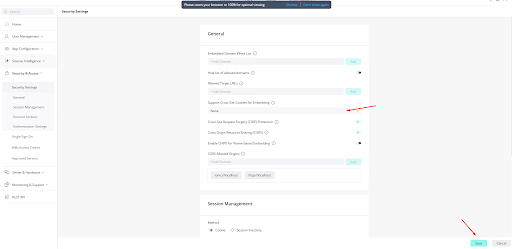
Support Cross Site Cookies for Embedding:
To support embedding Sisense pages for TeamConnect:
- In the Sisense application, go to Admin > Security & Access > Security Settings.
- Set Support Cross Site Cookies for Embedding to None, and then save your changes.
Force security cookies & adding proxy URL:
- To force secure cookies and configure a proxy URL, go to Admin > Server & Hardware > System Management, and then select Configuration.
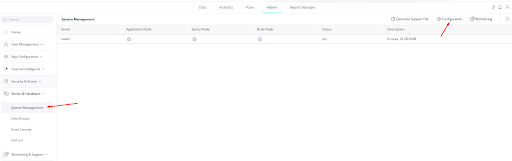
- On the Configuration page, press the Sisense logo five times to open the advanced configuration options.
- In Deployment Service, enable
security.ForceSecureCookies, and then save your changes.

- To set the proxy URL, go to Base configuration > Web Server.
- Set the proxy URL to your environment's proxy URL, and then save your changes.
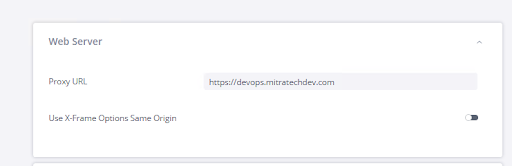
- After you save, Sisense signs you out. Sign in again to continue.

Sisense Linux Configuration Related to features
Build configuration & Troubleshooting
To configure Sisense for building and troubleshooting large eCubes:
- For larger eCubes, adjust the Data Group settings to increase available memory and (if needed) index size. In the Sisense application, go to Admin > Server & Hardware > Data Groups.
- Select the applicable Data Group, and then click Edit. Increase Max memory (for example, set the Data Group max memory to 32 GB), and then save your changes.
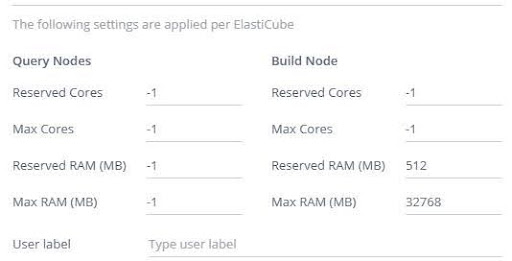
- If increasing max memory does not resolve the issue, change Index size from Short to Long, and then save your changes.
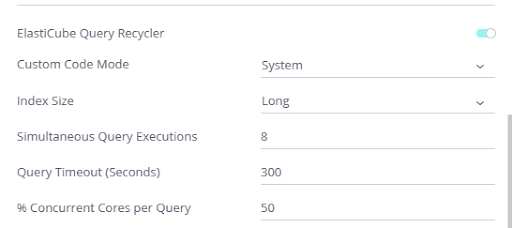
- To reduce build resource usage, go to Admin > Server & Hardware > System Management, and then select Configuration.
- In the Build section, change Base Table Max Threads from 4 to 2, and then save your changes.

PDF Exporting
To configure PDF exporting for scheduled reports:
- In the Sisense application, open the schedule for the report. Set the delivery option to send the report as a PDF attachment.
- Enable the image scaling setting (PDF attachment scaling). When this setting is enabled, Sisense scales the exported image to fit within the email.

Pivot Table Limits
To configure pivot table limits in Sisense:
- In the Sisense application, go to Admin > Configuration.
- Search for Pivot Table. Update the following settings as needed:
- Maximum number of columns displayed in a pivot table
- Maximum number of rows displayed in a pivot table
- Save your changes.

Kubernetes Deployment configuration
In order to avoid Java.Lang.OutOfMemory when you query your dashboards it is recommended to increase the resource limits for the query deployment. To do that, in the Sisense Linux server you execute the following command:
kubectl -n sisense edit deployments.apps query
This will open the editor and you can look for the resources > limits section and change to the following values:
limits:
   cpu: "4.5"
   Memory: 6Gi
requests:
   cpu: 300m
   memory: 2Gi
