
Office Documents and Emails Versions 3.1+
Documents and emails that are shared in TeamConnect can be opened in Office Suite with the TeamConnect add-in, allowing easier access to documents without the necessity of working from multiple programs.
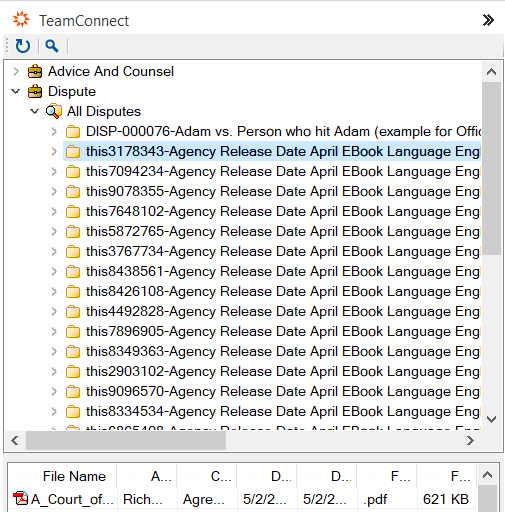
In an Office Suite program, such as Word, documents can be seen in the TeamConnect add-in on the right side of the page. Double-clicking on a document inside the TeamConnect pane will allow you to view the document content in Read-Only Mode.
Opening Documents
When you open a document, you have the option to open it as read-only, to check it out, or to save a copy.
Note: When looking for a document in a list of folders, you can only find documents in project folders or folders within project folders.
To open a document from the TeamConnect add-in, double-click a document from a Matter folder in your Disputes. The document will open in Read Mode.
Saving Documents
When you upload a document to TeamConnect, you must upload the document to a project.
The name of the document will auto-populate in the entry field after clicking save. Note: The document extension is not able to be edited.
To save a document from Word, Excel, or PowerPoint to TeamConnect
1. From the document, click the Save to TeamConnect button from the toolbar.
2. Browse to the project folder where you want to save the document.
3. Enter a filename for the document in the File Name field.
4. Click Save.
In TeamConnect, the document now appears on the Documents page for the project.
Saving to the same folder as a document with an identical file name will cause an error message. However, clicking the exact identical file and saving to it will allow versioning.

Office Metadata Population
Documents can be uploaded via the Office add-in, and metadata is automatically extracted and placed into the appropriate fields. This visible data will make locating and identifying documents easier.
TeamConnect extracts the following metadata:
| Extracted Metadata | Conversion Description |
| Document Name | File Name |
| Document's Creator | Author |
| Document Category | Category |
| Document Creation Date | Date Created |
| Document Last Modified | Date Modified |
| Document Extension | File Type |
| Document Size | File Size |
Note: If the Document's Creator cannot be extracted, the description will be left blank. If Creation Date cannot be extracted, the current date will be used. If Last Modified cannot be extracted, Creation Date will be used.
Searching Documents
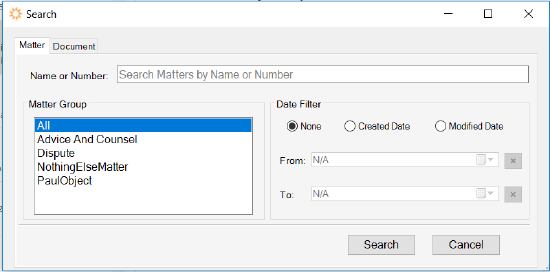
Matters can be quickly searched from the TeamConnect add-in within Office, saving users from scrolling through hundreds or thousands of Matter folders. You can search by clicking the Magnifying Glass icon in the TeamConnect add-in pane.
Enter your query into the Search text box. You can also filter by Created or Modified Date. Click Search and the search results will populate in the TeamConnect add-in pane. The documents and the action is the same as when you interact with documents in the standard TeamConnect document pane.
Note: Search results will remain until the Refresh button is pressed. This is located next to the Search button.
New to 3.1.1
Click search results will now highlight the folder that the document was in, showing the matter. If a file exists in multiple matters, clicking the file located at the bottom will show the folder for that file. Also new to 3.1.1, the add-in will show whether a file is checked out or not in the pane:
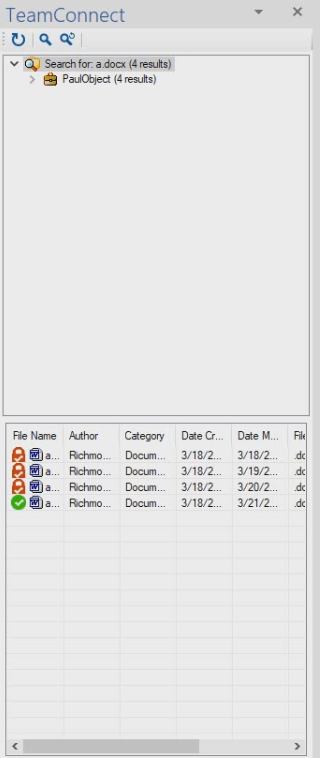
The green checkmark means the file is checked out by the current user, the red locks mean the files are checked out by another user.
Once you select the file, it will show you the folder for the matter it is in, and you can also double click the file checked out by you in the bottom to open the file:
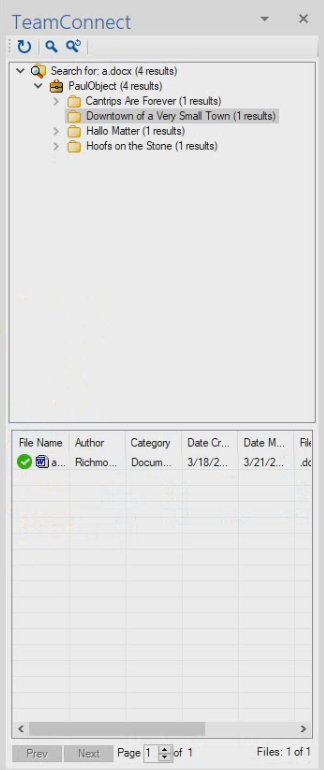
Note: The matters will not necessarily be in the same order as the files shown in the results.
Updating Documents
To update documents
If the document is a read-only document, click the Check Out button. Click the Undo Check Out button to check the file back in without saving your changes.
- Make your updates to the document.
- Click the Check In button.
- (Optional) Enter an explanation of your changes in the Notes field of the Save Dialog
- window.
- Click Save. A read-only version of the updated document opens.
You can see a list of the documents you have checked out in the Checked Out Documents section under the tab.
Uploading Documents
Users can easily upload local documents into TeamConnect via the add-in. Documents uploaded from a local computer will then be able to be checked in or checked out by multiple users.
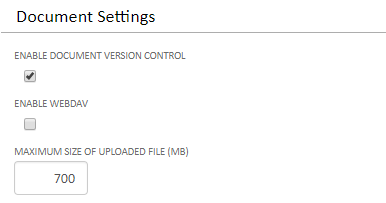
Document upload sizes are set by your TeamConnect administrator. The upload will fail (and you will receive notification) if your document(s) exceed the upload size limit. If you are a TeamConnect administrator, navigate to Admin > Admin Settings > Documents and adjust the upload size limit.
Uploading a document
- Click the TeamConnect tab.
- Select Save to TeamConnect.
- Select the desired directory, and add a name for the file and description (if needed). Click Save.
- The Check Out and Check In options are now available for this file.
- Check Out this file to make changes.
- The document will now be locked for editing by other users. Click Check In after your changes to remove this lock.
Note: Local changes will not be automatically reflected in the add-in. Users must check the document back in for these changes to be stored and reflected in the add-in.
Editing Document Metadata
From any Office or the Outlook add-in, I can right-click on any document or email (in Outlook) in the TC Documents Pane and I have an option to Edit Document Metadata.

Users are able to change fields and document information that they would have access to change in the main TeamConnect application. Changes made to the document metadata here will be reflected both in the add-in as well as the main application.
|
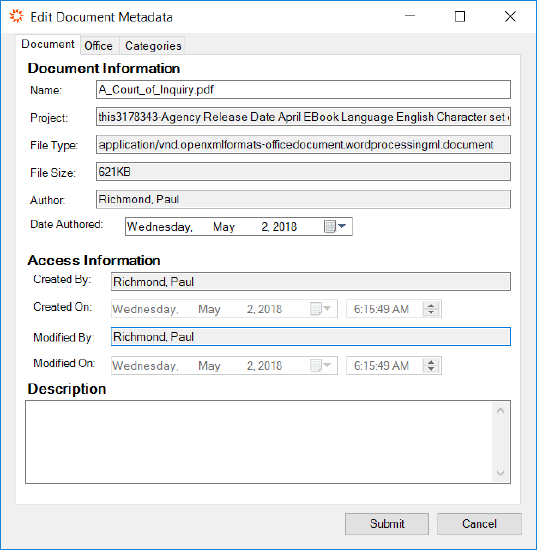
Document Tab The document tab contains the editable name and author date of the file as well as other non- editable information fields. Click Submit to finalize any changes to the name field or Date Authored field. While the File Type is not editable, users can change the extension via the Document Name field. Users will be prompted to click Yes after clicking Submit if they make changes to the extension. While the name will now reflect the new extension, your computer will still recognize the file as its original file type. Changes to the file type should be made in the main application. |
 |
|
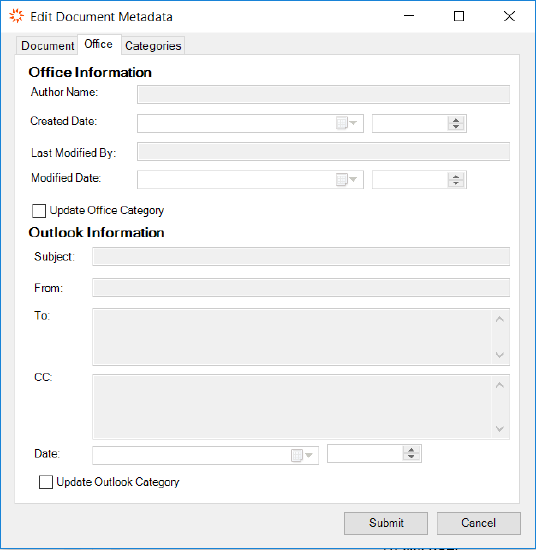
Office Tab Click the Update Office Category checkbox to make edits on the Office tab. These changes will be reflected in the document file bank in the add-in but not in the Document tab. |
 |
|
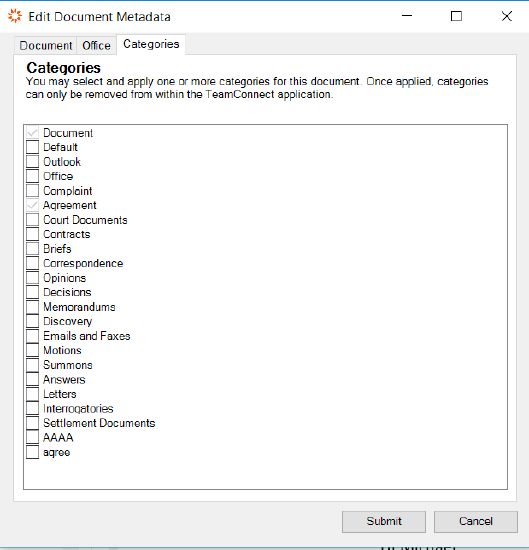
Categories Tab The Categories tab allows for improved filtering and document management. Click the checkbox next to the desired categories to add that category. Categories inherited from TeamConnect cannot be removed from the add-in. Likewise, categories added in the add-in itself cannot be removed after clicking Submit. Categories can be removed in the main application. |
 |