
Elasticsearch Setup (TCE 5.2 and 6.0)
Before you begin:
- Read the Installation Overview
- Make sure you are using Java 1.8.
- After upgrading Elasticsearch or TeamConnect, you must drop and rebuild the index. Open the Global Search Index Tool, select your index, click the Drop Index button, and then click the Index Selected button. Note that items will be unavailable for search during this time. Preliminary testing finds that it takes roughly one hour per 4GB for indexing. This number will vary based on the types of files present in the index.
Note: Only Elasticsearch 5.3.0 is certified for TeamConnect 5.1 and later. Elasticsearch 5.3.x patches and updates are supported, but no updates outside of the 5.3.x versioning are supported.
For more detailed information on Elasticsearch, clusters and nodes, and global search indexing functions outside of TeamConnect, visit the Elasticsearch help and the latest support matrix for Elasticsearch compatibility.
Elasticsearch Installation
The following instructions detail a RedHat and Windows installation via the Elasticsearch file. If your system is unable to perform this type of installation, contact Mitratech Support at support@mitratech.com. For installations with Search Guard, see Elasticsearch with Search Guard.
For Linux
- Download the RPM file from https://www.elastic.co/downloads/past-releases/elasticsearch-5-3-0. TeamConnect is only certified against Elasticsearch 5.3.0. Later 5.3.x patches and updates will be supported. No updates outside of the 5.3.x line will be supported.
- yum install the elasticsearch.xxxxx.rpm or rpm –Uvh elasticsearch.xxxxx.rpm
- chkconfig –add elasticsearch to have Elasticsearch start on boot.
For the following steps, the paths listed below should be accurate to your installation. If not, find the elasticsearch/bin folder and substitute that path in the directions below.
- Run the following command from the root Elasticsearch directory:
bin\elasticsearch-plugin install mapper-attachments
This plug-in provides the 'attachment' field type to Elasticsearch, thereby allowing it to index to content of documents like PDF files and Microsoft Word files.
- Configure properties as detailed in Elasticsearch Configuration below on this page.
- Start elasticsearch with: /etc/init.d/elasticsearch start after configuration is set.
For Windows
- Download the Elasticsearch zip file from the following website: https://www.elastic.co/downloads/elasticsearch
Note: If you are looking for an older version of ES, look here: https://www.elastic.co/downloads/ past-releases - Unzip the file in your directory of choice. Having a dedicated folder not in Program Files is usually a good choice. (e.g. C:\...\Apache\Elasticsearch)
- Navigate to your Elasticsearch /bin either through the command line using Windows Explorer and typing cmd in the top bar.
The directory should be similar to C:\...\app\Apache\Elasticsearch\elasticsearch-5.3\bin - Install the Mapper Attachments Plugin.
This plugin is used to parse documents that are sent over from TeamConnect. It must be installed for documents to index properly. https://github.com/elastic/elasticse...er-attachments - Run the following command from the root Elasticsearch directory:
bin\elasticsearch-plugin install mapper-attachments
- Configure properties as detailed in Elasticsearch Configuration.
To run Elasticsearch, navigate to the bin directory of your Elasticsearch installation and start the elasticsearch.bat file.
Elasticsearch Configuration
The following configuration details cover a basic, functional installation of Elasticsearch for TeamConnect 6.0. If your situation requires a more robust configuration or if you are unable to proceed through the following configuration, contact Mitratech Support.
Many properties can be configured during the installation; however, viewing the configuration file in a text editor provides better visibility and custom configuration options. The configuration file is the same for both Windows and Linux.
To modify the Elasticsearch configuration file:
- Using a text editor, open the elasticsearch.yml file located in elasticsearch-5.3.0/config.
- For Linux, use a text editor such as vim or nano.
- For Windows, use a text editor of your choice.
- Uncomment and set a value for the cluster.name property (for example, Cluster).
- Since multicast is disabled, provide the entry points into the cluster by specifying the server locations. For example, if a configuration has two notes and only one server, designate the one server without duplication or a "hostname2:port":
discovery.zen.ping.unicast.hosts: ["hostname1:port", "hostname2:port"]
Elasticsearch Configuration Properties
The following properties are commented out and set to the following default values. If you would like to enter custom values for these properties, remove the comment hashtag and replace the default value.
|
Property |
Default Value |
Recommendation, if available |
|---|---|---|
|
network.host |
0.0.0.0 |
Recommended to set this to the IP Address where Elasticsearch is/will be running |
|
http.port |
9200 |
|
|
transport.tcp.port |
9300 |
Note: Your Linux host might not start if all Elasticsearch specifications are not met. It is not highly recommended, but users can work around this issue by adding the following line to the config/elasticsearch.yml file:
bootstrap.system_call_filter: false
Additional Properties Regarding Nodes
The following properties are optional, but may be useful for instances with multiple nodes:
This is the name of this specific node. If it is not set, Elasticsearch selects a name from the Marvel Universe.
node.name: Node1
This allows the node to be master eligible. You will need to manually add this property in if desired. For further detail, please see the Master Node sections below.
node.master: true
This allows the node to store data. The default is true.
node.data: true
Set this to true if the server is in a Linux environment. It locks the memory for Elasticsearch so that the JVM does not start swapping.
bootstrap.memory_lock: true
Master Nodes
The single master node is the node that controls the state of the cluster. All nodes within the cluster report to the master node.
A cluster can have multiple master-eligible nodes that can temporarily replace the function of the master node if the master node stops or encounters a problem.
If a configuration has more than one master-eligible node, a condition called "split brain" can occur. For example, if a cluster has 2 master-eligible nodes and one of the node loses communication but does not crash, the lost node now has no communication with a master node so it elects itself as master.
The communication is regained between the nodes, and there are now 2 Master Nodes.
Data is sent to one node for indexing, and search requests are sent to another node that does not hold the recently indexed information. This causes corruption of data.
In order to remedy this, Elasticsearch has a setting called discovery.zen.minimum_master_nodes. This allows you to set the minimum number of Master Eligible Nodes that need to be present for a Master Node to be elected. The idea is that if you have 3 Master Eligible Nodes, you can set this setting to "2". If one node gets lost, the cluster will still be up and running because it has 2 Master Eligible Nodes. The one node that lost communication will try to elect itself as master but won't be able to because it needs at least one more Master Eligible Node in the cluster to become Master.
A general rule of thumb is to have this setting set to (number of master-eligible nodes / 2) + 1.
This setting is useless if you have 2 Master Eligible Nodes in the cluster. Setting it to 2 means that if one node goes down, the entire cluster is inoperable. Setting it to 1 does not protect against split brain.
Dedicated Master Nodes
If the cluster becomes too large, then it becomes difficult for a data/master node combo to maintain the state of the cluster and perform the regular work of a data node. In these cases, it becomes useful to have Dedicated Master Nodes.
A Dedicated Master Node is a node that has node.data: false & node.master: true. Since a master node is only in charge of maintaining the state of the cluster, it is fairly lightweight; thus, it can be allocated less memory than a normal node. This reduces the risk of the Master Node crashing and making the cluster inoperable.
Because there is already a Dedicated Master Node, other nodes in the cluster can also be relieved of their burden as Master Eligible Nodes (i.e. node.data: true & node.master: false).
A good configuration for larger clusters is to have the proper number of Master Eligible Nodes that are Dedicated Masters, and an equal (or more) amount of data nodes underneath them with the Master Eligible Nodes being the entry point into the cluster (discovery). An example configuration would be:
- 3 Master Eligible Nodes that are Dedicated Masters with discovery.zen.ping.unicast.hosts pointing to them.
- 6 Data nodes.
- discovery.zen.minimum_master_nodes: 2
TeamConnect Properties Configuration
Details for optimizing and configuring Global Search for TeamConnect can be found below. This information can be entered automatically into the TeamConnect properties file during the installer or manually entered into the teamconnect.properties file after installation.
Configuring the TeamConnect Properties File
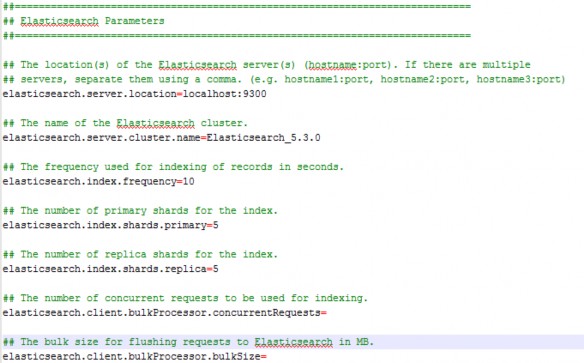
Elasticsearch (Global search) parameters are able to be edited in the TeamConnect properties file found in the WEB-INF folder.
The server address, name of the cluster, and indexing frequency are required for search to function. The name of the cluster can be found in the Elasticsearch configuration file referenced here. The indexing frequency refers to how often (in seconds) TeamConnect will look for changes to existing, enabled indexed items and automatically update them. In the image below, the index will be scanned for modifications, additions, and entry removal every ten seconds.
The number of primary shards defaults to a value of '5'. Entering in any invalid character here will thereby result in 5 primary shards.
The number of replica shards defaults to a value of '1'. Entering in any invalid character here will thereby result in 1 replica shard.
Details on shards and replicas from Elasticsearch documentation:
An index can potentially store a large amount of data that can exceed the hardware limits of a single node. For example, a single index of a billion documents taking up 1TB of disk space may not fit on the disk of a single node or may be too slow to serve search requests from a single node alone.
To solve this problem, Elasticsearch provides the ability to subdivide your index into multiple pieces called shards. When you create an index, you can simply define the number of shards that you want. Each shard is in itself a fully-functional and independent "index" that can be hosted on any node in the cluster.
Note: The concurrent requests and bulk size for flushing requests are not required and do not have default values.
Elasticsearch Best Practices
Indexing and Performance
Your Elasticsearch indexing time may vary significantly based on the objects and fields selected to be indexed. For example, memo fields containing large volumes of text will be indexed exponentially slower than numeric-type fields. As such, it is recommended to discern which fields you plan to leverage for global search before your initial indexing. Limiting the index to these fields (as opposed to a blanket index of the instance) will result in quicker indexing times while also reducing the load on the memory required for indexing.
Indexing of documents stored in external DMS systems may also slow performance times. Users are encouraged to appropriately schedule their indexing if they have a significant volume of documents being indexed from an external DMS.
Allocated Memory
Never allocate all available memory to Elasticsearch. A best practice for this is to only ever allocate 50% of your available memory to Elasticsearch. The other half should be reserved for Lucene caching, which uses ANY free memory on the machine. It loads segments (inverted indices) into memory for faster searching, so definitely keep that in mind when calculating Elasticsearch memory requirements.
General Best Practices
If multicast is disabled (which is suggested), it is a good practice to make the Master Eligible Nodes the discovery nodes.
For TeamConnect instances that are 100GB, it usually suffices to have a single node cluster where the node acts as both a master and data node.
For instances that require more nodes, or if the client wishes to utilize Elasticsearch's shard replication for backup and high availability, then a larger cluster is usually preferred.
In order to utilize shard replication, you simply need to start up another node within the same cluster (don't forget to specify the entry point into the cluster for unicast).
In order to utilize shard replication, you simply need to start up another node within the same cluster (don't forget to specify the entry point into the cluster for unicast).
Please read the Master Eligible Nodes details here for more information.
Elasticsearch FAQ
|
Question |
Answer |
|---|---|
|
Is the full-text search in TeamConnect the same as Elasticsearch? |
No. Elasticsearch provides global searching based on an index stored on a dedicated server. Full text search can still be achieved directly from your database, though it may not be as robust as the new global search. |
|
How many shards should I use? |
The default value of 5 primary shards should be more than sufficient for almost all clients. |
|
Can Elasticsearch work with clustered instances? What infrastructure is needed on premise? |
Yes. On-premise clients will need one instance of TeamConnect Enterprise (clustered or not) and one instance of Elasticsearch. |
|
What hardware requirements are suggested for Elasticsearch? (Heap Size) |
The suggested Elasticsearch hardware requirements are flexible depending on each use case. General requirements include: 8 GB RAM (most configurations can make do with 4 GB RAM) |
|
Are there words which Elasticsearch will not search on? |
Elasticsearch/Lucene has the following words filtered out of searches: "a", "an", "and", "are", "as", "at", "be", "but", "by", "for", "if", "in", "into", "is", "it", "no", "not", "of", "on", "or", "such", "that", "the", "their", "then", "there", "these", "they", "this", "to", "was", "will", "with" |