
Managing Your Workflows
What is the Workflow Dashboard?
The Workflow Dashboard is your landing page when you log in to TAP. From the Dashboard, you have a birds eye view of the status every workflow — whether it is completed, in process, or yet to be initiated. But what IS a workflow, and why would you be interested in its status? Let’s dive in.
What are TAP Workflows?
TAP Workflows are your business processes – automated. Any time your company has a process in place, it can be automated through TAP. When you click “submit” after filling out a webform, you’re completing one stage of what could be a very long and intricate process. Your “completed” form will automatically be submitted to the right person (and the data pushed to the appropriate database) with minimal effort on your part – TAP workflows use conditional routing to push and pull information to the right place, every time.
Why am I at the Dashboard?
You’re at the Dashboard to initiate requests, check on the status of those requests you have already initiated, and look at the information that has been submitted into various forms.
How do I initiate a request?
.jpg?revision=1)
The Select your workflow menu at the top left side of the Workflow Dashboard shows a list of different workflow templates. Select the desired template and then click the Create button to display the first stage of the end-user form.
How do I respond to a request?
Workflows connect different people and applications to different tasks. In some cases, you may want to initiate a workflow, but other times your role is that of the person responding to a request that has been initiated. In most cases, you’ll receive an email notification alerting you that your action is needed. However, if you spend a lot of time in the Dashboard, you might want to respond to requests from this central location.
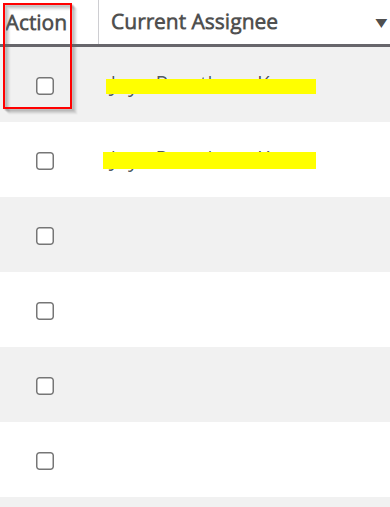
The Actions menu associated with each workflow gives you several options for managing workflows. The available options depend on your specific role permissions as well as the status of the workflow. Click the  check box in the Actions column of the Dashboard to open the Actions menu at the bottom of the screen, then select Edit Request.
This will open the current stage of the end-user form, where you will enter information. This information, once submitted, is directed to the appropriate place, according to the workflow requirements.

Where can I view Workflow History?
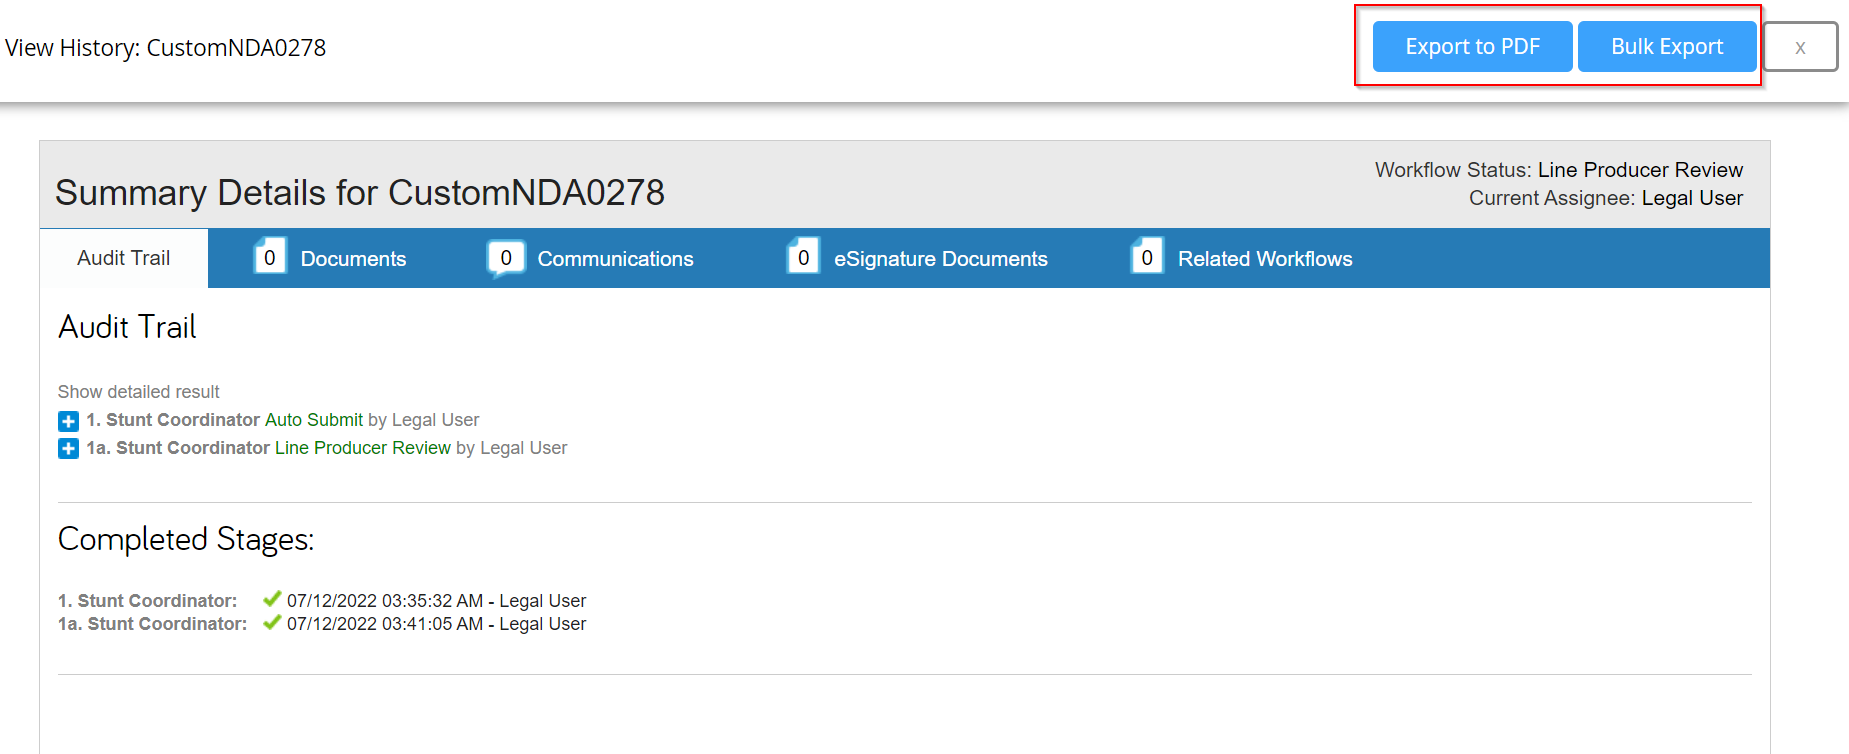
Let’s say a workflow has completed its life cycle, and would you like to review its history? You can do this using the same Actions menu you used to edit the workflow. This time, select View History. This will display the full Audit Trail for the workflow, which includes all information that has been submitted into the form at any stage, any Documents attached at any stage, any comments and Communications, any eSignature Documents, and any Related Workflows. You can download attachments and eSignature documents; and you can Export the Audit Trail as an Adobe PDF document. You can even Bulk Export the audit trail. It will be downloaded as a zip file.
Can I filter my view of the Dashboard?
You might see a lot of workflows in your Dashboard! No need to be overwhelmed. Instead, use filters to customize your view of the Dashboard.
To Filter Your Dashboard View
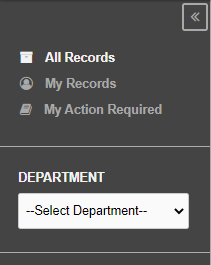
Use the three “out of the box” filters to toggle the Dashboard view between All Records, My Records, and My Action Required records. These filters are located in the collapsible side menu (on the left-hand side of the page), under Records.
- All Records allow you to see any workflow. This means you can check up on workflows that are not currently assigned to you, and that you yourself did not initiate.
- My Records lets you filter the Dashboard contents to show only those workflows that you initiated. These workflows may or may not currently be in flight. This filter is helpful for viewing workflows that you initiated – you might want to check up on their progress and see who they are assigned to or check out the Audit Trail.
- My Action Required is your “to-do” list. This filter shows you all the workflows that are in flight and currently waiting for your action.
To Filter Dashboard Columns
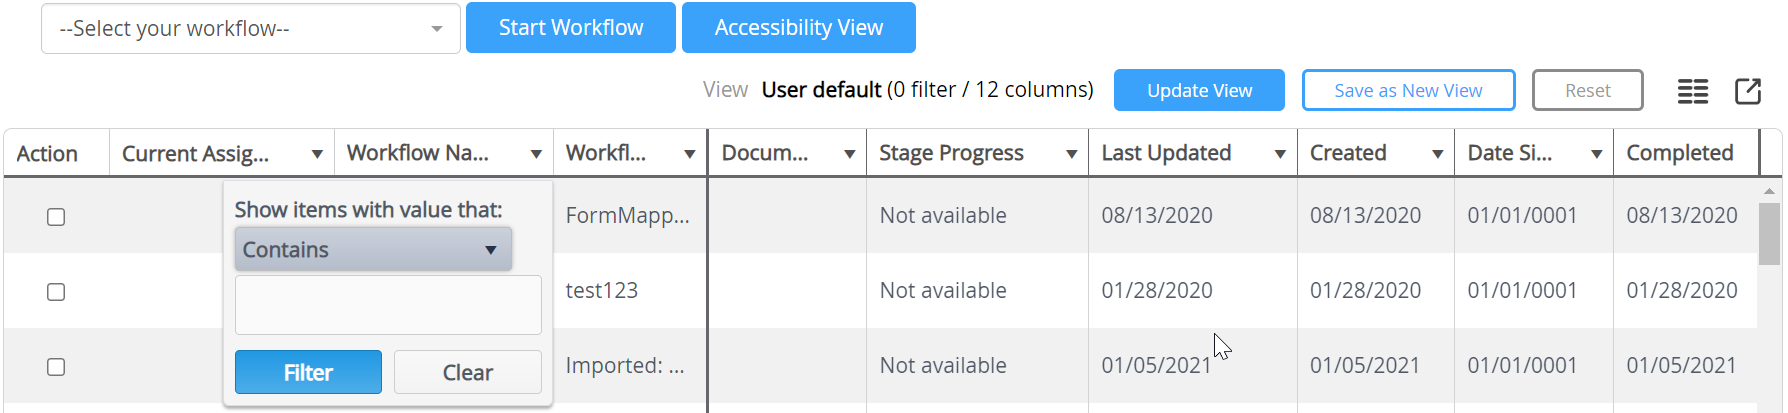
You can further customize your view of the Dashboard by filtering within the columns themselves.
Select the filter icon to the right of a column name. Select your matching criteria from the Show items with value that menu, enter a term in the text box, and click the Filter button. (Click the Reset button to clear a previously entered filter.)
The filtered view can be even saved as a new view.
To Add Dashboard Columns
You can further customize your view of the Dashboard by selecting new columns to sort your information.
Select the column icon .jpg?revision=1&size=bestfit&width=22&height=17) above the workflow records area on the right-hand side. A pop-up will appear. Selecting from the drop-down options in the pop-up will allow you to add new columns or delete Dashboard grid columns.
above the workflow records area on the right-hand side. A pop-up will appear. Selecting from the drop-down options in the pop-up will allow you to add new columns or delete Dashboard grid columns.
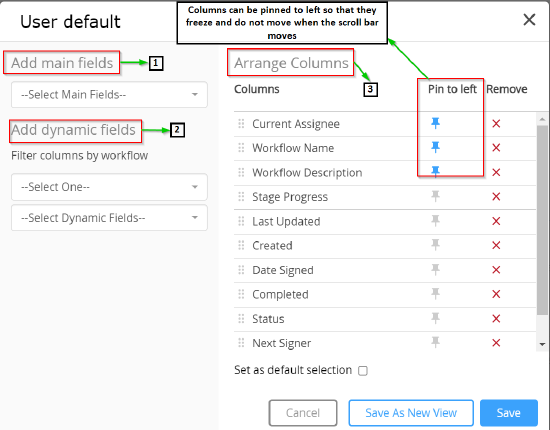
There are three different sections here: Main Fields, Dynamic Fields, and Arrange Columns
- Main Fields represent pieces of information that are meta to a workflow. They include fields like Workflow Name, Status, Description, Stage Description, and Current Assignee. These fields should be familiar: often, when viewing a Dashboard, you see columns with this title. The main fields represent information about the workflow – pieces of information that are generically relevant to any workflow. Every workflow, whether it’s a Self-Service NDA or an Onboarding workflow, will have a name, a description, and status. The pieces of information you are interested in will determine the main fields that you Add.
- Dynamic Fields represent pieces of information that are found within a workflow. For example, if one form field in your workflow asks that someone fills in a certain geographic region, TAP can pull this geographic region in its own column, titled, Geographic Region. Any piece of information submitted into a workflow is 100% trackable. Select the workflow from the drop-down options and just Add the dynamic field. Remember to Save when you are done.
- Arrange Columns to prioritize the sequence of information that must be displayed on the dashboard. The columns which are important can be pinned and they will freeze on the screen without moving when scrolled left or right. Click the
 cross icon to delete any column. Remember to Save when you are done.
You can even set the selected options as default selection by clicking the check box.
The selected columns can be even saved as a new view by clicking Save as New View instead of just saving the modifications.
Add the fields that you wish to track by first selecting them from their respective dropdown options and then selecting Add. After doing so, Save and close the popup. When you return to your dashboard view, you should be able to see a new configuration with custom-added columns. If you like this view and wish to return to it in the future, be sure to save it .jpg?revision=1&size=bestfit&width=15&height=16) with the Save icon in the top right corner, next to the Select Columns
with the Save icon in the top right corner, next to the Select Columns .jpg?revision=1&size=bestfit&width=21&height=16) icon. You will be asked to name it, and after you do so you will find this view saved in your collapsible side menu.
icon. You will be asked to name it, and after you do so you will find this view saved in your collapsible side menu.
Life Cycle of a Workflow Record
Within the Workflow Dashboard, any record can be handled through deletion, archiving, or restoration. The process differs for regular deletion and archiving and is subject to user roles:
Deletion by Users:
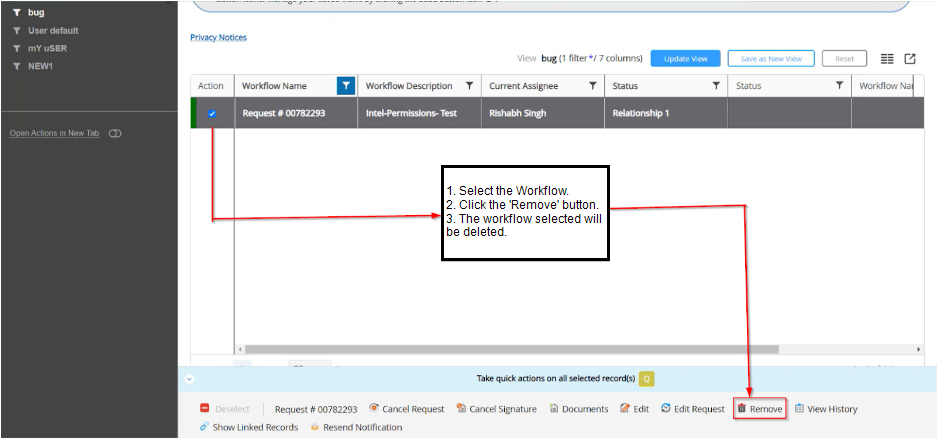
- This option is available exclusively to users with removal permissions, allowing them to delete a record. This user can remove it directly from the user interface.
Note: Remove action from the dashboard does not delete the record permanently, it only archives it. - Navigate to the Workflow dashboard.
- Select the desired workflow.
- Click the Remove button at the bottom of the screen.
- The workflow record will be archived.
Archiving and Restoration by Super Admin:
Archiving and restoration actions are exclusive to super admins. Archiving a workflow removes it from the active dashboard while preserving its data. Restoration brings back an archived workflow to the active dashboard. These actions are executed through specific admin privileges and are not accessible from the user interface.
Note: It's crucial for users to exercise caution while deleting records, as this action is irreversible. Archiving, on the other hand, provides a way to retain data without cluttering the active workflow display.
Workflow records offer the flexibility of archival, restoration, and deletion through API endpoints, a privilege exclusive to Super Admins. Follow these steps to execute these tasks:
-
Obtain Access Token:
- Open the platform used for API interaction.
- Navigate to the 'POST Token' Endpoint.
- Copy the 'access_token'.
- Perform Archive or Delete:
-
Go to 'POST ARCHIVE/DELETE'.
- Paste the copied Token value in the Authorization tab.
- In the Workflow dashboard, copy the request number of the target record.
- Paste the request number in the Body tab under URL-encoded-form → advanced filter.
- Click Send; the request will return 'true'.
- The record will be either deleted or archived, hidden in the database and not visible in the user interface.
-
Restore or Activate:
- To restore or activate an archived record, follow the same steps.
- Searching for the record by the request number will reveal it on the user interface again.
These actions can be performed based on the request number, workflow name, or filter.
To know more get a list of the API Endpoints, Check TAP API Documentation.