
Using Suite Autoinstaller
This article provides instructions to use Suite Autoinstaller, as well as instructions to back up installation files and uninstall Suite. To update or migrate Suite, refer to the Suite Installation Guide. This article assumes that Suite will run on a single Windows Application Server. For Suite running as a cluster, refer to the Suite Installation Guide and Suite Technical Overview.
Suite Autoinstaller installs Suite 8.11 service pack 16.3.0, BOXIR4, Java or OpenJDK, and Apache Tomcat.
Prerequisites
You need a Windows Application Server with Internet Information Services (IIS) installed.
Verify the IIS Configuration
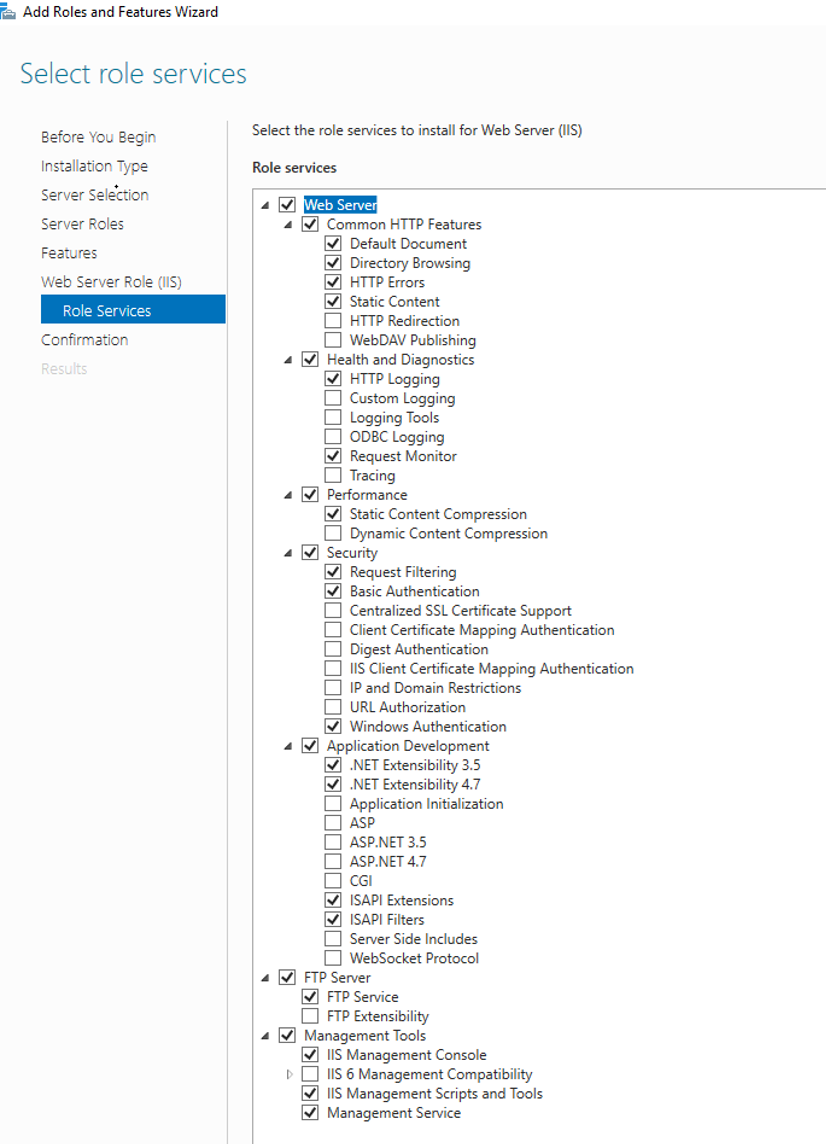
Verify that IIS has the necessary server roles. In the Add Roles and Features Wizard, ensure that the following server roles are installed:
|
Role Name |
Roles Installed |
|
Common HTTP Features |
- Default Document - Directory Browsing - HTTP Errors - Static Content |
|
Health and Diagnostics |
- HTTP Logging - Request Monitor |
|
Performance |
Static Content Compression |
|
Security |
- Request Filtering - Basic Authentication - Windows Authentication |
|
Application Development |
- .NET Extensibility 4.5 - ASP.NET 4.5 - ISAPI Extensions - ISAPI Filters |
|
Management Compatibility |
- IIS Management Console - IIS Management Scripts and Tools - Management Service |
For IIS 8.5, the Add Roles and Features Wizard shows the following features installed.
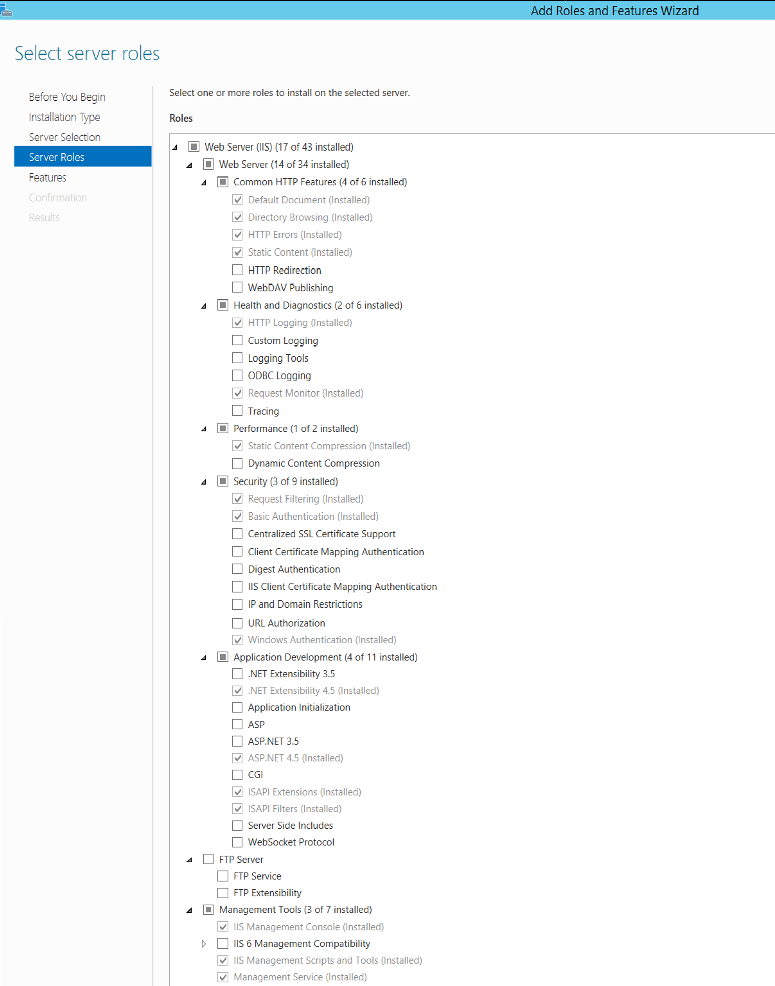
For IIS 10, the Add Roles and Features Wizard shows the following features installed. Note that the example shows more features installed.
Extract the Suite Autoinstaller
The Suite Autoinstaller is distributed as a ZIP file. The file naming convention is as follows: Suite<version>Server<patch>Auto-Installation<autoinstaller-version>-with-Tomcat-<Tomcat-version>.zip, for example, Suite811Server_16_3_Auto-Installation-v1-with-Tomcat-9.0.89.zip.
Unzip the contents of the Suite Autoinstaller in C:\. This action creates the folder C:\Suite<version>ServerInstall, for example, C:\Suite811ServerInstall. The contents of C:\Suite811ServerInstallare similar to the following output. OpenJDK, Apache Tomcat, and Java versions may change.
   ChangeLog.txt
   IIS.ps1
   IIS.zip
   InstallSuite.bat
   InstallSuite.properties
   InstallSuite.ps1
   OpenJDK11U-jdk_x64_windows_hotspot_11.0.23_9.zip
   SuiteFiles.zip
   apache-tomcat-9.0.89-windows-x64.zip
   jdk-8u401-windows-x64.exe
   tomcat-connectors-1.2.40-windows-i386-iis.zip
   tomcat-connectors-1.2.40-windows-x86_64-iis.zip
Download the Latest Versions of Tomcat and Java/OpenJDK
The Suite Autoinstaller already contains the installation files for Tomcat, Java, and OpenJDK, however, we recommend that you compare the versions bundled in the Suite Autoinstaller with the latest versions available and replace the Tomcat and Java/OpenJDK versions in the Suite Autoinstaller with the latest versions.
Starting April 16, 2019, Java SE requires a subscription, for this reason, Suite comes with a version of OpenJDK to use as an alternative to Java SE.
To replace the old versions of Tomcat or Java/OpenJDK:
-
Download the latest Tomcat and Java installation files, or download OpenJDK if you won't be using Java.
-
Go to
C:\Suite<version>ServerInstall, for example,C:\Suite811ServerInstall. -
Replace the files. Delete the old versions and add the new ones. For example,
Suite811Server_16_3_Auto-Installation-v1-with-Tomcat-9.0.89.ziphas the following Tomcat, Java, and OpenJDK versions.-
Tomcat: apache-tomcat-9.0.89-windows-x64.zip
-
Java: jdk-8u401-windows-x64.exe
-
OpenJDK: OpenJDK11U-jdk_x64_windows_hotspot_11.0.23_9.zip
-
Edit the InstallSuite.properties File
The InstallSuite.properties file contains the installation configuration used by the Suite Autoinstaller. Edit InstallSuite.properties if necessary. This section explains the configuration variables.
|
Variables |
Default |
Description |
|
property.target.folder |
C:\Suite811 |
The folder that contains Suite 8.11 installation files. |
|
property.source.folder |
C:\Suite811ServerInstall |
The folder that contains Suite Autoinstaller. |
|
suite811 |
The name of the Suite context in the URL. |
|
|
property.instances |
2 |
The number of Tomcat instances to be installed on the server. The instance per concurrent users ratio is 1:25. A server can have up to 4 instances |
|
property.openjdk |
true |
Set property.openjdk to false for Suite installations that use Java SE. |
|
property.iis.enabled |
false |
Set property.iis.enabled to true to use IIS |
Example InstallSuite.properties file:
   #property.target.folder: The full path of where LM Server is to be installed.
   #NOTE: This defaults to and is usually “C:\Suite811”. The folder must not exist, the program will create it.
   property.target.folder="C:\Suite811"

   #property.source.folder: The full path of the folder containing the LM Server installation files.
   #NOTE: This defaults to and is typically “C:\Suite811ServerInstall”.
   property.source.folder="C:\Suite811ServerInstall"

   #property.deployment.name: This is the name of the suite context in the URL.
   #NOTE: This defaults to and is typically “suite811”.
   property.deployment.name="suite811"

   #property.instances: This is the number of Tomcat instances to be installed on the server.
   #NOTE: This defaults to and is typically 2.
   #There should be about 1 instance per 25 concurrent users, with about 3 to 4 maximum instances per server depending on available memory. Refer to the Suite Server Installation Guide.
   #The PowerShell installer script will not work with 5 or more instances, the server.xml files will have overlapping ports.
   property.instances=2

   #property.openjdk: This designates whether OpenJDK "true" or Oracle JDK "false" is to be used (“true” = OpenJDK, “false” = Oracle JDK”).
   #NOTE: This defaults to and is typically true.
   property.openjdk=true

   #property.iis.enabled: This designates whether Windows IIS (Internet Information Services) is to be used.
   #NOTE: This defaults to and is typically false.
   property.iis.enabled=true
Unblock the InstallSuite.ps1 and IIS.ps1 files
Files InstallSuite.ps1 and IIS.ps1 might cause an error during installation: "The file C:\Suite811ServerInstall\InstallSuite.ps1 is not digitally signed. You cannot run this script on the current system". To prevent this error, unblock the files before running Suite Autoinstaller. Perform one of the following methods.
Method 1
Unblock files InstallSuite.ps1 and IIS.ps1 by using the File Explorer.
-
On File Explorer, go to C:\Suite811ServerInstall
-
Find file InstallSuite.ps1, right-click and select Properties.
-
On the General tab, go to Security and click Unblock.
-
Repeat the procedure for file IIS.ps1.
Method 2
Unblock files InstallSuite.ps1 and IIS.ps1 by using PowerShell.
-
Right-click Windows PowerShell and select Run as administrator.
-
Enter the following commands:
    unblock-file -path C:\Suite811ServerInstall\InstallSuite.ps1

    unblock-file -path C:\Suite811ServerInstall\IIS.ps1
Run Suite Autoinstaller
To use the Suite Autoinstaller:
-
Go to Windows Start, type cmd and press Enter.
-
Right-click Command Prompt and select Run as administrator.
-
On Do you want to allow this app to make changes to your device, click Yes.
-
Enter:
cd C: \Suite<version>ServerInstall
for example,
cd C: \Suite811ServerInstall
-
Enter InstallSuite.bat.
-
The installation creates the following folders:
   CustomFiles
   OPENJDK (or JDK if you set property.openjdk = false)
   suite811-instance1-[ServerName]
   suite811-instance 2-[ServerName]
   suite811-instance 3-[ServerName]
   suite811-instance 4-[ServerName]
   tomcat
   Wars
-
Ensure the following ports are open and listening: 8005, 8090, 8091, 8092, 8093, 8094, 8443, 8020, 8021, 8022, 8023, 8024. On cmd, enter netstat -an to list the ports open and listening.
Update the Tomcat/conf/server.xml File
Perform this procedure if you downloaded the latest version of Tomcat instead of using the Tomcat version bundled in the Suite Autoinstaller. Add the following connectors to the Tomcat/conf/server.xml file:
<!-- Define a non-SSL/TLS HTTP/1.1 Connector on port 8080-->
    <Connector port="8090" protocol="HTTP/1.1"
        connectionTimeout="20000"
        redirectPort="8443" />
    <!-- A "Connector" using the shared thread pool-->

    <!-- Define an AJP 1.3 Connector on port 8009 -->
    <Connector port="8020" protocol="AJP/1.3" redirectPort="8443" />
Start the Tomcat Instances from Windows Services.
-
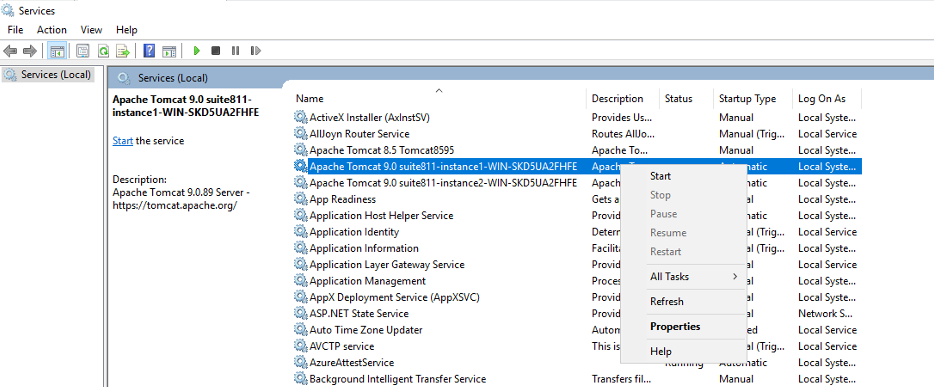
Go to Start > Programs > Administrative Tools > Services.
-
Look for the services whose names start with the following pattern: Apache Tomcatsuite-instance, for example, Apache Tomcat9.0suite811-instance1-WIN-SKD5UA2FHFE.
-
Right-click on the service and click Start.
Test Suite Installation
Ensure that Suite and BOXIR can be accessed.
-
Browse Suite. From the Suite server, open a browser and enter http://localhost/suite811.
Note: The context in the URL could be different depending on the value set in property.deployment.name in the InstallSuite.properties file.
-
Browse BOXIR by entering http://localhost/boxir4. A blank webpage with boxir4 written in plain text appears.
Update the isapi_redirect.properties File
Update the isapi_redirect.properties file.
-
Run Notepad as an admin and open C:\inetpub\suite811\isapi_redirect.properties.
Note: The context in the URL could be different depending on the value set in property.deployment.name in the InstallSuite.properties file. -
Delete:
log_level=debug
and replace with:
log_level=info
-
Save the file.
-
Restart IIS. Go to Start > Settings > Control Panel > Administrative Tools.
-
Open Services and right-click on the IIS Admin Service.
-
Select Restart.
Uninstall Suite
This procedure creates a backup of the configuration files and uninstalls Suite and BOXIR by deleting the Suite installation manually.
Back Up Suite Configuration Files
Back up the following files:
-
C:\Suite811\CustomFiles\darwin.properties
-
C:\Suite811\CustomFiles\dbs.enc
darwin.properties contains custom properties while dbs.enc contains the product license key and database configuration.
Remove Tomcat Middle Tier Services
Use Windows Services to stop the Tomcat Instances.
-
Go to Start > Programs > Administrative Tools > Services.
-
Look for the services whose names start with the following pattern: Apache Tomcatsuite-instance1, for example, Apache Tomcat9.0suite811-instance1-WIN-SKD5UA2FHFE.
-
Right-click on the service and click Stop.
-
Run cmd as an admin.
-
Enter cd \.
-
Enter:
sc delete <Tomcat service instance name>
-
for example,
sc delete suite811-instance1-WIN-SKD5UA2FHFE
-
Repeat for each Tomcat service instance.
-
On Services, verify that the Tomcat service instances are not listed.
Delete Manually the Suite Installation
Uninstall Suite by deleting the installation files manually.
-
Restart the Windows Application Server.
-
On File Explorer, search C:\Inetpub and delete the Suite<version> folder, for example Suite811.
-
Go to C:\ and delete the Suite811 folder.
Remove the jakarta Virtual Directory in IIS
The jakarta virtual directory is linked to Tomcat. To delete the jakarta virtual directory:
-
Go to Start menu > Control Panel > Administrative Tools > Internet Information Services (IIS).
-
Right-click jakarta and select Remove.
Uninstall Java
This procedure is only needed to uninstall Java. For OpenJDK, it’s not necessary to manually uninstall OpenJDK. To uninstall Java:
-
Go to Start menu > Control Panel > Administrative Tools > Uninstall a Program..
-
Right-click the Java SE Development Kit, for example, Java SE Development Kit 8 Update 1, and select Uninstall.