Administering SuperViewer
Setting SuperViewer Open Options
An additional security measure has been incorporated on the Administrator’s page in SuperViewer. This additional measure is only necessary if you are going to use the configuration where the users do not have to login and are using the following to access SuperViewer:
http://<ServerName>:<Port>/<Context>/svopenoptions.htm
where <ServerName> is the name of the application server, <Port> is the port used for connection (omit the :<Port> if a redirector is being used), and <Context> is the context name for Suite (for example, http://server1:8080/suite8/svopenoptions.htm).
To Configure Suite Manager:
In Suite Manager, create a user with the following credentials and security access settings:
- Login Name: svguestuser
- Password: sv$guestuser#10
- Access to SuperViewer: Allow
- Access to Secretariat: Deny
- Access to eCounsel: Deny
See the Suite Manager Administrator Guide for more information.
To Enable Open Site:
- Log into SuperViewer with administrator credentials.
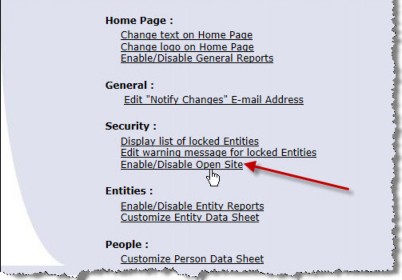
- Click on the Admin link.
- In the Security area, click on Enable/Disable Open Site.

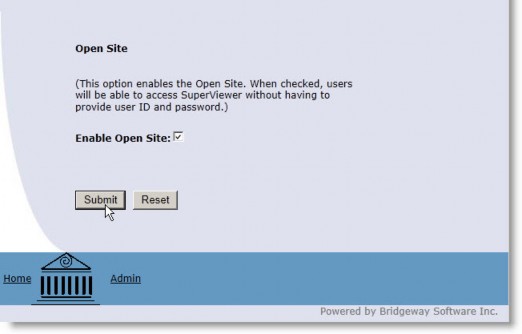
- Select the Enable Open Site checkbox, and click Submit.

The above steps must be done before anyone can access SuperViewer without a login prompt.
Creating User IDs
If SuperViewer was installed in multiple user mode it will be necessary to create user IDs. This is done using the Suite Manager program. If SuperViewer was installed in single user mode, no logon page will appear.
The User Lockout feature is available in SuperViewer.
To Create a User ID:
Open Suite Manager, click the Users/Groups icon, and click New on the Users tab. If the new user ID is solely for access to SuperViewer, only the following fields are necessary:
- Login Name (up to 20 characters)
- User Name
- Password up to 20 characters (blank passwords are allowed)
- Confirm Password
If WorldView is installed, it also will be necessary to assign the user ID to a WorldView site.
You also will need to change the Access to SuperViewer attribute to Allow for the user’s security attributes.
To Assign WorldView Sites:
Click the Users/Groups icon in Suite Manager, select the user, and click Edit. On the Edit User dialog box, click on the Security Attributes tab. Click on Secretariat, then click on the WorldView – Sites security attribute. Click Edit. Change the access level to Limited, then select a WorldView site security attribute profile as needed.
You also can assign the user to a user group, then assign the security attribute profile to all users in the group.
Working with Crystal Report Templates
SuperViewer and Secretariat can use i-net Clear Reports or SAP Business Objects Business Intelligence Platform for running reports. The templates must be stored in a directory on the server accessible to all appropriate users. Templates for all Suite programs can be stored in the same place.
To import a template, see the Suite Manager Administrator Guide for instructions on importing templates for Secretariat.
Be aware that although any standard report can be published in SuperViewer, not every report is appropriate or able to be displayed. For example, if a report prompts for titles or jurisdictions, the report will not be able to be run since these items are not displayed as a separate component in SuperViewer.
To Select an Action for a Template:
The template will now be listed on the reports list in Secretariat. The following buttons are available:
- Run – Generates the report.
- Delete – Removes the template.
- Edit – Opens the properties window.
- Reimport –Imports the template again.
To Publish the Report Template to a Page:
The next step is to publish the report template to the appropriate page.
- On the SuperViewer home page, click the Admin link.

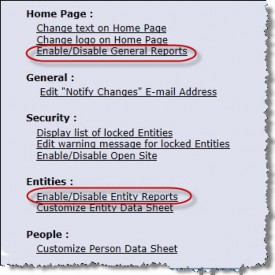
- On the SuperViewer Admin page, click the appropriate option:
Home Page: Enable/Disable General Reports
Entities: Enable/Disable Entity Reports

3. On the Publish General Secretariat Reports to SuperViewer page or Publish Entity Secretariat Reports to SuperViewer page, select the checkbox of the appropriate report and click Submit.


