
How to Install Office Online Server and Enable M-Files for Co-authoring
If your Suite on-premise deployment uses M-Files, you can enable co-authoring by adding an Office Online server and configuring your M-Files server. This article explains the minimum server requirements for installing Office Online on-premise on a single server and configuring it to work with your Suite deployment with M-Files. Finally, this article gives instructions to configure co-authoring in the M-Files server.
The M-Files configurations covered in this article are:
-
M-Files Web with M-Files Admin version October 2022 and later.
-
M-Files Web enabled with IIS version May 2022 and later.
Refer to M-Files Documentation for more information about M-Files co-authoring.
Office Online Server Network Requirements
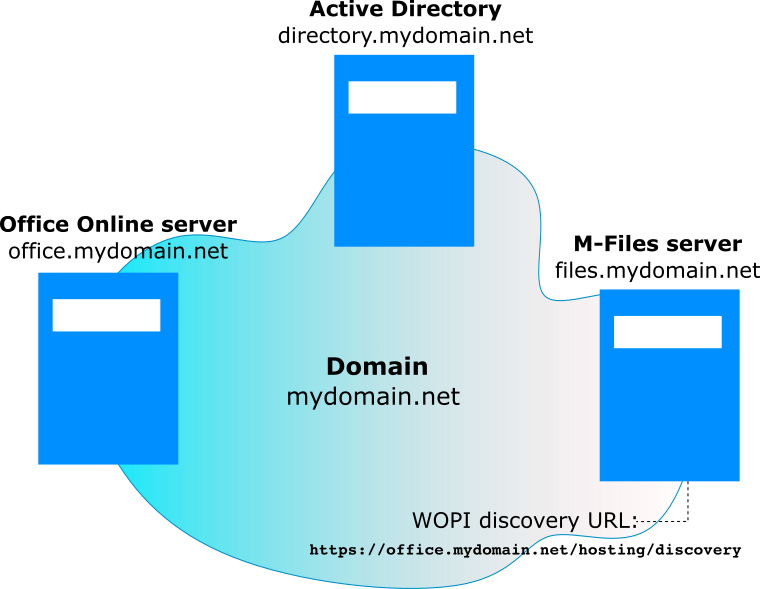
Office Online is installed as a farm even if it consists of a single server. The Office Online farm needs to be part of the domain where the Active Directory and the M-Files server reside. If Office Online Server resides in a different domain, that domain needs to belong to the same domain forest as the M-Files server.
Office Online Server Hardware Requirements
For Office Online Server hardware requirements, refer to Plan Office Online Server.
Office Online Server Software Requirements
For more information about software requirements, refer to Plan Office Online Server.
The following list contains the software requirements for an Office Online Server that supports M-Files co-authoring:
-
Office Online Server can be installed on a server running Windows Server 2012 R2, Windows Server 2016, or Windows Server 2019, all with the latest security patches installed.
-
The Windows firewall and network devices must have the necessary ports open and configured to allow communication with Office Online Server, for example, port 443 for HTTPS.
-
Office Online Server and M-Files can communicate via HTTP or HTTPS, however, we recommend that you use HTTPS.
-
For HTTPS, you'll need an SSL certificate installed in the Office Online Server.
Deploy an Office Online Server
This section explains how to install the software required for the Office Online installation on a Windows Server for an on-premises server farm.
Install Features on your Windows Server
Install the required software before installing Office Online.
-
Open the Microsoft PowerShell prompt as an administrator and run the commands that apply to your Windows Server.
Windows Server 2012 R2:
Add-WindowsFeature Web-Server,Web-Mgmt-Tools,Web-Mgmt-Console,Web-WebServer,Web-Common-Http,Web-Default-Doc,Web-Static-Content,Web-Performance,Web-Stat-Compression,Web-Dyn-Compression,Web-Security,Web-Filtering,Web-Windows-Auth,Web-App-Dev,Web-Net-Ext45,Web-Asp-Net45,Web-ISAPI-Ext,Web-ISAPI-Filter,Web-Includes,InkandHandwritingServices,NET-Framework-Features,NET-Framework-Core,NET-HTTP-Activation,NET-Non-HTTP-Activ,NET-WCF-HTTP-Activation45,Windows-Identity-Foundation,Server-Media-FoundationWindows Server 2016, 2019, 2022:
Add-WindowsFeature Web-Server,Web-Mgmt-Tools,Web-Mgmt-Console,Web-WebServer,Web-Common-Http,Web-Default-Doc,Web-Static-Content,Web-Performance,Web-Stat-Compression,Web-Dyn-Compression,Web-Security,Web-Filtering,Web-Windows-Auth,Web-App-Dev,Web-Net-Ext45,Web-Asp-Net45,Web-ISAPI-Ext,Web-ISAPI-Filter,Web-Includes,NET-Framework-Features,NET-Framework-45-Features,NET-Framework-Core,NET-Framework-45-Core,NET-HTTP-Activation,NET-Non-HTTP-Activ,NET-WCF-HTTP-Activation45,Windows-Identity-Foundation,Server-Media-Foundation -
If prompted, restart the server.
-
Next, install the following software:
Install Office Online Server
This procedure assumes that Office Online Server is only used for M-Files. If you plan to use an Office Online Server for other services such as Excel Online or if you need to support multiple languages, refer to Deploy an Office Online Server.
-
Download Office Online Server.
-
Run Setup.exe.
-
On the Read the Microsoft Software License Terms page, select I accept the terms of this agreement and click Continue.
-
On the Choose a file location page, select the folder where you want the Office Online Server files to be installed (for example,
C:\Program Files\Microsoft Office Web Apps) and select Install Now. If the folder you specified doesn't exist, Setup creates it for you.
Note: Microsoft recommends that you install Office Online Server on the system drive.
- When Setup finishes installing Office Online Server, choose Close.
Deploy the Office Online Server Farm
This procedure deploys an Office Online Server farm of one server that uses HTTPS. HTTPS is the recommended protocol for integration with M-Files.
Note You'll need to install a certificate on Office Online Server.
Use the New-OfficeWebAppsFarm command to create a new Office Online Server farm that consists of a single server.
New-OfficeWebAppsFarm -InternalUrl "https://server.contoso.com" -ExternalUrl "https://wacweb01.contoso.com" -CertificateName "OfficeWebApps Certificate" -EditingEnabled
Parameters:
-
InternalURL is the fully qualified domain name (FQDN) of the server that runs Office Online Server, for example: http://servername.contoso.com.
-
ExternalURL is the FQDN that can be accessed on the Internet.
-
CertificateName is the user-recognizable name of the certificate.
-
EditingEnabled enables editing in Office Online.
Verify that the Office Online Server Was Created Successfully
Perform the following actions to verify that Office Online Server was created successfully:
-
Verify that your browser can access the Web Application Open Platform Interface Protocol (WOPI) file from the Office Online internal URL.
-
Verify that IIS lists the sites used by Office Online and M-Files.
-
Verify that users can access the Office Online Server from different networks and different devices.
Verify That You Can Access the WOPI File
The WOPI file lets users edit Office files from their browser or web application. To access the WOPI file:
-
From the internal network where Office Online Server resides, open a browser.
-
Access the Office Online Server by using the URL set with the - Internal URL parameter when configuring the Office Online farm. For example, if the URL is:
https://server.contoso.comEnter the following URL in your browser:
https://server.contoso.com/hosting/discovery
The response is the WOPI file written in XML format, as in the image:

Verify IIS in the M-Files Web Server
Verify that the IIS server hosting M-Files Web and the Office Online server is accessible to the clients. To verify that IIS contains the sites needed:
-
Open the IIS Manager and expand the Sites node.
-
Ensure that HTTP80 and HTTP809 appear on the list.

Confirm That Clients Can Access the Server
Confirm that the clients that use co-authoring can access Office Offline Server. Clients are the devices that users might use, such as laptops, tablets, or phones. Scenarios are the networks from which users might access Office Offline Server, such as the internal network or access to the internal network through VPN. Perform tests in different scenarios to ensure that the clients can access Office Online and work on files.
Configure M-Files Clients to Use Office Online
This procedure configures M-Files Web, Classic M-Files Web, or M-Files Desktop to use Office Online for co-authoring, among other features. See Enabling Microsoft Office for the Web Services for M-Files to learn about the features that Office Online enables for M-Files.
Prerequisites to Enable M-Files for Co-authoring
To perform the procedure, ensure that the following settings are in place:
-
Your account is a system administrator.
-
Office for the web is enabled.
For information to enable Office for the web, see Setting Up the Backend for the New M-Files Web and Web-Based Add-Ins.
The following M-Files configurations are supported for this procedure:
-
M-Files Web with M-Files Admin version October 2022 and later.
-
M-Files Web enabled with IIS version May 2022 and later.
Enable M-Files Co-authoring
The following procedure enables co-authoring on the M-Files server:
-
Log in to the M-Files server and go to M-Files Admin.
-
Expand the list of document vaults, select the vault and go to Configurations > Advanced Vault Settings.
-
Expand Client > Manage Client Settings Centrally and click Yes.
Important: Read the description carefully before you click Yes.
-
Click Save.
-
Expand Client > Common > Office for the Web.
-
Set Enabled to Yes. The Office for the web configuration is displayed.
-
Enter the values for the Office for the web configuration. The following table explains the values.
| Value | Description |
|---|---|
| Discovery URL | The WOPI discovery URL, which is the URL set with the - Internal URL parameter when configuring the Office Online farm. For example, if the URL ishttps://server.contoso.comthen enter: https://server.contoso.com/hosting/discovery |
| Use Internal URL | This setting is for on-premises setups only. - Enter Yes if you use an internal-http or internal-https configuration for Office Online Server. - Enter No if you use an external-http or external-https configuration for Office Online Server. |
| Application Server | This setting is required for M-Files Desktop. Enter the application server URL. If a custom port is used, the URL must contain the port number. For example:https://exampleserver.cloudvault.m-files.com/or https://exampleserver.cloudvault.m-files.com:800/ |
| Source Domain | This setting is required for cloud-based setups only, so, if you have an on-premises setup, ignore this setting. |
| Operation Timeout | This is an optional setting. The maximum number of milliseconds to wait for an operation to complete. The default value is 10,000 milliseconds (10 seconds). |
- Open a document with an M-Files Web add-in or M-Files Web to make sure that you see option Check out for co-authoring listed.
