
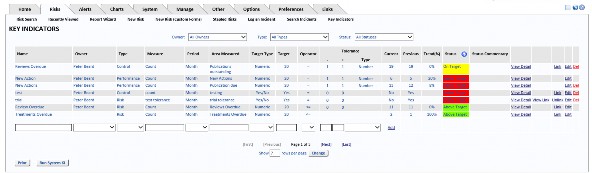
Key Indicators
Key Indicators are used to track trends such as Overdue Reviews and Actions. There are three different types of Key Indicators:
- Key Risk Indicators: These are used to identify current risk exposure and emerging risk trends and are an indicator of the possibility of future adverse impact.
- Key Control Indicators: These are used to define control environments and monitor levels of control relative to desired tolerances.
- Key Performance Indicators: These are used to define performance targets based on an organisation's goals and objectives, and to monitor progress towards achieving these targets.
Key Risk Indicators can be created and linked to Risks, while Key Control Indicators can be created and linked to Actions. Key Performance Indicators are not linked.
The information is recorded against the Key Indicator to show if the target is met.
See “Key Indicator Detail Report” for the available reporting options for Key Indicators.
Note For Administrators: To activate Key Indicators, select the System tab, then select System Settings and select the Options tab. The Activate Key Indicators option is on this page. The default setting for Activate Key Indicators is Off. See “Options Tab” for further information

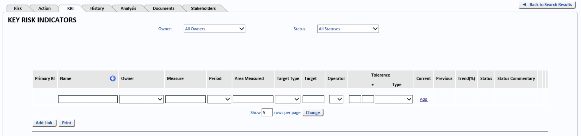
Filters
The Key Indicator filters are located at the top of the page.

Key Indicators can be sorted using any of the three filters:
- Owner - Filtered by All Owners or an individual Key Indicator Owner.
- Type - Filtered by a list of All Types, Risk, Control, or Performance.
- Status - Filtered by All Statuses, Above Target, On Target, or Below Target.
Note: A Key Indicator can only be updated by its Owner or a System Administrator. The Key Indicator Update or Edit is limited to its owner when custodian permissions have been applied.
Key Indicator Fields
Key Indicators can be sorted by ascending or descending order by any of the following columns:
- Name.
- Owner.
- Type.
- Measure.
- Area Measured.
- Target Type.
- Target.
- Current.
- Previous.
- Latest.
- Status.
- Status Commentary.
Name
This is the Name of the Key Indicator. There are a set of six default Key Indicators to choose from:
- New Actions.
- New Actions Completed.
- Old Actions Completed.
- Old Actions Outstanding.
- Reviews Overdue.
- Treatments Overdue.
In addition to the six default Key Indicators, you can also create your own by entering the data in the fields at the bottom of the page and then selecting Add. The system will prompt you if you do not complete all the mandatory fields needed.
Owner
The Owner column allows you to assign an Owner to the Key Indicator. It is also used in Key Indicator reporting.
Type
This is a drop down menu that allows you to assign a Risk, Control or Performance type to the Key Indicator.
Measure
This is a ‘type text’ field that determines how the Key Indicator is measured.
Period
This is a drop down menu that establishes how often the Key Indicator is measured. The Period
can be changed from Month to Quarter or Year.
Area Measured
This is a ‘type text’ field that describes the Key Indicator. The Area Measured field can be edited to clarify the description of the Key Indicator, if required.
Target Type
This field lets you choose whether the Key indicator will be a Numeric Target value or a Yes/No Target value.
Target
This is the Key Indicator Target. By default, the Target count is not set to any specific number when the Numeric Target Type is selected. A number must be entered when creating a new Key Indicator. It can be changed later by selecting Edit next to the item you want to change, as required.
Note: If the Yes/No Target Type is selected only the = Operator is available.
Operator
Operator can be changed from <= (less than or equal to) to >= (greater than or equal to) or to = (equal to). When the <= Operator is used, the - Tolerance value is ignored. Likewise, when the >= Operator is used, the + Tolerance value is ignored.
For example, if the following configuration is entered: Target is set to <= 20, the Type is set to Number, the - Tolerance is set to 2 and the + Tolerance is set to 5, the result is that the value of 2 for the - Tolerance is ignored and the Target is met if the value is 25 or lower.
For example, to change the Target of New Actions from less than or equal to 20 a month to equal to 30 a quarter, the following values would be edited. New Actions – Period: Quarter, Target: 30, Operator: =.
Note: If the Yes/No Target Type is selected only the = Operator is available.
Tolerance
A Tolerance can be set for any numeric Target. A Tolerance is made up of a - value, a + value and whether the Tolerance is a Number or a Percentage. For example, if the Target is equal to 30, the - value is set to 2, the + value is set to 1 and the Type is set to Number, the tolerated Target is in the range 28 - 31. A value which is outside the defined Tolerance counts as a missed Target.
Note: Tolerance is not available for a Yes/No Target Type.
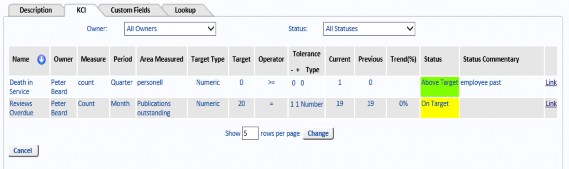
Current
The Current column shows the most recent value for the Key Indicators.
Previous
The Previous column shows the previous value for the Key Indicators.
Trend
The Trend column shows the percentage by which the Key Indicator has increased/decreased when comparing the Current column values with the Previous column values.
Status
The Status column displays the current condition of the Key Indicator.
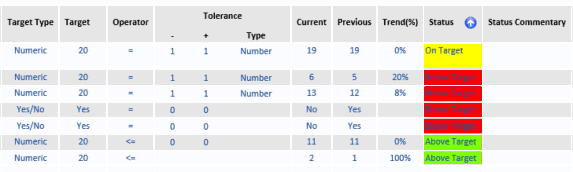
In the above example, the top row in the Status column indicates On Target (highlighted yellow) as the Current column value meets the Target (for example if there were 10 New Actions opened in the latest quarter for the updated Target).
In the same example, the second row shows the Status column Below Target (highlighted red) as the Current column value is 6, which is below the Target value of 20 (for example if there were 12 New Actions opened in the Latest quarter for the updated Target).
The two bottom rows in the example show the Status column Above Target (Highlighted green) as all the Current column values are all less than the Target values. The Operator <= is selected, hence the Above Target status is shown.
Had the >= Operator been selected for these three examples, the Status would be Below Target.
Status Commentary
The Status Commentary column displays the latest comment from the Status Commentary field in the Key Indicator Detail page.
Note: The Status Commentary cannot be edited in the Key Indicator page. It is automatically updated when the Status Commentary for the Current period is updated.
Additional Selections
- The Run System KI button updates the Key Indicators values.
- The View Detail selection lets you view and print Key Indicators details.
Note: The View Detail selection lets you view, print, edit or delete User type Key Indicators details.
- A Risk Indicator can be linked to a Risk using the Link selection, see “Linking Key Risk Indicators".
- A Control Indicator can be linked to an Action using the Link selection, see “Linking Key Control Indicators”.
- The Edit selection allows you to edit the Key Indicators.
- The Save selection allows you to save the changes made to a Key Indicator. Alternatively, the Cancel selection allows you to cancel any changes and return to the Key Indicator page.
- A User type Key Indicator can be deleted using the Delete selection.
- The number Key Indicators per page can be changed by inserting the required number in the Show box and selecting Change.
- Where the number of Key Indicators exceed the number in the Show box, subsequent pages will become available. Navigation to these pages can be done by selecting [First], [Previous], [Next] or [Last].
KRI Tab
You can navigate to the KRI tab from the Risk Details page. the KRI page lets you:
- Select Key Indicator Status Type.
- Link Risks to Key Risk Indicators.
- Add new Key Risk Indicators.
- Print the page view.
- Edit or Delete the Key Risk Indicator.
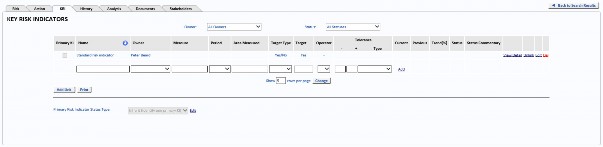
The KRI page also has filters where you can sort Key Risk Indicators by:
- Owner - Filtered by All Owners or an individual Key Risk Indicator Owner.
- Status - Filtered by All Statuses, Above Target, On Target, or Below Target.
- Primary Risk Indicator Status Type - Allows you to display from the following selections:
- Inherit (Identify one primary KI)
- Identify one primary KI.
- Roll-up of all KI statuses.
- Display worst KI status.
See “Primary Key Indicator” for further setting information.
KCI Tab
You can navigate to the KCI tab from the Risk Details > Action page. the KCI page lets you:
-
Select Key Indicator Status Type.
-
Link Actions to Key Control Indicators.
-
Add new Key Control Indicators.
-
Print the page view.
-
Edit or Delete the Key Control Indicator.
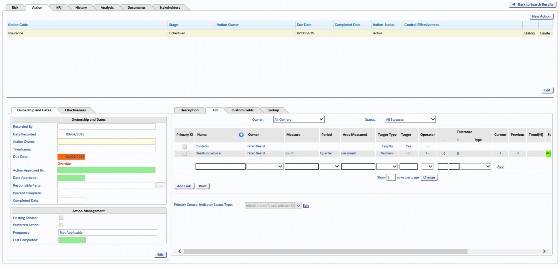
The KCI page also has filters where you can sort Key Control Indicators by:
- Owner - Filtered by All Owners or an individual Key Control Indicator Owner.
- Status - Filtered by All Statuses, Above Target, On Target, or Below Target.
- Primary Key Indicator Status Type - Allows you to display from the following selections:
- Inherit (Identify one primary KI)
- Identify one primary KI.
- Roll-up of all KI statuses.
- Display worst KI status.
See “Primary Key Indicator” for further setting information.
Linking Key Indicators
Key Risk Indicators can be linked to Risks, see “Linking Key Risk Indicators". Key Control Indicators can be linked to Actions, see “Linking Key Control Indicators”.
Linking Key Risk Indicators
Key Risk Indicators can be linked to a Risk either by using the Link selection on the Key Indicator page or from the Risk Details > Key Risk Indicator Selector page.
Note: A Key Risk Indicator can only be linked to one Risk. However a Risk can be linked to multiple Key Risk Indicators.
Linking From A Risk
- From the Risk Search page, select the Risk that you want to link the Key Risk Indicator to, see “View”.
- Select the KRI tab.
- At this stage you can either link an existing Key Risk Indicator by selecting the Add Link button at the bottom left of the screen, or create a new Key Risk Indicator by filling in the required fields and selecting Add Link on the left of the page.
- The selected Risk is now linked to the Key Risk Indicator.
Note: After the Key Risk Indicator has been linked to a Risk, an Unlink selection becomes available if you decide to remove the link.
Linking To A Risk
- From the Key Indicators Page, select the Key Risk Indicator you want to link to a Risk using the Link selection on the right of the page.
- The Risk Search page opens.
- Select the Risk you wish to link and select the corresponding View option on the right of the page.

- At the bottom of the Risk Details page select the Link KRI button.
- The system returns to the Key Indicators page where the Link selection has become Unlink.
- The Key Risk Indicator is now linked to the selected Risk.
Note: After the Key Risk Indicator has been linked to a Risk, an Unlink selection becomes available if you decide to remove the link.
Linking Key Control Indicators
Key Control Indicators can be linked to an Action either by creating a new Key Control Indicator in the Risk > Action > KCI page, see “Linking From An Action”, or by navigating to the KCI page and selecting the Key Control Indicator, see “Linking To An Action”.
Note: A KCI button appears at the bottom left of the page when viewing an action in the custom form, whereas a KCI tab is available when viewing a non-custom action.
Note: A Key Control Indicator can only be linked to one Control. However a Control can be linked to multiple Key Control Indicators.
Linking From An Action
- From the Risk > Action page, select the Action that you want to link the Key Control Indicator to, see “Risk Actions”.
- Select the KCI tab.
- At this stage you can either link an existing Key Control Indicator by selecting the Add Link button at the bottom left of the screen, or create a new Key Control Indicator by filling in the required fields and selecting Add on the left of the page.
- The Key Control Indicator is now linked to the Risk Action.
Note: After the Key Control Indicator has been linked to the Risk Action, an Unlink selection becomes available if you decide to remove the link.
Linking To An Action
- From the Key Indicators Page, select the Key Control Indicator you want to link to a Risk using the Link selection on the right of the page.
- The Action Search page opens.
- Select the Action you want to link and select the corresponding View option on the right of the page.

- The Risk Details - Action Of Risk page opens. At the bottom of the Risk Details page select the Link KCI button.
- The system returns to the Key Indicators page where the Link selection has become Unlink.
- The Key Control Indicator is now linked to the selected Action.
Note: After the Key Control Indicator has been linked to an Action, an Unlink selection becomes available should you decide to remove the link.
Primary Key Indicator
Setting the Primary Key Indicator to a Key Risk Indicator displays it in the KRI Status column (Providing the KRI Status column is set to visible) on the Risk Search, Selected Risks page.
Similarly, setting the Primary Key Indicator to a Key Control Indicator displays it in the KCI Status column (Providing the KCI Status column is set to visible) on the Risk Search, Selected Actions page.
There are three key indicator status types to choose from:
- Identify one primary KI - this selection will only display the Primary Key Indicator.
- Roll-up of all KI statuses - this selection will display a Roll‐up of all KI statuses similar to a majority rule.
For example: If two statuses are above target, one status is on target and one is below target, then the roll-up will display Above Target. If their is a tie, then the worst situation rules.
For example: If two statuses are above target and two statuses are below target, then the roll-up will display Below Target.
- Display worst KI status - this selection will display the worst KI status.
Setting The Default Value For A Primary Key Indicator
The global Key Risk Indicator or Key Control Indicator settings are the ones which provide the default value for the Primary Key Indicator within a risk or a control.
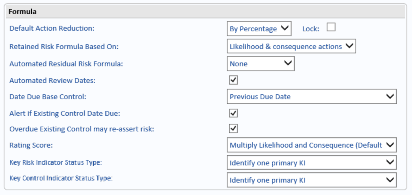
The primary key indicator default value can be set in the System > System Setting > Formula tab.
Setting A Primary Key Indicator
An administrator can configure the overall Key Risk Indicator or Key Control Indicator status to be a roll-up. A control owner can decide on an individual action that they want to identify as the Primary KI.
- To select the Primary KI, first choose the individual Key Risk Indicator or Key Control Indicator that you want.
- Next select the Key Indicator Edit option.

- In the 3 KI column, select the check box and select Save. The KRI or KCI is now set.