
Risk Matrix Options
You have a choice of many Risk matrices. Before you begin to use OpRiskControl, you need to decide which Risk matrix you wish to use. A 9x9x9 (9 levels of Likelihood, 9 levels of Consequence and 9 levels of Risk Rating) matrix gives you the most granularity and flexibility. The 5x5x5 matrix (five levels of Likelihood, five levels of Consequence and five levels of Risk Rating) is simpler and the most popular.
If you work in the health industry, you may find that a Triage style Risk matrix may be more acceptable. With the Triage style Risk matrix, a rating of one is the highest Risk and four the lowest. The matrix is the reverse of the normal matrix.
The choice is yours, but it must be made before you enter any Risks. If you decide to use a 5x5 or 9x9 matrix, you will be able to alter the level at which Risk Ratings start, however such a change is system wide and will affect all Users of the system.
5x5x5 Risk Matrix
The OpRiskControl default configuration uses a 5 by 5 Risk matrix. The 5x5x5 matrix gives a maximum rating of 25.
You are able to adjust the levels at which Risk Ratings start, so you can increase (or decrease) the number of cells that are high or extreme Risks. You are then able to rename (or translate) the Likelihood, Consequence and Rating labels to suit your methodology.
The Risk Rating is usually calculated by multiplying the values for the Likelihood and the Consequence (although it can be set to the sum of the Likelihood and the Consequence see “Formula Tab” on page 35). The Residual Risk is calculated from the Risk Rating less the effectiveness (as a percent or level reduction) of any completed Actions. The Residual Risk is the rating which is often used on executive reports.
Triage Style Risk Matrix
When OpRiskControl is initially configured, the System Administrator may elect to use the Triage Style matrix and change it from the default 5x5x5 to a 5x5x4 matrix (five levels of Likelihood, five levels of Consequence and four levels of Risk Rating). The Triage 5x5x4 matrix gives a maximum rating of 1.
The system is delivered with a predetermined mapping of Likelihood and Consequence to give Risk Ratings. If this mapping is not to your liking, configure the matrix so it meets your requirements.
Select Matrix Type
Decide which matrix type best suits your operation.
On the System tab, select System Data and select Change Matrix from the menu.
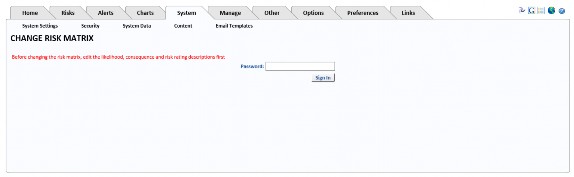
The password is changematrix (one word). This password protects the matrix if you are not using RBS.
Numeric Value
The Numeric Value Risk matrix relies on cut-off values specified on the Risk Rating table. To use it, select Numeric Value then click Activate the Matrix. If required, select Edit Risk Ratings and change the levels at which the Risk Rating changes.
Custom
Customers have different Risk matrix requirements. If their requirements are not met by the default 5x5x5 matrix, they can use the Custom Risk matrix.
For example, customers who do not want to use the standard five levels of Risk Rating can use a Custom matrix.
Triage
A Triage style Risk matrix is reversed so that 1 is the highest Risk Rating. If you want to use a Triage matrix, you will have to configure the matrix, the Likelihood descriptions and the Consequence descriptions.
5x5x5 Numeric Matrix
To use the dynamic 5x5x5 matrix, select Numeric Value and specify the cut-off values in the Risk Rating table.
Change Matrix
After changing the type of matrix from, for example, Custom to Numeric Values, click Change Matrix to display the appropriate configuration options for the selected matrix.
If you select Custom or Triage and click Change Matrix, the form will expand so that you can change the intersection of Likelihood and Consequence to specify the desired Risk Rating.
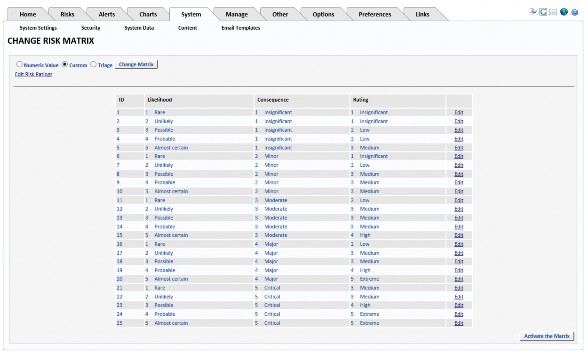
Edit the column named Rating to declare which rating you want to appear in that cell.
Note: You will not be able to delete a Level (for example, Level 5 if you have decided to use just 4 Levels of Risk) if that Level appears in this table. Change the Levels so that, for example, Level 5, does not appear in this table. You will then be able to delete Level 5.

When you have edited the list, click Activate the Matrix to save the changes. Exit the browser and re-start the application. If you have any problem activating the matrix, refer to “Activating The Matrix” on page 8.
Set Up A Custom 5x5x4 Matrix
A 5x5x4 matrix has five levels of Likelihood, five levels of Consequence and 4 levels of Risk Rating. Place a number from 1 to 4 in the Rating column (for a 4 level Risk Rating) as an indicator that such a Risk Rating will apply for that intersection of Likelihood and Consequence.
Set Up A Custom 5x5x5 Matrix
A 5x5x5 matrix has five levels of Likelihood, five levels of Consequence and five levels of Risk Rating. In the Rating column place a number from 1 to 5 (for a five Level Risk Rating) as an indicator that such a Risk Rating will apply for that intersection of likelihood and consequence.
Edit Risk Ratings For Numeric Value Matrix
Note: This section applies only if you have selected Numeric Value for your matrix. It does not apply if you have selected a Custom or Triage matrix.
If you want to change the levels at which Risk Ratings cut in, then use Edit Risk Ratings to change the cut-off values as shown below.
The top settings show a Risk Rating of 0-2 is Insignificant, 3-4 is Low, 5-9 is Medium, 10-19 is High and 20 or higher is Extreme. The Risk Rating is usually calculated by multiplying the values for the Likelihood and the Consequence, (see “Formula Tab” on page 35 for more information).
Activating The Matrix
If you have edited the Risk Rating levels, click the Activate the Matrix button to save your changes.
Exit all browser sessions and then restart OpRiskControl.
Select the System tab, select System Settings, then, at the bottom of any page, press Refresh System Settings.

This causes a refresh of the system settings.
Note: It is often necessary to restart IIS. If you are not able to restart IIS due to other live web applications, then Stop and Start the website itself.
To finish activating the matrix, select the Manage tab, select Risk Data and click on the option Recalculate risk values if risk matrix altered (applies to ALL risks, ignoring filter criteria above).
Go to Dashboard to check the matrix. If the labels are not as you want them, follow instructions in “Risk Matrix Descriptions” on page 9.
Risk Matrix Descriptions
Likelihood Descriptions
If you are not using five levels of likelihood, you will have to either delete the likelihood levels you do not need (starting from the highest – see “Removing A Likelihood Level” on page 11), or add the Likelihood levels you need.
If you wish to change the Likelihood Names (not normally changed) and Descriptions (changes are often made) you will need to change the values (select the System tab, then select System Data and select Likelihood from the menu).
With five levels of Likelihood there will be five rows numbered 1 to 5.
Triage
For a Triage matrix, you will have to edit the descriptions so that 1 is Almost certain and 5 is Rare.
Consequence Descriptions
If you are not using five levels of Consequence, you will have to delete the consequence levels you do not need, starting from the highest (see “Removing A Consequence Level” on page 11), or add the Consequence levels you need.
The Consequence Descriptions are not normally changed. However, if you decide they should be changed, click the System tab, select System Data and then select Consequence from the menu. Click on the Select link text beside the Consequence Description you want to edit. See “Consequence” on page 61 for more information about editing the Consequence Description.
With five levels of Consequence there will be five rows numbered 1 to 5.
The Cut-off Value should have values that are consistent across the Enterprise. The Cut-off Value is not used in calculations. If the Cut-off Value is shown, it should be consistent with the Enterprise Rating Cut-off Values which are used in the calculation of the Enterprise Rating.
The 13 Consequence Labels can be changed by clicking the Rename Consequence Labels button. To change these settings, select the System tab, select System Data, and select Consequence from the menu. The Rename Consequence Labels button is below the Consequence descriptions.
Triage
For Triage matrix you will have to edit the descriptions so that 1 is Catastrophic and 5 is Insignificant.
Risk Rating Descriptions
If you are using fewer than five levels of Risk Rating, you will have to delete the Rating levels you do not need, starting from the highest. If you are using more than five levels of Risk Rating, you will have to add the Rating levels you need. However because 4 levels of Rating is quite popular, level five may be deleted from within the application. The best way to handle this is to configure the matrix, ignoring level 5 and delete it when everything is configured.
The Risk Rating Descriptions are not normally changed. The Management Criteria are often changed. Both can be changed by the System Administrator selecting the System tab, then selecting System Data and selecting Rating from the menu.
With five levels of Rating there will be five rows numbered 1 to 5.
You may select the colour associated with each Rating.
You should enter the one-character code for each description. This is used in the one- character short columns (S-A-R-T) in the Risk Search form. Being one character, if you have description names that start with the same letter, you will have to compromise or use numerals 1-5.
For a Triage matrix you will have to edit the descriptions so that 1 is Extreme and 5 is Negligible.
For a 4-level Triage matrix just have 1-4 going from Extreme to Low.
Risk Rating Levels
Note: If you are using the Custom or Triage Risk matrix, set all Rating levels to zero as they are not used with Custom or Triage matrix types.
The Rating Level is used in the formula for the dynamic Numeric Value 5x5x5 Risk matrix to determine what cells in the Risk matrix are used for extreme, high, moderate, low and negligible. If the mathematical product of the Likelihood and Consequence is equal to or greater than a Rating Level but less than the next highest Rating Level that cell (intersection point) will be deemed to be that Risk Rating.
The Rating Levels must be set to 0 if Custom or Triage is used otherwise they may confuse Users.
Thus, if the Extreme Risk Rating Level is set to 20, then only intersections of 4x5, 5x4 and 5x5 will be rated extreme. The Rating Levels must be in ascending order, must start from zero and the must not be higher than 25.
Excess Risk Ratings
If you have a custom matrix and you have less than five levels of Risk Rating, the Risk matrix on the dashboard and in the Risk Matrix report will appear correctly.
However, if you select the System tab, select System Data and select Rating from the menu, you might see Level 5 (which you do not want). Delete Level 5 after you have configured the matrix correctly.
Removing A Likelihood Level
If you are absolutely sure you want to reduce the Likelihood levels to 4 levels (and not the Risk Rating levels to 4 levels), do this with Database Administrator’s assistance:
- First, back up the database.
- Search for Risks that have a Likelihood equal to Level 5 and change the Likelihood to Level 4.
- The Database Administrator should then delete row 5 in the database table tblLikelihood.
- Select the System tab, select System Data and select Change Matrix from the menu. Enter the password changematrix and click the Sign in button.
- Check the Risk matrix mapping is using the Custom matrix. If it is not, change it to Custom. Check all the intersections between Likelihood and Consequence are correctly mapped. If they are not, Edit the line and correct it.
- Click the Activate the Matrix button (at the bottom of the screen, on the right).
- Close all browser sessions and re-start OpRiskControl to check the matrix looks correct in the Risk Dashboard.
Note: If you are reducing the Likelihood to three levels, remove level 4 as well.
Removing A Consequence Level
If you are absolutely sure you want to reduce the Consequence levels to four (not the Risk Rating levels to four), do this with Database Administrator’s assistance:
- First, back up the database.
- Search for Risks that have a Consequence equal to Level 5 and change the Consequence to Level 4.
- The Database Administrator should then delete row 5 in the database table tblConsequence.
- Select the System tab, select System Data and select Change Matrix from the menu. Enter the password changematrix and click the Sign in button.
- Check the Risk matrix mapping is using the Custom matrix. If it is not, change it to Custom. Check all the intersections between Likelihood and Consequence are correctly mapped. If they are not, Edit the line and correct it.
- Click the Activate the Matrix button (at the bottom of the screen, on the right).
- Close all browser sessions and re-start OpRiskControl to check the matrix looks correct in the Risk Dashboard.
Note: If you are reducing the Consequence to three levels, remove level 4 as well.