
Incident Actions
Introduction
OpRiskControl Incident Manager users are able to record Actions to mitigate an Incident.
You can add as many Actions to an Incident as required. Only the Action name and description are mandatory.
Action Search
When an Incident is displayed and you click the Action tab, you will see a list of Actions that have been attached to the Incident. If you wish to add an Action, click the New Action button.
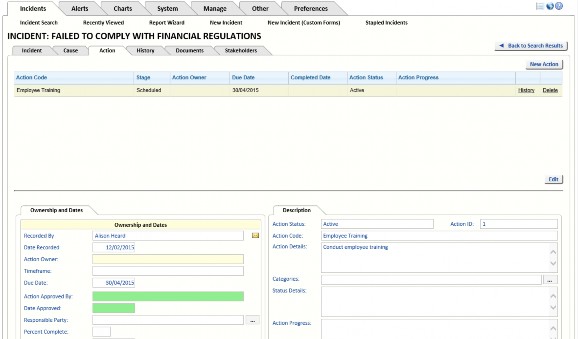
The Action grid includes the following columns:
- Action Code – The Action Code used to create the Action.
- Stage – The Stage is determined automatically, based on the status of the Incident and of the Action:
- When the Incident has not been accepted and the Incident status is Input, the Action is In Progress.
- When the Incident status is Open and the Action has a Completed Date or the Action is an existing control, the Action is Completed.
- When the Incident status is Open and the Action has neither a Due Date nor a Completed Date, the Action is In Progress.
- When the Incident status is Open and the Action has a Due Date but does not have a Completed Date, the Action is Scheduled.
- When the Incident status is New, Closed, Cancelled or Suspended, the Action is Non Active.
- Action Owner – The user who was assigned as the Action Owner.
- Due Date – The date selected for the Due Date.
- Completed Date – The date the Action was completed.
- Action Status – The current status of the Action (for example: Active, Cancelled, Closed, Completed or Suspended).
- Action Progress – Displays the current entry in the Action Progress field for this Action. The Action Progress field can be used to record how effective the control has been at mitigating the Incident.
The following links are available for each Action:
- History – Displays the Action History for the selected Action.
- Delete – Deletes the selected Action.
There is an Edit button below the Action grid. Click the Edit button and then click on any field in the Action grid you want to edit. Either a text box or a drop-down list is displayed, allowing you to change the selected field.
Note: When editing the Action Grid, the columns may be different from those displayed when viewing the Action grid. All the changes made to the Action grid in Edit mode are saved as you make them.

New Action
While viewing an existing Incident, select the Action tab and click the New Action button.
This section describes the items on the standard Action Form. If you are using a Custom Form, the fields displayed will differ.
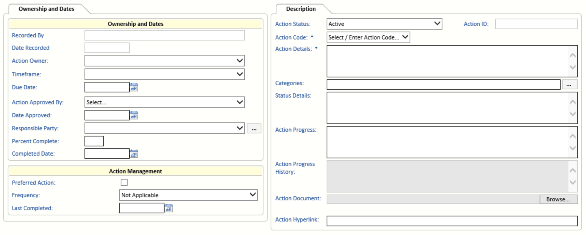
Ownership And Dates
Recorded By
Automatic: The user who records the Action is entered automatically.
Date Recorded
Automatic: The system will enter the date the Action was recorded and it cannot be altered.
Action Owner
Optional: Select the Action owner (user who has overall responsibility for the Action) from the list.
It is highly desirable to allocate an Action owner as soon as possible. It is optional here only to allow time for the Action to be approved, and until approved the ultimate Action owner is not responsible for progressing the Action. An Action owner can be external to your company.
Timeframe
Optional: Select the time frame. Action time frames can be project phases, and they can be included in the Action Status Report and Work Schedule Report. The Work Schedule Report can also be sorted by Timeframe.
Due Date
Optional: Enter the date by which the Action should be completed. Although this field is optional, any Actions with a Due Date will be omitted from Action Due Date reports, and will not have automatically created Alerts.
Action Approved By
Optional: This field has been provided for enhanced workflow management, and is under RBS control so that only those with approval permissions can approve an Action.
Please refer to the OpRiskControl System Administrators’ Guide for more information about RBS.
Date Approved
Optional: This field has been provided for enhanced workflow management, and is under RBS control so that only those with approval permissions can enter the date. If the details of the user who approved the Action are removed, the date is cleared from the record.
Please refer to the OpRiskControl System Administrators’ Guide for more information about RBS.
Responsible Party
Optional: Select the party responsible for this Action (for example, a government agency, another party, or a contractor).
Percent Complete
Optional: Enter the percentage of the Action that has been completed.
Completed Date
Optional: Enter the date on which the Action was completed. Although this field is optional, any Actions without a Completed Date will be included on any Action Due Date reports, and will automatically create Alerts if the due date has passed.
Action Management
Preferred Action
Optional: This field is for documentation purposes only. It is not involved in any automated calculation.
Frequency
Optional: Select the frequency if the Action is to be a recurring action – for example, an annual inspection. It is the number of days the process Activate Recurring Actions uses to put recurring controls back on the 'to do' list, to make them Due again. The system will then put the recurring control back on the to-do list a number of days (as specified in system settings with the option Recurring Action Reset (Day)) before they are due to be completed again.
Incident Manager normally stores Actions that occur once. However, the system supports recurring Actions. The system must be able to reset the Due Date, clear out the Completed Date, and not lose track of what has been done before. The reset must not compromise Actions due and overdue Alerts, but it will distort Dashboard Action counts in that recurring Actions will be subtracted from Completed and added to Approved. Users need to be aware that recurring Actions get put back in the queue and counted as such.
The Job Scheduler updates Recurring Actions daily.
Last Completed
Automatic: This field is automatically populated with the date of the last Completed Date so that when recurring Actions are put back on the list of jobs to be done (according to the Frequency and when the Completed Date is cleaned out), there is a Last Completed date for tracking purposes. Completed Actions are also logged to the History page. Note that recurring Actions are put back on the list to be completed when Activate Recurring Actions is run.
Description
Action Status
Mandatory: The status will default to Open but can be set to Closed, Cancelled, Completed or Suspended.
A Suspended Action is one that is not currently active. For example, when your CCTV system has failed and needs to be fixed, or your insurance company has declined to renew your insurance and you are uninsured for fire and burglary, the Action Status could be set to Suspended.
A Closed Action is one that may have worked in the past but is not considered effective or at least not cost-effective. If you want to keep the Action for later reference, Close the Action. If the Action is not required for future reference, Delete it.
A Cancelled Action is one you were thinking of using but changed your mind (perhaps due to cost or complexity). If you want to keep the Action for later reference, cancel the Action. If the Action is not required for future reference, Delete it.
Control over what is shown on the screen and in reports is managed from the Action List preferences.
Action Status is a user selectable item while Stage is determined automatically. Status and Stage are selectable items (select the Preferences tab and then select Action List).
Action ID
The Action ID is automatically generated. The system uses the database unique ID for the Action record but does not guarantee sequential allocation of unique IDs.
Action Code
Required: Select an Action Code from the drop-down list. If a suitable code does not exist, select Other from the list and create your own.
Note: When editing the Action Code field, you will be editing the Action Code for the selected Action only (by typing it in the Action Code field). This edited Action Code will not be available when creating new Actions.
Action Details
Required: The Action detail is defaulted from the available Action types, but you can alter or overtype this specific instance of the Action without affecting the available Action types.
Categories
Optional: Click on the ellipsis button to open the Category Selector. The list of configured Categories is opened.
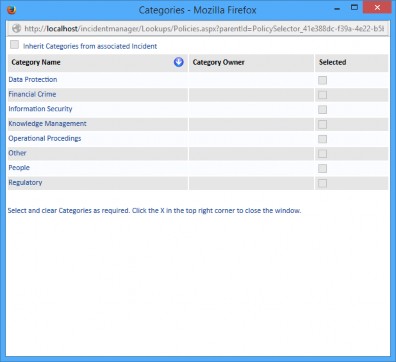
To make the Action inherit the Categories of the parent Incident, select the option Inherit Categories from associated Incident and then close the Category Selector window.
To set Categories for the Action, clear the option Inherit Categories from associated Incident, select the Categories you want to add to the Action and then close the Category Selector window.
Note: By default, when an Action is created for an Incident which already has Categories configured, the Action inherits the parent Incident’s Categories
Status Details
Optional: The status detail is entered. This relates to the current situation relating to progress in implementing the Action. This field can be selected and included on reports.
Action Progress
Optional: The Action Progress field can be used to record how effective the control has been at mitigating the Incident. Each new entry overwrites the previous entry. Each entry is written to the Action Progress History field (see below).
Action Progress History
Read Only: The Action Progress History field is automatically updated when the Action Progress field is changed. The new entry for Action Progress is added to the Action Progress History field with a date stamp.
Action Document
Optional: Enter the name (including file path) of any Action document if the document relates to this specific Action. You can Browse for the document to capture the path and name, and Open the document using the buttons provided. If the Action Code was set up with an Action document, this field will inherit that document name.
Action Hyperlink
Optional: Enter the hyperlink (web link) of any information if the information relates to this specific Action. If the Action code was set up with an Action hyperlink, this field will inherit that URL.
Lookup
When Custom Action Lookups is selected in the System Settings you will see the Lookup tab. The following fields on the Lookup tab are the same as the fields on the Description tab.
- Action Status
- Action ID
- Action Code
- Action Details
- categories
- Status Details
- Action Progress
- Action Progress History
- Action Document
- Action Hyperlink
Please see “Description” on page 26 for descriptions of these fields.
Action Lookup 1-6
The Action Lookup fields are displayed below the Description tab fields.
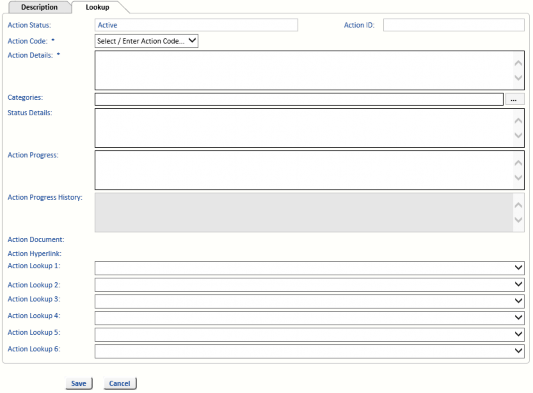
Optional: (These Action Lookup fields might have been renamed.) Select a value from the drop-down list for each field, as required.
Note For Administrators: See Manage Lookups in the OpRiskControl Incident Manager System Administrators’ Guide for more information on Action Lookup fields