
Incidents
Incident Search
Incident Search is the main entry point to OpRiskControl Incident Manager.
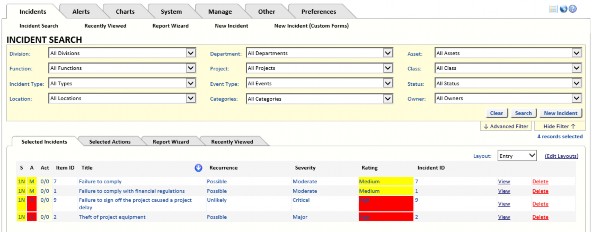
The search form is automatically populated with your Search Criteria preferences (see “Search Criteria” on page 51). You can make changes to the search criteria then click the flashing red Search button. You will then be presented with the first page of the search results.
The normal search panel is used to find an Incident by up to twelve search criteria.
If required, configure your Search Results preferences (see “Search Results” on page 52) to restrict the number of columns in the search results.
When the search results have been displayed, you can sort a column by clicking on the column header. If you wish to sort the column in the reverse order, click on the column header again.
The number of Incidents per page can be set by selecting the Preferences tab, then selecting
Search Results and Editing the Number of Incidents per page.
Clicking the Clear button performs a search with the default criteria. That is, it does not clear all search criteria fields but resets them to the configured defaults (see “Search Criteria” on page 51).
The returned Incidents have a View link and a Delete link.
Note: When you delete an Incident, all of its Actions are also deleted.

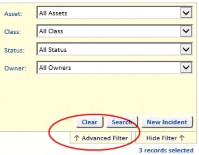
Advanced Incident Search
You can use the ↓ Advanced Filter link to show the advanced search area so you can search on a number of extra criteria including:
- Incident containing text – Search for a specific word in the Incident descriptions.
- Action containing text – Search for a specific word in the Action descriptions.
- Dates – Select either Date Identified, Date Created, Date Reviewed or Date of Incident from the drop-down list. Enter the range of dates for which you want to search. Select All to clear the filter for this field.
- Item ID – Enter the Incident ID for which you want to search in the text box.
- Other Ref No. – Enter the value for Other Ref No for which you want to search in the text box.
- Rating – Select the field on which you want to search from the drop-down list. Or select All to search all the listed fields. When a specific field is selected (for example, Assessed Rating), you can then select one of the following:
- Equal to – Search for a specific value for the selected field.
- Greater than – Search for all values greater than the entered value for the field.
- Greater than or equal to – Search for all values greater than or equal to the entered value for the field.
- Less than – Search for all values less than the entered value for the field.
- Less than or equal to – Search for all values less than or equal to the entered value for the field.
Next, select the value for which you want to search from the drop-down list. The value in the drop-down list changes according to the field selected.
- Click ↑ Advanced Filter to hide the advanced search area.
You can select from seven standard search results layouts (Dates, Entry, Location, Other, Ownership, Review and Value). You can edit those layouts as described in “Search Results” on page 52.
The SA Indicator Columns
The SA columns indicate the status of each Incident without having to View each individual Incident.
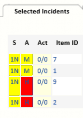
The short-form columns are used as follows:
- S – The Incident status:
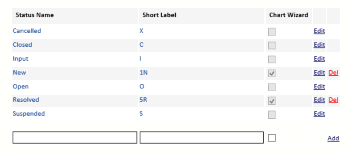
These can be edited by the System Administrator by selecting the System tab then by selecting System Data and then by selecting Incident Status. Status codes that are essential to the system cannot be deleted.
Other status codes can be added by your System Administrator and can be deleted (unless they have been used in the system). Incidents with non-system status codes are counted in the Dashboard under Other/Active but the system will not automatically process them in any way.
- A – The assessed rating. The Assessed Incident Rating is derived from the Severity and the Recurrence.
- Act – The number of Completed Actions/number of Active Actions. For example, 1/3 indicates there is one Completed Action and three Active Actions.
- Item ID – The unique ID (which was either entered by a user or generated by the system). See “Item ID” on page 10.
View
Click the View link beside an Incident in the Search Results to open the selected Incident for viewing. To edit the selected Incident, select the required tab and then click the Edit button. After making the required changes, click Save to save the changes or Cancel to discard your changes.
Note: If, when you try to edit an Incident, you see user is editing this record, the record is currently being edited by another user. You will be allowed to edit the record once the other user has saved their changes, cancelled their edit, or once the record locking period has expired.
Delete
Click the Delete link beside an Incident in the Search Results to delete the selected Incident. A dialog is displayed asking you to confirm you want to delete the Incident and any Action or History associated with it. Click OK to delete the Incident and associated Actions and History, or Cancel to cancel the deletion.
Recently Viewed
Select the Recently Viewed tab to view a list of the last 10 Incidents you have viewed. The first Incident on the page is the last Incident you viewed.
Report Wizard
See “Report Wizard” on page 33 for a detailed description on the Report Wizard.
New Incident
The following shows an example of the screen layout.
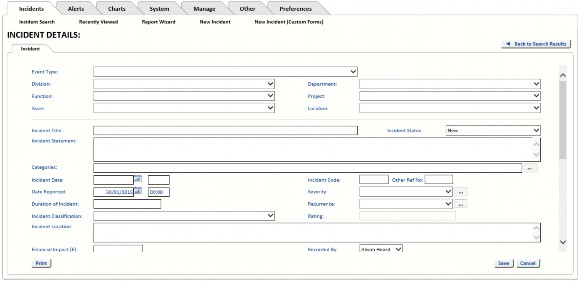
If the information on this form does not meet your requirements, discuss Custom Forms with your System Administrator. Custom Forms is an optional module that allows you to create and use different forms for different types of Incident. That means some types of Incidents can be entered in brief while other Incidents may require more detail.
Event Type
Required: Select the Event Type from the list. The Event Type identifies the Incident that has occurred.
Division
Optional: Select the Division that will own the Incident from the drop-down list. Do not select the Division where the recorder, contact or owner works, but the Division that has agreed to own and, if necessary, manage Actions.
Division is mandatory if RBS is switched on by Division. Please refer to the OpRiskControl System Administrators’ Guide for more information about RBS.
Department
Optional: Select the Department that has agreed to own the Incident from the drop-down list. Department is mandatory if RBS is switched on by Department. Please refer to the OpRiskControl System Administrators’ Guide for more information about RBS.
Function
Optional: Select the Function that will own the Incident from the drop-down list.
Function is not visible unless Show Additional Enterprise Structure is selected.
Note For Administrators: On the System tab select System Settings, then select the Workflow tab. The Show Additional Enterprise Structure option is in the section with the title Workflow forms.
Project
Optional: Select the Project that will own the Incident from the drop-down list.
Project is not visible unless Show Additional Enterprise Structure is selected.
Note For Administrators: On the System tab select System Settings. Then select the Workflow tab. The Show Additional Enterprise Structure option is in the section with the title Workflow forms.
Asset
Required: Select the Asset from the list.
People use different terms for the item or area involved in the Incident, such as asset, object, or element. This is the thing that was affected by the Incident.
Location
Required: Select the Location from the drop-down list.
If an Incident is specific to an asset at a specific location, use a street address. If more general, use a city, council, region, state, country or global description.
Incident Title
Required: Enter the Incident Title, keeping it short but unique.
This is a short description (up to 100 characters) of the specific Incident, and is used in reports.
Incident Status
When a new Incident is created, its status is set automatically according to the setting for Default Status for New Incident which is set by the System Administrator. A new Incident will normally default to either Open or Input. When a new Incident is automatically set to Input it enables an Incident manager to validate the Incident before setting it to Open (which means it is active).
To close an Incident, change its status to Closed and enter the date closed.
When an Incident is created erroneously, change its status to Cancelled. The date closed is not changed in this case.
Should the Incident need to be suspended for any reason (for example, the condition cannot logically exist at a point in time but may do later), change the status to Suspended so that it is not actively monitored. The date closed is not entered in this case.
Incident Statement
Optional: Enter more details about the Incident.
Categories
Optional: Click on the ellipsis button to open the Category Selector. The list of configured Categories is opened.
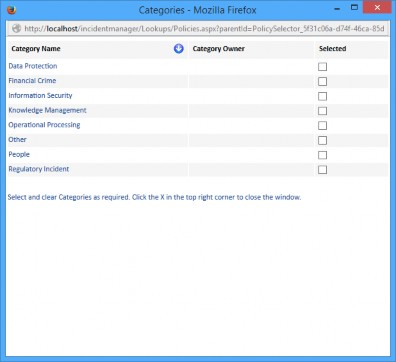
Select the Categories you want to add to the Incident and then close the Category Selector window.
Other Ref No
This field can be used, for example, to record an Incident’s old reference number when it is imported from a different system.
Incident Date
Required: Enter the date the Incident happened. If required, enter the time the incident happened in the format hh:mm. If no time is entered, 00:00 is used.
Item ID
Automatic: Your System Administrator might have configured the system to have the ID automatically populated (i.e. select the System tab then select the General tab and select the option Autogenerate Codes). If the Incident ID is automatically generated, the system uses the database unique ID for the Incident record but does not guarantee sequential allocation of unique ID.
Optional: If your System Administrator has not configured the system to have the ID automatically populated, you can enter an Incident ID in this data field. It is recommended that you enter a unique Incident ID. If you enter an Item ID manually, the system does not validate that the ID is unique.
Date Reported
Automatic: The system will enter the date the Incident was recorded. This date can be changed and, if required, a time can also be entered. The time must follow the format hh:mm. When no time is entered, 00:00 is used.
Severity
Required: Select the Severity. The descriptions are editable by your System Administrator. Click … next to Severity to see the definitions for Severity.
Duration Of Incident
Optional: Enter information about how long the Incident lasted.
Recurrence
Required: Select the Recurrence. The descriptions can be edited by your System Administrator. Click … next to Recurrence to see the definitions for Recurrence.
Review Frequency
Optional: The Review Frequency defaults to the setting for Default Review Frequency in your Context Profile preferences but it can be changed. Select the frequency of review, as required.
Rating
Automatic: The Incident Rating is the level of seriousness and is derived from Recurrence and Severity. The Incident Rating is often shown as Rating for short as a column header on search results and reports.
Date Reviewed
Automatic: The date the record was last reviewed (for example, when either the Recurrence or Severity estimates were changed). On a new record, the date will default to the current date. Optional: When reviewed, and if there is no change to either the Recurrence or Severity, the date the record was last reviewed can be changed by the user.
Date Next Review
Automatic: The system will add the number of days of the Review Frequency to the Date Reviewed to determine the date of the next review. The Date Next Review drives the automatic alerts via the Notification Manager and the posting of alerts to the Alerts page for Incident Reviews. If the review date is due, the message Due will appear in red under the Date Next Review. If the review date has passed, the message Overdue will appear in red under the Date Next Review.
Incident Classification
Optional: This field allows the customer to define another dimension of classifying Incidents. Incident Classifications are set up in Reference Data and used here.
Incident Location
Optional: Enter where the Incident took place.
Financial Impact
Optional: Enter the value of the financial impact. If used, this field must contain a monetary value, for example 10,000 or 49.99. The currency symbol (e.g. £) is not required.
Recorded By
Required: Select the name of the user who recorded the Incident.
Reported By
Optional: Enter the name of the person who reported the Incident.
Contact
Required: Select the name of the user who is the contact for the Incident.
Reported To
Required: Select who the Incident was reported to.
Owner
Required: Select the Incident owner (the user who has overall responsibility for the Incident) from the list.
Date Closed
Automatic: The date the Incident status was changed to Closed.
Closed By
Automatic: The name of the user who changed the Incident status to Closed.
Closure Comment
Optional: Enter a comment about how or why the incident was closed.
Description Of Events Prior To Incident
Optional: Enter a description of the events just prior to the Incident happening.
Description Of Event (The Incident)
Optional: Enter a description of the Incident.
Immediate Actions After The Event
Optional: Enter a description of the events just after to the Incident happened.
Incident Lookup 1-6
When Custom Incident Lookups is selected in the System Settings you will see the Incident Lookup fields.
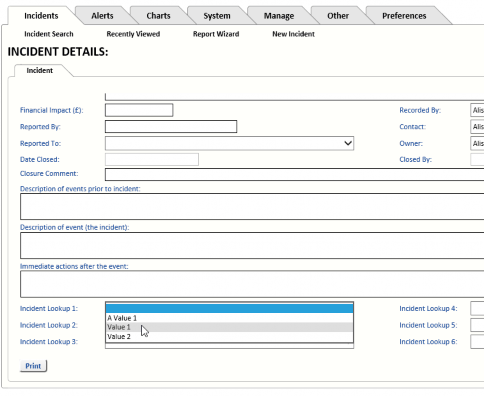
Optional: (These Incident Lookup fields might have been renamed.) Select a value from the drop-down list for each field, as required.
Note For Administrators: See Manage Lookups in the OpRiskControl Incident Manager System Administrators’ Guide for more information on Incident Lookup fields.
Cause Tab
Optional: One or more causes can be added to an Incident.
Cause
Required: To add a Cause for the Incident, select a Cause from the drop-down list.
Cause Description
Required: Enter a description of the Cause of the Incident.
Data Recorded
Optional: By default, today’s date is entered for the date the Cause was recorded. Select a date from the calendar or type a date in the text box.
Recorded By
Optional: By default, the name of the user who added the Cause is added as the person who recorded the cause. Select a name from the drop-down list.
Cause Document
Optional: To ink a document to the Cause, click the Browse button and browse to and select the document. The document is added as a link to the Cause. To remove a Cause Document, click the [Clear] link.
Actions Tab
This tab shows the list of Actions related to the Incident. Existing Actions can be edited or new Actions can be created from this page. Actions are described in “Incident Actions” on page 23.
History Tab
This tab shows the list history events related to the Incident. The History tab is described in “Incident History” on page 31.
Documents
A tab named Documents is provided on the Incident View form so that you can attach multiple documents to each Incident.
You can attach a document using the Attach Document button. You can also view a document that has already been attached to the Incident by clicking on the View text link. To edit a document’s details, click the Select text link next to the appropriate document. The Del text link removes the document from this page.

The above image shows one document attached to an Incident.
Document Name
Optional: Enter the name (including file path) of any Incident document if the document relates to this specific Incident. You can Browse for the document to capture the path and name.
Created
Optional: Enter the date the document was created, or at least attached to the Incident. The date defaults to the current date.
Author
Optional: Select the author of the document if the author is on the user list, or leave blank.
Revised
Optional: Enter the revised date if the document was revised, or leave blank. If the document details are changed, the system uses the current date by default. However, this can be edited, or left blank.
Version
Optional: Enter the document version number, or leave blank. This is a free format text field and is not validated in any way.
Attached By
Optional: Select the user who revised the document if the user is on the user list, or leave blank.
Security Class
Optional: Enter the document security code, or leave blank. This is a free format text field and is not validated in any way.
Status
Optional: Enter the document status code, or leave blank. This is a free format text field and is not validated in any way.
Stakeholders
Stakeholder
Apart from Incident contact, Incident owner and Action owner, additional people might be interested in a particular Incident.

Stakeholders can be selected from the list of users and contacts. If a stakeholder needs to be alerted if anything changes in relation to the Incident, then select Alert.
Both Type and Review Date are optional. A typical Type will be Reviewer in free text. If a Review Date is set, it will be picked up in the Notification Manager under Updates and Reminders, Incident Reminders.
Alerts
Stakeholder alerts requires the Notification Manager. There are two types of alerts:
- A user has been added to the list of stakeholders.
- The Incident has been updated in some way.
Incident Form Buttons
When viewing an Incident, the Incident Form buttons are available at the bottom of the screen.

Print Button
Click the Print button to create an Incident Detail report which contains the selected Incident detail on one form.
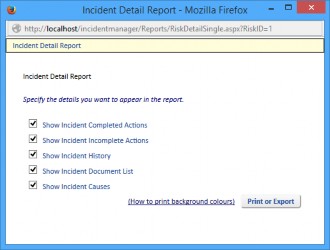
Select the details you want to appear in the Incident Detail report and click Print or Export.
The Incident Detail report is displayed in a new browser window. From here you can print the report, if required.
New Risk Button
The New Risk button enables you to link the current Incident to a newly created tabbed Risk. Click the New Risk button to open OpRiskControl Incident Manager with a new Risk. The Incident title is used as the new default title of the new Risk. This can be changed.
Enter the values for the Risk. Please refer to the OpRiskControl Users’ Guide for more information about creating Risks.
New Custom Risk Button
The New Custom Risk button enables you to link the current Incident to a newly created custom Risk. Click the New Custom Risk button to open OpRiskControl Incident Manager with a new Risk using a Custom form.
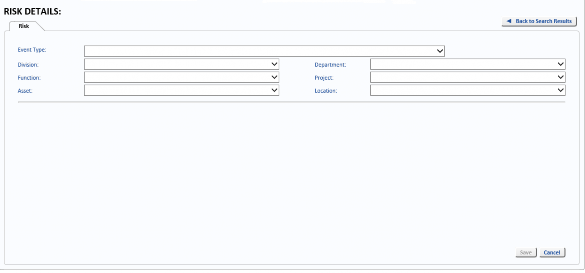
Select the Event Type to display the remaining Risk fields. Enter the values for the Risk. Please refer to the OpRiskControl Users’ Guide for more information about creating Risks.
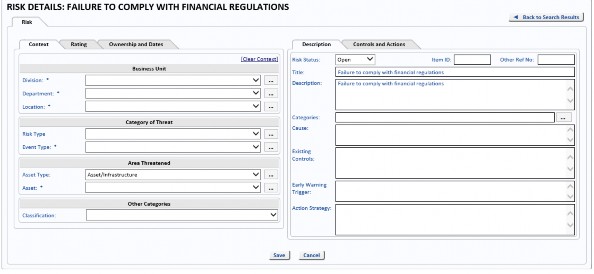
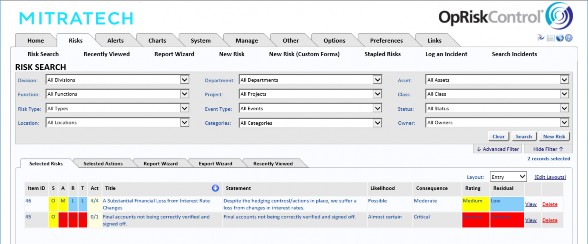
Link To Risk Button
The Link to Risk button enables you to link the current Incident to a Risk which already exists in OpRiskControl. Click the Link to Risk button to open OpRiskControl Incident Manager on the search results page. Select the Risk you want to link the Incident to and click the View link text to open the Risk.
Click the Link Incident button to link the selected Risk to the Incident.
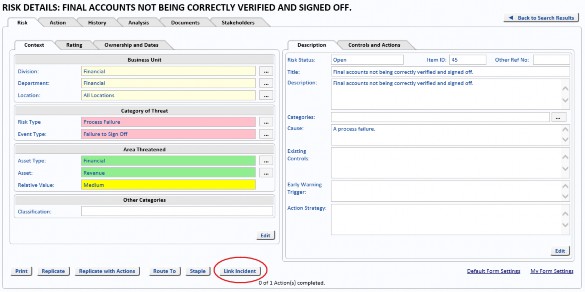
The Link Incidents button is replaced with the Incidents button. Click the Incidents button to show the Incidents which are linked to the selected Risk.

Incident
The title of the Incident linked to the Risk.
Date
The date the Incident occurred.
Event Type
The Event Type assigned to the Incident.
Reported
The date the Incident was reported.
View
Click the View text to view the Incident.
Unlink
Click the Unlink text to unlink the Incident from the Risk. A confirmation dialog is displayed asking you to confirm you want to unlink the Incident from the Risk. Click OK to unlink or Cancel to close the dialog without unlinking the Incident from the Risk.
Links Button
The Links button enables you to view all the Risks which are currently linked to the selected Incident. Click the Links button to open OpRiskControl’s Risk Search page. Only the Risks which are linked to the selected Incident are displayed.
Replicate Button
You can create a new Incident by copying an existing Incident. You will then need to change Title before you can save the Incident. The new Incident will have the same settings as the original with the exception of the following:
- The name of the User who copied the Incident appears in the Recorded By field.
- The Item ID is automatically created when Autogenerate Codes is selected on the System tab and the copied Incident is Saved.
Note For Administrators: Select the System tab, then select System Settings and select the General tab. The Autogenerate Codes option is on this page.
- Actions are not copied and therefore there will be no Actions associated with the copied Incident.
- Links are not copied and therefore there will be no Risks associated with the copied Incident.
Edit the copied Incident as required and Save the Incident.
When Show Additional Enterprise Structure is selected, you can copy (Replicate) an Incident to another Function or Initiative.
Note For Administrators: On the System tab select System Settings. Then select the Workflow tab. The Show Additional Enterprise Structure option is in the section with the title Workflow forms.
Route To
Work is routed to specific people (or User Groups) via the Route To button on the main Incident form.
This buttons allows work (on Incident, Action or control) to be routed to another user regardless of whether they are currently associated with the work. It also allows different parcels of work to be routed to different people (e.g. for approval of two different treatments), or the same parcel of work to be routed to multiple people (e.g. for optional review and comment).
Staple Button
Incidents are created by division, department, location, and so on, or by Incident rating level. However, sometimes you might want to manage a group of Incidents regardless of their home business unit or their Incident ratings.
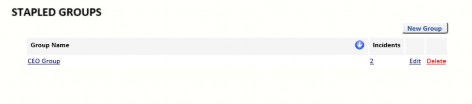
If, for example, the members of the Board of Directors have nominated a number of things they want attended to before the next board meeting, you are able to create Stapled Groups. You then staple any relevant Incident to that Stapled Group and manage them as a group regardless of their home business unit.
Before Incidents can be stapled, Activate Incident Stapling must be selected in System Settings. Also, a Stapled Group needs to be created by selecting the Incidents tab, then select Stapled Incidents and click the New Group button.
After a Stapled Group is created, an Incident can be associated with it via the Staple button at the bottom of the Incident form in View mode.
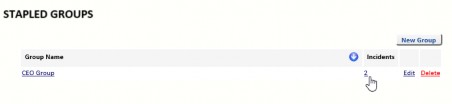
The list of Incidents which have been Stapled together can be viewed by clicking the number in the Incidents column for the appropriate Stapled Group.
Note For Administrators: On the Incidents tab, select Stapled Incidents to edit and create Stapled Groups.
If an Incident has already been Stapled, the button at the bottom of the view form will change from Staple to Stapled.
To remove an Incident from a Staple Group, select Stapled Incidents from the Incidents tab, click on the number of Incidents in the Stapled Group.
The Incidents which have been Stapled to that group are listed. Click Remove to remove the Incident from the Stapled Group.

In the Incident Search Results and Reports (Incident List, Actions Status, Executive Incident Summary) if the Stapled column is included in the Report it is displayed as SG (for Stapled Group). Stapled Incidents have a tick in the SG column.
Standard Button
The Standard button is displayed in Incident View mode if the current linked Incident Event has an associated standard. Standards are configured in the Reference Data, and optionally associated with Incident Events in the Reference Data.
Note For Administrators: Please refer to the OpRiskControl System Administrators’ Guide or more information about configuring a Standard for an Incident Event