
integrumLIVE Portal Guide
App Management Overview
- From the Main System Navigation bar >App Management
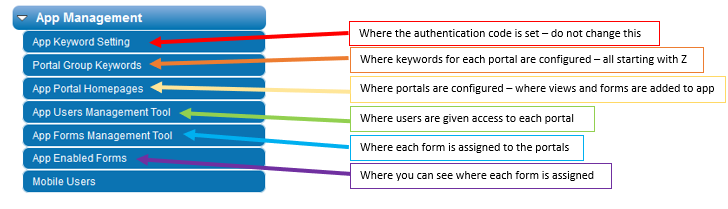
- App Keyword Setting - this is where you can see what the authentication code NEVER edit this setting.

- Portal Group Keywords – this is where you can see a list of all existing Portal keywords and, where new portals can be created.

Entering a new keyword into the Enter new Portal group field and hitting submit will create a new keyword for the App portals. All app portal keywords must begin with Z (these keyword aren’t visible in to the end user).
- App Portal Homepages – this is where you configure the new App Portal pages and, edit existing pages. When you click on “App Portal Homepages”, you will see a list of existing portal pages.
Creating a New Portal Page
- Create the new App Keyword in Portal Groups Keyword
- From within App Portal Homepages > click the New App Portal button


- Group = set to the new App Keyword that was created
- Portal Template Title = the name of the portal page that is to display on screen to the end user
- App Portal Template id = the unique identifier for the page. Ensure it doesn’t contain any spaces or special characters
- Select the Forms and Views to be displayed on the page.

- Within each row select:
- Hotspot Icon - the icon to display on the App
- Hotspot Label - the label visible to end users
- Linked Form Name / Group - the SMARTForm from the dropdown
- Linked View Name – the name of the SMARTForm View
- New Form Icon – Set to Yes allows the user to create the form via the App page. Set to No, the user won’t have an ICON to create that SMARTForm via the App.
- SAVE
- The screenshot below shows an example setup where the users have access to View Incident, Hazard and, Action forms but, only the ability to create new Actions and Hazards – they have not been given access to create Incidents.

App User Management
The next step is to assign the portal page to new users. This can be done manually from within the Employee or Contractor screens or, you can use the App User Management Agent as detailed below. This Agent can also be used to add or remove access.
- This is done under the App User Management menu option.
- Action field -set this to indicate if you are adding or removing user access
- Select App Portals – this is a multi select field in which you will select the Portal pages you which to allocate / remove
- Select which users you are adding (or removing) in the options.
- Click the Run Update Agent button at the top of the screen. This will update user access (note, the selected values will be removed from this screen once this button is clicked)

The final step is to SMARTForm templates with regard to which App Portal Pages they are available for. This can be done manually from within each SMARTForm template or, this Agent can be used to add / remove.
If this step is missed, users will not have access to raise new forms or view data, instead the App screen will be blank upon selection.
- From within App Forms Management Tool > set the Action field to Assign or Remove
- Select App Portals – select the portal pages to be updated
- Select Smart Form Templates – select the SMARTForms to be accessed via the Portal page
NOTE: This includes any subforms related to a parent form that is accessed via the App. For example – if the Incident form is being made available on the App and the Action form is a subform of the Incident form, the Action Form also needs to be updated (even though its not raised directly from the portal page itself).
- Click the Run Update Agent button

Your app has now been configured and your employees can now login to the new portal pages you have assigned them