
Themes and Styling
Introduction
The Theme and Styling functionality allows a user to select personalised company colours and styling. The process is simple but effective using HEX codes for exact colour matching, as well as allowing the uploading of logos to make the backend and to some extent the frontend of the system appear in line with an organisation’s brand guidelines.
Configuring a Theme and Styling
A theme is configured with the following process:
- Navigation
- Configuring Themes
- Configuring Styles (MSN)
Navigation
To edit an existing or create a brand-new theme or a style the superuser or administrator needs to navigate to ‘Themes and Styling’ section which is found under the Administration drop down in Main System Navigation:

From here the user will want to select the ‘Themes’ tab for editing the look of Smartforms, Smartform views etc. (as shown on the right side of the snip below) and the ‘MSN’ tab to update the styling of the options that appear on the left side panel (as shown on the left side of the snip below):

Configuring Themes
A new theme can be created using the ‘New Theme’ button. This option is mainly used when configuring a brand-new system. In other scenarios, it is recommended to edit the existing theme to prevent a clutter of too many options:

When creating a new Theme or when trying to edit and existing theme, you will be shown the following screen (it will be blank in case of a new theme and there may be some hex codes in case of editing an existing):

The Action bar section has two sections Form and View. Form section adjusts the top bar on top of an open form:

The View section adjusts the top bar but for a view:

The Form Skin section is made of three parts
- Form Header: This is the customisation of the Headers in a form as seen in the snip below, the ‘FORM SKIN’ title is in Purple.
- Section headers: This is the sub heading on the form. As seen above in Light blue.
- Form Labels : These are the areas of dark blue in the 2 snips below, is the default colour of the labels in a Smartform


In addition, we have a ‘Date and Time’ picker to update the colour on calendar header and dates background:

Configuring Styles (MSN)
A style or MSN is used to change the look and feel of the navigation on the left side of the user’s screen:

When creating a new style/MSN or when trying to edit and existing theme, you will be shown the following screen (it will be blank in case of a new theme and there may be some hex codes or sizes mentioned in case of editing an existing):

The MSN can be divided into 3 parts:
- Header/Title
- Content Link
- Logo
Header/Title
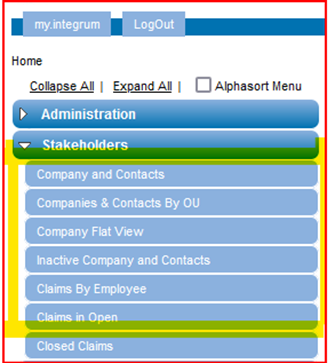
The below section for ‘Header/Title’ reflects the following colour and size options in the navigation menu (Snip 1 below for configuration and the following snip 2 showing the output of the configuration)
In these options the user can add gradient effects. This can be turned off by using the same colour in both the ‘Gradient Colour From’ and ‘Gradient Color To’ fields.
The Rounded Corner Radius changes the size of the corners of the heading dropdowns, the lower the number the smaller the radius of the corners.


Content Link
The section ‘Content Link’ is used for the subtitles contained in the dropdowns and reflects the following colour and size options in the navigation menu (Snip 1 below for configuration and the following snip 2 and 3 showing the output of the configuration):


The next section ‘Content Link’ is used for the subtitles contained in the dropdowns.
The user can set different elements of the subtitles, including colour of the background and font as well as the colour and text of the title when a user hovers or selects the subtitle.
In the Content Link section, the user can adjust the size and roundness of the dropdowns and buttons (Snip 1 below for configuration and the following snip 2 showing the output of the configuration).


Moreover, the user can change how the buttons on the MSN looks when one of the states is selected. The background and the font colour can be changed specifcally for each state of the button.


Additionally, the clients Logo can be added to the site:

The file of the image being upload should be either .gif, .jpg or .png only.
To upload the image, you can click on the ‘Browse’ button in ‘Select image to upload’ option and choose the right logo from your computer.
Troubleshooting
When wanting to edit an MSN the user will have to use the Firefox browser, as editing a style in Chrome is not supported. However, if creating a new MSN this can be done in Chrome.
On occasion when a change is saved and activated them issue may occur of the visual changes not taking hold. As such is it recommended to Log out, clear browsing history (CTRL+H: Clear browsing history) and relogging back into the site, the changes should now be seen.