
Homepage Profile Builder
Introduction
A group profile builder is a web-based functionality that helps users build required profile pages and add hotspots to them. Apart from hotspots, a user can also add images and headings and an HTML/CSS code for a more dynamic look and feel. It is a very user-friendly process as it allows users to simply “drag and drop” images, icons, or an HTML code etc.
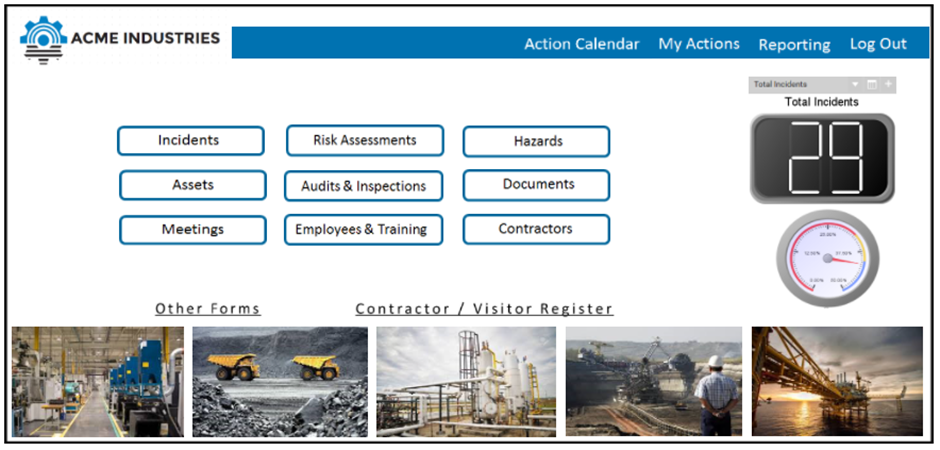
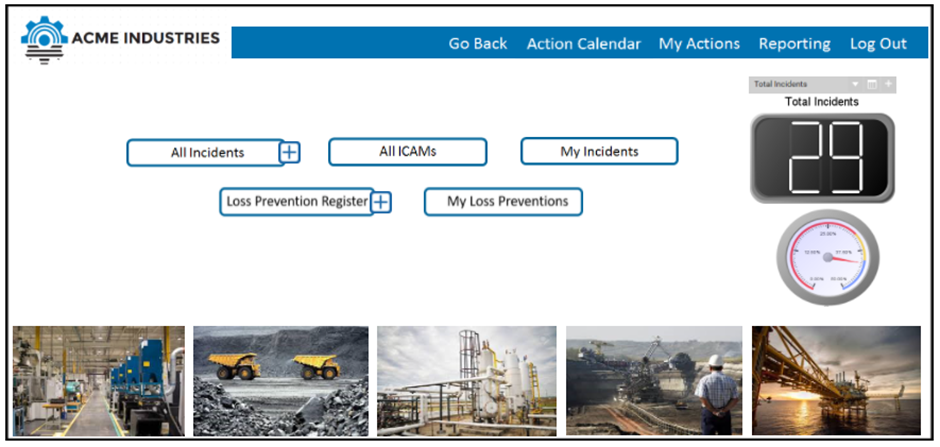
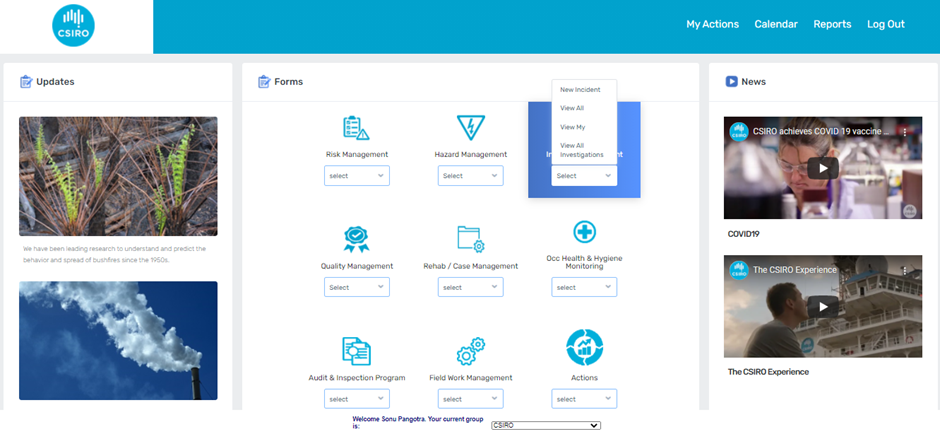
Following are some screenshots of the configured homepages built using hotspots and HTML code.
Example 1: Homepage profile using the Hotspots which link form one page to another.
Example 2: Homepage profile using the HTML/CSS code for a more dynamic homepage profile.

Configuring a group profile
A group profile is built using the following functions of integrum:
- Keywords
- Group Profile Set Up
- Homepage Builder
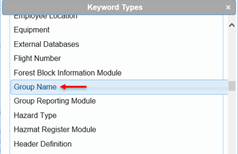
Creating “Group Name” keyword
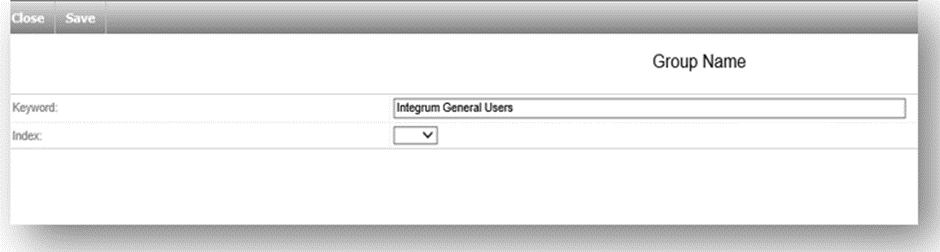
To create a group profile, the name of the profiles must be added to the keyword – Group Name.
For E.g.: If we must build 2 different profiles, one for general users and the other for Managers, then we must add “General Users Homepage” (or a name that is self-explanatory) and “Managers Homepage” in the Group Name.
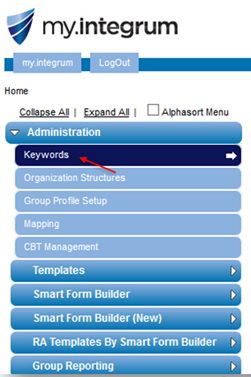
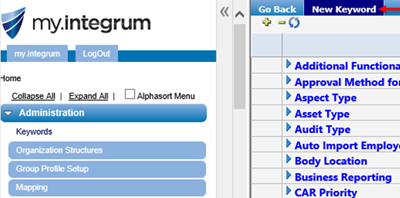
This can be done by accessing keywords under administration using the steps in the following order. We need to create as many group names as the number of profiles needed. E.g., if we need 2 profiles: 1 for general users and 1 for managers, then we must create 2 profiles and if we need a different profile for each of the 4 departments in an organisation, then we must create 4 different group names.
Administration > Keywords > New Keyword > Group Name > Add a group name à Save
Group Profile Set up
In this module, the group profile is configured. Display options, start-up options, quick links etc., are set up.
Group profile set up can be accessed via administration.
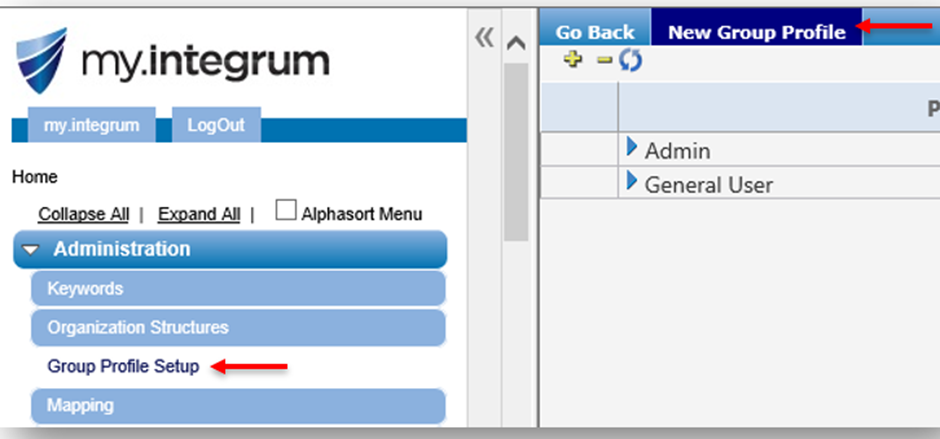
Under new group profile, the user can select the group name created in the keyword and build a group profile for that keyword.
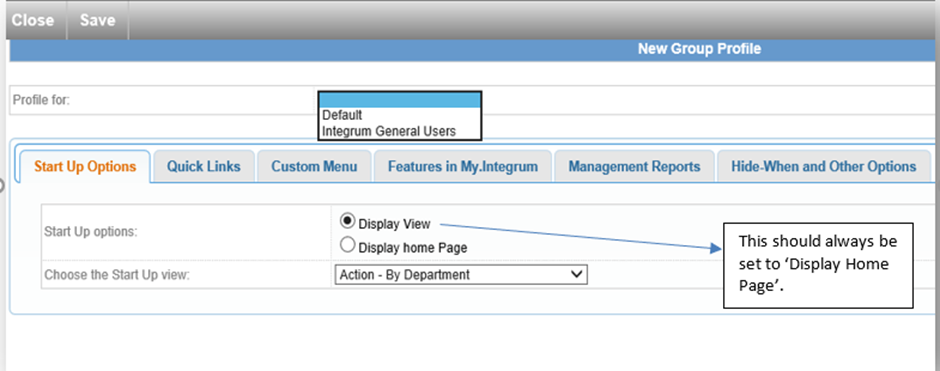
Once the profile is selected, the user should now be able to select different options suitable for the profile.
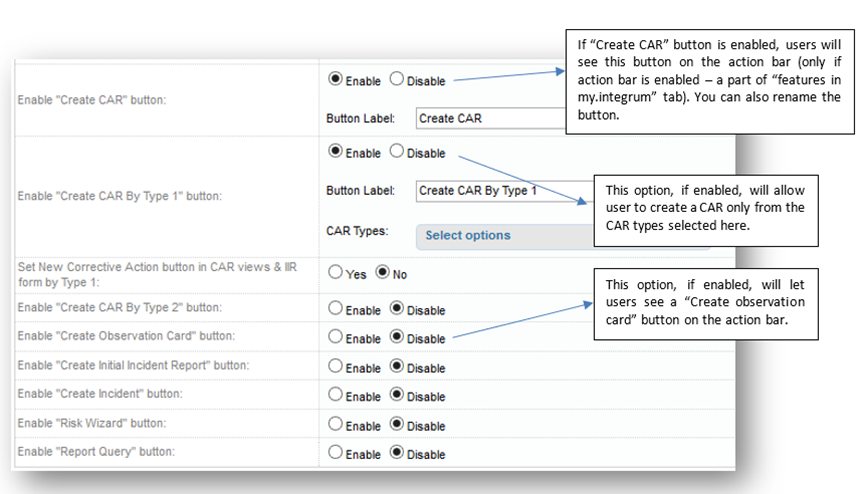
- Section > Start Up Options
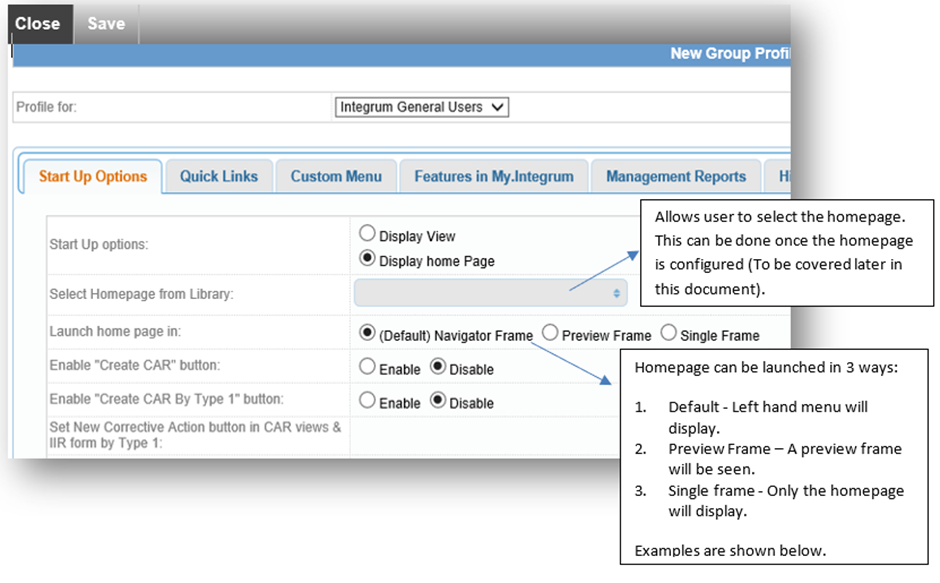
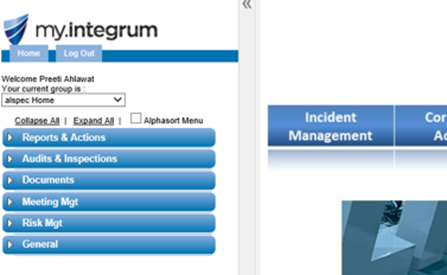
- Example screenshot of ‘(Default) Navigator Frame > This is mostly used for admin homepage with some quick links defined on the left:
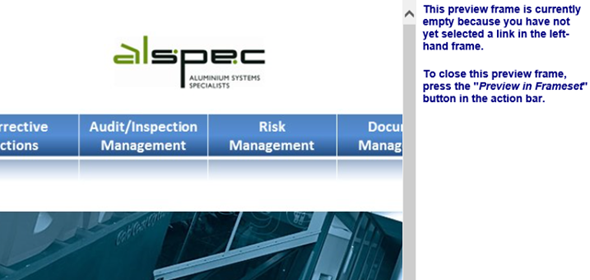
- Example screenshot of ‘Preview Frame’ à You can see a navigator pane on the side.
- Example screenshot of ‘Single Frame’ à The left-hand navigator is not seen. User can only navigate via the hotspots built on homepage:

The other options available are:
- Section > Quick Links
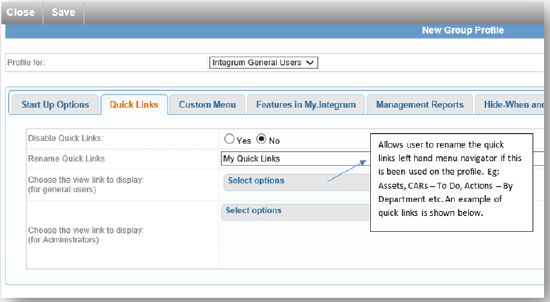
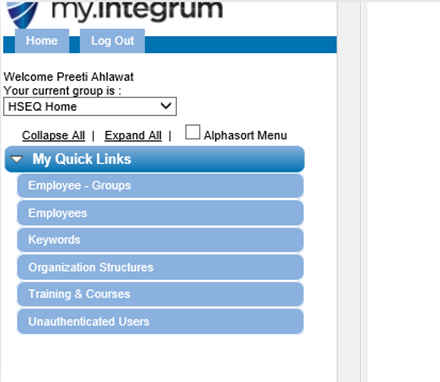
Example of some configured quick links in the screenshot below:
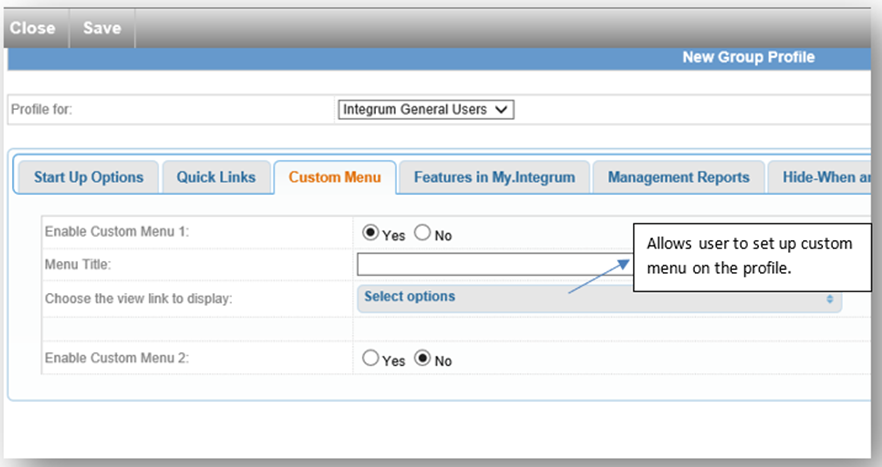
- Section > Custom Menu
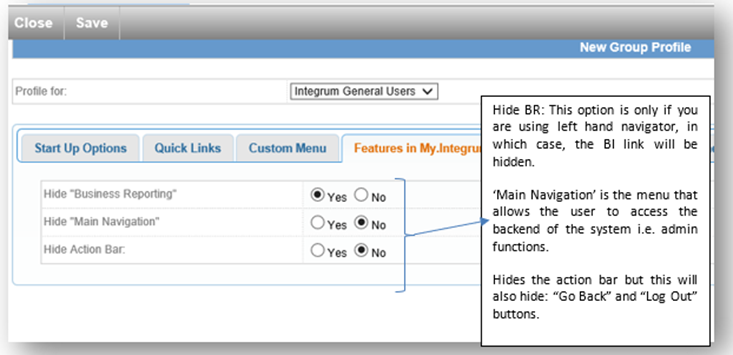
- Section > Features in My.Integrum
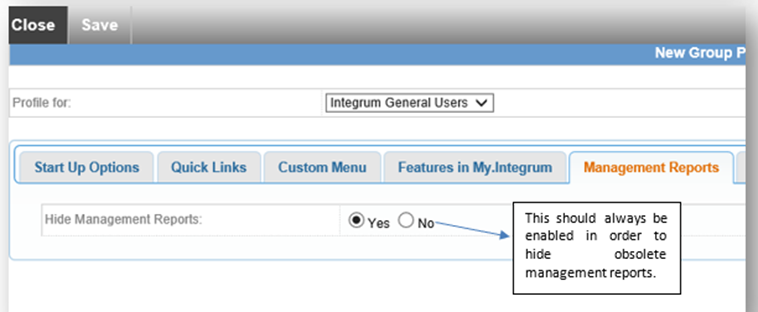
- Section à Management Reports
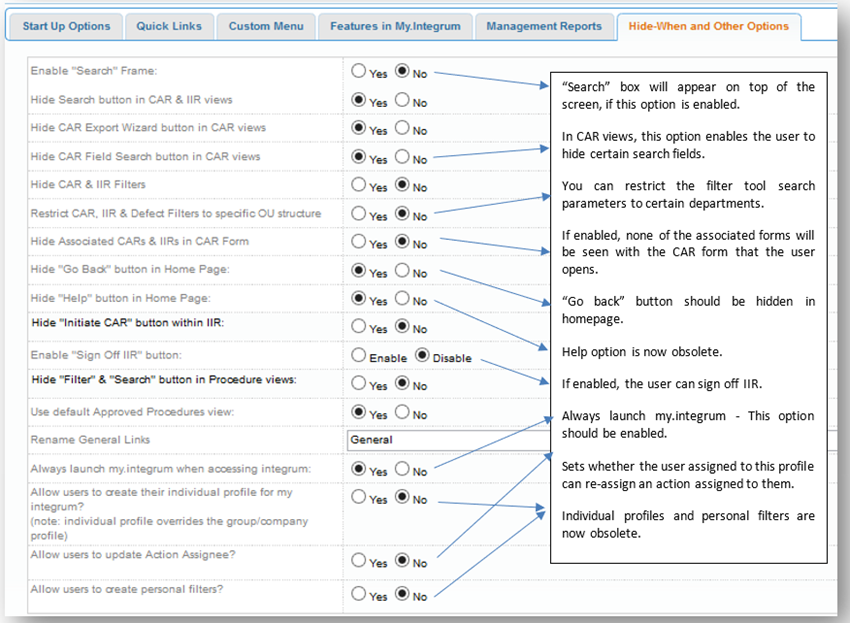
- Section Hide-When and Other Options
Lastly, click Save. Once the profile is saved, it should appear while developing the homepage and sub-pages.

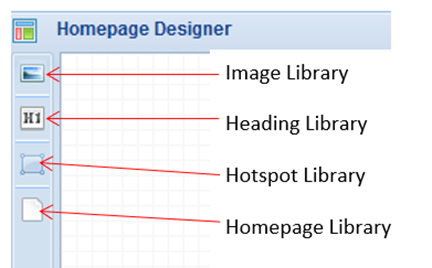
Home page Builder
In this module, the home page is designed and finally attached to the group profile. The homepage builder has the following functionalities, which will be covered in detail, below:
- Image Library
- Heading Library
- Hotspot Library
- Homepage Templates
- Group Library
- Custom Library
- Library Setting
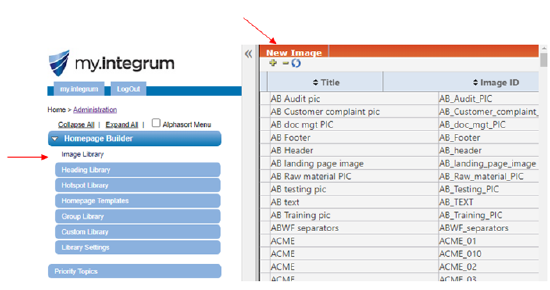
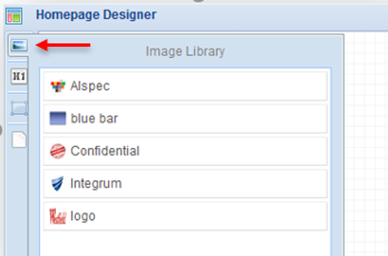
Image Library
This functionality helps users build images that can be used for graphics, such as logos and backdrops, on a homepage or subpage. Users must note that an image built in image library is not a hotspot and is just an image. Click on Image library option present in homepage builder and select “New Image”.
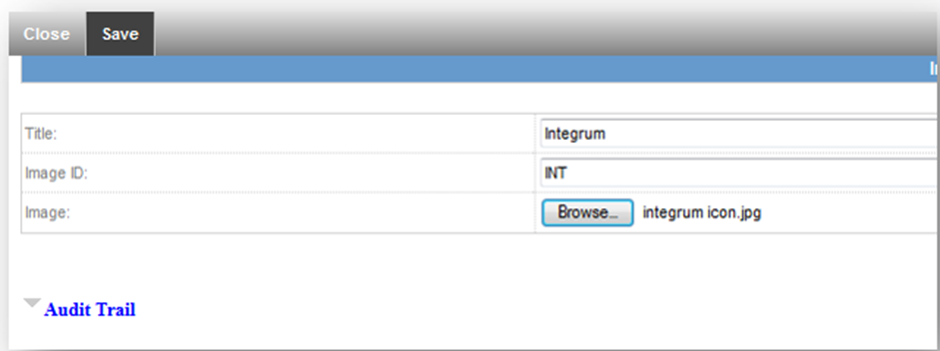
Set the title and image ID of the image. The image ID must be a unique ID (Can be alphabetical or numeric) and must not contain a space. No two images should share the same ID. Browse for the image and attach. Click on save.
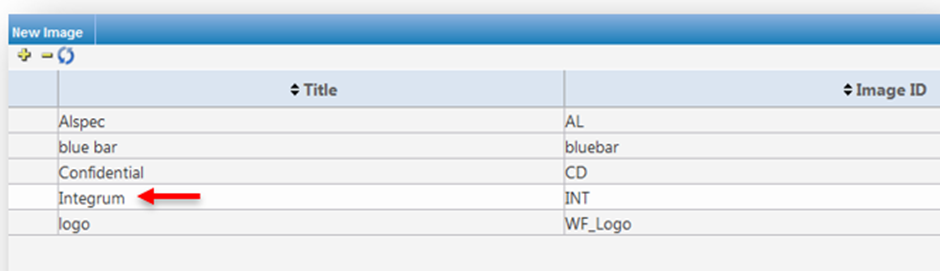
Once the image is saved, the image appears in the image library.
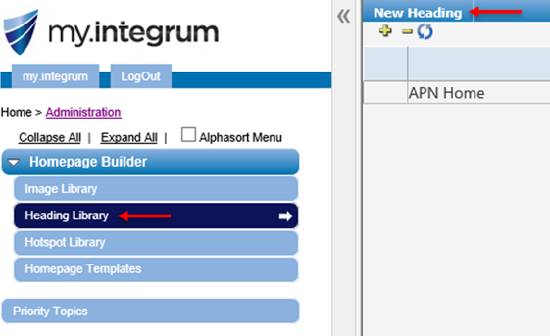
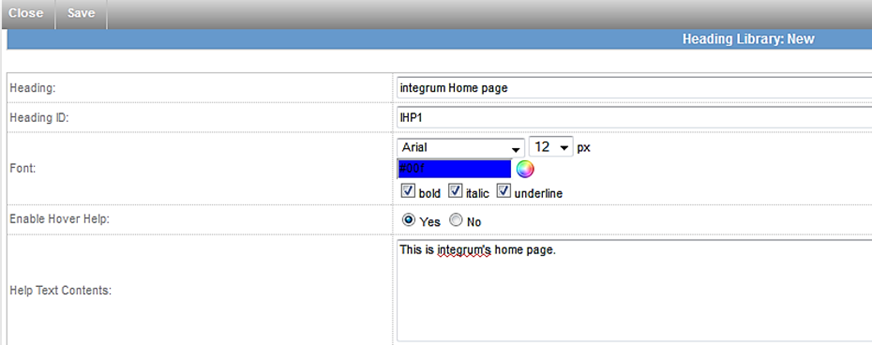
Heading Library
Like the image library, heading library helps users build headings of their choice of font and colour. Users must note that a heading built in heading library is not a hotspot. Click on heading library option present in homepage builder and select “New Heading”.
Set the title and Heading ID of the heading. The heading ID must be a unique ID (Can be alphabetical or numeric). Select font and colour. Also, if hover-over text is needed for the heading, it can be enabled here. Finally, Click on save. Once the heading is saved, it can be seen in the headings library.
Hotspot Library
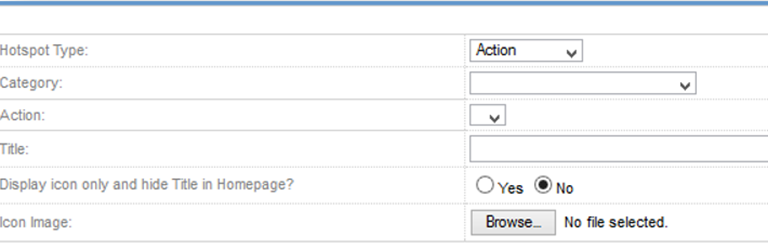
Here, the user can build hotspots (actions/links) that are required on the profile page. Click on hotspot library present on the homepage builder. Now click on new hotspot.

Based on what the hotspot is needed for, the user needs to select the correct option for the following:
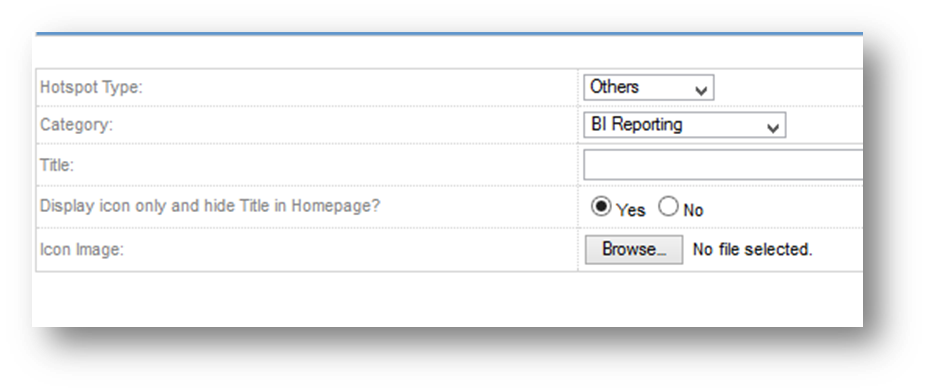
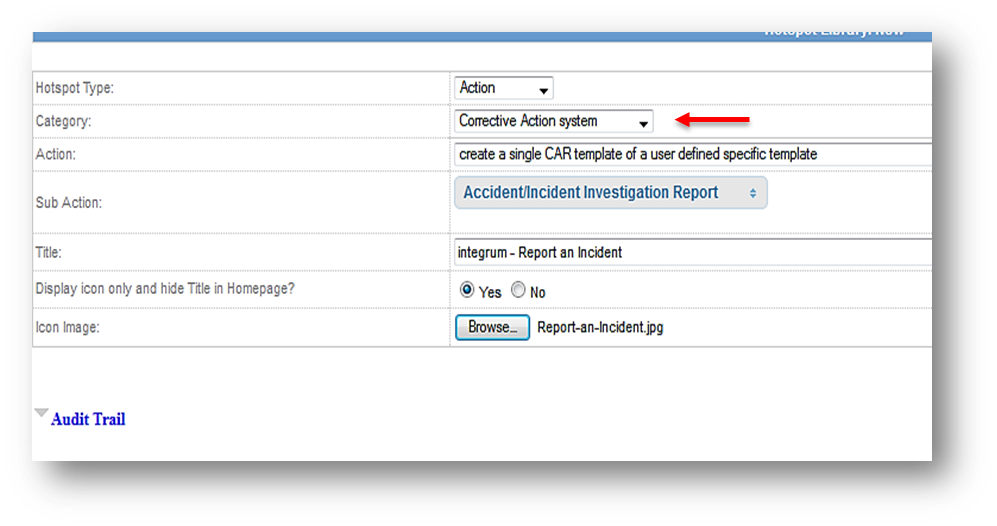
a. Hotspot Type:
This describes the type of hotspot. It could be an action, a view, a report filter template or any other type of hotspot.
b. Category:
The category is the system module you would like to create a hotspot from.
c. Action:
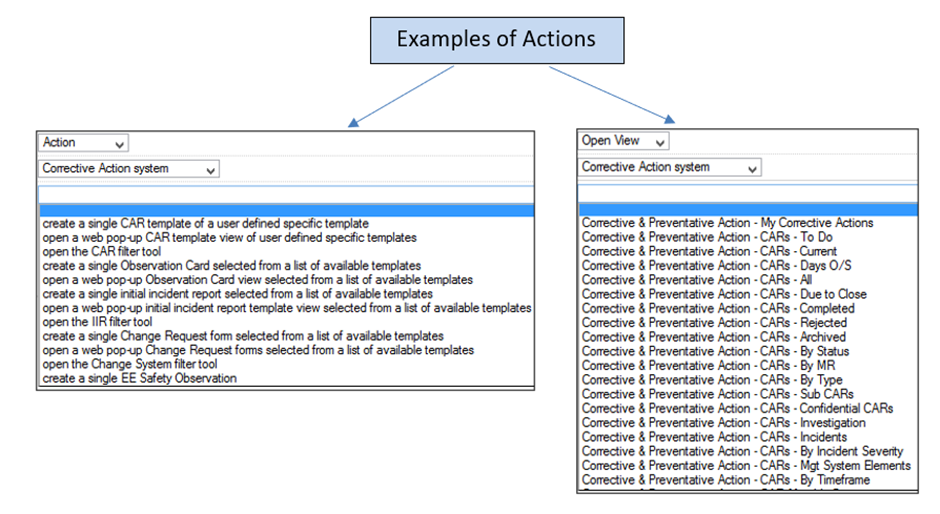
Based on the hotspot type and category, the user can select action that the hotspot is required to do.
a. Hotspot Type:
This describes the type of hotspot. Based on the action to be taken, hotspots can be of 4 types:
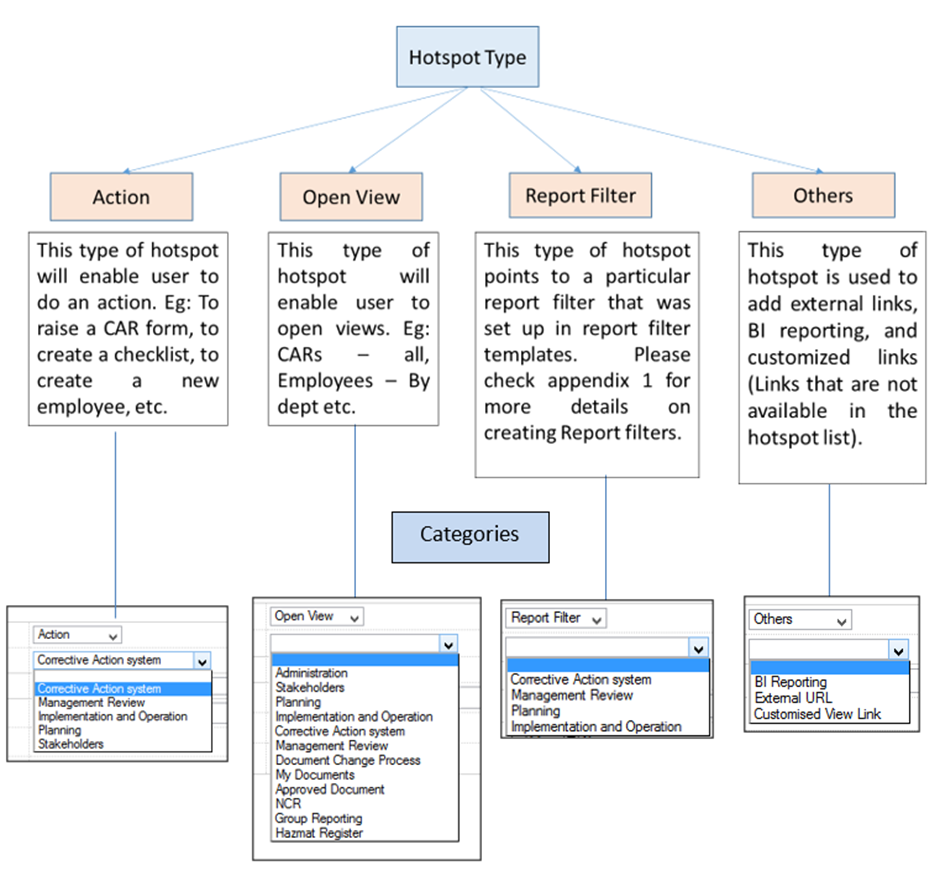
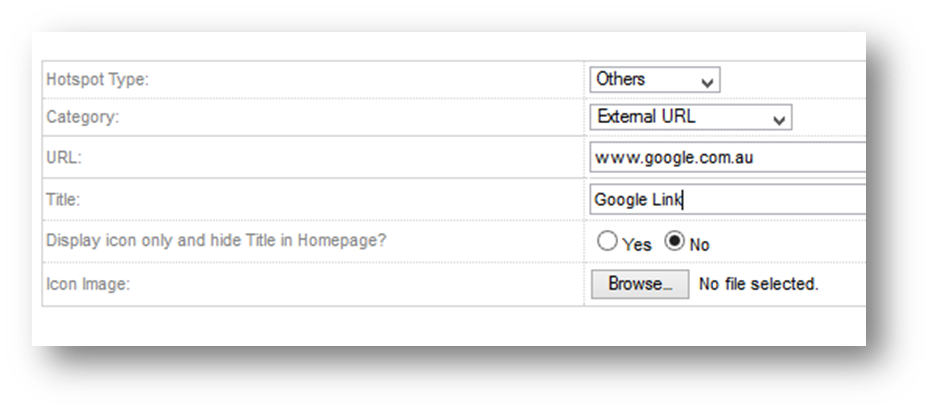
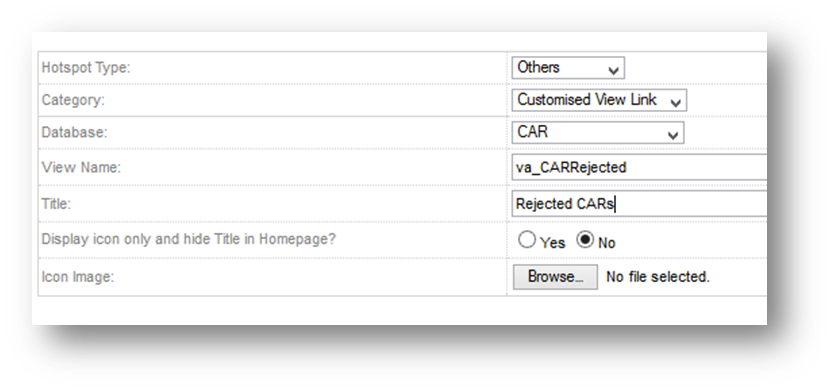
In case of “Others”, the users can create links of the following types:
- BI Link
- External URL
- Customised view links
BI Link: User can add the link to BI as a hotspot. It’s done as shown below:
External URL: These links can be added on the pages as hotspots, along with the integrum hotspots.
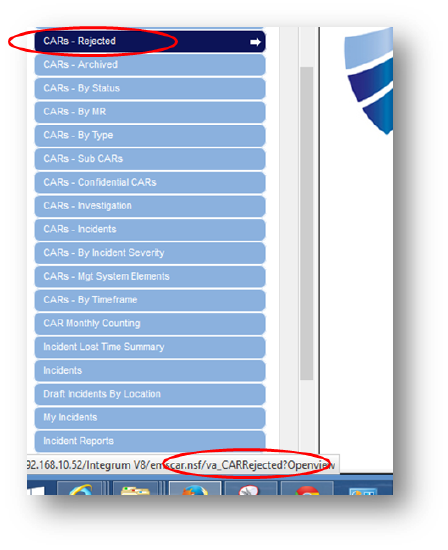
Customised View links: In case if you want to use a view that is not present in any of the dropdowns in the categories, you can create a view by selecting the database and view name. View name can be obtained checking the left-hand navigator links and their codes. (Ask your integrum representative for a list of custom links).
Sometimes, the name of the icon is written on the icon image itself. In such cases, the user needs to select “Yes” for “Display icon only and hide title in homepage”. In case “No” is selected, the title of the hotspot will appear below the hotspot when it is placed on the homepage. After this, click on save.
The hotspot shown below has an icon image that reads “Report an Incident”. When clicked, it should open a corrective action form, named Accident/Incident Investigation Report.
Once the hotspot is saved, it will be seen in the hotspot library, under the category that was selected while building the hotspot.
Custom Library
The Custom Library section allows you to create a new HTML code or edit an existing one.
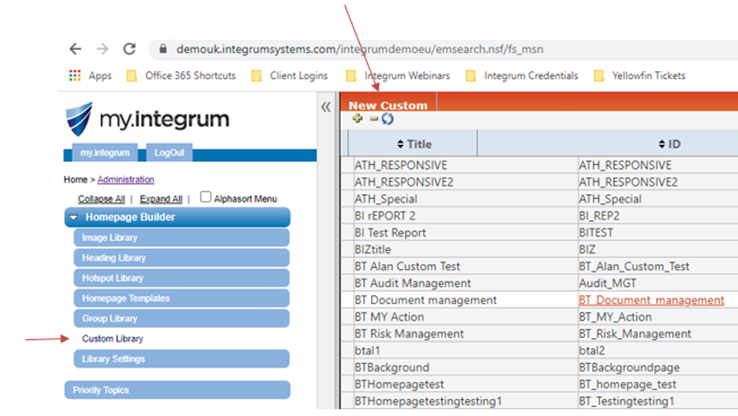
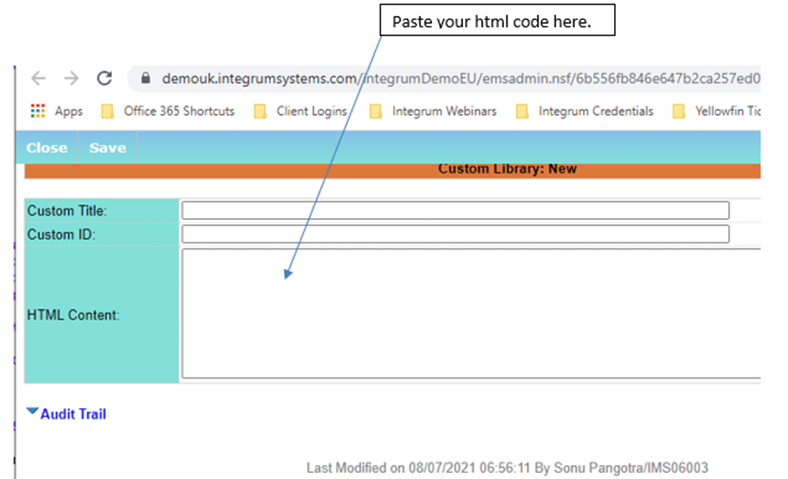
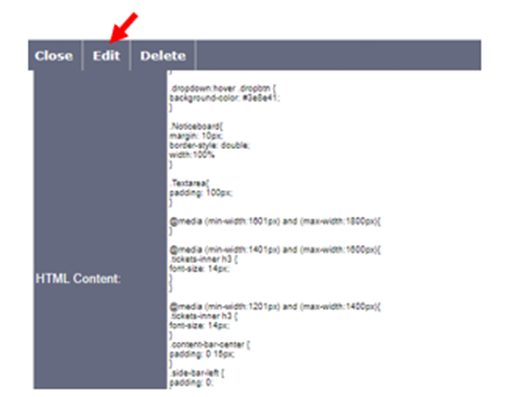
Next, Paste the html file code in the HTML content box if the code is ready to use or edit it in an editor preferably in Notepad++. You can edit the code in the HTML content box as well if needed. If editing an existing custom library code, simply click to open it and hit edit as shown in snip below.
To best see the changes in real time, feel free to use the below website where you can change your code and see the updates in real time. (Bonus, its completely free!)
Copy the below code by clicking

Once pasted onto the website simply click run to see your code in action as shown in the snip below.
Every image, icon, logo, background, Smartform link or Smartform view link is a URL which exists somewhere in Integrum already. We just need to find it to add or modify the look and feel of it.
Let us look at how to make simple changes like changing the URL of the link to point to a different Smartform.
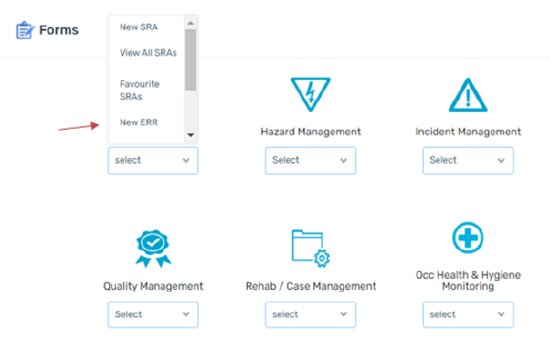
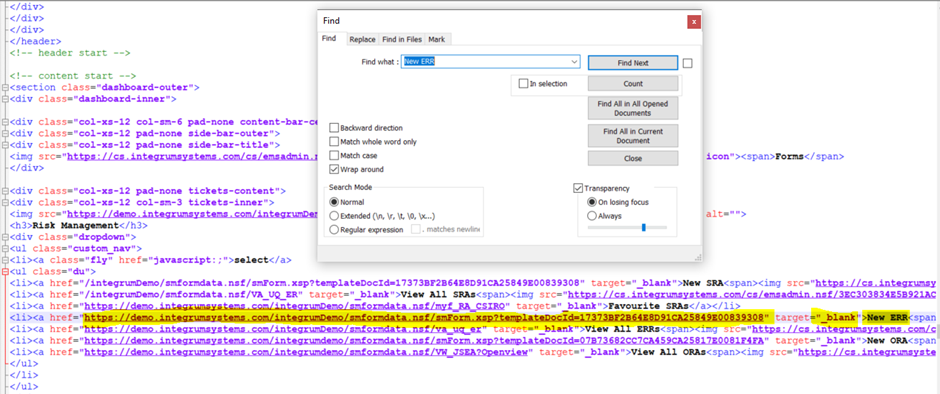
For example, from the snip below, lets try to change the ‘New ERR’ smartform link and rename it. In order to do so, follow the steps shown below:
Firstly, find the new link for the Smartform you want to add in here. To do so, navigate to Main system Navigation à Smartform builder (New) à Form Template à Click on the respective Smartform to get to a screen like below:

Click on the ‘Raise Form’ to get to the below screen. The highlighted URL in blue is what you need to copy to point the link to this new Smartform instead.

If you needed to do this to point to a Smartform View instead, the steps are very similar. Navigate to View library and click on the respective view to open it.

Click on Open View to get to the following page where we need to copy the blue highlighted URL.

The next you need to do is find the line in the html code where we update the above noted points ‘The best way to do this is to scroll down until you find the Smartform you need or simply use ‘CTRL1+F’ to find it easily. In the snip below, we try to use CTRL+F to find the word ‘New ERR’. It points us to the line where we need to update the URL link and rename the ‘New ERR’ to anything else.
In the above snip, the first highlighted bit in yellow is the URL which can be amended to point to a different Smartform or view by simply copy pasting the new link between the quotes “”. Next, target = blank ensure the new link opens in a new tab and not the same one and lastly, New ERR can be renamed to something else more meaningful to show the new form or view name.
Next, let’s look at making changes to a text or details of a notice board in the profile.
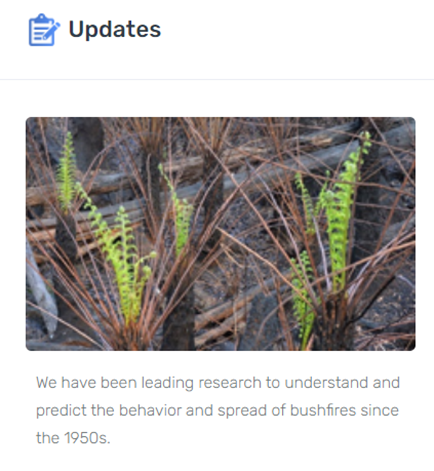
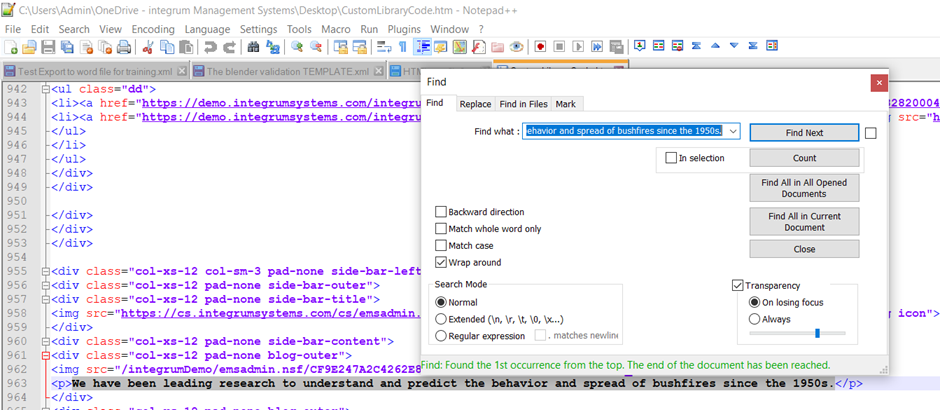
Example: Lets try to change the ‘We have been leading research to understand and predict the behaviour and spread of bushfires since the 1950s’ form the snip below to read something else.
To do so, simple use CTRL+F to find this text in the code as shown in the snip below and update the new text within the <p>New text</p>
Lastly, let us see how to modify colours in the profile. To do so, we need hex code for the colours needed. Hex code is a unique 6-digit codes used to represent every colour shade possible. Example, the hex code of red is #FF0000. So, if we change the background of the below snip by updating to red hex code, we will get this (snipe 2 below). Similarly, we can change the colours of the header, footer or any icons used in the profile.

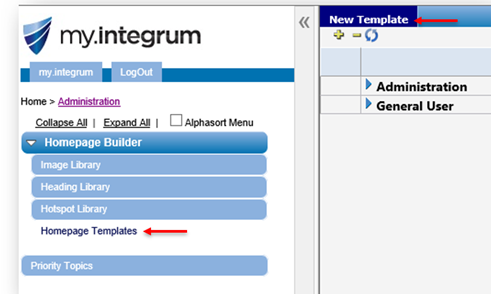
Homepage Templates
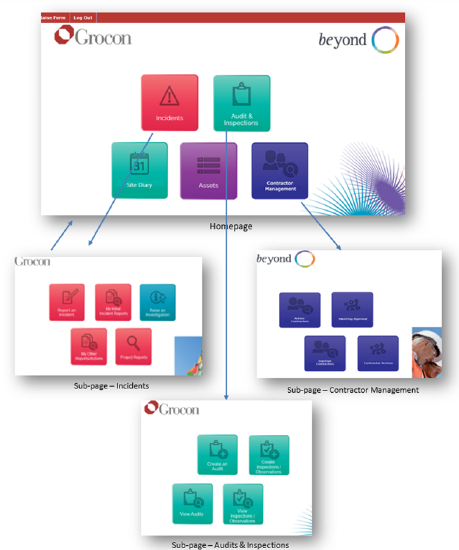
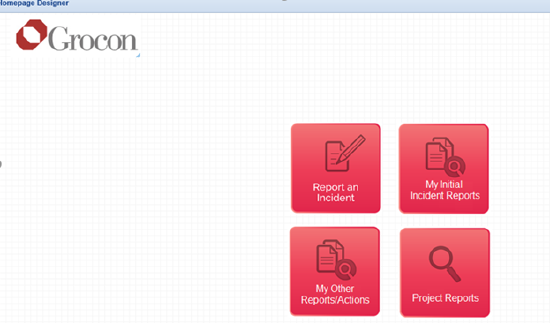
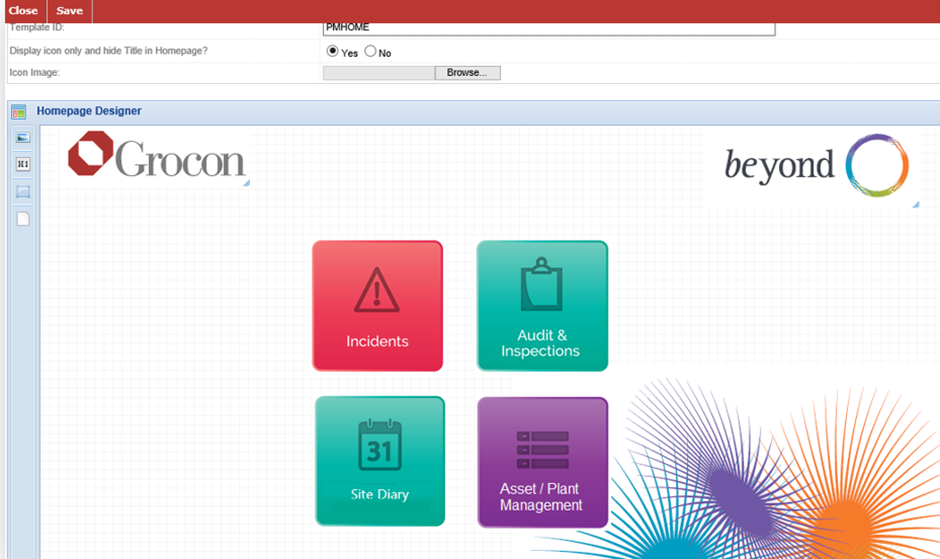
Under this section, we create sub-pages and the main home page. To understand the difference between a home page and a sub-page, an example is shown below. A homepage is the first page that a user lands onto, when he logs in. On clicking on the icons present on the homepage, the user navigates through different subpages.
Eg: When a user puts his login details and enters the system, the sees the below homepage. On the homepage, there are icons of the subpages like controlled documents, employee management etc. When the user clicks on any of these icons, he then moves into the respective sub-pages. These sub-pages have the various hotspots.
Every sub-page, in turn, has the home page icon, that takes the user back to the home page.
It is a good practice to first create the sub-pages and then add them to the home page.
Creating a Sub-page
This is only used with the templates based on images, headings and hotspots and is not sued for the ones based on custom library code.
Click on homepage templates and then new template.
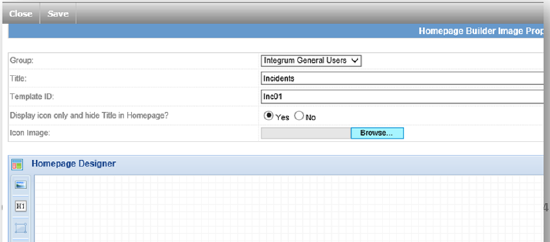
Select the profile you want to develop the page for.
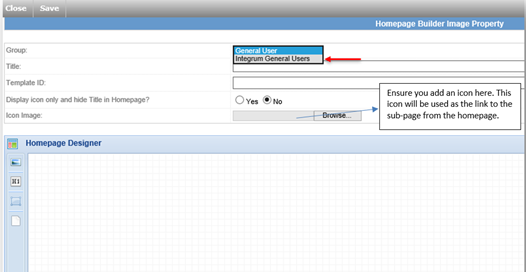
Once the group is selected, give a title and a unique template ID. Upload icon image. Later, when the sub-page is placed on the homepage, this image will be seen. So, make sure you select the right image.
On this page, all the necessary images, headings, and hotspots can be pulled in.
Click on image library, select the image to be pulled onto the page and drag it over to the designer page.
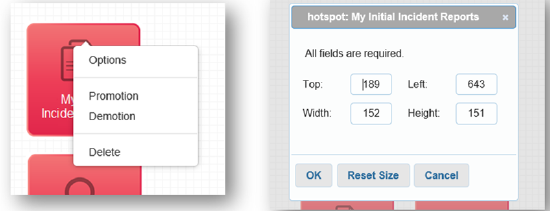
All the hotspots, images, and headings have resizing options and other features (seen on a right click) as follows:
- Options – This allows user to resize the icon (Check below).
- Promotion – This promotes or brings the icon on top of the other icons.
- Demotion – This demotes or puts the icon behind the other icons.
- Delete – This deletes the icon.
All the images and hotspots can be added on the designer now. Similarly, all the sub-pages can be created at this stage. An example is shown below:
Creating Homepage
After creating the subpages, the homepage is created. Click on new template and select the profile. Once the profile is selected, the user can see all the subpages configured for this profile under the homepage library.
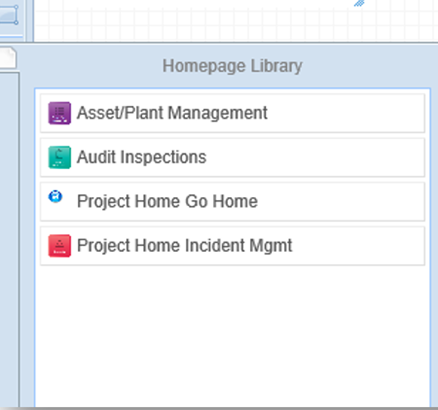
All the sub-pages can be pulled over to the designer. Also, at this point, all the relevant images and headings can be added. The page will then look like the one shown below:
NOTE: Do not forget to add the homepage icon on all the subpages, else the user will not be able to navigate back to the homepage from a subpage.
Also, once the homepage is made, it should be selected in the group profile set up.

Managing Employee Access to Group Profiles
Group profile, once created, must be assigned to the respective employees, in order for them to have access. This can be done in two ways:
i. Assigning group profile individually to the employees
ii. Assigning group profile via batch update
Assigning group profile individually to the employees
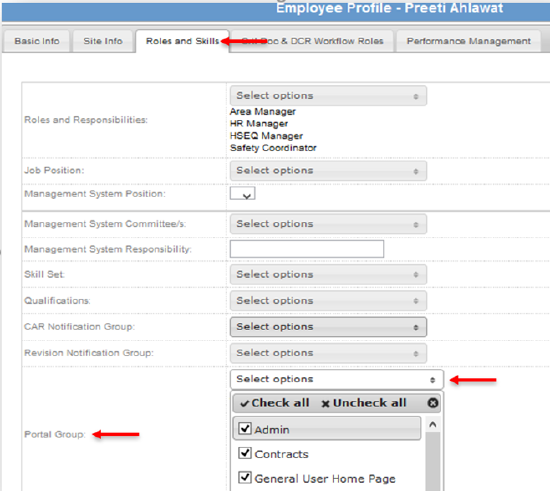
This process comes in handy when you must assign a particular profile to a few employees only. It can be done by going to the employee record and selecting the employee.

Once the employee record is opened, go into edit mode and select the tab “Roles and Skills”. The portal group that must be assigned, can now be selected. Save the record.
Assigning group profile via batch update:
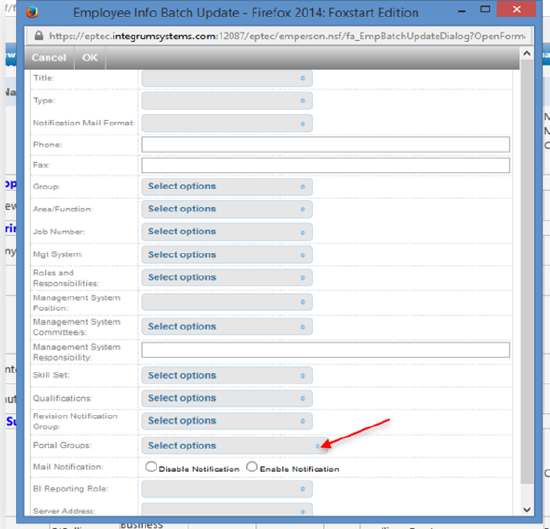
This process comes in handy when you must assign a group profile to a large number of employees. Hence, instead of adding it individually to each employee (which can be time consuming), we can do it in a batch. Batch update option can be found under employee module, on the right-hand side.

To use the batch update option, select the employees first and then click on batch update. The following screen will be seen. Select the portal to be assigned and click on “OK”. This way, all the selected employees get access to the group profile.
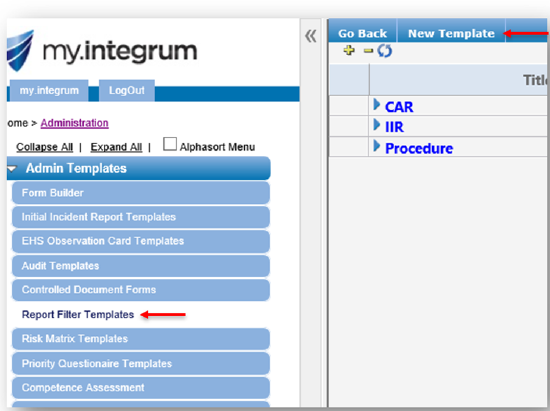
APPENDIX 1 - Creating Report Filter Templates
Report filter templates are used to create custom views that go directly to specific forms or forms filtered by organisational structure[1]. This module can be found under administration -> templates. Click on Report Filter Templates -> New Template.
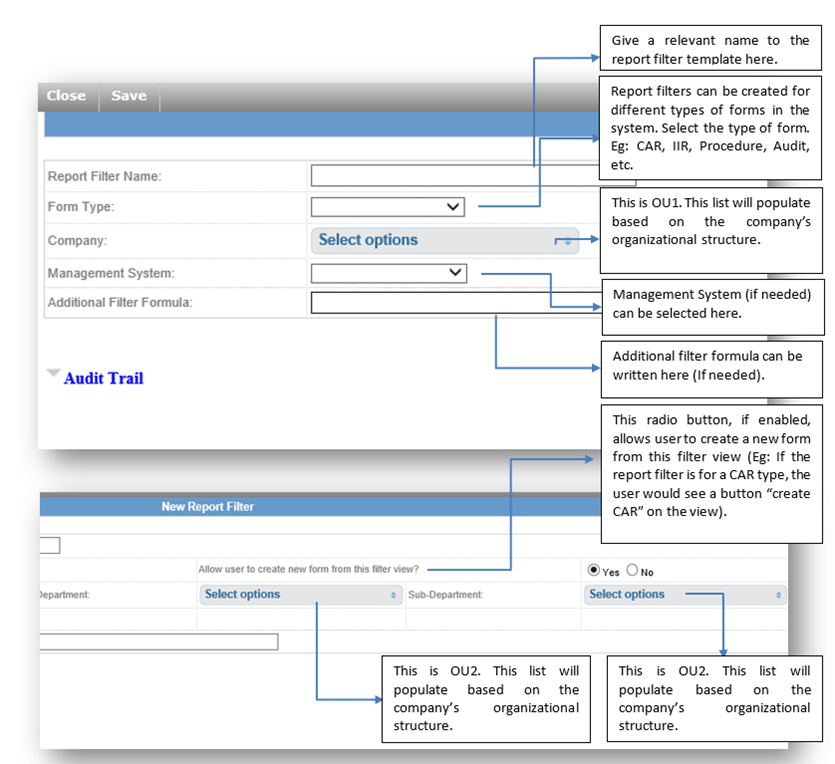
A blank template will open. It will have all the filter options such as filtering by OUs, by CAR type etc. Give a relevant name to the template.
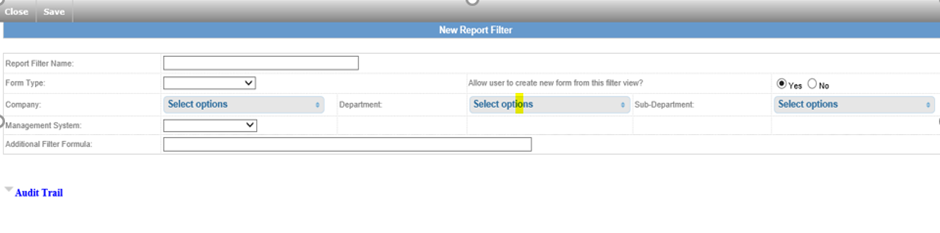
The template consists of the following features (The screenshot above is divided into two parts for clarity):
The report filter template changes depending on the type of form. For eg: If the form type CAR is chosen, the report filter template, then shows up the following options:
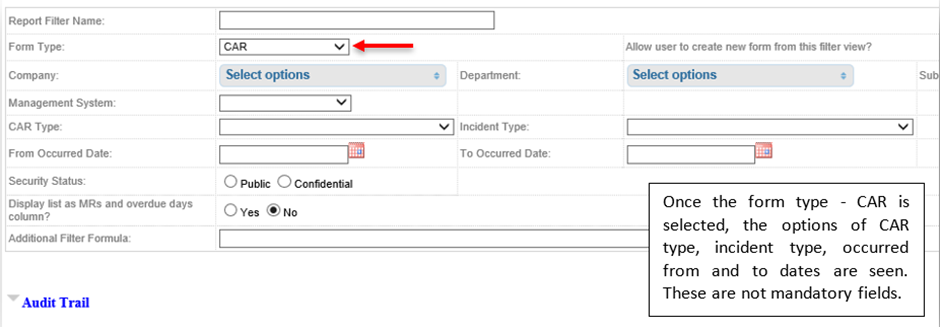
Similar options are seen when the different form types are selected.
Examples of some templates are shown below:
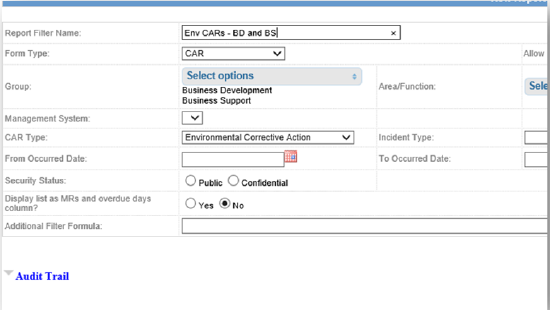
- The following template will open a view that has all Environmental CARs raised under OU1 Business Development and Business Support.
- The following template will open a view that has all HSE procedures (from all OUs)

These report filter templates, once created, will be seen while creating hotspots of the type – Report filter. These hotspots can them be added to the subpages.
[1] Organisation Structure (OU) is the hierarchical structure of the company which is formed by levels and sub-levels. OU1 is the top level of the organization, OU2 - the secondary levels and OU3 – the third levels of the organization under OU2. We can imagine this to be a hierarchical tree. Eg: OU1 – Company, OU2 – Departments, OU3 – Sites/sub-depts. OUs are set up in the keyword ‘Organizational Structure’ and the hierarchy is added in the section – Organizational Structure, under administration.