Controlled Documents
Introduction
The integrum controlled document management system provides tools for document creation and management. It allows you to version control any type of document within your organisation. Forms, checklists, procedures, policies etc. can all be managed and stored securely within the system. The controlled document system handles the following areas of the integrum system:
- Operational Control (Main document repository)
- Legal & Other requirements
- Emergency Preparedness
- Policy (in some cases this is managed through the ‘Operational Control’ section)
You can also set explicit access to specific documents using the ‘Document Security’ option.
Within the various forms which you can create in the system, you can either attach and/or edit text using the ‘CKeditor’ tool. This tool allows you to embed (copy and paste) an existing Word document into it and manipulate the document or text. Alternatively, you can create a document using the tools and options available within this editing system.
Editing tool screenshot:

In addition to this you can attach any file format to the document.
Configuration
Configuration of the system is managed through the ‘administration application’ or through your web admin portal. Before using the system, you have to ensure that all relevant keywords are configured and setup correctly.
Module Keywords
The various ‘module’ keywords set and control how the system will be used and in some cases at what level a document is ultimately approved.
Web Admin View ‘Keywords’:

The keywords relevant to the system are as follows, each will be explained in detail:
‘Approval Method for Controlled Document Workflow’
This keyword sets where to configure and add approvers. The default should be ‘Global’; ‘Management System’ is now obsolete.
Keyword View:

Other options are configurable within the keyword, such as ‘Prevent printing…..’ and DCR. DCR will be explained within chapter 5 of this manual.
Once the Approval Method is selected you need to add people to the relevant areas to ensure that approvers can be selected within the system.
Where to configure the approvers:
Global = OU (Organisational Unit) level approver configuration. For every OU there is a field called ‘Manager(s)’. You can add personnel to the list and when a specific OU is set in a new document the approvers will pull from the list of personnel assigned to the ‘Manager’ area of the OU structure.

E.g.

‘Controlled Document Workflow’
This keyword controls the workflow to be used and also other various options within a new document. ‘Workflow 2’ is the standard system workflow and is the only workflow that allows multiple ‘Reviewers’.
The system of (author/writer and reviewer(s)) is role based and the role is a one to one relationship where one unique role is assigned to one person only.
First, we have to create the role names to be used. In the Workflow Author Roles, or Workflow Reviewer Roles, write a new role name then hit the ‘Enter’ key to enter another one.
You define the role naming conventions within this keyword as shown below:

Other Options:


| Option | Details |
| Hide Form Field | Hide the title and field named Form in documents viewed from Approved Procedures view. |
| Field Label to display for the Author role in workflow 2 | Configure how the document creator ‘name’ will display in an approved procedure view. |
| Workflow entity to be used for document Sponsor | Configure who is the document sponsor (essentially this is the author/writer) |
| Field Label of 'Operational Procedure Type' | Rename the standard ‘Op Proc Type’ field name. |
| Do you want to hide these fields and sections? | Hide system options within a new document – this may be done to hide dropdowns you do not want to utilise. Notifications and revision notification sections should be hidden by default as these are under development). |
| Enable 'Reviewer Review Due Date' Functionality | Prompts each reviewer to enter ‘Reviewer review Due Date’ prior to processing the request, and log it in Audit Trail. |
| Set days overdue to trigger the Notification | Set the number of days the system will wait before the notification is sent. |
| Rename section title | Rename the Associated Procedures section to the name you specify in Section Title. |
| Rename 'Procedure' and 'Procedures' to | Change the names of Procedure and Procedures where they occur in the document to whatever you specify in here. |
| Allow to create new document from this section | Adds a new button to create a new Document. |
| Enable custom notification | Allows you to change the subject and content of emails when sent during creation, review and approval or rejection of documents. |
When custom notification is enabled, you will be able to write your own subject and content in the email that is sent by the system. For example, in the Submit to reviewer notification title field, write your own Subject/Title text, and add any of the system fields from [1] through [91]. When you place that code in any of these fields in this section, the system will replace them with the corresponding field value from the document. So when you write [1] system will replace it with the value in Document Type, and when you write [5] system will replace it with the document reference, before it sends the email.

The emails that you can customize are categorized below:
- Send from Author to Reviewer
- Document ready for review (Same email would be used for each reviewer in serial review)
- Re-Submittal to Reviewer
- Send from Reviewer to Author
- Rejection of document
- Approval of document
- Send from Author to Approver
- Document ready for approval
- Re-Submittal of Document to Approver
- Send from Approver to Author
- Rejection of document
- Approval of Document
After setting the Controlled Document Workflow, you assign the roles that you have created to the individual employees. This is done from the individual employee record. Navigate to the employee view or open the employee application, then search for the person you wish to allocate the role or roles to and open the record:
View:

Employee record:

Click the ‘Ctrl Doc & DCR Workflow Roles’ tab, then add the role to the person:

To check what roles are already assigned navigate to the ‘By Ctrl Workflow Roles’ view:

Dropdown list keywords & Disclaimer
The system standard keyword that allows you to allocate document ‘type(s)’ is the ‘Operation Procedure Type’ keyword. This is generally set to list as follows but is not limited to:

Other optional keyword dropdowns that can be configured and disabled/hidden within the ‘Controlled Document Workflow’ keyword are:
- Management system
- Management System Element
- Document Type
- System Type
- Hard copy location
‘Disclaimer keyword’
This keyword sets what is printed out below an approved document when the ‘Print with disclaimer’ button is selected.

Again this keyword is setup within admin – keywords view.
Readers Fields – Document Security
You activate/enable document security by creating and configuring the ‘Readers field’ keyword.
When enabled you can set what parts of the system the ‘Document Security’ action bar button will display for users to mark forms confidential. The keyword is added in the admin – keyword view.

When enabled the action bar button will become available within any new documents or revisions:

Document Control Workflow
New Document
All system review/approval functions are via email notifications.

Revision – New Version
All system review/approval functions are via email notifications.

Using the system
System Views
The system menus are usually allocated to specific group profiles. General Staff would only see the ‘Approved view’ and authors/reviewers/approvers would see both the ‘approved view and workflow view (operational control view). Other views can be created by use of the ‘report filter template’ keyword creator and added to group profile hotspot links.
Operational Control View
The controlled document view displays all fields and logs related to the lifecycle of the document, the menu display is as follows:

Document view when opened:


Approved Document View
The approved view displays the document with the system header information when a document is opened from this view.

View of a document when opened from this view:

Adding a new document
Once you have configured and assigned the relevant roles to the correct personnel you can then begin adding documents and using the review workflow and approval system.
Within the ‘Operational Control menu view’ and if you are set as an ‘Author’ you will see the ‘New Procedure’ action bar button:

When clicked this will open a new document:

Action Bar explanation:

- Close – Will close the form and lose any changes
- Save as Draft – Saves as a draft document
- Put Document into Review – If reviewers are set and all mandatory fields populated this will send the document into ‘review’ status and send an email notification to all reviewers set
- Update Assignee – Allows you to change the ‘Author and Approver’ generally used once a document is approved
- Submit to Approver – Sends the document directly to the Approver
- Document Security – Allows you to set this document as confidential
Section Explanations:
Organisational Unit allocation and Management System:
Set at what level of the organisation this document belongs to; remember that ‘Approvers’ display based on this selection. Management system is to classify and sort documents against an internal management system.

Controlled Document Review:
Set your customised ref number and document creation date. Allocate who is the author and if you wish reviewers to be part of this workflow, then set the overall approver:

Schedule Review Settings:
Set the date in which review of this document will be required, this will also set the date the system will notify the author one day before that it is due for review. Overdue notifications can also be setup to role (OU) based personnel.

Last Section:
Set the final elements of the document such as Type and Title, then either attach or create the document within the Main contents field. Note you can copy and paste into here but images need to be uploaded individually.

Main Contents Image Upload:
Click on ‘Insert Image’:

A new window appears:

Select ‘Upload’ then browse for the file and select ‘Send it to the server’:

Once sent successfully the screen will automatically switch back to the ‘Image Information’ screen:

Click ‘OK’ to insert.

Once you are happy with the document contents you can then proceed to either send for review or send directly to the approver.
Putting a document into review (new version)
If you are the author of a specific document you can place the document into a new version at any time. Open one of your authored documents and you will see the ‘New Version’ option within the action bar:

Approved document action bar options explanation:
- Close – Closes the document
- Edit – Edit document details
- Edit Workflow – Allows you to change the ‘Author, Reviewer(s) and Approver’ this will only display if you have the correct access.

- New Version – Creates a draft new version document
- Update assignee – Allows you to set a new author or approver this will only display if you have the correct access.

- Document Change Request – Creates a Document Change Request, this will be discussed in chapter 5.
- Email Link – Creates the URL of the document that can be sent to any employees in the system


When you select a new version and save the ‘Operational Control’ view will display the new version underneath the approved copy. Once the new version is approved it will overwrite (archive) the previous version and display a link to that previous version within the new version.
New Version – Unapproved view:

The new version allows you to edit all contents of the original document and follows the same review and approval process.
Previous version view within new version:

Using the ‘Filter’ and ‘Search’ functions
Filter:
The controlled document system contains a filter tool that allows you a user to search for and display a list of documents based on filter parameters. This can be accessed via all the document menus:

Filter View:

Set the relevant options then click ‘Quick Preview’. Once ‘Quick Preview’ is selected then the following options will appear:
- Generate Report – Will create a HTML table report you can print
- Export to Excel – Will export the search results to excel
Search:

Click ‘Search’ to conduct a free text search of all documents in the system:

Archiving a document
Archiving documents and removing them from the views is limited to users with the Super Users feature. Please contact your Integrum Administrator for access to process this.
Document Change request functionality
The DCR system is enabled within the ‘Approval Method for Controlled Document Workflow’ keyword. It allows users viewing approved documents to send a change request to the author of the document. The author can reject or accept this request.
An accepted request enters a separate workflow silo of review and final acceptance by the technical document change approver.
Option configuration
Keyword:

Once the ‘Technical Approver’ role is defined you can then setup DCR reviewers within the employee profiles.
Employee profile reviewer role creation:

Click ‘Edit’ to add a new one or edit the one you created already:
Save and close the employee profile.
Initiating a Change request
Within an ‘Approved Procedure’ the option to ‘Document Change request’ will be available once the keyword is activated:

Once clicked the following will display for user entry in the comments section as to what they want or think should be changed in the document:

Once submitted the form is sent to the procedure author for review:
Options are:
- Close – Closes the page
- Save & Close – Saves any changes
- Reject – Send a notification to the originator that it has been rejected and closes the request
- Send for review – Send for reviewer approval
- Approve – Approve document change request
The option is here is to set the reviewers of this request:

If the Author is confident to release this and does not reject, then they will set reviewers and release the document.
Review and approval
The reviewers receive a notification that a DCR has been accepted for review:

If they are happy with the request, then can send directly to the approver for final sign off.

Case note within change request document:

The review case notes display for all other reviewers and can be ‘Approved’ by them or ‘Rejected’
Once the reviewers are content, the approver can then approve or reject it:

Notification and Verification Setup
Assigning a Document Approver
- From within the Admin Portal -> Administration -> Organisation Structures
- Click to open the OU1 -> Edit
- Within the Company Manager(s) field click the dropdown arrow and select the person/s to be document approvers -> Click Save

- Repeat this process for each OU1 entry in the structure.
Notification Group setup
- From within the Admin Portal -> Administration -> Keyword -> New Keyword button (at the top of the screen) -> Revision Notification Group -> Name the group in the Popup window -> Click Save
- Navigation Bar -> Stakeholders -> Employees -> Employees -> locate the employee to be added to the group
- Open employee record -> Edit -> Roles & Skills tab
- Assign the Group/s to the employee -> Save

Notification and Verification in the Control Document
- Navigation bar -> Implementation & Operations -> Operational Control
- Click the New Procedure button at the top of the screen -> Set the following as applicable
- Company (OU1)
- Division (OU2)
- Site (OU3)
- Control Document Review -> Set the following
- Creation Date
- Author
- Approver
- Approver Due Date

- Revision Notification & Competency Assessment

- Click the ADD button
- Set the users who are required to Acknowledge reading the document.
- Use the Employees field to select individuals
- Use the Group field to assign Groups (this field will display the Groups you setup in the Preset up section of this documentation)
- Note – when you set a Group, the names of the group members appear in the lower part of the popup
- Click OK

- Click the Resend/Competency Assessment Notifications button - this option can be enabled in the control document keyword


- The employees that were identified as recipients will receive an email asking them to Acknowledge that they have read and understood the document.

- When the user clicks on the link they will be taken to a screen where they can make their acknowledgement as shown in the screenshot.

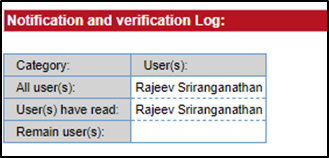
- From within the Control Document (Navigation bar -> Implementation & Operations- > Operational Control) -> Click on the Document name and navigate to the Notification Verification log
- This section shows the following:
- All Users = All the recipients to whom the Acknowledgement request was sent
- User(s) have read = the users who have Acknowledged
- Remain user(s) = those users still to Acknowledge