
CSV Lookup Table
Introduction
CSV lookup tables work in a similar way to the OU structure. The CSV tables align to a number of single select fields, and the selection of a value in the first single select triggers set values to appear in the second single select, and so on.
This is particularly useful for long lists with many options and sub-options.
Creating a .CSV Lookup Table
To use this type of field setup, you must first create an Excel spreadsheet. In the first column are the values for the first single selection box – in the second column, the second single select box and so on. Each column should be given a heading.
I have created some example data below.

Some important notes:
- Data must not contain any ampersands (&) or commas (,).
- Ensure no Whitespace is added to the start of end of words in the file
Each value in the second column must have a corresponding value in the first column. In the example below, Buzz Lightyear is not assigned a “Movie” and therefore will not show when “Toy Story” is selected.
In the example below, you can see there is no value in the first column next to Buzz Lightyear. This mean that once the file is loaded and Toy Story is selected in the first field, the only options to present in the second field will be Woody and, Rex. Buzz Lightyear will not be a selectable option as its not been identified as being related to Toy Story.

The screenshot below shows how the data should be entered in order for Buzz Lightyear to be a selectable value when the first field is set to Toy Story.

Once data file has been created ensure its saved as a CSV UAT – 8 (comma delimited) file as shown in the screenshot below.

Importing the CSV File
- Main System Navigation > Smart Form Builder (New) > Lookup Tables

- Create a New Table using the button in the header.

- This will open a new tab.

- Table Name and, Description fields - set these to be the same name as the .csv file name. For example: If the CSV file has been saved as Disney Movie Character CSV –
this is what is entered in the Table Name and, Description fields as shown in the screenshot above - Click the Add Column button – the following screen will appear:

- Column 1: Column Name = the column heading in the CSV file (eg. Movie) and, ‘Keyword’ to Yes > Click Ok
- Click the Add Column button again and add the name of Column B in your CSV file into the Column Name field and Click OK (note – the Keyword is only set to Yes for Column 1).
- Repeat this step for all remaining columns in the CSV file
- Once the setup is complete, the screen will look similar to that shown below:

- Click Save
- The Lookup will now appear in the list of Lookup tables (you may need to click the blue refresh arrows in the top bar underneath “New Table” in order to see it)

- Click the Table Name in the list > the table will open and you will see the following button bar – click the Import button

- Locate your saved CSV file post which you will see the following message.
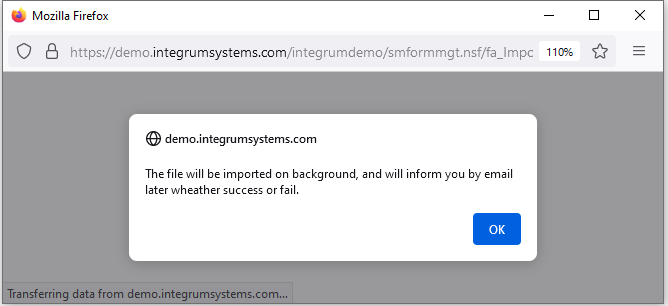
- After about 15 minutes you will receive an email confirming success import. You can also confirm the successful import by opening the Lookup Tables screen and clicking on your Table Name. If the import has been successful you will see the Import message in the Import log.

Configuring Lookup Table Fields
The next step is to create the fields that will be referencing the data in the CSV file.
- From within Smart Form Builder (New), > Field library > New field.
- Field type = Single Select
- Option Type = Imported Lookup Tables

- Click on the selection list in the Look up Table field and select your CSV file from the list

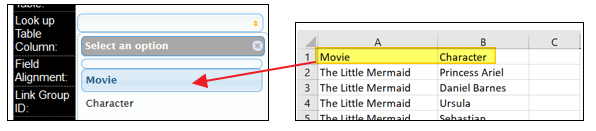
- Within the Look up Table Column field, select the column heading that corresponds to your first column in your CSV File
- Configure the rest of the field settings as usual > Save
The remaining fields are now created. Note - you will need to create as many fields as there are columns in your Excel spreadsheet. So if there are 5 columns in your spreadsheet you need to create 5 fields, etc.
- Create the second as follows:
- Field Type = Single Select
- Option Type = Imported Lookup Tables
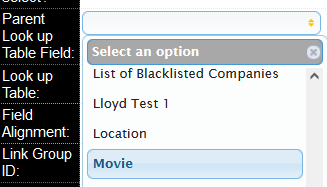
- Parent Lookup Table = the name of the first column in the field (this tells the system which field its to reference in order to determine the values to display in this second field. In this example we select Movie.
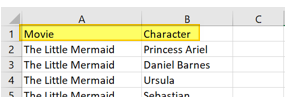
In doing so the system will know that if The Little Mermaid is selected in the first field then it is to display Princess Ariel, Daniel Barnes, Ursula, Sebatian and, Flounder as the selectable values in the second field:

- Look up Table Column = the name of the second column in the CSV file

- Complete the rest of the field settings as usual > Save
If required, setup the third and remaining fields – the two fields that are key to the use of the CSV file are the Parent Lookup Table field and, the Lookup Column field.
- Parent Lookup = the name of the preceding field in the CSV file
- Parent Lookup Table = the name of the column in the CSV file from which this field will draw its values.
Troubleshooting
If your fields aren’t functioning as expected:
- Ensure your file import was successful. If it was not, check the below.
- Ensure that the file imported was a .csv file, NOT a .xlsx file
- Ensure all columns in your spreadsheet are populated.
- All values in Column 2 MUST have a value in Column 1;
- All values in Column 3 MUST have a value in Columns 1 and 2 etc
- Ensure there are no whitespaces after the values in the file
- Check for special characters - in particular commas and ampersands – these do impact the lookup tables and must not be used. If, when clicking on the lookup table in the instance, it is completely blank, it is possible the data contains these characters.