
QuickBooks Online Sync
This article provides a comprehensive guide on how to integrate INSZoom with QuickBooks Online. It details the setup process, the advantages of syncing invoices and payments, and how to utilize this integration to streamline your firm's financial management and enhance operational efficiency.
What does it offer?
QuickBooks Sync offers the following values to users:
- QuickBooks Sync enables a user to sync invoices and/or payments between INSZoom and QuickBooks Online accounts to make sure all the financial data is in one place.
- Improves efficiency, transparency, and collaboration between different roles such as case worker, attorney bookkeeper, and/or billing team.
- Improves operational efficiency of the firm and individual staff by keeping the invoices and/or payments synced between INSZoom and QuickBooks Online.
- Improves tracking for receivables and prevents revenue leakage when Immigration service is offered and tracked from INSZoom while QuickBooks could be used for managing receivables.
How to get started with QuickBooks Online Sync?
- QuickBooks Sync is a subscription feature and users need to get started by subscribing to QuickBooks Online from the main navigation menu, hovering over Setup > click on 'Subscriptions' > click on 'QuickBooks Online'.

- Once QuickBooks Online is subscribed and successfully set up, users can start using QuickBooks Sync from the main navigation menu > Billing.

How does it work?
Before your firm begins syncing the INSZoom account with QuickBooks Online, it is important to become familiar with the two steps involved in this process:
I. Subscription to QuickBooks Online and setting up your account for the sync
II. Syncing Invoices with QuickBooks Online
1. Subscription and Setup for QuickBooks Online Sync
a. Subscription: Firm admins can subscribe to QuickBooks sync from the main navigation menu, hover over Setup > click on Subscriptions > click on QuickBooks Online.
b. Choosing a model for QuickBooks Online Sync: Once QuickBooks Online is subscribed, users should set up QuickBooks Sync by choosing a sync model that best suits the firm's practice. Users will have the option to choose between two sync models:
Model 1: Use INSZoom for invoicing, receiving & managing payments. This will enable the unidirectional sync of customers (payer), invoices & payments from INSZoom to QuickBooks Online for reconciliation.

Model 2: Use INSZoom for invoicing; and QuickBooks for receiving & managing payments. This will enable invoices from INSZoom to sync with QuickBooks online and payments from QuickBooks online to sync with INSZoom.
With Model 2, all options to Receive & Record payments, Payment Plans, and Credit/ Escrow will be disabled in INSZoom Billing.

c. Authenticating with QuickBooks Online: Once the Sync Model is chosen, the user will have to authenticate with the QuickBooks Online account to authorize INSZoom.
d. Mapping Billing Templates/ Content: QuickBooks Sync setup with INSZoom includes a utility to map INSZoom Billing templates to corresponding entities in QuickBooks Online (such as Payers and Fee items). This is a one-time activity (optional, but recommended) to ensure invoices are synced against the right Customers & Services in QuickBooks Online. Mapping the Payers and Fee items using the utility ensures data integrity between INSZoom and QuickBooks.
Subscriptions > QuickBooks Sync > Map Billing Templates/Content:

Nevertheless, users may skip this step activate QuickBooks sync, and map the items on-demand during each sync process.

2. Syncing with QuickBooks Online
Once QuickBooks Sync is successfully activated, users can navigate to the Invoice list by clicking the 'View Invoices' button or navigating to Billing from the Main navigation menu. Invoices created in INSZoom after activation of QuickBooks Sync will be available for sync to QuickBooks Online.
Users can sync an Invoice with QuickBooks by clicking, ‘Sync Now’ against a specific Invoice.

Users can also multi-select invoices to do bulk sync using, the ‘Sync to QuickBooks’ button on the top.

If an Invoice is changed/ revised in INSZoom after it’s posted to QuickBooks, the invoice action changes to ‘Sync Again’ notifying the user to sync the invoice again with QuickBooks.

Exclusive to Model 2: Whenever a payment is received or recorded in QuickBooks against an invoice synced from INSZoom, it is automatically posted from QuickBooks to INSZoom. Additionally, a visual indicator is displayed in the INSZoom billing interface for invoices that have had recent payments posted from QuickBooks Online.
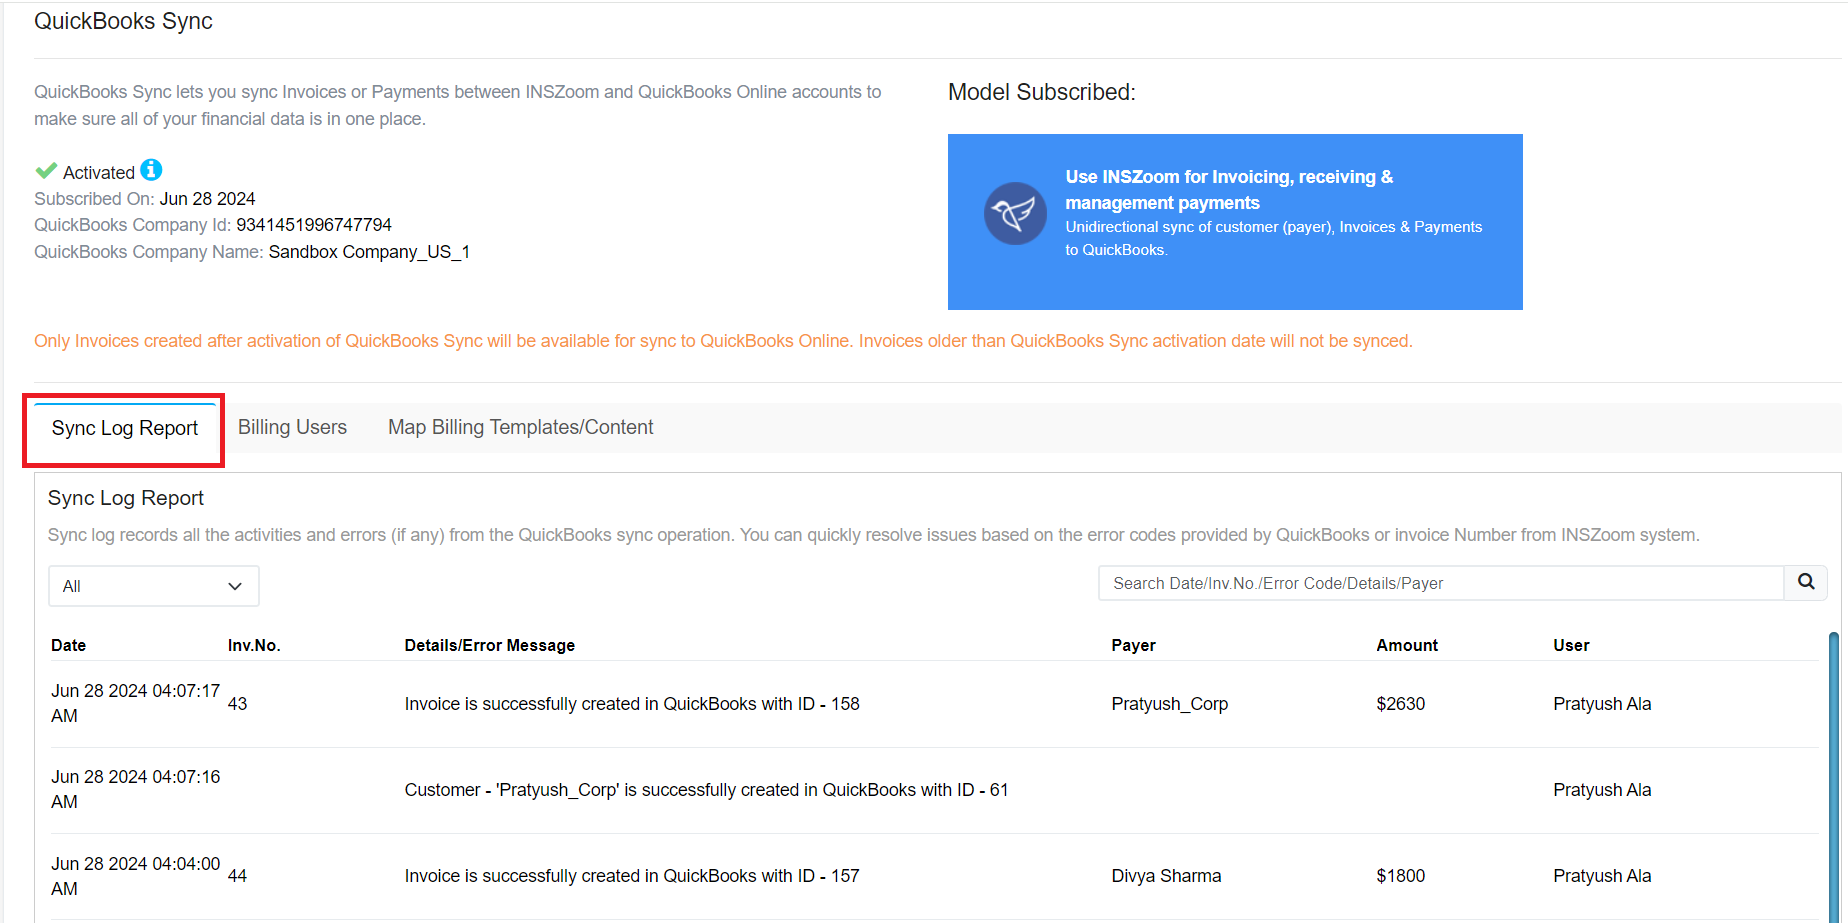
Sync Log Report:
Users have access to the Sync logs from the Invoice List > Split menu option nested under ‘Sync to QuickBooks’ or from Subscriptions > QuickBooks Sync > Sync Log Report. Sync log records all the activities and errors (if any) from the QuickBooks sync operation.
Fields that sync between INSZoom and QuickBooks Online
The mapping of the Invoices and Payment fields that get synced between INSZoom and QuickBooks is given below for the reference of the users.
1. Payer Fields (Billing > Invoices > Invoice Details > Payer):
| Field in INSZoom | Field in QuickBooks |
|---|---|
| Payer > First Name | Customer Info > First Name |
| Payer > Middle Name | Customer Info > Middle Name |
| Payer > Last Name | Customer Info > Last Name |
| Payer > Email | Customer Info > Email |
| Payer > Telephone #1 | Customer Info > Phone |
| Payer > Telephone #2 | Customer Info > Others |
| Payer > Mobile Number | Customer Info > Mobile |
| Payer > Fax | Customer Info > Fax |
| Payer > Country | Billing Address > Country |
| Payer > Apt./Ste./Flr./Door No | Billing Address > Street Address 1 |
| Payer > Street Number | Billing Address > Street Address 1 |
| Payer > Street Name | Billing Address > Street Address 1 |
| Payer > City/Town | Billing Address > City |
| Payer > State/Province | Billing Address > State |
| Payer > Zip Code/Postal Code | Billing Address > Zip |

Note: If the Payer is a corporation, the billing person's details will flow into the customer details of QuickBooks.
2. Invoice Fields (Billing > Invoices > Invoice Details):
| Field in INSZoom | Field in QuickBooks |
|---|---|
| Invoice Details > Invoice # | Invoice No. |
| Invoice Details > To | Customer |
| Invoice Details > Next Due date | Due Date |
| Invoice Details > Invoice Date | Invoice Date |
| Invoice Details > Balance Due | Balance Due |
| Invoice Details > Email | Customer Email |
| Invoice Details > Fee item 1 - Name | Product/ Service |
| Invoice Details > Fee item 1 - Name | Description |
| Invoice Details > Fee item 1 - Rate | Rate |
| Invoice Details > Fee item 1 - Quantity | Qty |
| Invoice Details > Apt./Ste./Flr./Door No. | Billing Address |
| Invoice Details > Street | Billing Address |
| Invoice Details > Country | Billing Address |
| Invoice Details > City/Town | Billing Address |
| Invoice Details > County | Billing Address |
| Invoice Details > State/Province | Billing Address |
| Invoice Details > Zip Code/Postal Code | Billing Address |
| Invoice Details > Telephone #1 | Billing Address |
| Invoice Details > Telephone #2 | Billing Address |
| Invoice Details > Mobile Number | Billing Address |

3. Fee Items (Billing > Billing Templates > Fee Items List):
| Field in INSZoom | Field in QuickBooks |
|---|---|
| Fee Items List > Description | Products and Services - Name |
| Fee Items List > Rate | Products and Services -Sales Price/Rate |
| Fee Items List > Class | Income Account (INSZoom Income/ INSZoom Expense) |

4. Payment Fields (Billing > Invoices > Payment History):
| Field in INSZoom | Field in QuickBooks |
|---|---|
| Payment History > Paid amount | Amount Received |
| Payment History > Payment Method | Payment Method |
| Payment History > Payment Received Date | Payment Date |
