INSZoom - How to setup Single Sign-On (SSO)
This article explains how to activate and set up Single Sign-On (SSO) for your firm as well as corporations.
Introduction
With the increasing number of applications, managing users across various platforms can be challenging for any firm or corporation. It can also be difficult for users to remember multiple sets of access credentials. Single Sign-On (SSO) offers a unified authentication mechanism that simplifies access management.
As data security and privacy become more critical, ensuring that only authorized users have access to their data is essential. Single Sign-On (SSO) adds a layer of trust by centralizing authentication.
For a law firm working with multiple corporations, managing users from different corporations can be complex. SSO allows leveraging a corporation's network authentication to connect to INSZoom, simplifying user management.
NOTE: Single Sign-On (SSO) is currently not compatible with our Zoomee Virtual Assistant (also known as ZoomeeBot) offering.
What is Single Sign-On (SSO)?
Single Sign-On (SSO) is a session and user authentication service that allows a user to use one set of login credentials (such as a username and password) to access multiple applications. This service authenticates the user for all the applications they have access to and eliminates additional login prompts when switching between applications during the same session. For INSZoom, SSO enables users to access the INSZoom application and other applications using a single set of credentials. This system validates usernames and passwords with the firm's database or other corporate apps that manage user authentication.
INSZoom supports SAML 2.0 and ADFS (with SAML 2.0) as SSO methods, which can be configured on a firm's internal site. This capability allows law firms and corporations to securely pass authenticated users to the INSZoom application for secure SSO verification and seamlessly integrate application handoff.
What does it offer?
Single Sign-On (SSO) provides the following benefits to users:
-
Enhanced User Experience: Users no longer need to remember multiple sets of login credentials. They can access various corporate applications seamlessly without repeatedly entering their credentials.
-
Fewer Support Calls: With just one username and password needed for different applications, the volume of IT support calls related to lost passwords is significantly reduced.
-
Strengthened Identity Protection: SSO enables companies to bolster identity security through techniques such as Multi-Factor Authentication (MFA), enhancing overall protection.
-
Increased Productivity for Employees: Employees can access various applications more quickly and focus on productive tasks, without the hassle of remembering different credentials for multiple logins.
Getting Started with SSO
This service can be subscribed to by visiting INSZoom's subscriptions portal.
Firm Admin can subscribe to this service by navigating to the subscriptions page.
- In the INSZoom main menu, click on 'Setup' and then select 'Subscriptions'.
- A new window will open displaying all subscription modules.
- Navigate to the 'Security and Privacy' category and click on the ‘Subscribe’ button for SSO.
- Once this is subscribed, our account management team will reach out to proceed with the SSO setup.
A. Single Sign-On setup for the firm:
To enable SSO for their firm, the firm super admin should follow these steps:
Step 1. Navigate to Subscriptions > SSO and click 'click here' to manage the SSO configuration.

Step 2: Toggle 'ON' the subscribe button.

Step 3: Choose the appropriate SSO Type based on your identity provider:
- SAML 2.0 -- Select this option if the identity provider is a third party or a customized web application built for the firm.
- ADFS -- Choose this option if the identity provider is Active Directory Federation Services.

Step 4: The INSZoom accounts team will receive the request and the INSZoom accounts team will reach out to the firm's super admin for further actions.

Step 5: The INSZoom Accounts team will enable the SSO configuration screen to set up the SSO.
Step 6: Once the configuration section is enabled, the firm admin can start configuring the details by clicking on the 'Complete SSO Configuration' button.


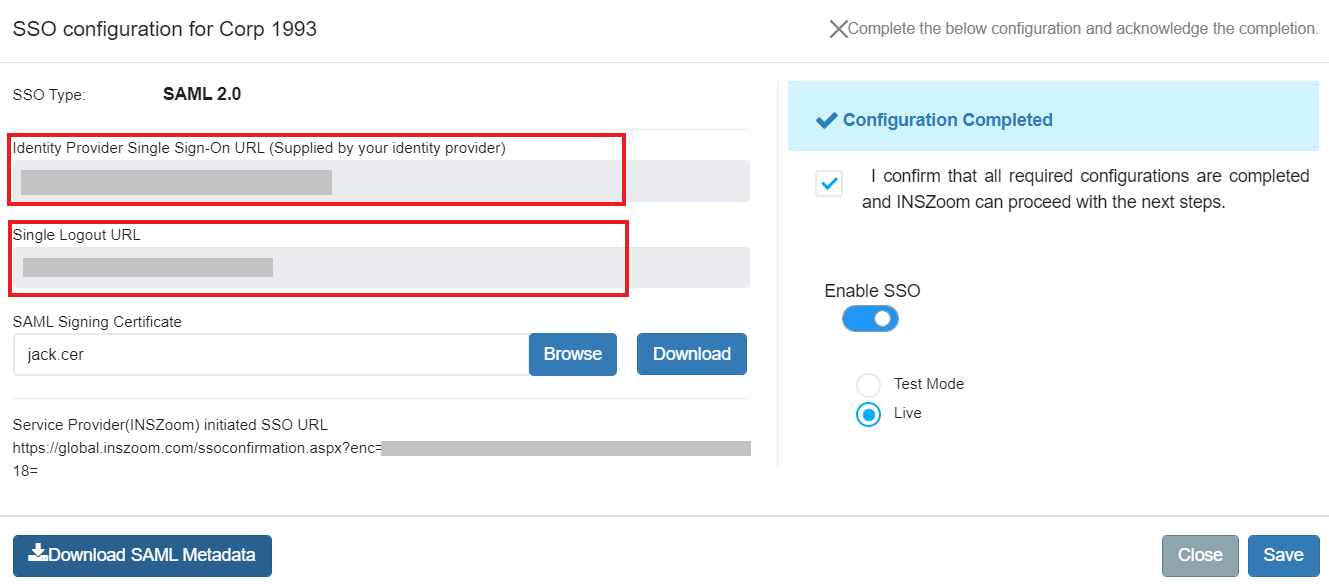
The basic details required for configuration are:
- IDP Login URL, Single Logout URL (optional).
- Certificate for configuration.
Step 7: Upload the public certificate of the Identity provider which will be used to sign the SAML request and response. Refer to C.Identity Provider (IdP) Setup for assistance.

Step 8: Download the service provider metadata required for setting up SSO on the Identity Provider's end.

Step 9: Confirm and save the configurations, which will notify the INSZoom team to proceed with the internal setup.

Step 10: INSZoom will validate the data provided in the configuration and use the uploaded certificate to prepare the environment for testing. Once the setup is complete, the firm’s super admin will be notified.
Step 11: The firm can enable SSO for testing and, once verified, SSO can be made live for users. Users can log in to the INSZoom application through SSO using the Service Provider (INSZoom) initiated SSO URL. Users can either bookmark this URL in a browser or use it as a hyperlink in the firm's website to log in.
Note: Once SSO is live and activated for all case managers, the users can log in to the INSZoom application only through SSO.

B. Single Sign-On setup for a corporation:
Corporation SSO setup is independent of the firm SSO setup. A corporation within a firm can use the SSO feature regardless of whether the firm has SSO enabled or not.
Step 1: Navigate to the SSO page. Select the Corporation from the drop-down menu and click the 'Add' button.

Step 2: Choose the appropriate SSO Type based on your identity provider:
- SAML 2.0 -- Select this option if the identity provider is a third party or a customized web application built for the firm.
- ADFS -- Choose this option if the identity provider is Active Directory Federation Services.

Step 3: The INSZoom accounts team will receive the request and will reach out to the firm super admin for further actions.

Step 4: The INSZoom Accounts team will enable the SSO configuration screen to set up the SSO for the corporation and the firm will get a notification of the subscription.
Step 5: The Corporation will have the configuration section enabled, and the super admin can start configuring the details by clicking on the configure icon highlighted below.


Basic details for configuration:
- IDP Login URL, Single Logout URL (optional).
- Certificate for configuration.
Step 6: Upload the public certificate of the Identity provider which will be used to sign the SAML request and response. Refer to C. Identity Provider (IdP) Setup for assistance.

Step 7: Download the service provider metadata for setting up the SSO at the identity provider end.

Step 8: Confirm and save the configurations which will notify the INSZoom team for internal setup.

Step 9: INSZoom will validate the data updated in the configuration and use the certificate uploaded by the firm in the INSZoom application to prepare the environment for testing and notify the firm about the setup completion.
Step 10: The firm can enable SSO for testing and, once verified, SSO can be made live for corporation users.


C. Identity Provider (IdP) Setup
Note: These instructions are specific to Azure Active Directory (Azure AD); the setup process may vary for other identity providers. Please refer to their respective documentation for detailed instructions.
C.1 Setup an Application (To be done by your IT Team)
Step 1: Sign in to the Azure portal and navigate to Home > Enterprise Applications.

Step 2: Add a ‘New Application’ to your Azure Active Directory (Azure AD) Tenant.

Step 3: Click on ‘Create your own application’ as the INSZoom application is not available in the Azure AD Gallery.

Step 4: Enter the name for the application and then click ‘Create’.

C.2 Setup SAML (To be done by your IT Team)
Step 1: Navigate to ‘Set up single sign on’ in the application created in previous steps to initiate setup.

Step 2: Select ‘SAML’ as the Single Sign-on Method

Step 3: Download the metadata file available on the INSZoom subscription screen. The firm’s super admin can share this metadata file with your IT team.
Navigation : Subscriptions Portal >> SSO >> View Configuration >> Download SAML Metadata

Step 4: Upload the metadata file in Azure Single Sign-on setup. The fields (Identifier, Reply URL) in basic SAML configuration get auto-populated. Click on 'Save'.

Step 5: Ensure emailaddress >> user.mail is part of the attributes list in the 'Attributes & Claims' box.

Step 6: Navigate to 'Users and Groups' in the left menu and add users/groups under users and groups. Only the users added here will be able to log in through SSO.

C.3 Configure SSO setup in INSZoom Application (To be done by firm’s super admin & IT team)
Step 1: Download the Base64 SAML certificate from 'SAML Certificates' in your IdP setup screen.

Step 2: Verify the certificate - Issued to: and Issued by: must be Microsoft Azure Federated SSO Certificate.

Step 3: Copy the Identity Provider SSO Login URL, and Logout URL (optional) and paste them into the form on the INSZoom SSO setup page.

Step 4: In INSZoom, upload the SAML Signing Certificate that was downloaded previously and save the configurations which will notify the INSZoom team to proceed with the next steps.