
Application’s Menu
Click on the Application’s icon in the top left corner of the Scanning Window to display the Application’s menu.
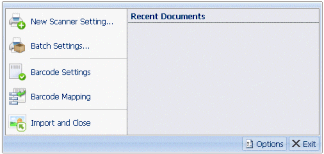
New Scanner Setting...
Opens the New Scanner Setting window enabling you to either edit an existing Scanner Setting or create a new one. See “Add Scanner Setting” for details.
Batch Settings...
Opens the Batch Settings window enabling you to edit an existing Batch Setting or create a new one. Although both the Import window and Scanning may share the same Batch Settings, they have their own Default Batch Setting. See “Batch Settings” for details.
Barcode Settings
Barcodes can be read from Scanned documents and from Imported PDF documents.
Select Barcode Settings to open the Barcode Manager which enables you to either edit an existing Barcode Setting or create a new one. See “Barcode Manager” for details.
Barcode Mapping
Barcodes can be read from Scanned documents and from Imported PDF documents.
Select Barcode Mapping to open the Barcode Mapping window which enables you to either edit an existing Barcode Mapping or create a new one. See “Barcode Mapping” for details.
Import And Close
When you have finished scanning all the documents, click Import and Close to import the scanned documents in to Indexing Studio, ready for Indexing. The Scanning Window is closed and you are returned to the Indexing Studio window.
Options Button
Click Options to open the Scanning Window Options window.
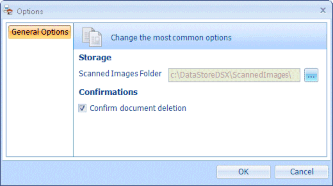
The items shown in the Scanning Window Options window are described in Table 171.
Table 171. Terminology: Scanning Window Options
|
Term |
Meaning |
||
|---|---|---|---|
|
Storage |
|||
|
Scanned Images Folder |
Sets the folder in which scanned images are temporarily stored until they are imported in to Indexing Studio. See “Save Scanned Documents”. Click the … (ellipsis) button and browse to the required folder. Click OK. |
||
|
Confirmations |
|||
| Confirm document deletion |
When selected, a confirmation box is displayed when a user deletes a scanned document.
|
||
Exit Button
Select Exit to close the Scanning Window. If there are scanned documents which have not been imported in to Indexing Studio, you will be prompted about importing the documents.