
User and Group Synchronization
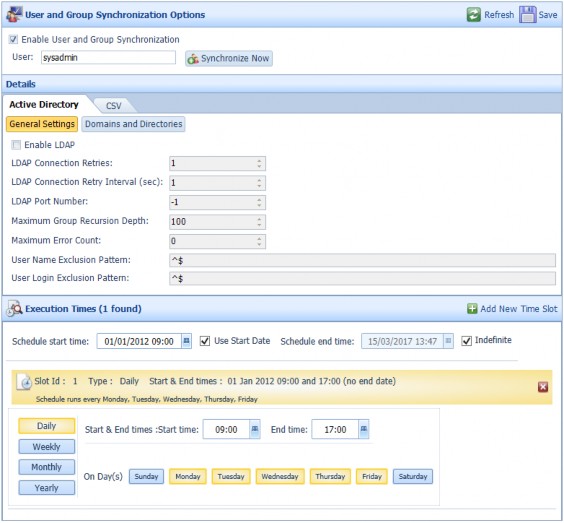
User and Group Synchronization enables you to configure which Domains and Directories are synchronized and when the imported Active Directory Users and Groups are synchronized.
There is also the ability to keep Users, Groups and their memberships synchronized using CSV text files. The system will look for files located in the CSV file locations to identify the User and Group set-up.
If both the Active Directory and CSV settings are enabled, scheduled execution will first run the Active Directory synchronization followed by the CSV synchronization. If only one is enabled, the other will not run.
In the tree view, expand Configuration and select User and Group Synchronization.
Note: The method used by DataStoreDSX to authenticate Windows users has changed and a user is now identified by a security identifier (SID) rather than by name. The security identifiers are placed in the database when an User and Group Synchronization is performed.
If a user's SID is not present in the table, DataStoreDSX falls back to the old method of identifying the user by name and logs a warning message:
User "DOMAIN\username" could not be authenticated by security identifier. User and Group Synchronization is required.
A DataStoreDSX administrator may see these messages in the event log after upgrading to DataStoreDSX v3.0. Perform an User and Group Synchronization to update the database and stop the messages being generated.
Note: When an Active Directory user is removed from DataStoreDSX (because, for example, the Domain or Directories configuration has been changed), if the configuration is changed so that the User is again added to DataStoreDSX, they will be displayed as Disabled. If required, select the User, right-click and select Enable from the menu to enable the selected User account.
The User and Group Synchronization Options are described in Table 40.
Table 40. Terminology: User and Group Synchronization Options
|
Term |
Meaning |
||
|---|---|---|---|
|
Enable User and Group Synchronization |
Select to enable User and Group Synchronization. The Active Directory is synchronized according to the schedule, time, General Settings and Domains and Directories settings configured. When selected, the User and Group Synchronization Options can be edited. Clear to stop User and Group Synchronization. When cleared, the User and Group Synchronization Options cannot be edited. |
||
|
User |
Enter the name of the DataStoreDSX user account which you want to see included in the Event Log entries for User and Group Syn- chronization events. |
||
|
Synchronize Now |
Click to perform an ad hoc User and Group Synchronization. |
||
|
Active Directory |
|||
|
General Settings |
|||
|
Enable LDAP |
Select this check box to edit the variables within the LDAP Active Directory selections. With Enable LDAP unchecked, the selections cannot be changed. |
||
|
LDAP Connection Retries |
The number of times LDAP will attempt to re-connect if the LDAP connection is lost. |
||
|
LDAP Connection Retry Interval (sec) |
The number of seconds between each connection retry. |
||
|
LDAP Port Number |
The LDAP port number used. A value of -1 causes the default port number to be used. |
||
|
Maximum Group Recursion Depth |
Specifies the maximum number of levels for Security and Distribution Groups. If this level is exceeded, the Security and Distribution Groups at the greater depths are not synchronized. |
||
|
Maximum Error Count |
Specifies the maximum number of errors allowed during a syn- chronization. If this number is exceeded, the synchronization stops. The next time a synchronization is scheduled, the error count is reset and, as long as the count is not exceeded again, the synchro- nization will complete. |
||
|
User Name Exclusion Pattern |
Enter a Regular Expression to specify User names to exclude from the synchronization. For example, ^John.Smith$ excludes the user with the user name John Smith. |
||
|
User Login Exclusion Pattern |
Enter a Regular Expression to specify login names to exclude from the synchronization. For example, ^Temp$ excludes all Users with a login name starting with Temp. |
||
|
Domains and Directories |
|||
|
Search Trusted Domains |
When selected, all Trusted domains are scanned, regardless of whether they are included in the list of Domains to Scan. |
||
|
Domains to Scan |
Enter the names of the Domains which you want to be included in the User and Group Synchronization. For example, HITEC.
|
||
|
Limit Scan to Directory Paths |
Select this option to optimize the search by limiting the scan to the specified locations. When cleared, the entire directory is scanned but only paths that match the start locations are included. |
||
|
Directory Start Locations |
Enter the Paths within the Domains to which you want to limit the User and Group Synchronization. For example, enter HITEC\Slough\development to limit the User and Group Synchronization to the Slough\development path of the Domain HITEC. |
||
|
CSV |
|||
|
Enable CSV |
Select this check box to edit the variables within the User and Group synchronization CSV menu. |
||
|
Input Folder |
This field shows the current location of the CSV User and Group Synchronization folder. |
||
|
Browse |
Selecting this button lets you navigate to the folder where User and Group Synchronization text files are located. |
||
|
User List Filename |
The CSV file that lists User data. |
||
|
User Membership Details Filename |
The CSV file that lists User Membership data. |
||
|
Group List Filename |
The CSV file that lists Group data. |
||
|
Group Membership Details Filename |
The CSV file that lists Group Membership data. |
||
|
Default Password |
An optional password can be included in this field for newly added users. |
||
|
Execution Times |
|||
|
Schedule start time |
The date and time at which the User and Group Synchronization schedule started. To change the schedule’s start date and time to a future date, select Use Start Date and enter the required start date and time here. |
||
|
Use Start Date |
Select to change the User and Group Synchronization Schedule’s start date and time to a date in the future. See Schedule Start Time. Clear to start the User and Group Synchronization immediately. |
||
|
Schedule end time |
The date and time at which the User and Group Synchronization Schedule will stop running. To change the schedule’s end date and time to a date in the future date, clear Indefinite and enter the required end date and time here. |
||
|
Indefinite |
Select to make the User and Group Synchronization Schedule run indefinitely. Clear to change the User and Group Synchronization Schedule’s end date and time to a date in the future. See Schedule End Time. |
||
|
Slot Id and details |
The configured time slot is summarized. Click the time slot to expand it. It can then be edited. |
||
|
Daily |
Select to display the days of the week. Select the days of the week for which you want to configure the time slot. Enter the time slot’s Start time and End time. The End time must be later than the Start time. |
||
|
Weekly |
Select to display the weekly time slot options. Select the week of the month (first, second, third, fourth or last) for which you want to configure the time slot. Then select the days of the week for which you want to configure the time slot. Enter the time slot’s Start time and End time. The End time must be later than the Start time. |
||
|
Monthly |
Select to display the months of the year. Select the months for which you want to configure the time slot. Next, select On week of month and select the week of the month (first, second, third, fourth or last) for which you want to configure the time slot. Then select the days of the week for which you want to configure the time slot. Alternatively, select On calendar day(s) and enter the days of the month for which you want to configure the time slot. For example, 1, 8, 15, 22, 29. Enter the time slot’s Start time and End time. The End time must be later than the Start time. |
||
|
Yearly |
Select to display the yearly time slot configuration options. Enter a value for Repeat this number of years. Select the months for which you want to configure the time slot. Next, select On week of month and select the week of the month (first, second, third, fourth or last) for which you want to configure the time slot. Then select the days of the week for which you want to configure the time slot. Alternatively, select On calendar day(s) and enter the days of the month for which you want to configure the time slot. For example, 1, 8, 15, 22, 29. Enter the time slot’s Start time and End time. The End time must be later than the Start time. |
||