Retention Policy
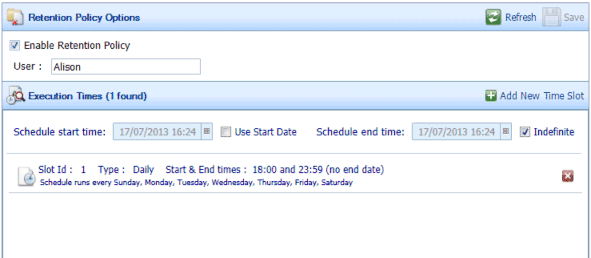
Retention Policy is the area of Management Studio where you can create and manage Data Retention Policy Schedules.
Data Retention Policy Schedules set the dates, times and term that data and records are searched to ensure they meet previously set legal and business data archival requirement policies.

The Retention Policy options are described in Table 38.
Table 38. Terminology: Retention Policy Options
|
Term |
Meaning |
|---|---|
|
Enable Retention Policy |
Select to enable the configured Retention Policy Schedules or to create a new Retention Policy Schedule. |
|
User |
Enter the DataStoreDSX user name under which you want the Schedule to run. If you do not enter a valid user name, the user name of the account under which you are currently logged in will be used. This User may be displayed in Audit Logs. |
|
Execution Times |
|
|
Add New Time Slot |
Click to add a new time slot. |
|
Schedule start time |
The date and time at which the Retention Policy Schedule started. To change the schedule’s start date and time to a future date, select Use Start Date and enter the required start date and time here. |
|
Use Start Date |
Select to change the Retention Policy Schedule’s start date and time to a date in the future. See Schedule Start Time. Clear to start the Retention Policy Schedule immediately. |
|
Schedule end time |
The date and time at which the Retention Policy Schedule will stop running. To change the schedule’s end date and time to a date in the future date, clear Indefinite and enter the required end date and time here. |
|
Indefinite |
Select to change the Retention Policy Schedule’s end date and time to a date in the future. See Schedule End Time. Clear to make the Retention Policy Schedule run indefinitely. |
|
Slot Id and details |
Each configured time slot is summarized. Click a time slot to expand it. It can then be edited. For details about the options, see Table 39. |
|
X |
Click the X icon beside a Slot Id details to delete the time slot. |
Note: At least one Time Slot must be configured when Enable Retention Policy is selected. If there are no Time Slots configured, Enable Retention Policy will be unavailable.
The Time Slot Configuration options are described in Table 39.
Table 39. Terminology: Retention Policy Time Slot Configuration Options
|
Term |
Meaning |
|---|---|
|
Daily |
Select to display the days of the week. Select the days of the week for which you want to configure the time slot. Enter the time slot’s Start time and End time. The End time must be later than the Start time. |
|
Weekly |
Select to display the weekly time slot options. Select the week of the month (first, second, third, fourth or last) for which you want to configure the time slot. Then select the days of the week for which you want to configure the time slot. Enter the time slot’s Start time and End time. The End time must be later than the Start time. |
|
Monthly |
Select to display the months of the year. Select the months for which you want to configure the time slot. Next, select On week of month and select the week of the month (first, second, third, fourth or last) for which you want to configure the time slot. Then select the days of the week for which you want to configure the time slot. Alternatively, select On calendar day(s) and enter the days of the month for which you want to configure the time slot. For example, 1, 8, 15, 22, 29. Enter the time slot’s Start time and End time. The End time must be later than the Start time. |
|
Yearly |
Select to display the yearly time slot configuration options. Enter a value for Repeat this number of years. Select to display the months of the year. Select the months for which you want to configure the time slot. Next, select On week of month and select the week of the month (first, second, third, fourth or last) for which you want to configure the time slot. Then select the days of the week for which you want to configure the time slot. Alternatively, select On calendar day(s) and enter the days of the month for which you want to configure the time slot. For example, 1, 8, 15, 22, 29. Enter the time slot’s Start time and End time. The End time must be later than the Start time. |
Note: To create a Retention Policy schedule which runs from, for example, 9pm until 5am, create one time slot from 9pm until 23:59 and a second time slot from 00:00 until 5am.

