
Core Purge Service Settings
When data is deleted from a Depot or when Templates are deleted from Management Studio, the items are marked for delete but they remain in the DataStoreDSX database until a Core Purge Service is run. The default Core Purge Process (named 24/7) runs all the time and deletes the data which is marked for delete. Core Purge processes can be created and deleted, as required.
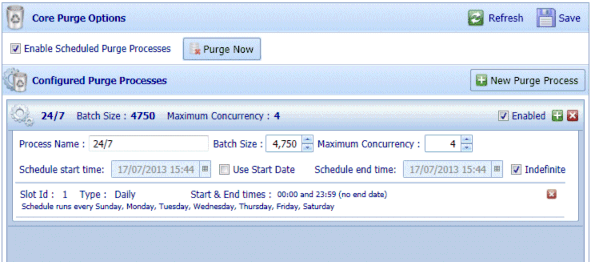
The Core Purge Options are described in Table 31.
Table 31. Terminology: Core Purge Options
|
Term |
Meaning |
||
|
Enable Scheduled Purge Processes |
Select to enable the configured Core Purge processes. When selected, existing Core Purge processes can be edited or deleted and new Core Purge Processes can be created. Clear to disable Core Purge processes. When cleared, existing Core Purge processes cannot be edited or deleted and new Core Purge Processes cannot be created.
|
||
|
Purge Now |
Click Purge Now to delete all items that have been marked for deleted in the DataStoreDSX database. |
||
|
Configured Purge Processes |
|||
|
New Purge Process |
Click to add a new Purge Process. |
||
|
Name |
The name of the Purge Process is displayed. |
||
|
Batch Size |
The Batch Size configured for the selected Purge Process is displayed. |
||
|
Maximum Concurrency |
The Maximum Concurrency configured for the selected Purge Process is displayed. |
||
|
Enabled |
When selected, the Purge Process is enabled. When cleared, the Purge Process is unavailable and the Name, Batch Size and Maximum Concurrency values are dimmed. |
||
|
+ |
Click the + icon to add a new time slot to the selected Purge process. See Table 32 for description of the Time Slot options. |
||
|
X |
Click the X icon to delete the selected Purge Process. |
||
|
Schedule start time |
The configured Schedule start time for the selected Purge Process is displayed. |
||
|
Process Name |
Enter a name for the Purge Process. |
||
|
Batch Size |
The Batch Size provides a method for advanced users to optimize the Purge Process performance. You should change this value only when advised by Mitratech. The default value is 4,750. |
||
|
Maximum Concurrency |
Enter the maximum number of items that will be deleted concurrently. The default value is 4. When setting this option, consider the number of cores on the Server, disk performance and what other processes will be running at the same time as the Core Purge process. |
||
|
Schedule start time |
The date and time at which the Core Purge Process schedule started. To change the schedule’s start date and time to a future date, select Use Start Date and enter the required start date and time here. |
||
|
Use Start Date |
Select to change the Core Purge Process Schedule’s start date and time to a date in the future. See Schedule Start Time. Clear to start the Core Purge Process immediately. |
||
|
Schedule end time |
The date and time at which the Core Purge Process Schedule will stop running. To change the schedule’s end date and time to a date in the future date, clear Indefinite and enter the required end date and time here. |
||
|
Indefinite |
Select to make the Core Purge Process Schedule run indefinitely. Clear to change the Core Purge Process Schedule’s end date and time to a date in the future. See Schedule End Time. |
||
|
Slot Id and details |
Each configured time slot is summarized. Click a time slot to expand it. It can then be edited. |
||
|
X |
Click the X icon beside the Slot Id details to delete the time slot. |
Each Purge Process consists of one or more time slots. The Time Slot options are described in Table 32.
Table 32. Terminology: Core Purge Options – Time Slot Options
|
Term |
Meaning |
|---|---|
|
Daily |
Select to display the days of the week. Select the days of the week for which you want to configure the time slot. Enter the time slot’s Start time and End time. The End time must be later than the Start time. |
|
Weekly |
Select to display the weekly time slot options. Select the week of the month (first, second, third, fourth or last) for which you want to configure the time slot. Then select the days of the week for which you want to configure the time slot. Enter the time slot’s Start time and End time. The End time must be later than the Start time. |
|
Monthly |
Select to display the months of the year. Select the months for which you want to configure the time slot. Next, select On week of month and select the week of the month (first, second, third, fourth or last) for which you want to configure the time slot. Then select the days of the week for which you want to configure the time slot. Alternatively, select On calendar day(s) and enter the days of the month for which you want to configure the time slot. For example, 1, 8, 15, 22, 29. Enter the time slot’s Start time and End time. The End time must be later than the Start time. |
|
Yearly |
Select to display the yearly time slot configuration options. Enter a value for Repeat this number of years. Select to display the months of the year. Select the months for which you want to configure the time slot. Next, select On week of month and select the week of the month (first, second, third, fourth or last) for which you want to configure the time slot. Then select the days of the week for which you want to configure the time slot. Alternatively, select On calendar day(s) and enter the days of the month for which you want to configure the time slot. For example, 1, 8, 15, 22, 29. Enter the time slot’s Start time and End time. The End time must be later than the Start time. |
Note: To create a Purge Process which runs from, for example, 9pm until 5am, create one time slot from 9pm until 23:59 and a second time slot from 00:00 until 5am.