
Automated Indexing Watched Folders, Bulk Image Import
This example shows how to automatically import several image files. First, create a new (very simple) Data Definition which can be used to Index the image files.
Licence required: Automated Indexing and Bulk Image Import each require a licence. If you do not see the options described here, contact support@mitratech.com about purchasing a licence.
Create a Data Definition
- Click on Data Definitions in the tree view, then right-click and select New. The Data Definition Editor is opened.
- Give the new Data Definition a name. On the General Details tab, enter a name for the Data Definition in the Name field. In this example, enter Image Name for the Data Definition name.
- The ID is created automatically.
- Select the Store content for full text searching tick box if you require the documents which are stored using this Data Definition to be text searchable. (See “Content Full Text Searchable” for an example.) In this example, leave this cleared.
- This Data Definition can be created without opening a Sample Document.
- Create a new field. With the General Details tab selected, click the New Text Field button.
- In this example, the only Index Field is for the Image Name being Indexed. Image Name is a text field and it is a Page-level index. Enter the Field name, Type and Index level information.
- This Index Field must be stored so select the Is Stored tick-box.
- In the Behaviour Properties section, as required, select the Mandatory (field must be ...) tick-box to ensure the index field is always filled in for the item to be valid. Alternatively, clear the Mandatory (field must be ...) tick-box to make it optional for the index field to be given a value. In this example, the Image Name is Mandatory, so select the tick-box.
- Next, select Single Field Value tick-box to set one value per field, as, in this example, there is only one Image Name.
- In this example, the Field Index is automatically extracted from the document so (with the Index Field and the Input Source tab selected) select Values are extracted automatically (not externally provided).
- Leave the remaining Input Source parameters left set to their default settings.
- Although the Index Field is configured to be automatically extracted from the document, the value will, in fact, be provided via a text file when the image is imported via a Watched Folder. Therefore, no Position information needs to be configured. Leave all the remaining parameters set to their default values.
Save, Publish and Configure Access
- Click Save (on the Home ribbon) to save the Data Definition.
- Click the application’s icon in the top left of the Data Definition Editor and select Publish. Select Publish and create a new Search Template to publish the Data Definition and create a Search Template which will be used later.
- Click on the Image Name Data Definitions in the tree view, then right-click and select Control Access to this Data Definition.
- Give yourself (and other users) access to Search for results, View results, View documents and pages, Change field values and Store document, as needed. See “Create ACLs for Data Definitions” for an example.
Automated Indexing Options
- In the tree view, expand Configuration and select Automated Indexing Options.
- Select the Enable Indexing tick-box.
- From the Base Folders pane, click New and browse to the base directory which contains all the Automated Indexing Watched Folders you will be using. For example, you might have a base folder C:\Automated Indexing watched folders which contains sub- directories named after each of the Data Definitions you are using for Automated Indexing Watched Folder.
- In the User: text box, enter your user name or the user you want to be displayed in the Audit Logs as performing the Automated Indexing. If you enter an invalid user name, DataStore®DSX will use the user name you are currently logged in as.
- In the Watched Folders section, select New to open the Watched Folder Configuration window.
- To enable the Watched Folder, select the option Enable this watched folder.
- Click the Choose Watched Folder button and, in the Choose Watched Folder window, navigate to and select, the required watched folder. In this example, the base directory is C:\Automated Indexing watched folders and you have a Data Definition named Statement, so create the directory C:\Automated Indexing watched folders\Image Name and then set this as the Watched Folder.
Note: All items successfully imported and Indexed into DataStore®DSX are immediately deleted from the Watched Folder.
- Click the Choose Data Definition button and, in the Data Definition Selection window, navigate to and select, the required Data Definition (Image Name in this example).
- Enter a File pattern to search for. In this example, a text file will contain the list of images to be imported and the values the Index Field must take so enter the pattern *.txt.
Note: When configuring Bulk Image Import, you must use the File Pattern of the Bulk Image file (which contains the list of graphics and field values) – not the File Pattern of the image files you want to import.
- If required, in the Flag File (Optional): text box, enter a flag file description. This enables you to delay importing the files until a particular Flag File is found. However, in this example you can delay importing the TIFF files by not copying the text file to the Watch Folder until you are ready to start the importing them. Therefore, leave this field clear.
Image Import
Bulk image import files are comma- or tab-delimited files specifying the documents to be imported and the field values to use. In this example, use a comma delimited file.
When you Bulk Import image files from Watched Folders using a CSV text file, the field values are validated.
When the injection of one or more CSV rows fail, a CSV '_error' file with a CSV header and failed CSV rows is created in an error folder in each folder's respective '.Error' directory, so that users can manually rectify the field values and then return them to their Watched Folders for re-injection.
If no errors are encountered, the delimited file is deleted.
Note: These options are only available when no Unicon or Encoding Pre-conversion options are set.
- To import images, select the Delimiter tick-box.
- From the drop-down list, select the required delimiter from the drop-down list. In this example, select Comma.
- Click OK to exit the Watched Folder Configuration window and then click Save to save the Automated Indexing Options settings.
Create Bulk Image Automated Indexing File
The next step is to create a text file which contains the information needed to import and Index the images. This text file will be deleted from the Watched Folder when the TIFF files are imported and Indexed.
Simple Example
- Create a text file using your preferred text editor software.
- The text file needs a header which defines the information in the rest of the file. See “Bulk Image Import File Format” for more information on this file format. The first item on the line is the value to be assigned to the Index Field Image Name. A comma separates the items. The second item on the line is the name of the file. To define this, enter the first line of the text file:
"Image Name","[Filename]" - Next, list the Index values you want stored in the Index Field Image Name and the name of the file to Index. In this example, there is a list of TIFF files which are images of products being sold.
"Product 1","image_product1.tiff"
"Product 2","image_product2.tiff"
"Product 3","image_product3.tiff"
"Product 4","image_product4.tiff"
"Product 5","image_product5.tiff" - When you have finished listing the index values and files, save the text file with an appropriate name (ending in txt because that is what was defined in the Watched Folder Options). In this example, save the text file with the name image name.txt. Do not move this file to the Watched Folder yet.
- Copy (or move) the product image files to the Watched Folder C:\Automated Indexing watched folders\Image Name.
- When you are ready to begin importing and Indexing the images, copy the text file you created image name.txt to the same location.
- The TIFF files and the text file are removed from the Watched Folder. To check the TIFF have been imported and Indexed successfully, open Searching Client and select the Image Name Search Template. Search for the images you have just imported and Indexed to make sure they have been stored on DataStore®DSX.
Multiple Field Values
Note: In this example, Field 1 has had the option Single field value cleared and a maximum of 3 values has been configured. (See “Content Field, Extract a Multi-Line Address” for an example on how to use the option Single field value.)
- Create a text file using your preferred text editor software.
- The text file needs a header which defines the information in the rest of the file. See “Bulk Image Import File Format” on page 847 for more information on this file format. The first item on the line is the Index Set number. Next are the three Index fields Field 1, Field 2 and Field 3. A comma separates the items. The last item on the line is the name of the file. To define this, enter the first line of the text file:
"[Index set number]","Field 1","Field 2","Field 3","[Filename]"
- Next, list the Index values you want stored in the Index Fields Field 1, Field 2 and Field 3 for Index Set 1. Do this for file1 and file2.
"1","35","46","101","C:\FilesToImport\file1"
"1","36","47","102","C:\FilesToImport\file2"
- Field 1 supports multiple values, so you need to repeat the entry but with the other values. So to give Field 1 the values 37, 38 and 39 for file3.
"1","37","48","103","C:\FilesToImport\file3"
"1","38","","","C:\FilesToImport\file3"
"1","39","","","C:\FilesToImport\file3"
- Notice that Field 2 and Field 3 have just a single Index value.
- When you have finished listing the index values and files, save the text file with an appropriate name (according to what was defined in the Watched Folder Options).
- Copy (or move) the file1, file2 and file3 to the Watched Folder.
- When you are ready to begin importing and Indexing the images, copy the text file you created to the same location.
- The file1, file2, file3 and the text file are removed from the Watched Folder. To check the files have been imported and Indexed successfully, open Searching Client and select the appropriate Search Template. Search for the files you have just imported and Indexed to make sure they have been stored on DataStore®DSX.
Event Log Message
In the above example, Field 1 has been configured to have multiple Index values. However, if Field 1 was configured incorrectly, with Single field value left selected, the following errors would be seen in the Event Log:
Discarding value "38" for field "Field 1" because the maximum value count of

1 has been reached.

Discarding value "39" for field "Field 1" because the maximum value count of

1 has been reached.
In this case, only the first value, 37, is used to Index Field 1.
Pre-Conversion Configuration
It is possible to perform conversions on files in Automated Indexing Watched Folders before they are Indexed and Stored. Currently, two types of pre-conversion are supported – Unicon and Encoding. Unicon is a product from Mitratech which runs scripts for converting files. Encoding defines the type of encoding used so DataStore®DSX can convert the files in the Watched Folder to UTF-8 encoding prior to importing, indexing and saving the files in the watched folder.
Note: Mis-configuration of these settings can result in the files imported and Indexed via watched folders being corrupted.
Unicon and Encoding Pre-Conversions
Note: These options are only available when no Image import options are set.
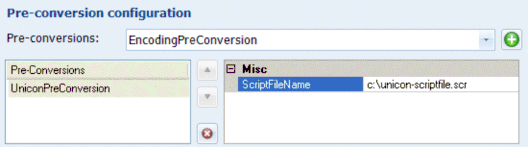
In the Pre-conversion configuration section, select the required pre-conversions from the list of available pre-conversions in the drop-down list, then click the green Add button  to add them to the list.
- UniconPreConversion – Unicon is a separate product from Mitratech that can perform transformations on text data. If you have a Unicon script available which you want to use, select this option and enter the path and script name. For example, C:\unicon-script- file.scr:
- EncodingPreConversion – If the files to be imported are not in UTF-8 encoding, enter the code page number for the encoding used. The default is 1252 (ANSI encoding).
Note: Failure to enter the correct code page number may result in some characters not being stored accurately.
It is possible to configure one Unicon script and one Encoding (code page) number. You can change the order in which these pre-conversions are applied by selecting a pre-conversion and using the up and down arrows to move it.